The Basics of Data Loss Prevention

RT Blog (Basic Data Loss Preventation)

Microsoft Purview Data Loss Prevention (DLP) helps prevent that by keeping an eye on your organization’s data. It can identify sensitive information like credit card numbers or patient records, and then take action to protect it. DLP policies in Microsoft Purview are a powerful tool for organizations looking to enhance their data security posture and protect sensitive information.

Microsoft offers a range of pre-defined DLP templates tailored to specific countries and regions, such as the US Patriot Act, UK Data Protection Act, or GDPR. These templates come with pre-configured sensitive information types and rules containing conditions and actions. You simply need to assign the template to one or more Microsoft 365 locations. In my experience implementing DLP for organizations, custom policies are frequently utilized.

Data Loss Prevention Apply On:

  • Microsoft 365 services: Like Teams, Exchange Online, SharePoint Online, and OneDrive for Business accounts.
  • Office applications: such as Word, Excel, and PowerPoint.
  • Endpoints: Devices like Windows 10, Windows 11, and macOS computers.
  • Power BI: Detecting sensitive data uploaded to Power BI datasets.
  • Monitoring on-premises file shares and SharePoint.

Benefits of using DLP policies in Microsoft Purview:

  • Minimize data breaches: DLP helps prevent sensitive data from being accidentally or intentionally shared with unauthorized users.
  • Meet compliance requirements: DLP policies can help your organization comply with data privacy regulations like GDPR or HIPAA.
  • Reduce risk of insider threats: DLP can help detect and prevent malicious attempts to steal or leak sensitive data.
  • Increase data security awareness: DLP policies can educate users about the importance of handling sensitive data responsibly.

Here’s a breakdown of how DLP policies work in Microsoft Purview:

  • Identify Sensitive Data: You define what constitutes sensitive data in your organization. This could include things like social security numbers, credit card information, passport numbers, or any sensitive information data classified as “Confidential” based on your internal policies.
  • Set DLP Rules: You create rules that specify what actions to take when sensitive data is detected. These actions can include:
    • Blocking the transfer of the data (e.g., preventing external sharing)
    • Encrypting the data
    • Sending alerts to administrators or users
    • Displaying policy tips to users informing them about the sensitivity of the data
  • Apply DLP Rules: You define where these DLP rules will be enforced. This could include locations like SharePoint sites, OneDrive accounts, emails, or even on user endpoints (laptops).

Features of a DLP Policy:

1. Build Your DLP Policy with templates or custom policies:

In the policy template, there are different templates available to protect different types of information.

IMG1

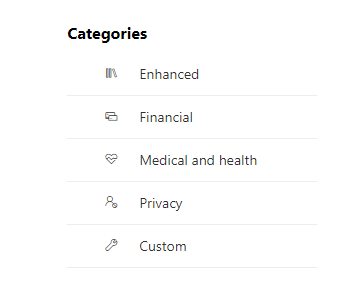
Financial: Secure financial information by preventing users from sharing details like credit card numbers, bank account numbers, debit card numbers, social security numbers, and more.
Medical and Health: Stop users from sharing confidential and important information.
Privacy: Safeguard information such as license numbers, passport numbers, tax file numbers, national IDs, insurance numbers, and other sensitive details.
Custom: You can create a custom policy from scratch in which you choose the type of content to protect and how you want to protect it.
For more details visit the (https://learn.microsoft.com/en-us/purview/dlp-policy-templates-include?redirectSourcePath=%252farticle%252fc2e588d3-8f4f-4937-a286-8c399f28953a)

2. Define Policy Scope:
A Data Loss Prevention (DLP) policy can identify and safeguard items containing confidential data across various locations. When establishing such a policy, you have the option to designate the specific location(s) where you wish to implement your conditions.

IMG2

3. Define DLP Protection settings
Data loss prevention (DLP) rules act like shields for your sensitive information. You choose what kind of information needs protection by creating these rules.
First, you define the conditions that trigger the rule. This could be finding a Sensitive information in a document.

IMG3

Then, you set the instructions actions that follow. If the rule detects sensitive information, users won’t be able to share the document with anyone outside the company.

IMG4

4. User Notifications
Sharing sensitive information with unauthorized individuals can be a mistake. To help everyone stay informed and protect your organization’s data, you can enable user notifications. When someone tries to share sensitive information externally, they’ll receive a friendly reminder. This includes an email and a clear policy tip explaining why sharing isn’t allowed. You can also customize these notifications! Choose who gets notified (admins or specific teams?), craft a clear email subject and message, and tailor the policy tip text for maximum impact.

IMG5

5. User Overrides
DLP policies offer flexibility In some cases, users might need to share information that triggers a DLP rule. To handle these situations, you can allow users to override the policy.
There are two options for overrides:
Quick Share: Users can proceed without providing a reason.
Explain It Out: Users can provide a business justification for sharing the information.

IMG6

6. Activity Explorer (Reporting Features)

The Activity Explorer tab within DLP lets you monitor all user actions related to sensitive data. You can also filter this activity based on specific criteria, such as policies or sensitivity labels, to focus on what matters most. (Shown below)

IMG7

View Alert Details by Selecting an alert from the “Alert” tab.

IMG8

Click “View Details” to get more information about the alert.

IMG9

This section provides an overview of the triggered alert. You can even assign the alert to a specific user and add comments for further clarification.

IMG10

Click “Events” tab to get a overview of actions taken on the content that triggered the alert.

IMG11

Share this entry

Leave a Reply

Your email address will not be published. Required fields are marked *

Table of Contents

Categories

Categories