Migration From SharePoint 2013 to SharePoint Online – Best Practice

Microsoft SharePoint has been the best collaborative and content management solution for literally decades. When Microsoft released SharePoint Server 2013, it had several breakthrough features still in use today, such as connection with OneDrive for Business, the launch of Community Forums, and microblogging features.

Like other perpetual license software providers, Microsoft will cease long-term support for Microsoft SharePoint customers in April 2023. While upgrading to the most recent SharePoint Server 2019 is conceivable, there is no direct path to migration from SharePoint 2013. SharePoint migration is the process of migrating all of the content from the current file server or SharePoint to a new and existing environment.  In this article, let us look at the advantages of migration from SharePoint 2013 to SharePoint Online.

Why Migrate from SharePoint 2013 to SharePoint Online?

Migration from SharePoint 2013 to SharePoint Online provides you with many advantages, which are listed below:


  •   SharePoint Online has no “End of Support,” typically at most ten years in the case of Microsoft SharePoint Servers with everlasting subscriptions.
  •   Site proliferation can be better managed, saving engineering time and money while boosting security and technical adaptability.
  •   It is constantly updated, so the user would not have to wait for new features or security updates.
  •   Microsoft manages it, so administrators rely less on it for infrastructure and updates.
  •   It consolidates sites and content into a single Office 365 tenancy, reducing the number of different farms.
  •   Avoid the licenses and expense of maintaining on-premises servers and software.
  •   Server, site, and disaster recovery are built-in and inherent to the Microsoft cloud.

Are you in need of assistance? We can help!

Book a live 1-on-1 call with the experts of Reality Tech to find out how we will help you to achieve your goal.

What Is the Procedure for Migrating from SharePoint 2013 to SharePoint Online?

The migration from SharePoint 2013 Server to SharePoint Online goes through the two-step procedure: planning of migration and execution of migration. The two-step procedure is described in brief as below:

Planning of migration from SharePoint 2013 Server to SharePoint Online

The migration from SharePoint 2013 to SharePoint Online begins with an audit of the current sites and portals. Their number and nature would determine the migration strategy, which may range from simply shifting sites and portals to starting fresh in the cloud. We refer to this as mapping.

After identifying the sites to be moved from SharePoint 2013 to SharePoint Online, the second step is to evaluate governance before migrating the sites. It includes determining how much authority different stakeholders have over the transfer and accessibility, matching on-premises provided based on the cloud, and developing policies for utilizing Microsoft SharePoint in the cloud. Following the establishment of the governance plan, enterprises must determine where they must migrate all the workloads to the cloud.

Executing Migration from SharePoint 2013 Server to SharePoint online

The execution of migration from SharePoint 2013 Server to SharePoint online should go through a process as described below:

  •   Rather than moving outdated SharePoint 2013 sites, build new sites with the correct template, corresponding to how they would be used in SharePoint Online.
  •   Permissions are reviewed, simplified, or flattened where possible and configured in the destination.
  •   The on-premises SharePoint 2013 taxonomy and metadata structures are consolidated where possible and replicated in SharePoint Online.
  •   Root site information is consolidated and updated with SharePoint Online content.
  •   Where sensible, site collections are grouped into Hub(s) for common theme and navigation.

Additional Read

SharePoint for Enterprise Content Management – Why Should Choose?

Key Features of SharePoint Migration Tool

  • The SharePoint Migration Tool allows you to effortlessly transfer data from Microsoft SharePoint on-premises documents library or your on-premises file shares to SharePoint or OneDrive in Office 365.
  • The utility will run automatically and will not affect the production environment.
  • The tool will take about two days to scan your area. The utility will report progress in the terminal window throughout this time. When the scan is finished, you can find the result files under the Logs directory.
  • Provide a valuable report for existing and finished migrations and task reports to assist in identifying and resolving any issues that may have arisen during the transfer process.
  • It has a very user-friendly interface.
  • It enables batch transfer from the Share folder, SharePoint on-premises, and CSV files.
  • It supports small-scale migrations as well as large-scale migrations.

Post Migration and Pre-Launch Activities

Complex processes, workflows, integrations, and workloads, such as dashboards and ETL for Business Intelligence, must be re-linked just after content is migrated. Review the necessary endpoints, prerequisites, and permissions before utilizing SPMT. You must join Microsoft 365 as a Global or SharePoint admin to migrate at the organizational level. You must be the site administrator for that site collection to transition to the traditional project level. Both SharePoint and file share migrations do not support proxy connections. HTTP connections would fail if Web Browser proxy is configured since SPMT by default does not use system proxy credentials.

You might see problems like “SharePoint login failed” or “can’t load document library,” for instance. You can, however, change the SPMT app’s configuration file so that it uses the system proxy settings. The source SharePoint 2013 and target SharePoint Online environments must be cross-referenced to determine whether the migration was successful.  Scripts may need to be built for specific operations, such as establishing and creating new sites from a request in a Microsoft SharePoint list.

Furthermore, Officials must watch changes in office 365 and SharePoint regularly to determine the impact on the SharePoint 2013 to SharePoint Online migration, mainly if it is a lengthy process. Microsoft has also created a simple command-line tool called “SharePoint Migration Assessment Tool (SMAT)” that will analyse the content of your Microsoft SharePoint to assist identify any issues with data that you plan to migrate to SharePoint Online.

Additional Read

Your Complete SharePoint Migration Guide (Step-By-Step)

Conclusion

You are strongly advised to move the Microsoft SharePoint Server 2013 to SharePoint Online before the support period expires. Many people who are still using SharePoint 2010 can use the same way to migrate from SharePoint 2010 to SharePoint Online.

Most organizations must examine a wide range of factors related to the wider Office 365/ Microsoft 365 ecosystem while moving from SharePoint 2013, because, while technically viable, SharePoint 2013 would not generally be transferred to SharePoint Online on its own.

SharePoint Migrator Tool is a professional migrator tool that can move an unlimited amount of domains, site collections, versions, workflow, metadata, list/libraries, and other items between two SharePoint accounts.

Mirroring SharePoint Document Library Contents to Multiple Sites

We had a use case where one of our clients had two different SharePoint sites. One SharePoint site was where team members create and modify content.

Another SharePoint site was used by the CEO where team members manually update the finalized content from their site since the CEO wants to only see finalized content.

This allowed for final published content aggregation for review by the CEO in one location.

This way the CEO did not need to go across multiple sites, allowing for a single location for making business decisions easily.

It is quite a tedious process to manually replicate and update content on the CEO’s site in real time. Our client was looking for a way to automate the whole process.

One option is to create a Power Automate workflow on a document library of the source site which will sync the data to the destination-defined document library.

This will work perfectly fine for one source document library. However, challenges will appear when we want to implement the same solution for more than one source document library.

It is not scalable or recommended to create a Power Automate workflow every time we create a new document library on multiple sites, so this approach would not easily be scalable.

There is no out-of-the-box or straightforward way to achieve the requirement of replication across a growing number of source document libraries.

We, therefore, implemented a reliable solution using SharePoint lists and Power Automate which can sync data from multiple document libraries and their folders across multiple sites to the destination folders (CEO Consolidated content).

By using this approach we are able to manage the replication of thousands of folders/files across multiple sources and destinations.

SharePoint Lists structure

  1. Create one central Mapping List. In this list, we are managing the source location of different sites and the destination location of the CEO Site.
  2. Add Source path and destination path in the central mapping list as per the below example
  3. Added an InternalID column in the destination library in which we will store the ID of the source’s folder/file. This InternalID will be used to check whether a folder/file exists or not at the destination location. This will be the key column between the source and the destination.

Power Automate Solution Structure

We need to create a Power Automate solution and will need to create three different Power Automate flows inside the solution as shown below. The Content Replication Parent Flow will run first and inside that flow, we will run two child flows for content replication and for cleaning up files

  • Content Replication Parent Flow (Parent Flow])
  • Content Replication (Child Flow)
  • Clean-up Files (Child Flow)

Power Automate Schedule

From an operational perspective, we schedule the Content Replication Parent Flow daily at midnight.

It will further call the Content Replication and Clean up Flows and will pass the current mapping ID in it.

Content Replication Parent Flow

This Flow extracts the active mappings from the Central Mapping List and loops through each active mapping.

This Flow passes the current mapping details to the Child Flows (Content Replication and Clean Up Flow) as seen in the image below.

Content Replication

  1. This Flow will Copy Content from the source to the destination based on the current mapping. It will receive the mapping details from the Parent flow.
  2. Loop through all folders/files of the source path mentioned in the mapping and fetches the folder/files modified after the date-time mentioned in the “LastFlowRunTime” column of the central mapping list. After getting all the folder/files it will check folder/file already exists on the equivalent destination path same as the source path using the Internal ID column which we created in the destination library
  3. If it exists, then we overwrite it.
  4. If it does not exist, then the Flow will create the folder/file

Clean-up Files

  1. This Flow will remove files from the destination which were deleted from the source
  2. Loop through all folders/files in the destination path mentioned in the mapping and will fetch the folder/files. After getting all the folder/files it will check whether the folder/file already exists in the equivalent source path using the Internal ID column.
  3. If the folder/file is not found in the source path, it means that the folder/file was deleted from the source, so we delete it from the destination.
  4. This way, it will delete all the files from the destination which were originally deleted from the source.

After implementing the solution, we found that when we move a folder/file to another folder then it does not modify the modified date of the moved subfolder or file.

So content movement between folders and libraries can cause an issue, where the updates don’t get reflected in the destination.

In practice, we found that the moved folder does not get captured in the next cycle of the Power Automate Flow, as we are only synchronizing the folders/file which was modified after the previous Power Automate Flow run, based on the timestamp which we store in “LastFlowRunTime” columns of the central mapping list, and therefore will not get synced to the destination equivalent location.

We had further optimized the solution to overcome this move folder/file issue and made the changes in the solution as shown below.

SharePoint Lists structure

  • Create Moved Mapping List (For Moved Folder/File: a complete replica of central mapping list)

Content Replication

  1. This Flow will Copy Content from the source to the destination based on the current mapping. It will receive the mapping details from the Parent Flow.
  2. Loop through all folders/files of the source path mentioned in the mapping and will fetch the folder/files modified after the value of “LastFlowRunTime”. After getting all the folder/files it will check whether the folder/file already exists on the equivalent destination path the same as the source path using the Internal ID column which we created in the destination library
  3. If it exists, then the Flow will overwrite it.
  4. f it does not exist, then a further check of the folder/file to see whether it exists anywhere in the destination library. If it exists somewhere in the destination library, then it seems the file has moved to another folder in the source location. If so, it will create an entry for the parent folder of the folder/file in a Moved Mapping List. If it does not exist in the library at all, then the Flow will create it as a new folder/file

Power Automate Solution Structure After adding Move functionality

  • Content Replication Parent Flow (Parent Flow)
  • Content Replication (Child Flow)
  • Clean-up Files (Child Flow)
  • Replicate Moved Content (Flow for moved folder/file attached on Moved Mapping SharePoint List on Item create the event)

 Replicate Moved Content

  1. This Flow is a complete replica of the Content Replication flow. But it only triggers for the specific moved folder file which we created in the Moved Mapping list while executing the Content Replication Flow.
  2. Power Automate will trigger when any new item will be created in the Moved Mapping list and move the folder/file to the destination path mentioned earlier.

In Conclusion, Mirroring the SharePoint document library contents to multiple sites is an important task that needs to be done with care, and having a reliable SharePoint development company with expertise in Microsoft Sharepoint services is crucial for efficient and smooth mirroring.

Part 1: Expand-Collapse rows in PowerApps Canvas App Gallery

Summary

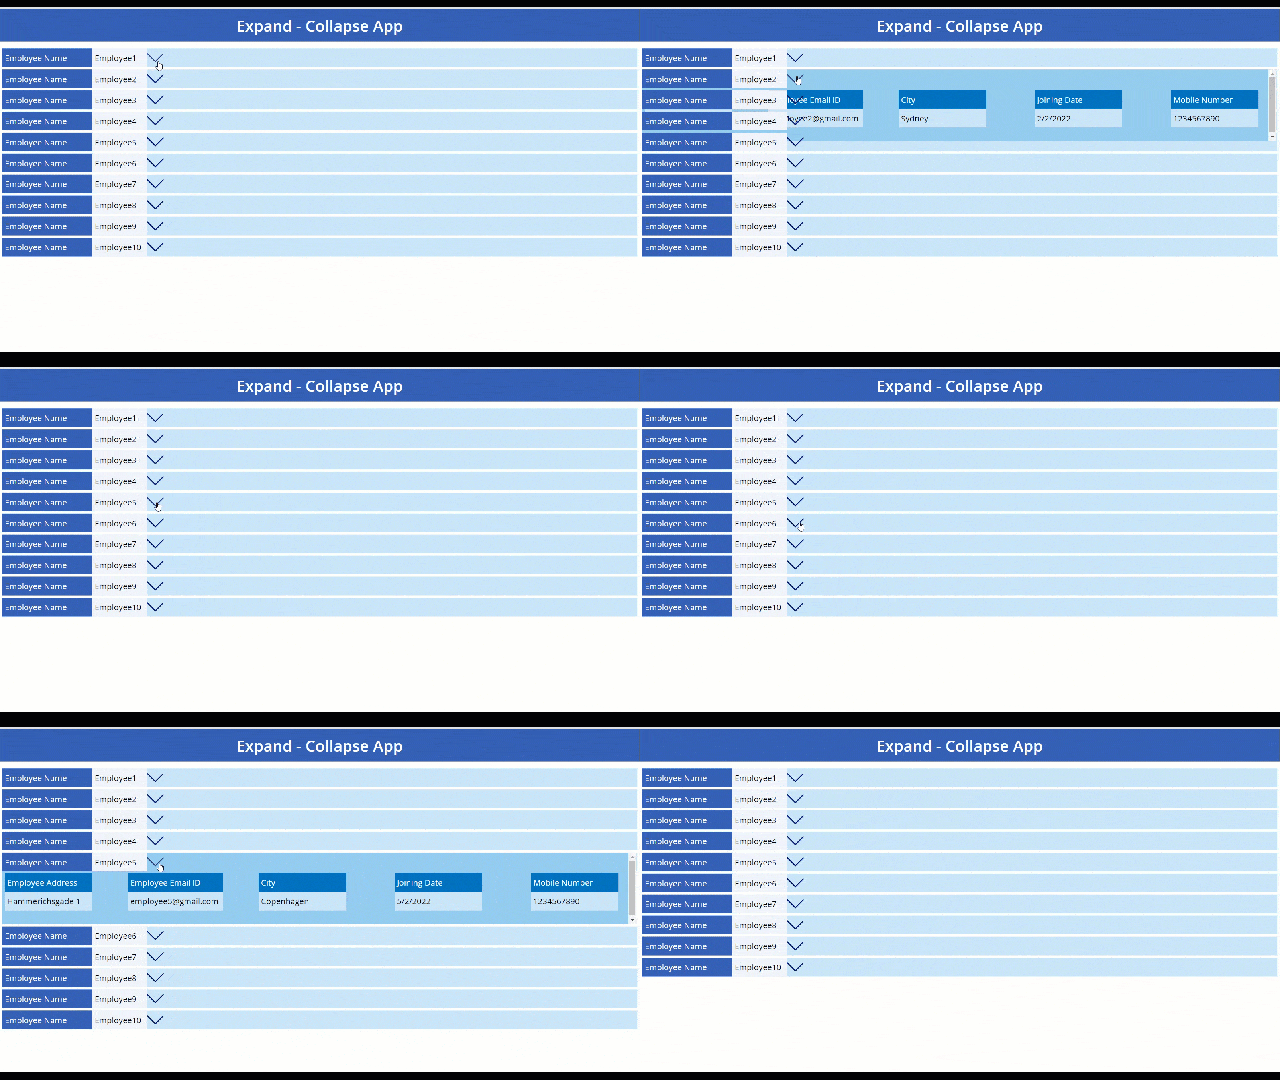
In this blog post, I share the steps for creating an expand-collapse gallery control in the PowerApps Canvas App. 

gif-01

Now, let’s start building the Gallery, for which we would have to create our list first and have the same loaded in a PowerApps App as a data source.  

Step-1

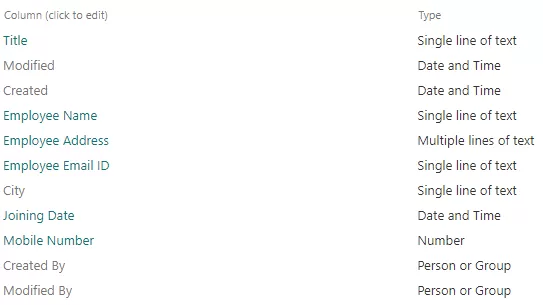
Create “Expand-Collapse Control” list with the following columns and their types 

img-01

Step-2

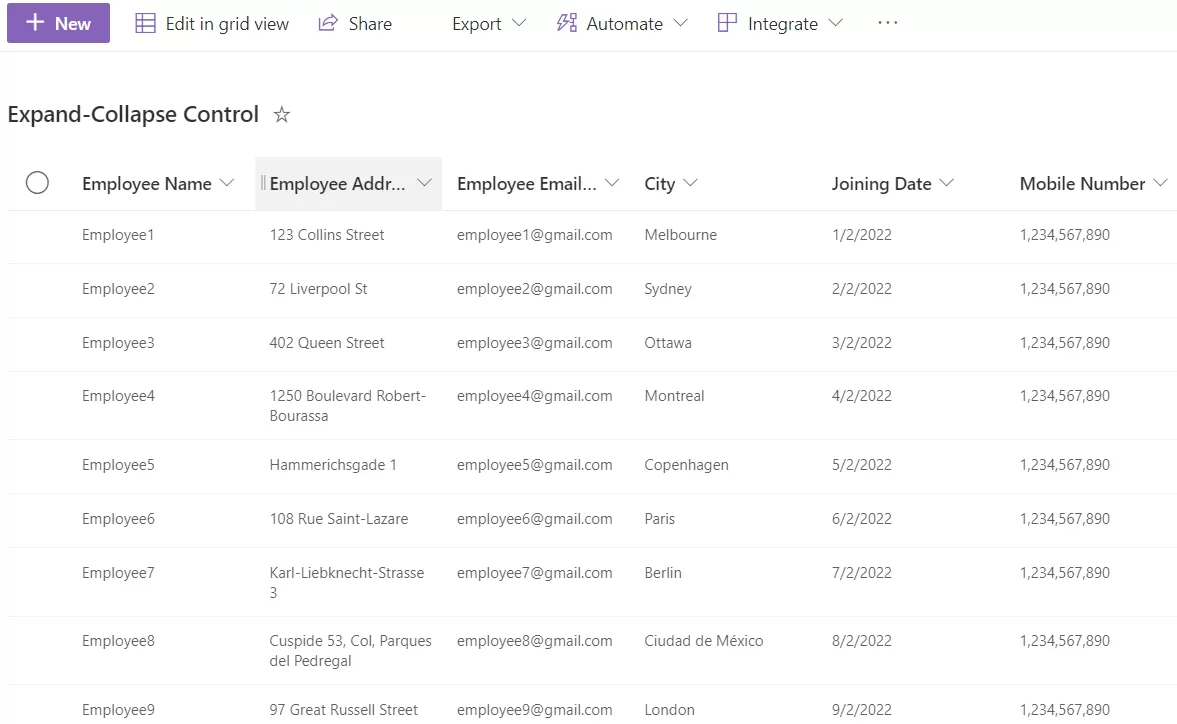
Add few entries in “Expand-Collapse Control” list 

img-02

Step-3

Create a Canvas App and name it “Expand-Collapse App” 

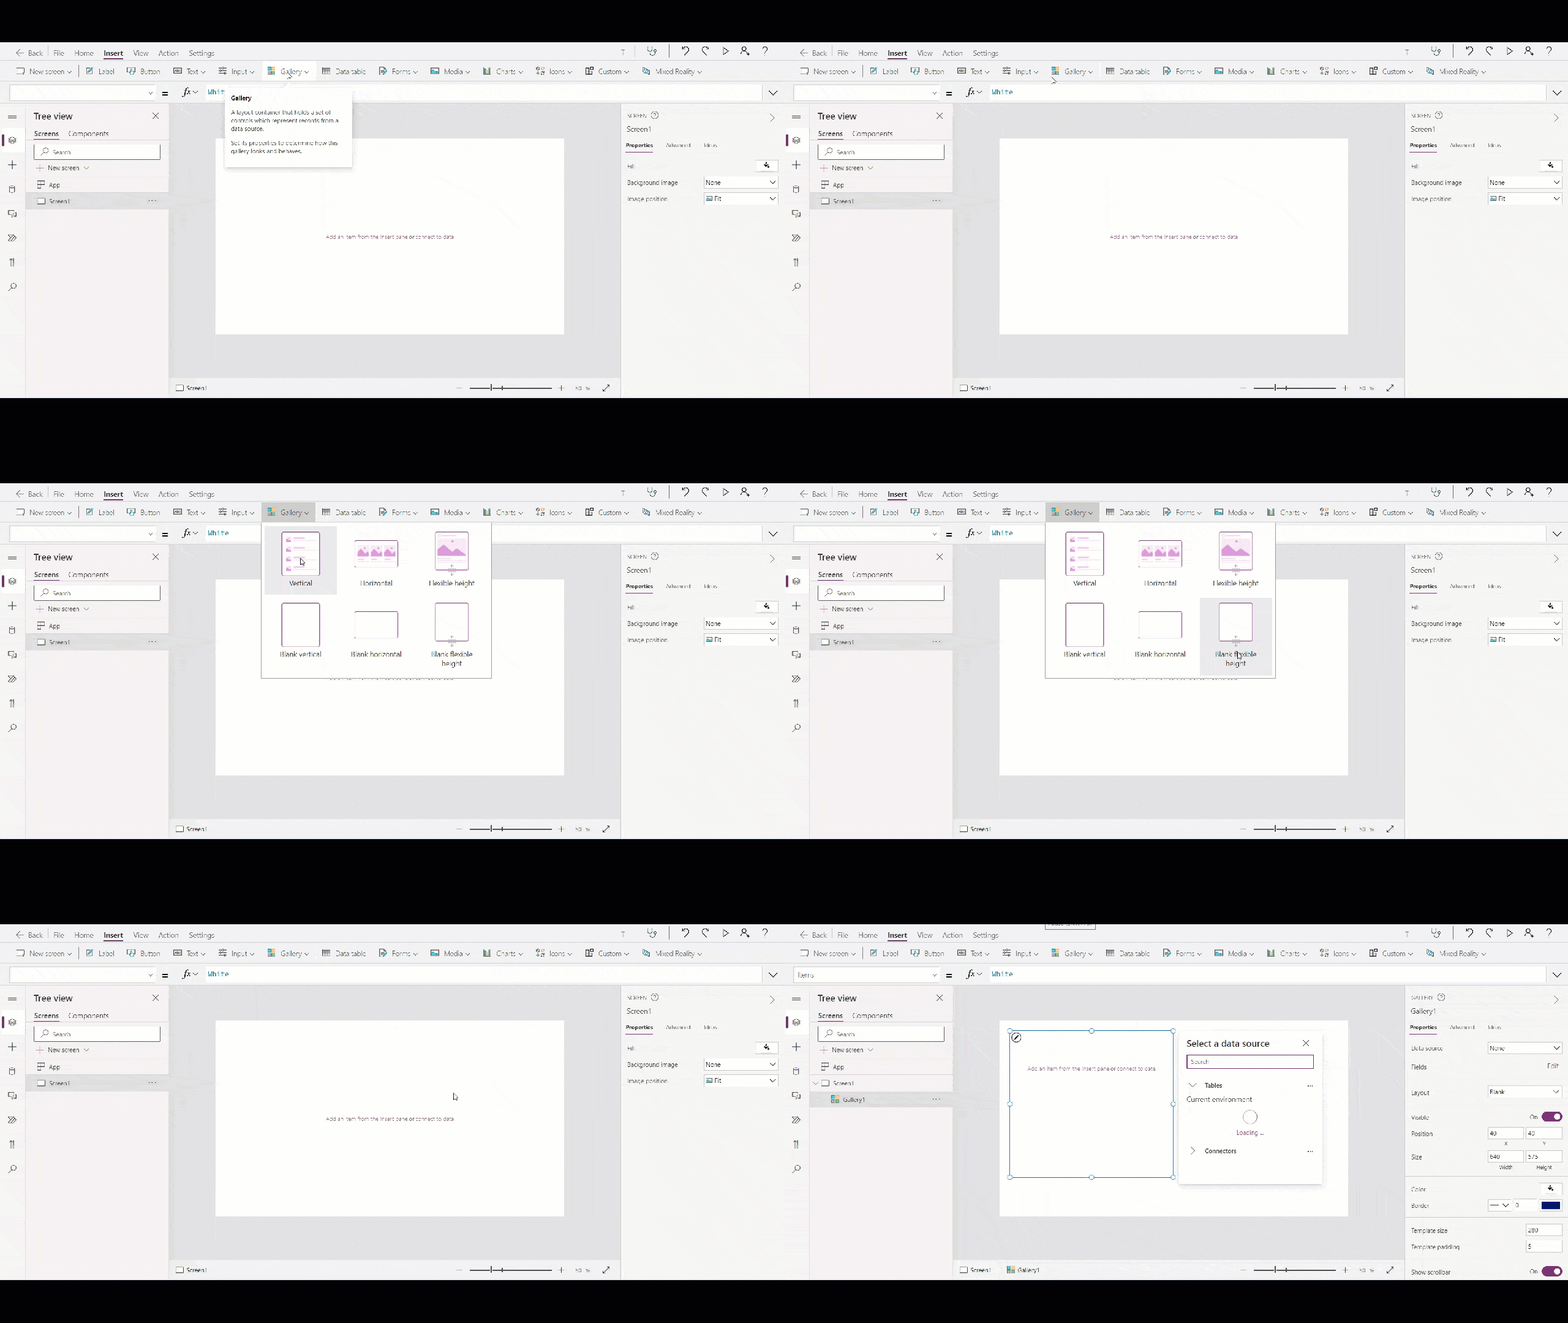
  1. Add a new Blank screen 
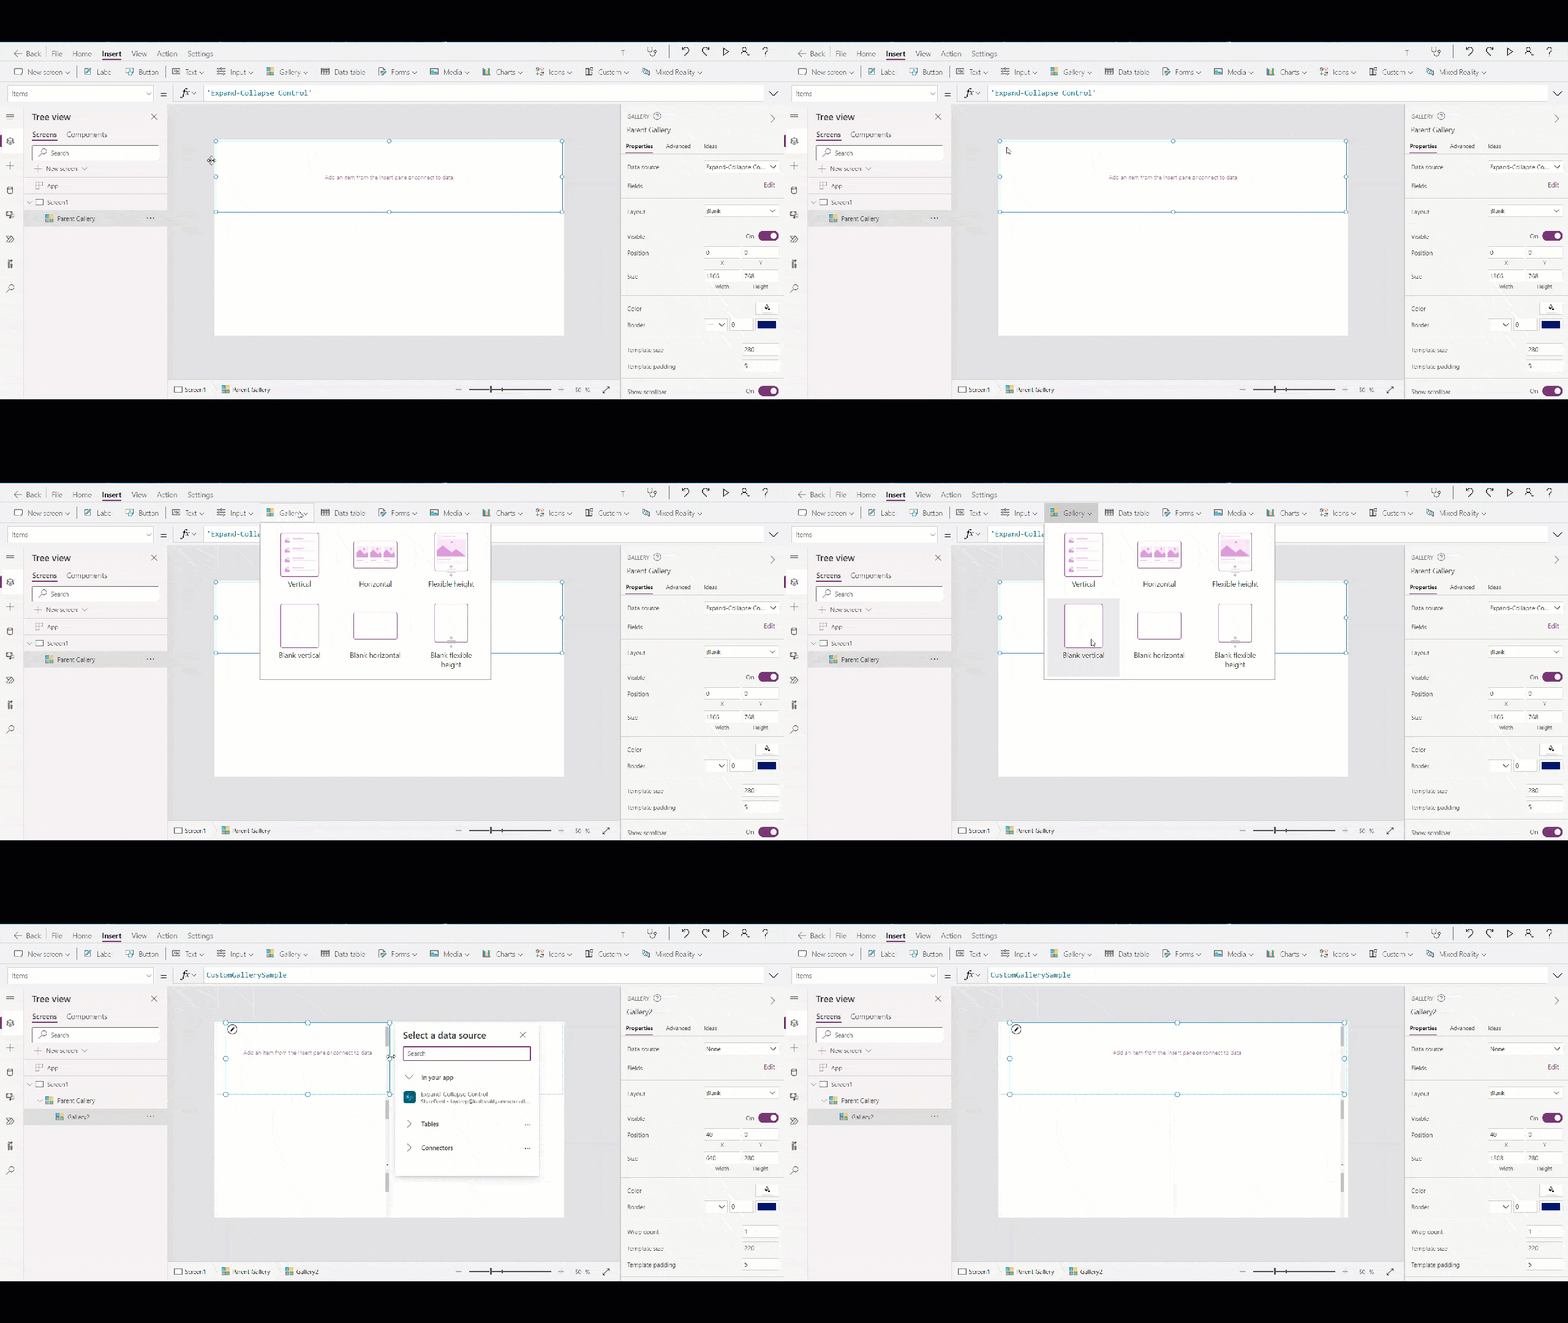
  2. From the Controls section on the top in Insert tab, add a “Blank flexible height” gallery – which would be our Parent Gallery
  3. And add a “Blank vertical” gallery in “Blank flexible height” gallery  which would be our Child Gallery 
  • Parent Gallery 

gif-02

  • Child Gallery 

gif-3

Step-4

Adding the data source to Gallery 

In the Parent Gallery add “Expand – Collapse Control” list data 

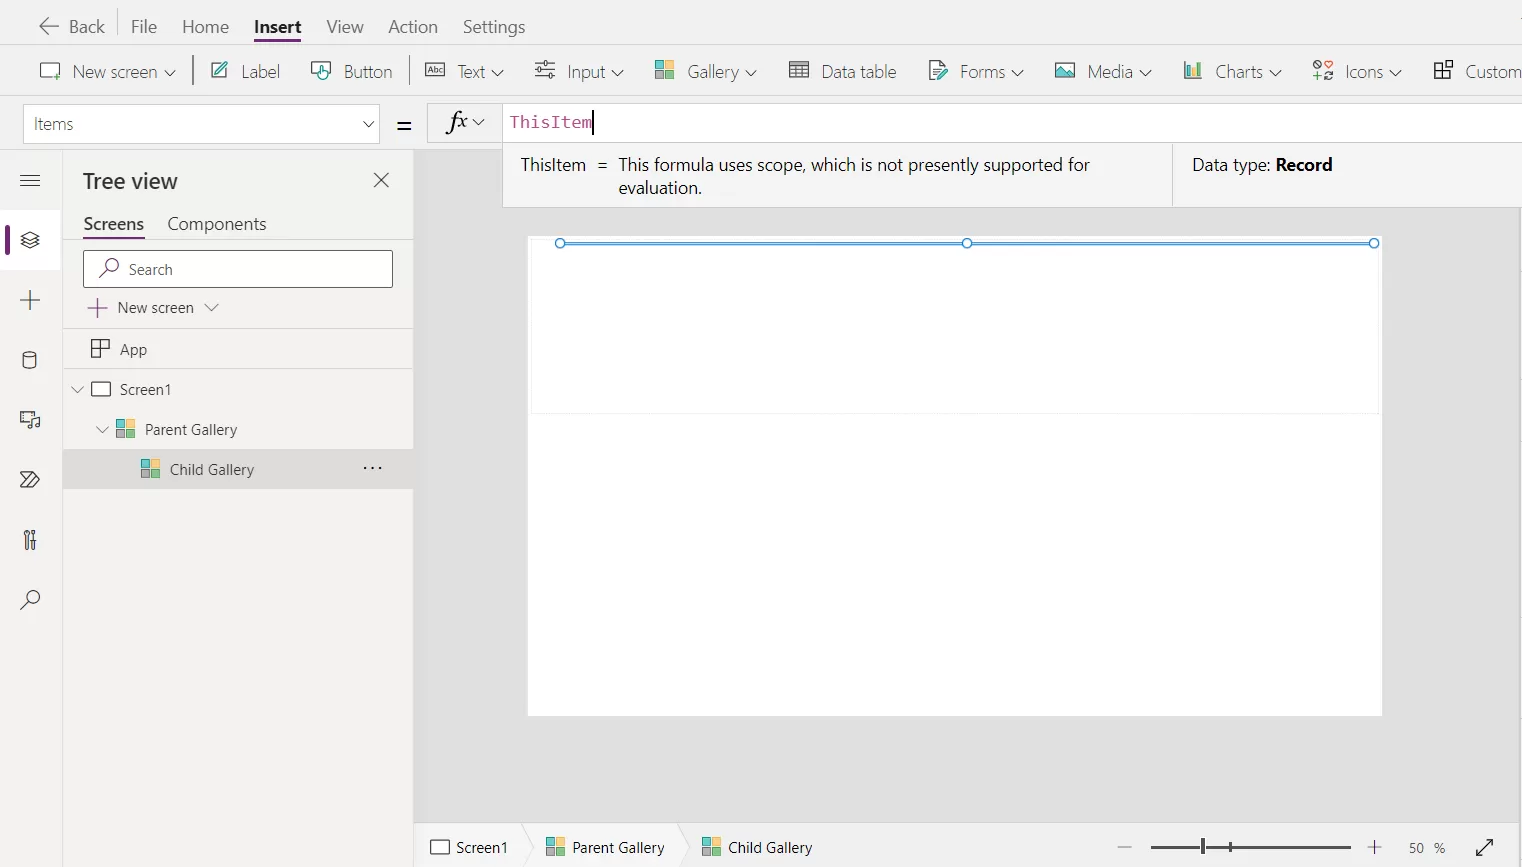
For Child Gallery in “Items” property add code – ThisItem 

img-03

Step-5

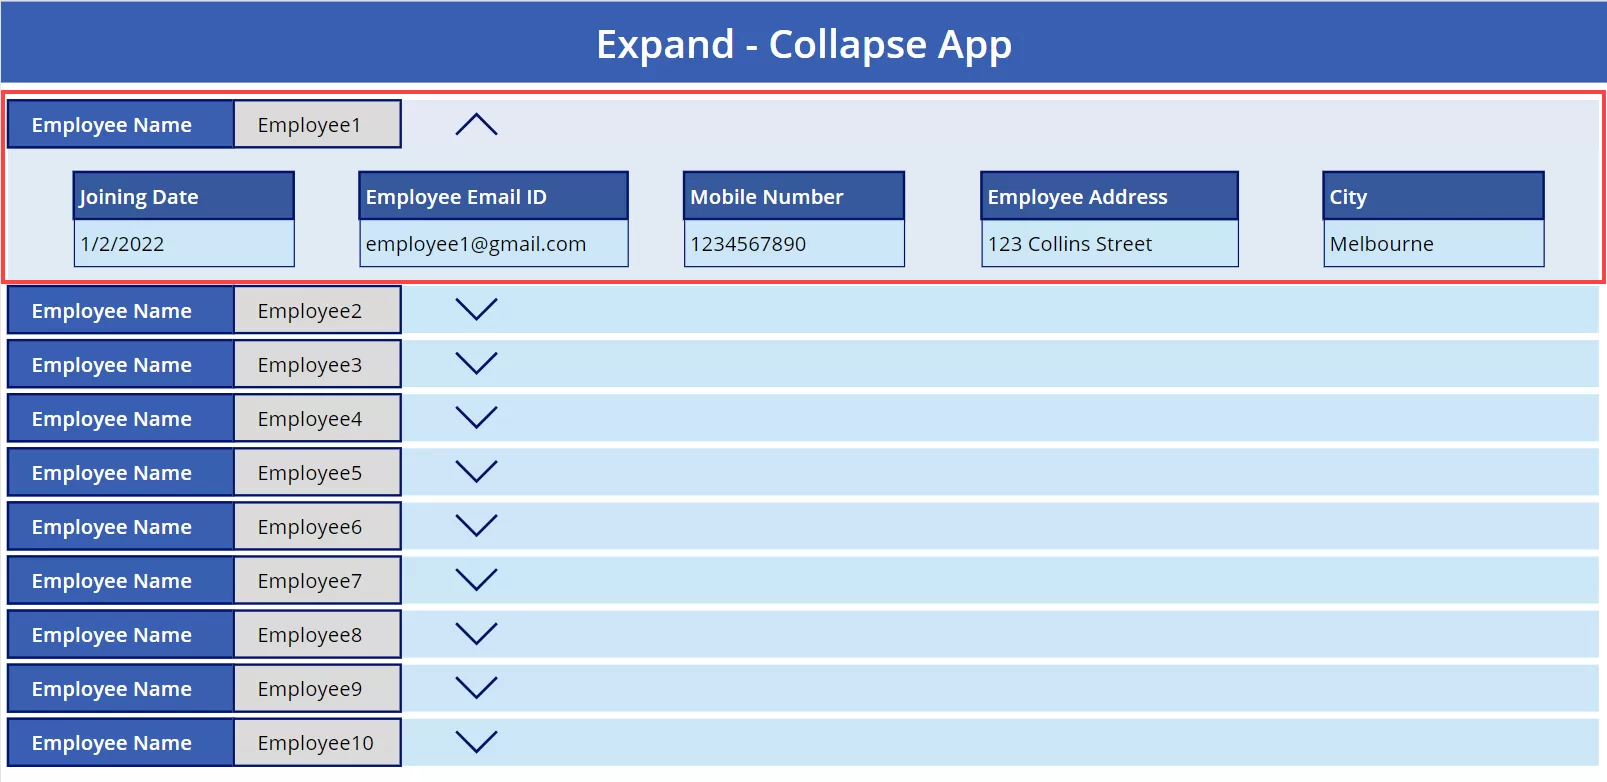
Add labels according to the list’s columns and add show data 

img-04

Step-6

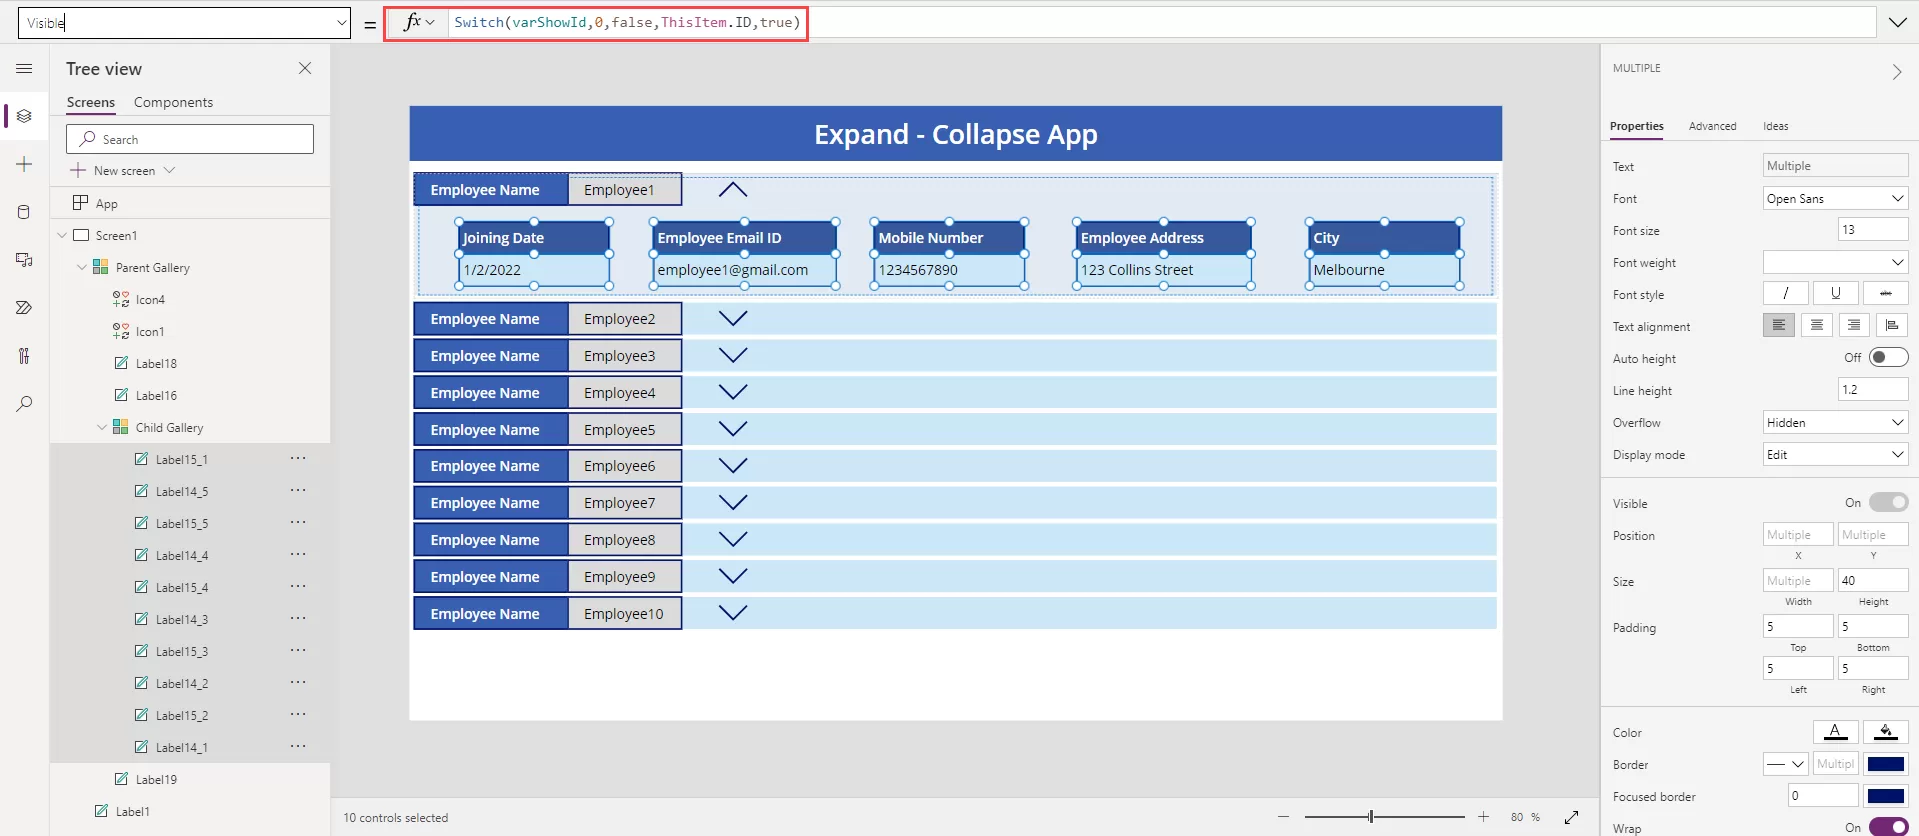
Add code on all label’s “visible” property which are added in “Child Gallery”Also, to have the Child Gallery show when button is clicked, we have to add code in Child Gallery’s on “Visible” property  

“Visible” property – Switch(varShowId,0,false,ThisItem.ID,true)

img-05

Step-7

Add down arrow icon and up arrow icon. 

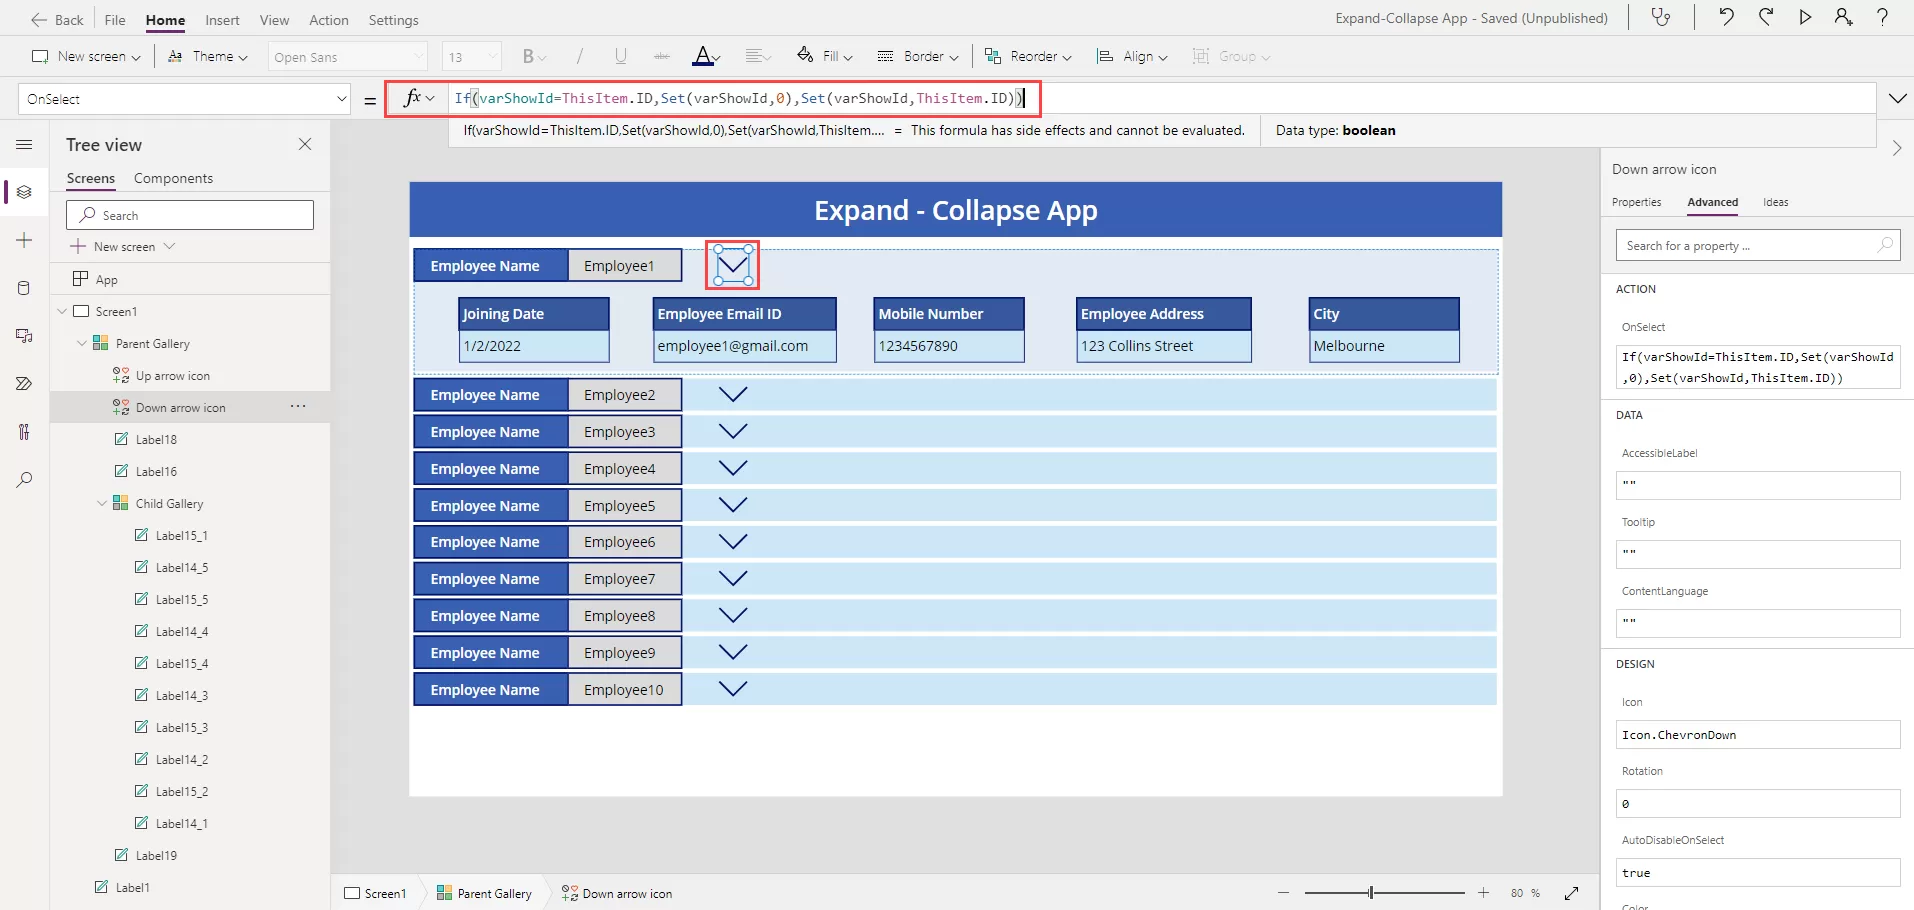
Then first write code for the down arrow icon(Down arrow icon) on its “OnSelect” property –

If(varShowId=ThisItem.ID,Set(varShowId,0),Set(varShowId,ThisItem.ID)) 

img-06

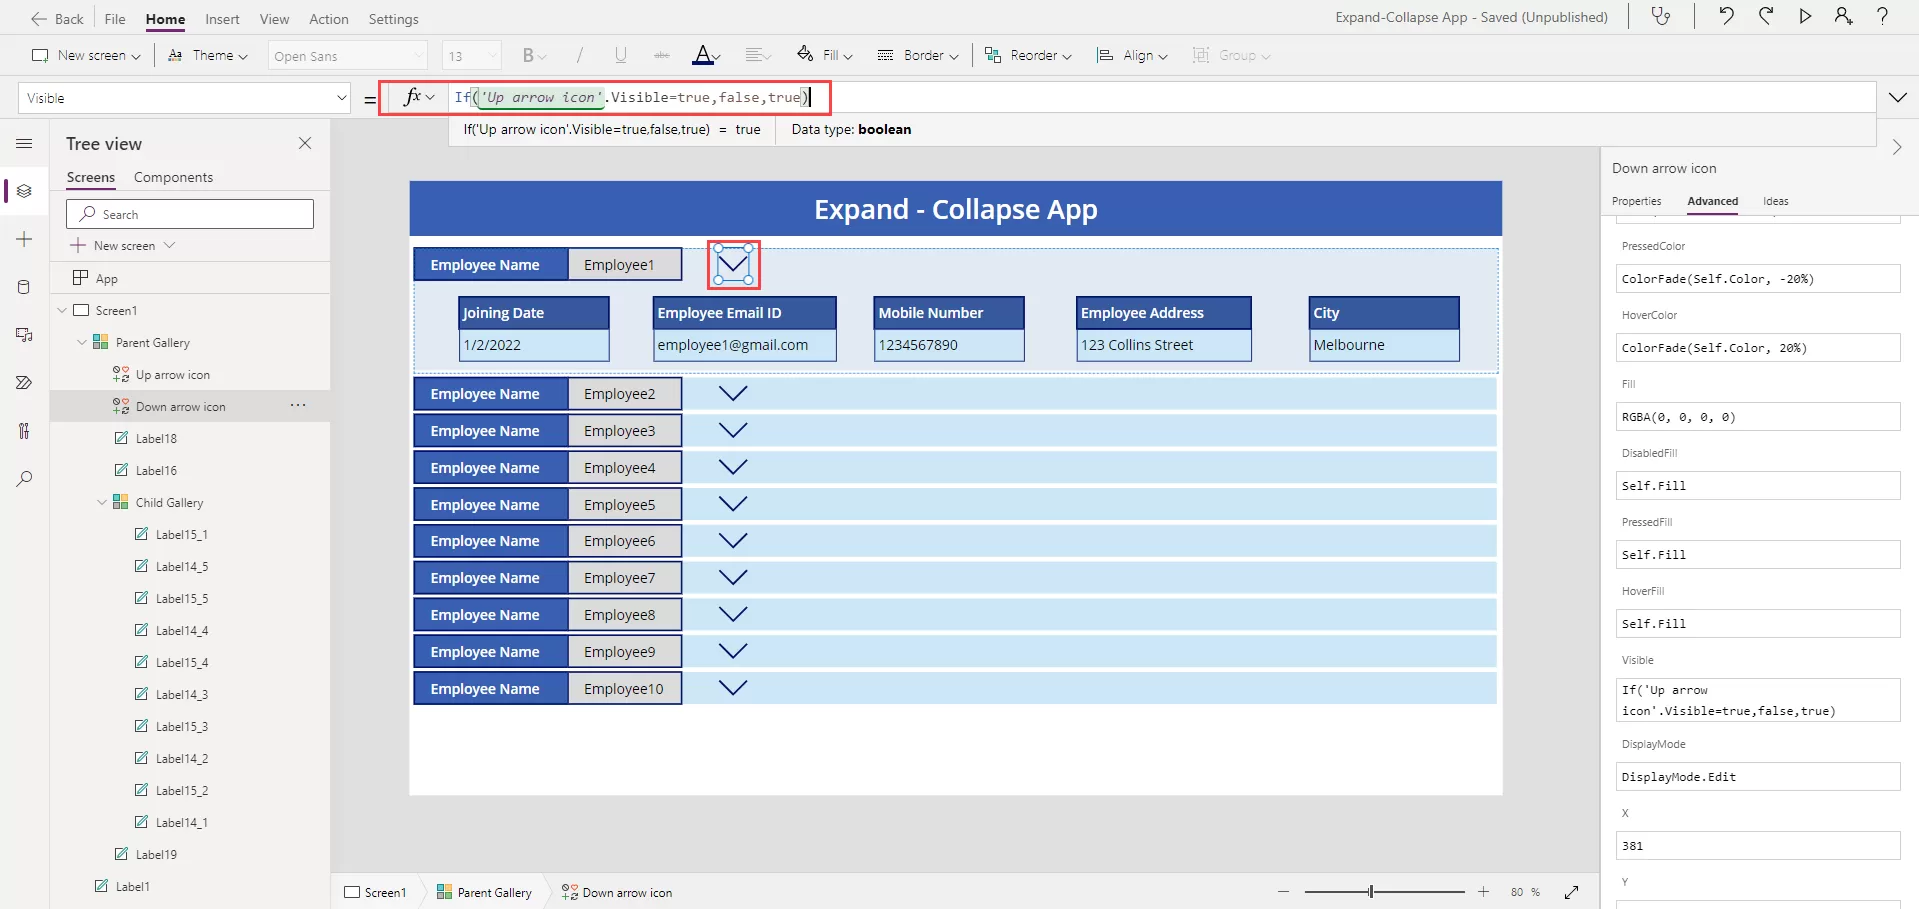
And add code on visible property – If(Up arrow icon.Visible=true,false,true) 

img-01

Step-8

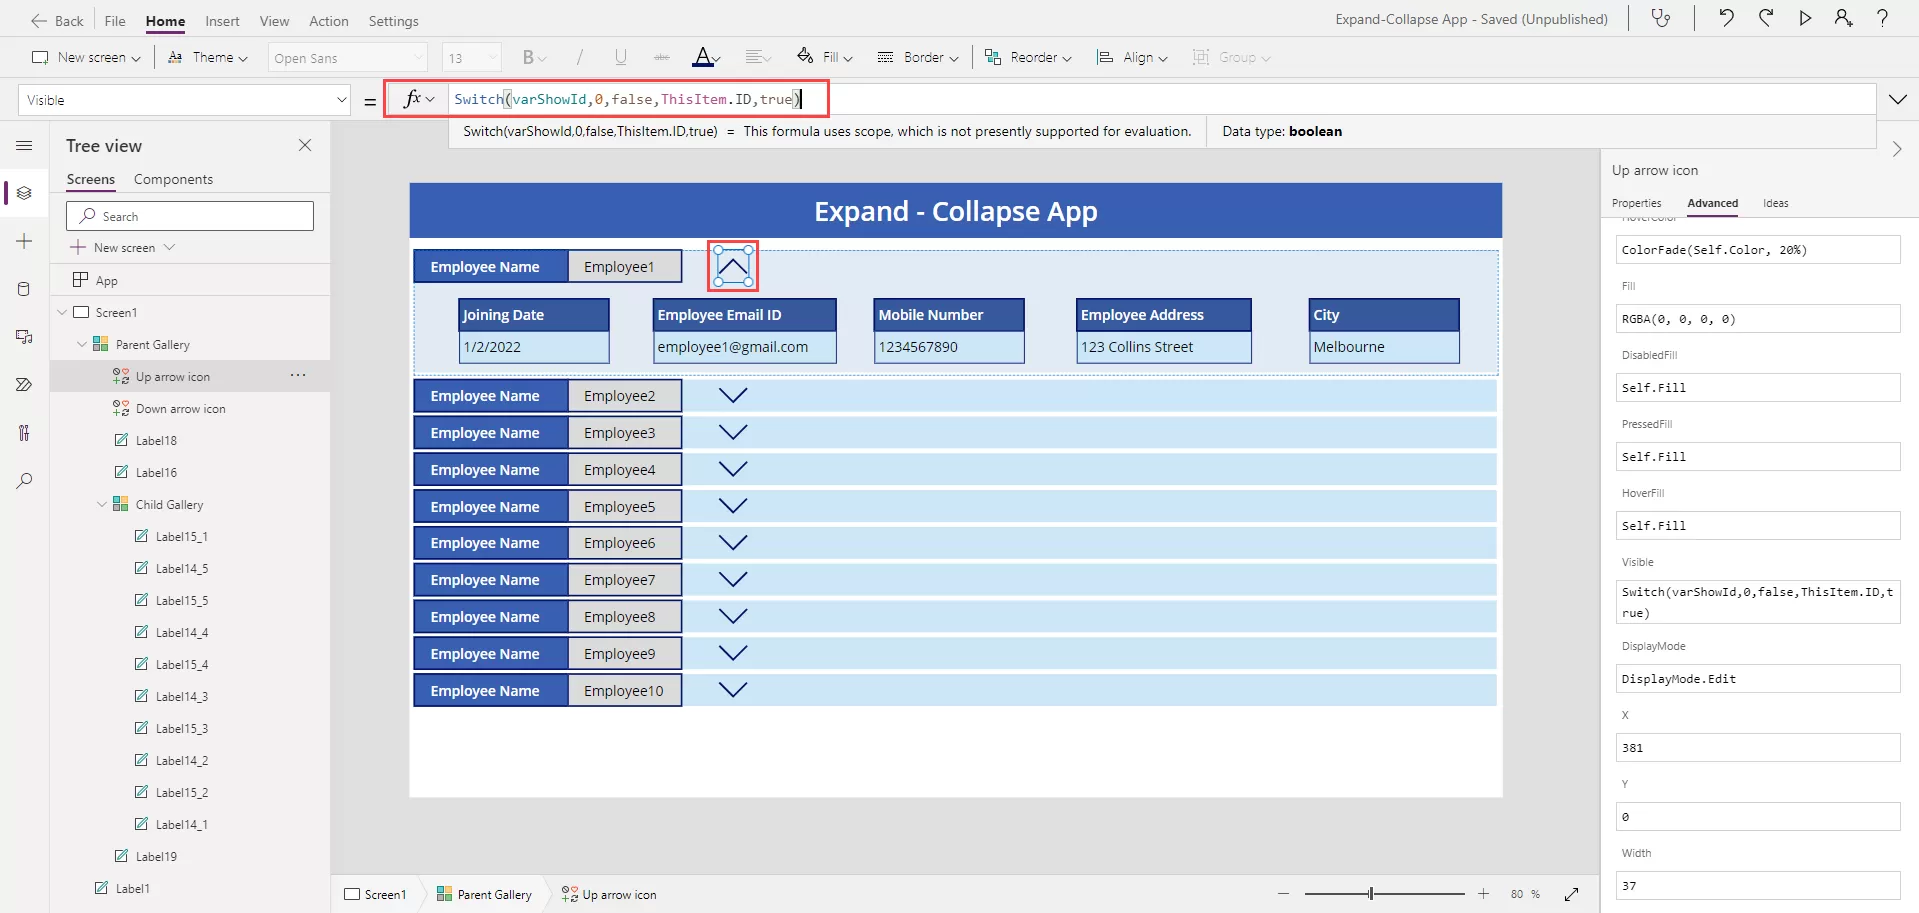
On  the down arrow icon and write code on it’s “OnSelect” property –

If(varShowId=ThisItem.ID,Set(varShowId,0),Set(varShowId,ThisItem.ID)) 

img-07

And write code on its “Visible” property –

Switch(varShowId,0,false,ThisItem.ID,true)

img-07

Please post your question, if you will find while implementing this process. Thank you.

In this tutorial, we explored how to create an Expand-Collapse feature in a Microsoft PowerApps Canvas App Gallery.

By following the step-by-step guide, you can enhance the user experience of your PowerApps solutions by allowing users to efficiently navigate and interact with data.

Implementing features like Expand-Collapse rows can greatly improve the usability and functionality of your Canvas Apps, providing a more intuitive interface for users to work with.

We hope this tutorial has been helpful in expanding your understanding of building dynamic interfaces in PowerApps.

Stay tuned for more insights and tutorials on optimizing your Microsoft PowerApps solutions for enhanced productivity and user satisfaction.

Reach out to Reality Tech for getting help in optimizing the Microsoft PowerApps solutions

PowerApps – Role Based Security Using SharePoint Group

Table of Contents

Summary

While creating a PowerApps app, we needed to add a button that would be visible only for a particular set of users who were present in a specific group in SharePoint. This was accomplished with the help of Flow.  

We would check with the help of Flow that the user that is trying to access the App, is present in the group or not. If yes, the button is available and if not, the button won’t be. 

The approach goes like, 

Step-1

Create a SharePoint Security Group and add the users who would have the access to the button in PowerApps App.

And enable the access to view the members of the Group to Everyone, so that when the user tries to login, not all users would be in the group.  

img-01

Step-2

Creating the Flow 

  • Create the Flow, with the trigger PowerApps of PowerApps connector. 

img-02

  • Add an action, Initialize variable of Variables connector. Set the name as isAdministrator to store a Boolean value.

img-03

img-04

  • Add another Initialize variable of Variables connector. Set the name as UserGroupInfo to store a Boolean value. 
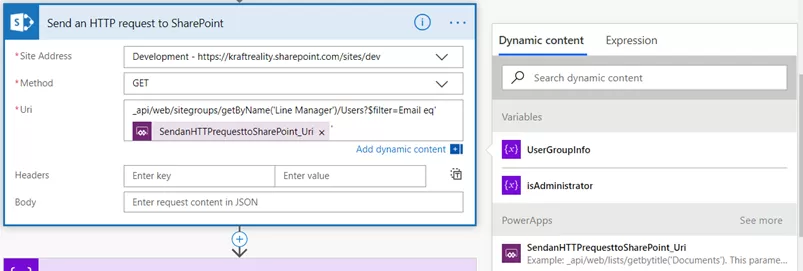
  • Add an action, Send an HTTP request to SharePoint of SharePoint connector.  
Site Address – Select the site address where the security group is created 

Method – GET 

Uri – api/web/sitegroups/getByName(‘SharePoint Group’)/Users?$filter=Email eq ‘’ 

Replace the SharePoint Group with the name of the group created in Step-1. Here I had created the group ‘Line Manager’.  

Put the cursor pointer in between the single quotes and select the option from PowerApps, SendanHTTPrequesttoSharePoint_Uri from dynamic content window.

img-05

  • Add an action, Set Variable of Variable connector. Select the variable UserGroupInfo in Name and value as Body from Send an HTTP request to SharePoint from dynamic content. 

img-06

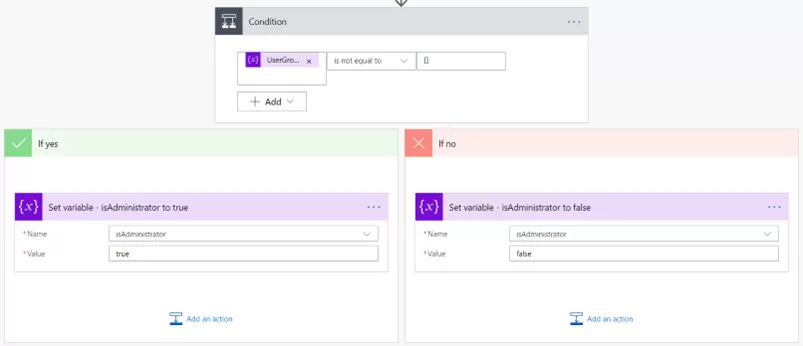
  • Add an action, Condition of Control Connector. Set the conditional value as variable UserGroupInfo and select the condition is not equal to and in value  to be compared as ‘[]’. 

     Inside the if yes and if no options, 

 For the option if yes, add an action Set Variable of Variable connector. Select the variable  isAdministrator and set the value as true, 

         For option if no, add an action Set Variable of Variable connector. Select the variable isAdministrator and set the value as false. 

img-07

  • Add an action, Respond to PowerApps of PowerApps connector. Select the text option for the output. Set the variable as isAdminUser and the value as isAdministrator from the Dynamic content. 

img-08

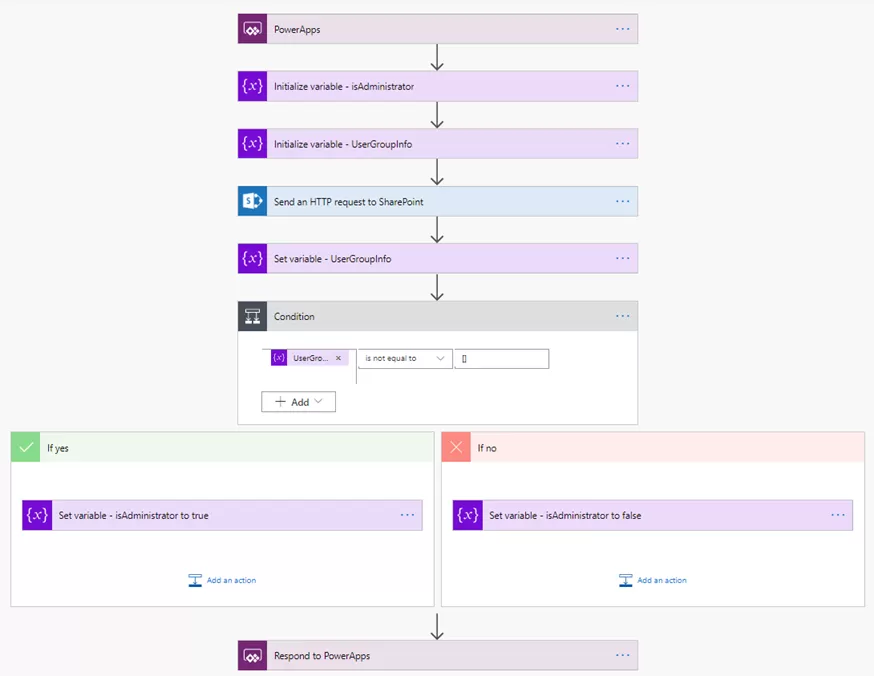
The final look of the flow would be like this: 

img-09

Step-3

Implementing the Flow with PowerApps App 

After the Flow is ready, lets configure the same with the App to test it. 

On the first screen that would be visible when you run the App, on its OnVisible Property, set the variables as below: 

img-10

First, we take the variable isAdmin and set it as false.  

Secondly, we would check with the flow to set the variable UserGroupInfo as the flow’s outcome.   

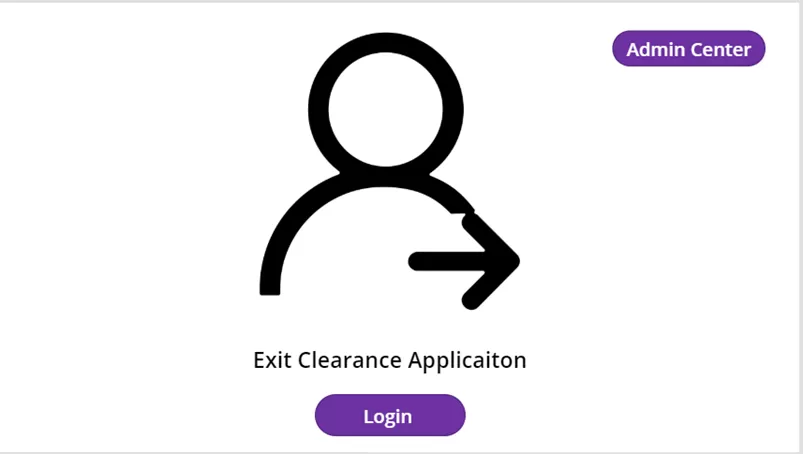
On the button’s visible property, set it as If(isAdmin, true). SO that if the user is in the SharePoint Group the button would be visible else it would not. 

So when a user is inside the SharePoint Group, the screen would display the button: 

img-11

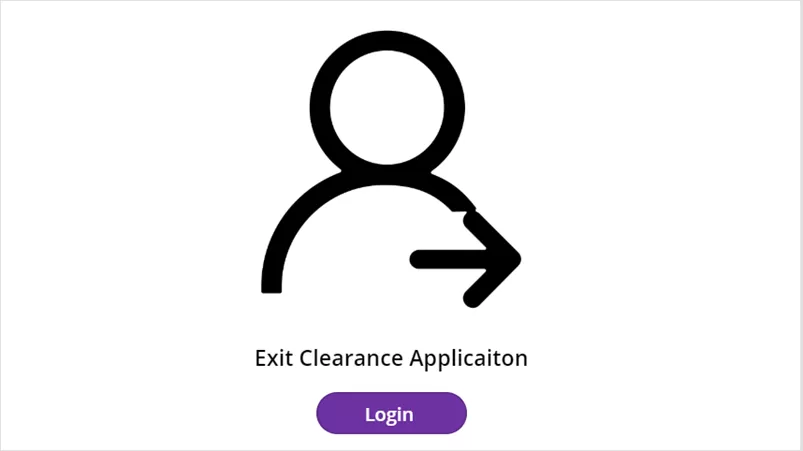
And when the user is not, we display: 

img-12

Additional Read

SharePoint for Enterprise Content Management – Why Should Choose?

In conclusion, leveraging PowerApps in conjunction with SharePoint groups provides a dynamic solution for implementing role-based access control within your applications.

By utilizing the capabilities of Flow, we have demonstrated how to seamlessly manage user permissions, ensuring that only authorized individuals can access specific features or functionalities.

With Microsoft PowerApps solutions, organizations can not only enhance security measures but also streamline workflows and improve overall efficiency.

Whether it’s creating custom apps tailored to unique business requirements or integrating with existing systems for seamless collaboration, PowerApps empowers businesses to unlock the full potential of their digital ecosystems.

By following the steps outlined in this guide, you can effectively implement role-based security measures in your PowerApps applications, providing a tailored and secure user experience for your organization.

Incorporating Microsoft PowerApps solutions into your development toolkit opens a world of possibilities, enabling you to drive innovation, maximize productivity, and achieve your business objectives with confidence.

Please post your question, if you will find while implementing this process. Thank you.

Publish Power App To The Teams App Store

Summary

In this blog, I am performing the steps one should follow to publish your PowerApps to the Teams App Store.  

Let’s get started- 

Step-1

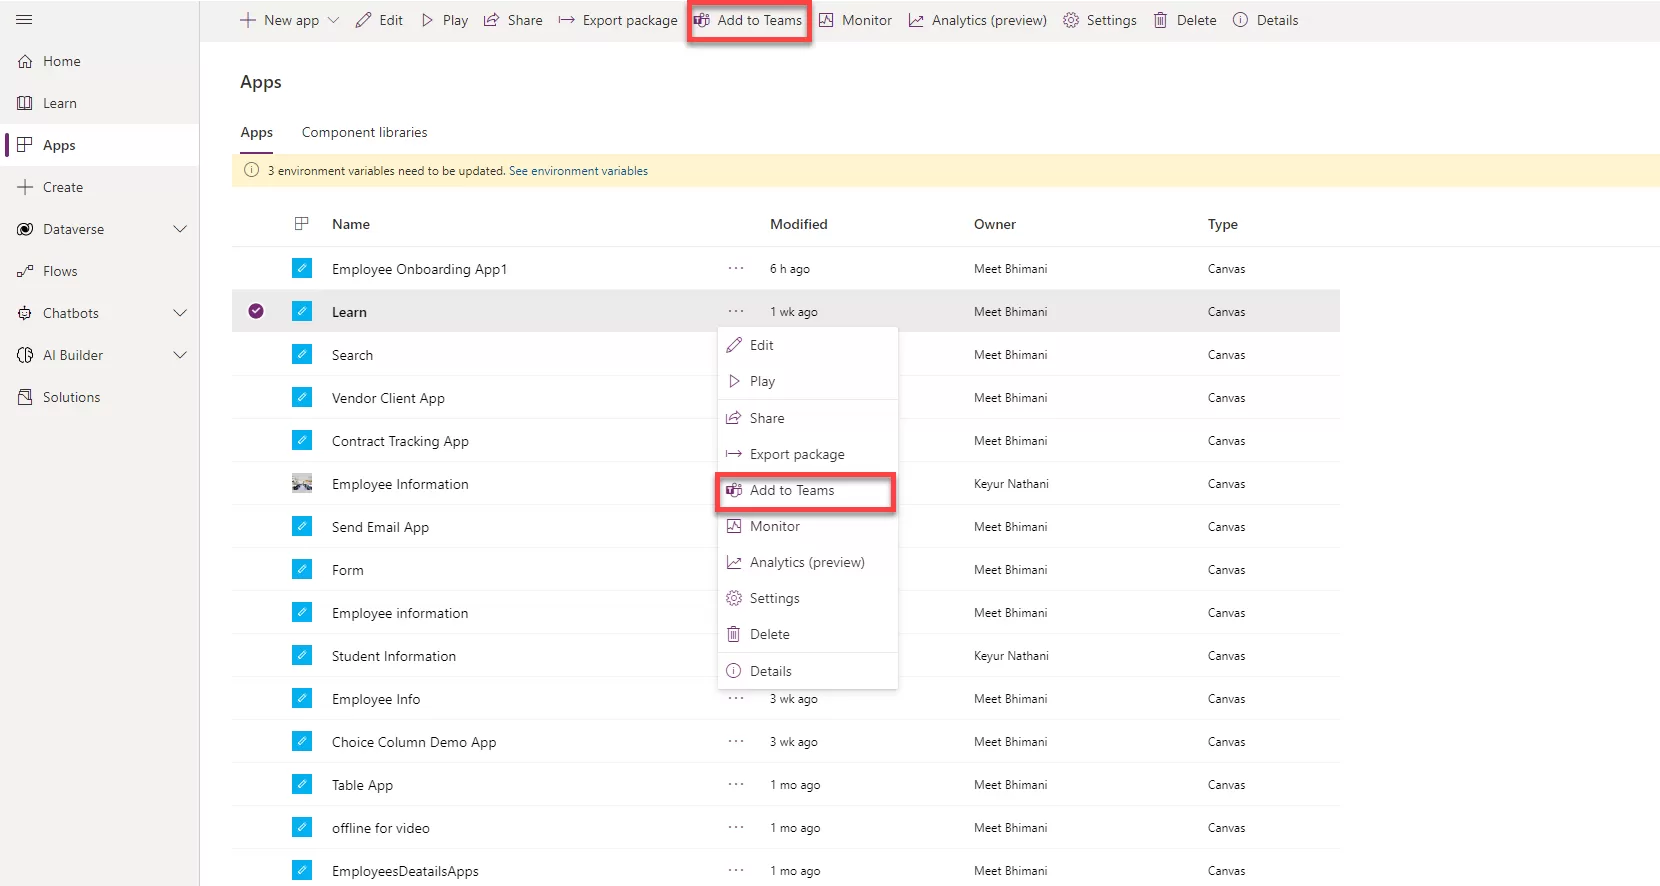
From the PowerApps portal, Click Apps in the app bar.

Step-2

To the right of your app name, Click the menu then select Add to Teams.

img-01

Step-3

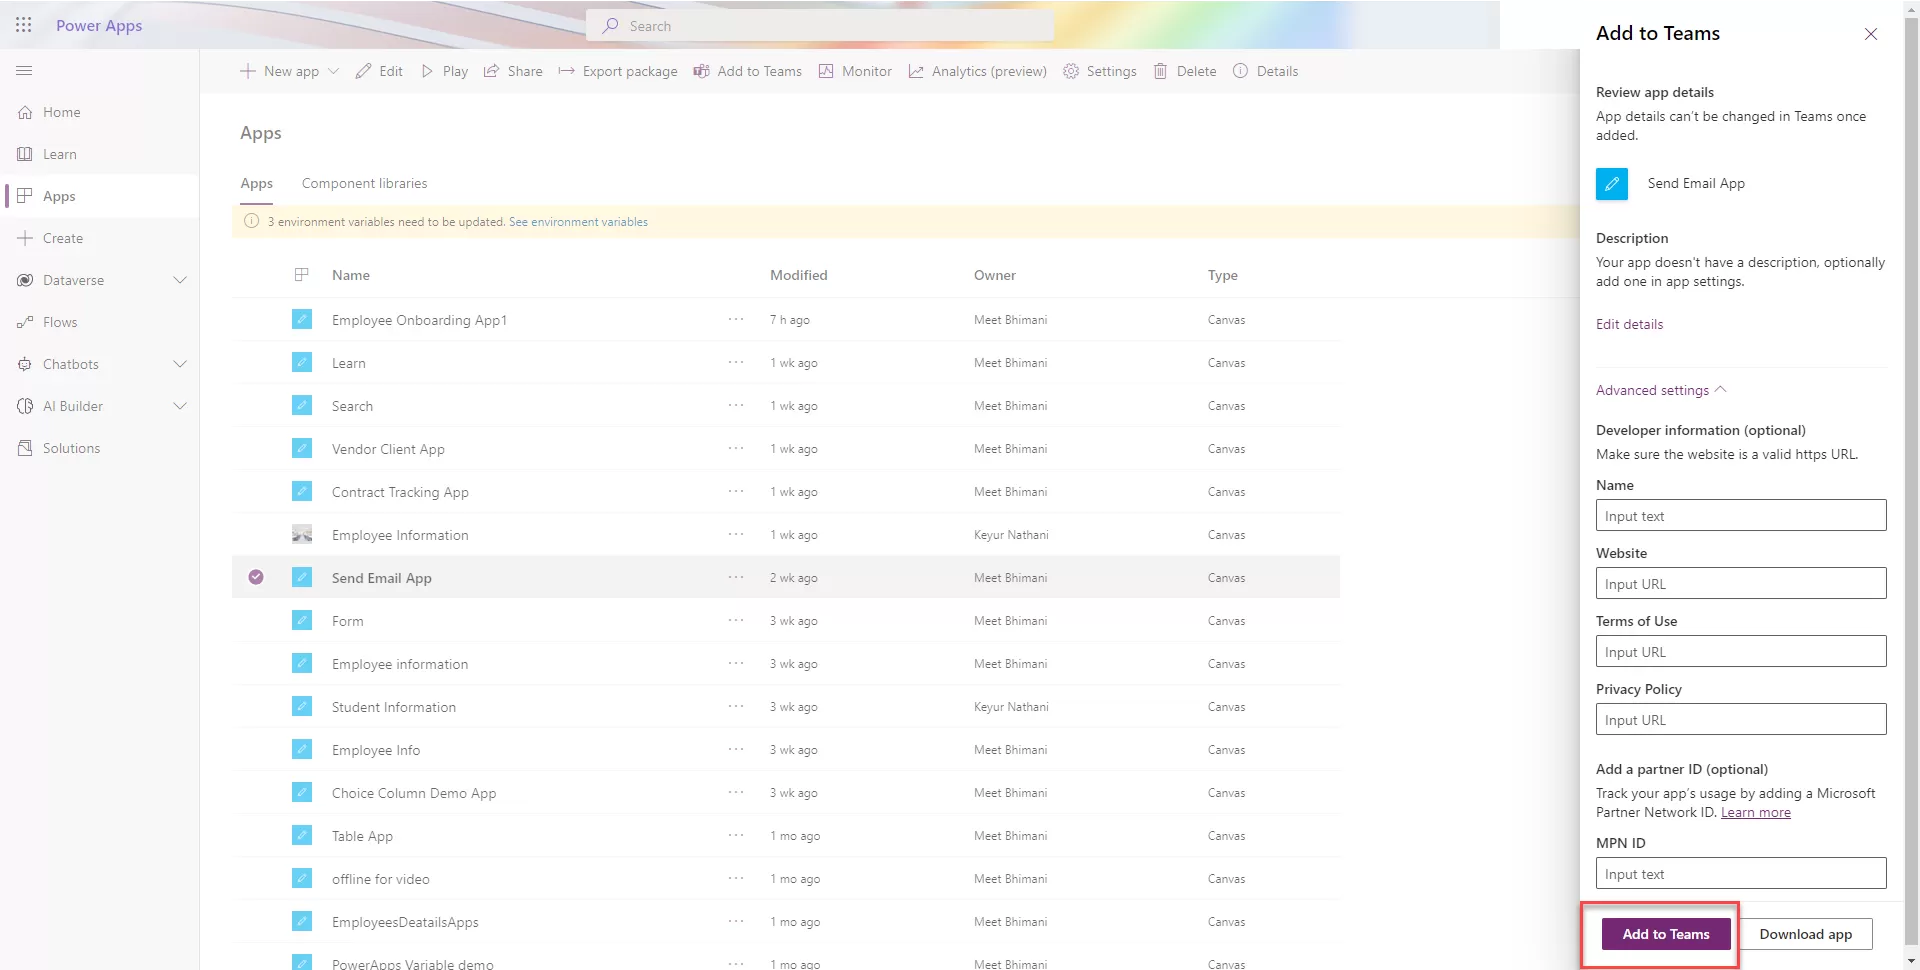
In the Add to Teams pane, click Add to Teams. 

Note: you may want to first click Edit details to add a short description, so your users know what‘s expected when using this app. You can also expand the Advanced settings to add further information. For example, you can include a link to instructions if you‘d like. 

img-02

Step-4

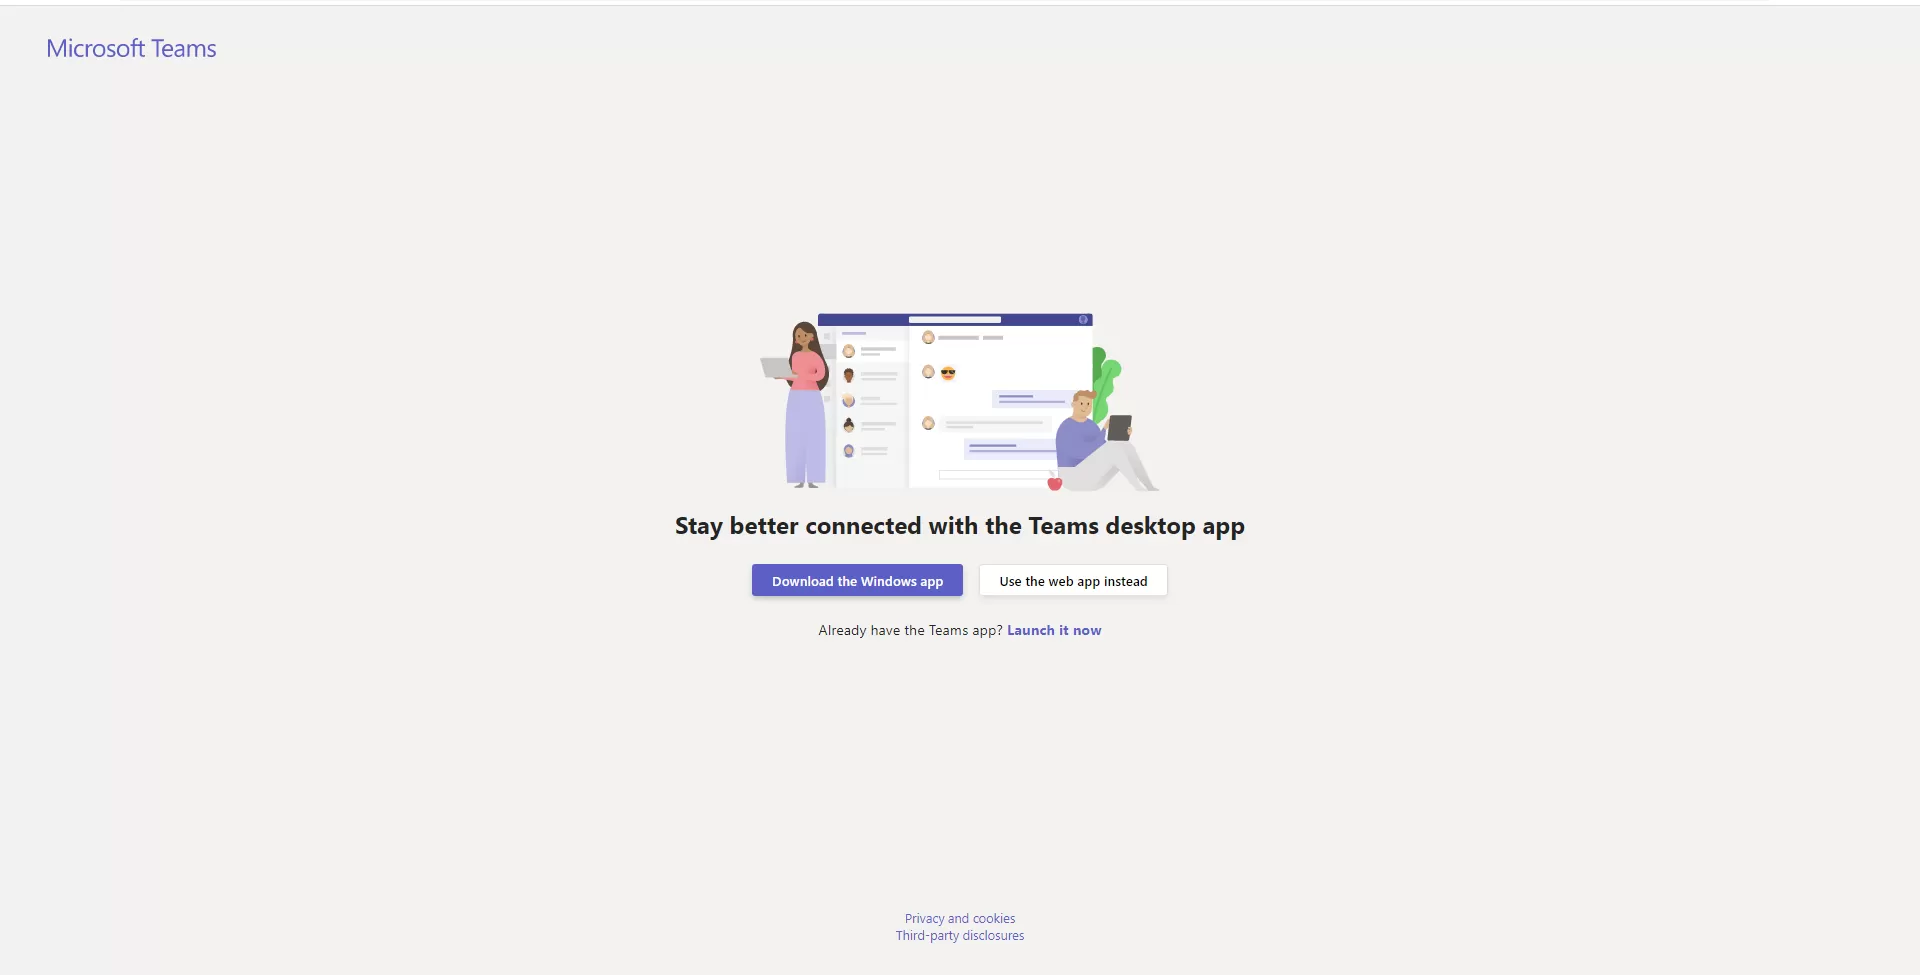
Power Apps will open Teams. Your browser may request access to open in the desktop app. If you prefer that, allow it. If not, click Cancel then click Use the web app instead. 

img-03

Step-5

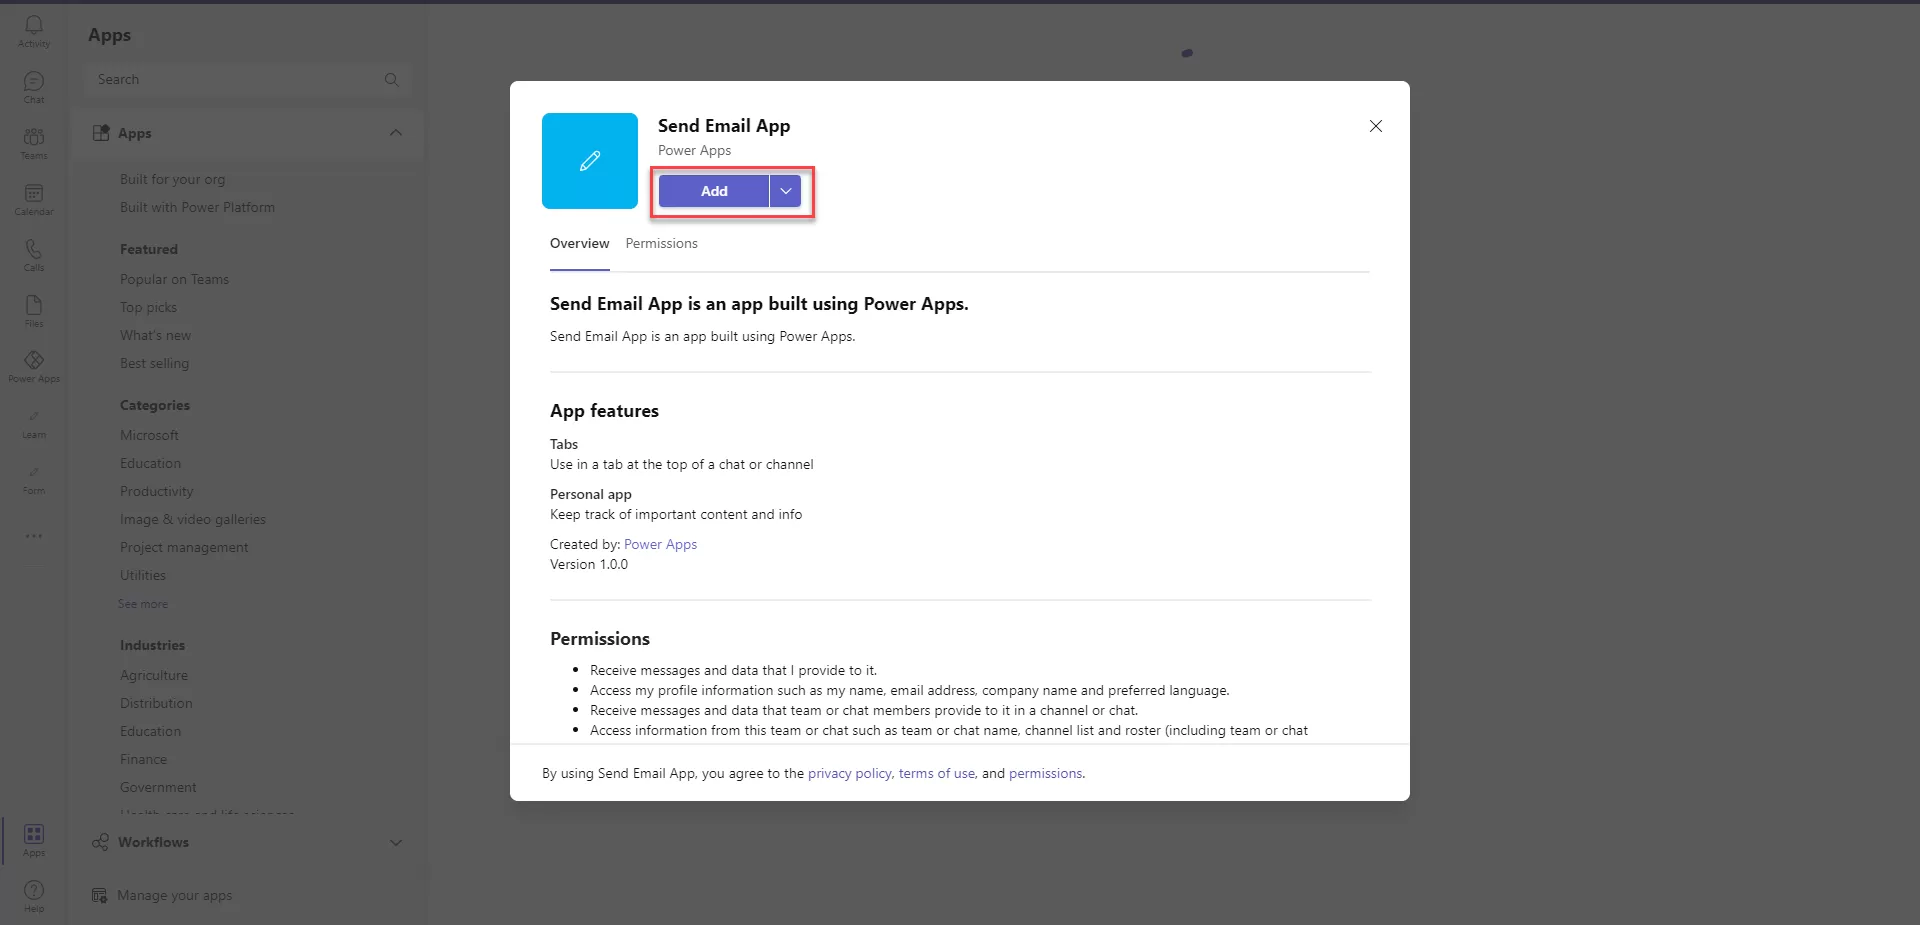
Once Teams opens to the app details page, click Add.

img-04


Step-6

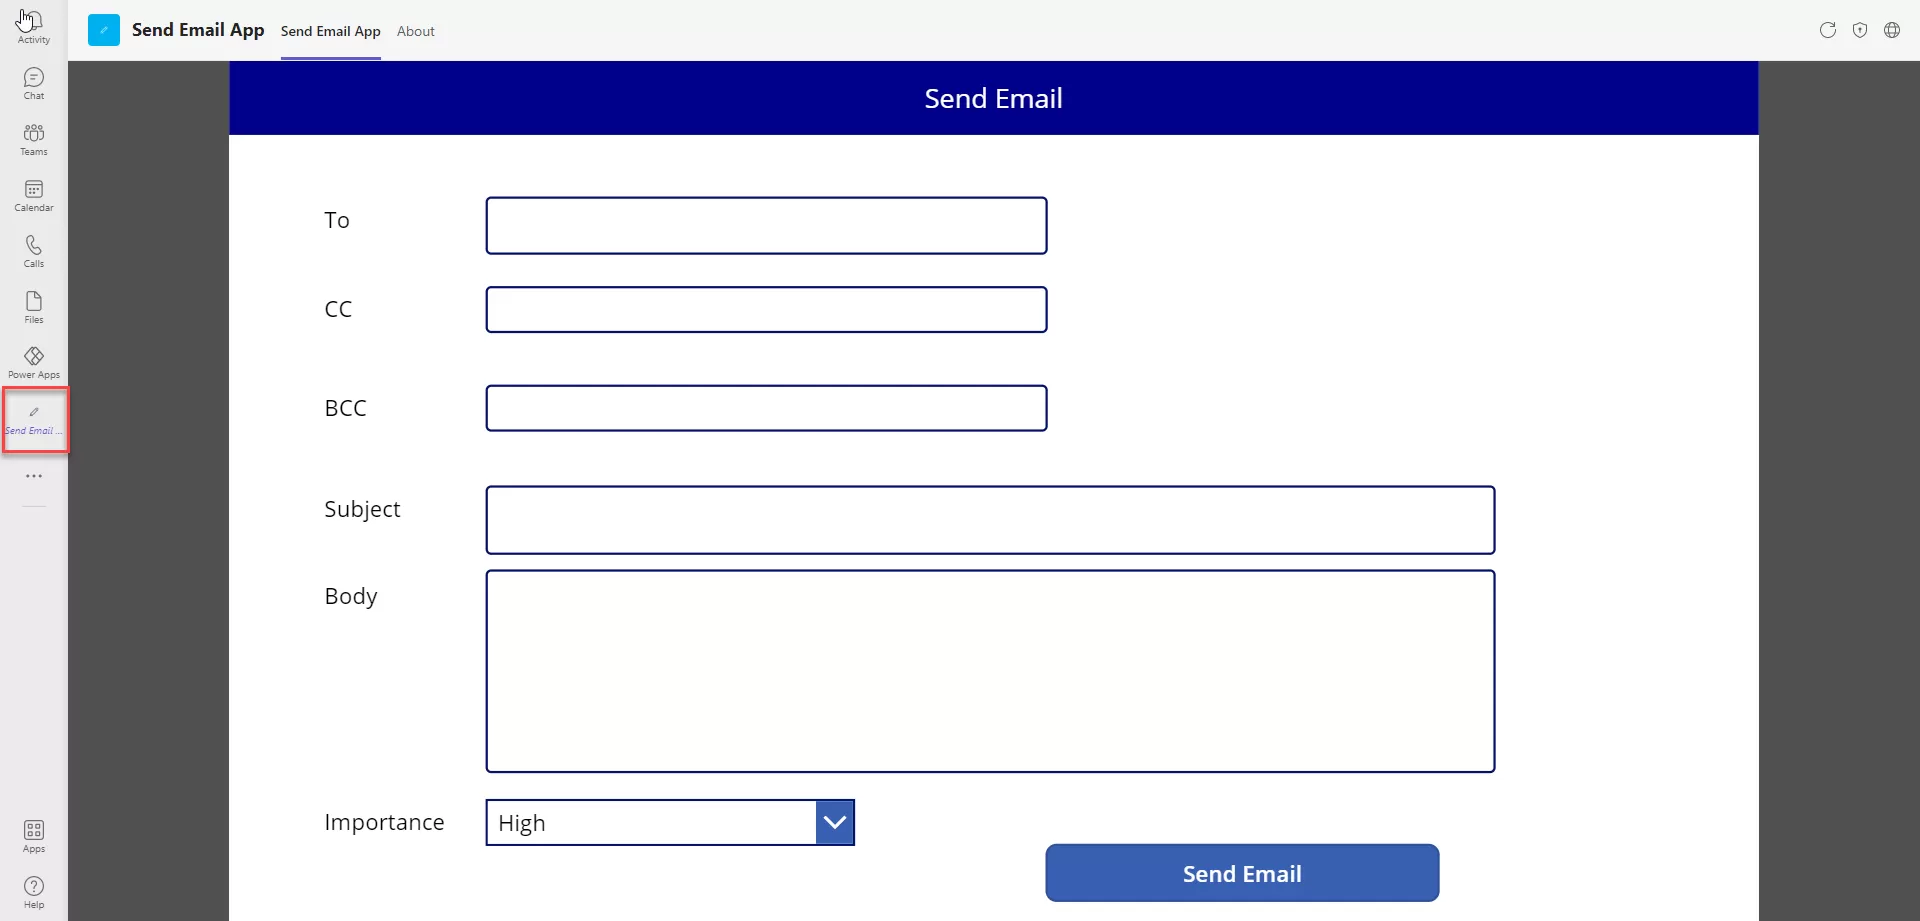
The app opens from the Teams app bar. 

img-05

Step-7

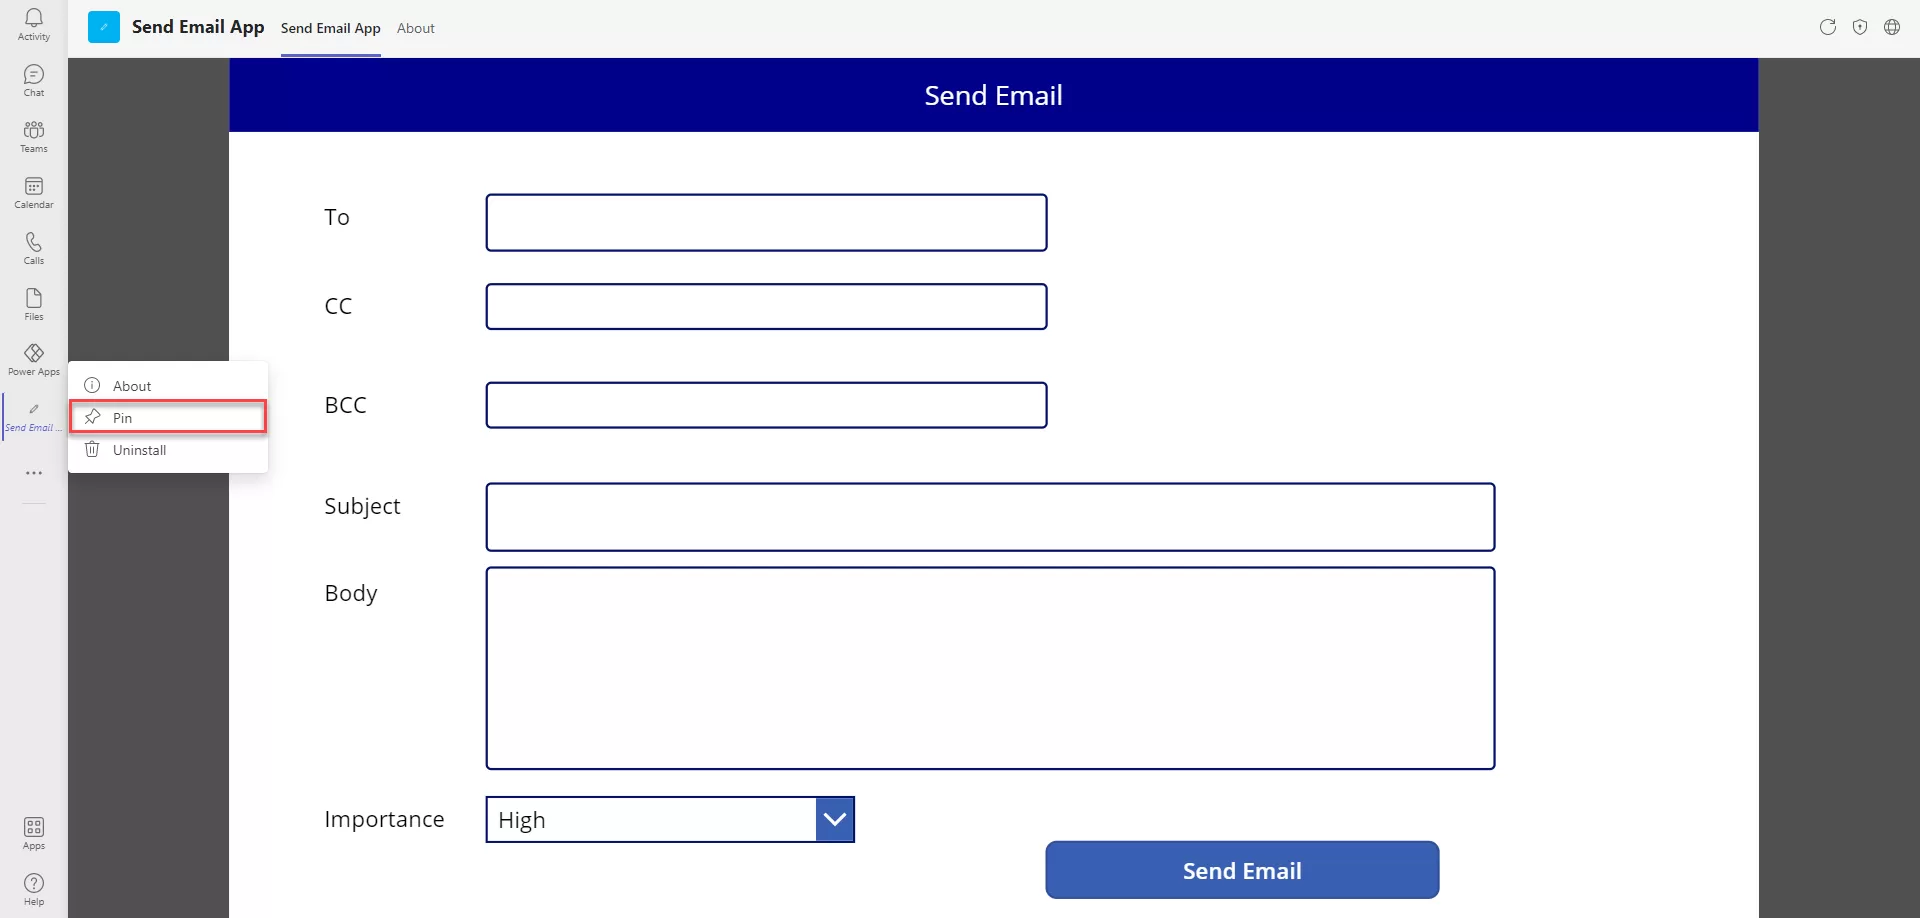
Right-click the app icon to pin it to stay.

img-06

Additional Read

SharePoint for Enterprise Content Management – Why Should Choose?

Please post your question, if you will find while implementing this process. Thank you.

Generate a PDF from Microsoft Automate Method – 1

Summary

Recently while working for one of the client’s requirements, in which they wanted to generate a PDF saved in SharePoint Document Library once the user submits a Form. The PDF had to be in a pre-defined format that they were using as Word Document.

This was achieved with 2 different approaches –

Generate a PDF of SharePoint List Data Through HTML Template from Microsoft Flow

In this approach we created a html of the document and upload as a Template, used the template in Flow to create html file in OneDrive and then converted the file to PDF and saving it in SharePoint Document Library.

Generate a PDF of SharePoint List Data with Word Template from Microsoft Flow

In this approach we used the predefined format as Template in SharePoint Document Library, then updated the file properties and created a template in OneDrive then converting that template to PDF and saving in SharePoint Library.

Part-1

Generate a PDF of SharePoint List Data Through HTML Template from Microsoft Flow.

Step-1

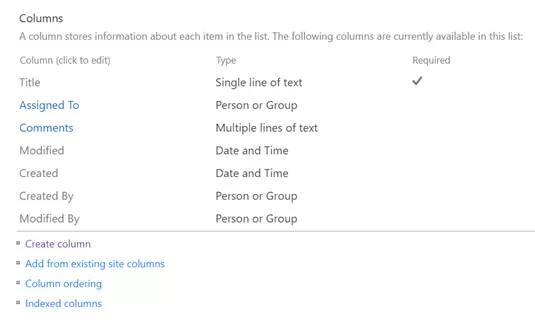
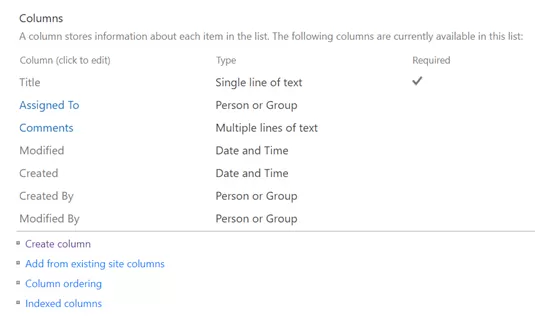
Create a SharePoint Custom List named Conversion-to-PDF-from-Flow with necessary fields to enter the data, required to move to predefined PDF Format. Here I have taken following fields  

img-01

Create another SharePoint Document Library with name Test-PDF-Documents to store the generated PDF’s. 

Please note, while creating multi-line columns, make sure the plain text is selected. 

Step-2

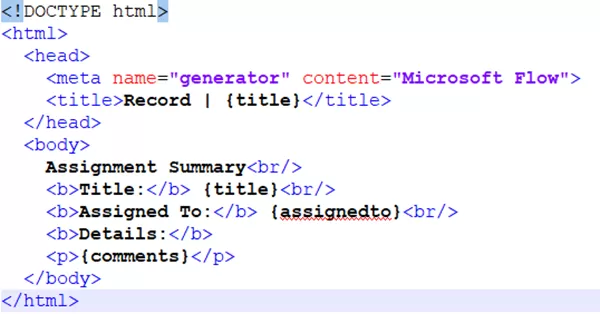
The HTML Template

Create a html format of the data you want, here is the format I used, the structure used here contains {tokens} that would be used in Flow compose actions to perform text replacements.  

img-02

This is a simple document, for creating more styled document, you can add CSS as per the requirements. 
Create a SharePoint Document Library named Templates to store the template in html format.

img-03

Step-3

Creating the Flow 

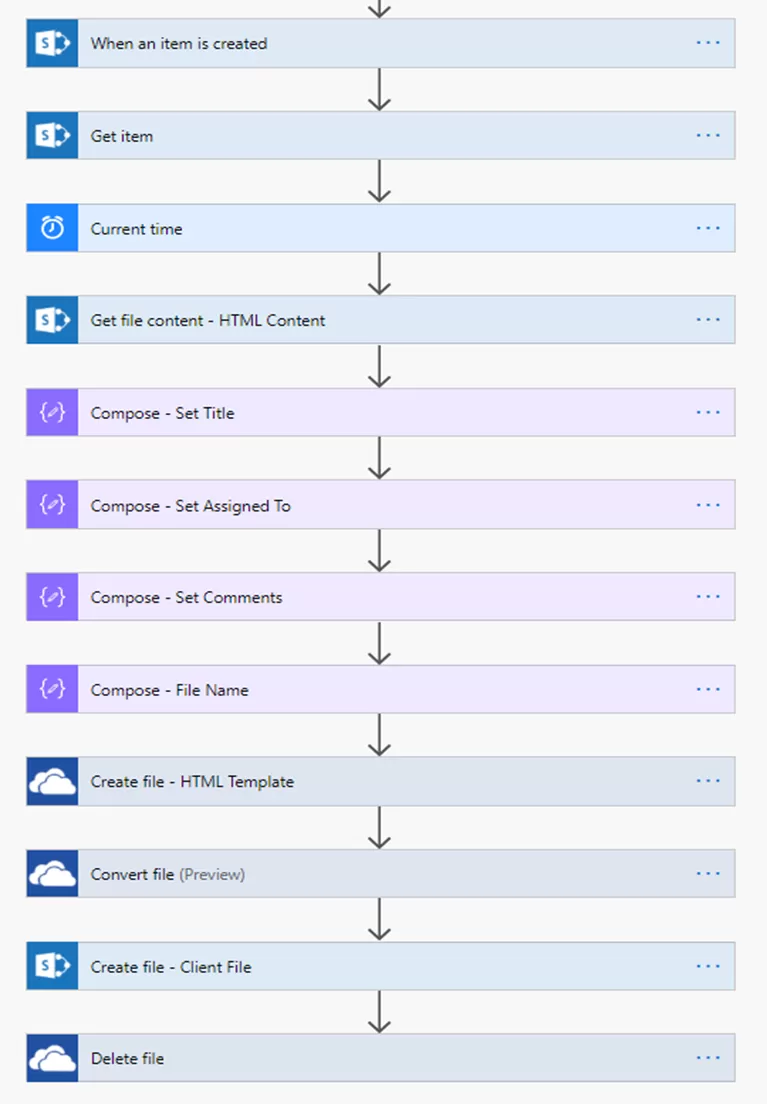
  • Create the flow with the trigger, when an item is created of SharePoint connector. Select the site collection address and List’s name. 

img-04

  • Click on + sign or next step, add Get Item action of SharePoint connector. Select the Site Collection address and List’s name and select ID parameter from Dynamic content window from When an item is created section. 

img-05

  • Add an action, Current time of Date Time connector. We would use the same in compose action while creating the file name.  

img-06

  • Add an action, Get File content of SharePoint connector. Select the Site collection address and the File Template, in this case I created a Library named Templates, and Template is the name of the template, we would be using  

img-07

  • Add an action Compose from Data Operations connector, in this action we would replace the token of template with the data from the list. The Expression we would use would be, replace. 

The expression would look something like this,

 @{replace(body(‘Get_file_content_-_HTML_Content’),'{title}’,body(‘Get_item’)[‘Title’])}

The title token, would be replaced by the Title that we would get from Get Items action.

img-08

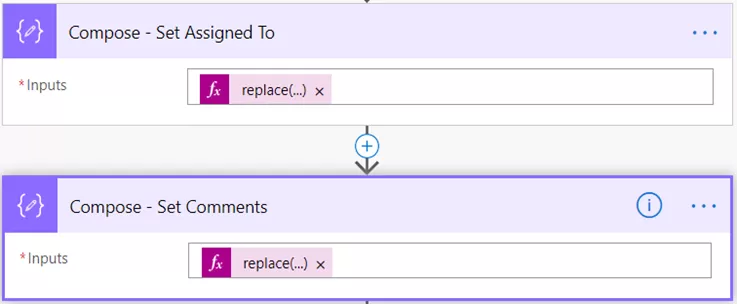
  • Similarly, we would add 2 compose actions to replace Assigned to and Comments section with the following expression respectively. 
        @{replace(outputs(‘Compose_-_Set_Title’),'{assignedto}’,body(‘Get_item’)? [‘AssignedTo’]?  [‘DisplayName’])}  
 
        @{replace(outputs(‘Compose_-_Set_Assigned_To’),'{comments}, body(‘Get_item’)? [‘Comments’])}

img-09

  • Add another Compose action to set the file name. We can set the name as we want, here I have taken Name from the SharePoint list and Current time to differentiate the files.  
img-10

  • Add an action, Create File of OneDrive for business connector. Select the Folder path, set the file name from the output of the File Name and add .html at its end, select the File Content from the output of action Compose- Set Comments 

img-11

  • Add an action, Convert File of OneDrive connector. Select the ID from the previous action of Create File  

img-12

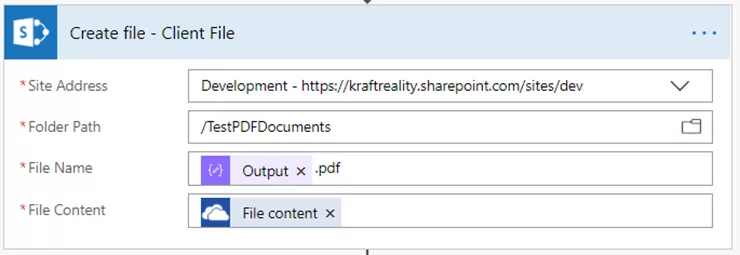
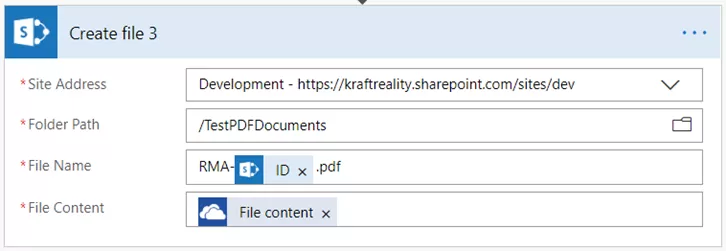
  • Add an action Create File of SharePoint connector. Select the Site collection address, select the Folder path as the Library where you would like to store the file, set the File Name as the output of action Compose- File Name and add .pdf at its end, set the File Content as the File Content from Dynamic Content of previous action Convert File 

img-13

  • Add an action to Delete the File created in OneDrive folder, Add Delete File of OneDrive for business connector. Select the ID as the ID that was used to create file from previous Create File action. Save the Flow. 

Additional Read

How to Migrate File Server to SharePoint Online [Expert Guide]


img-14

The final look of flow would be like this, 

img-15

Let’s enter data in our SharePoint Custom List Conversion to PDF from Flow,  

img-16

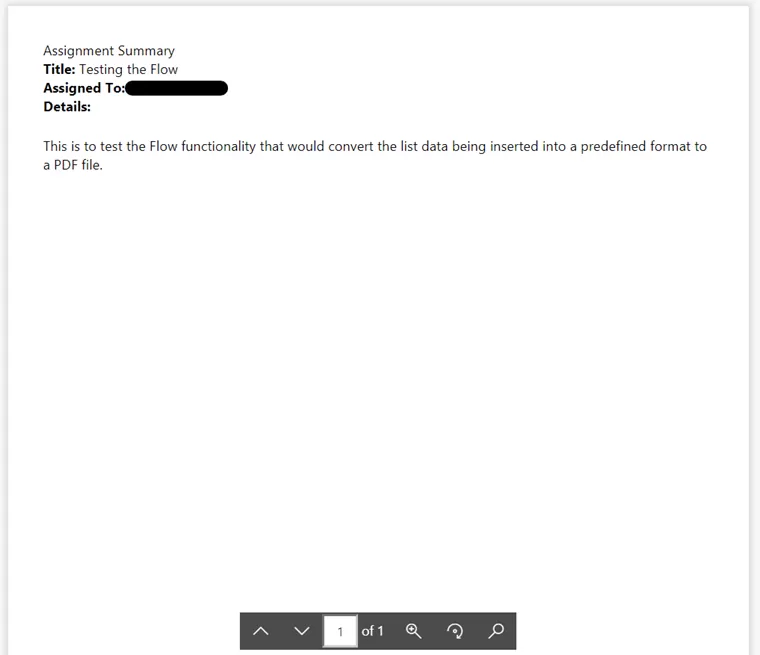
The document that would be created inside the Library after the Flow runs would come up as, 

img-17

The file content will come up like this, 

img-18

Are you in need of assistance? We can help!

Book a live 1-on-1 call with the experts of Reality Tech to find out how we will help you to achieve your goal. You’ll find our solutions robust, scalable, and dependable.

Let’s talk!

Please post your question, if you will find while implementing this process. Thank you.

Generate a PDF from Microsoft Automate Method – 2

Table of Contents

Summary

In previous blog, we discussed Generating the PDF from Microsoft Flow with two approaches. The First one with an HTML Template can be accessed from here –link—

Let’s start with the Second approach,

Part-2

Generate a PDF of SharePoint List Data with Word Template from Microsoft Flow

This is the second approach for generating the PDF from SharePoint List data that is using the predefined format as Template in SharePoint Document Library, then updated the file properties and created a template in OneDrive then converting that template to PDF and saving in SharePoint Document Library.
The approach is described below:

Step-1

Create a SharePoint Custom List named Conversion-to-PDF-from-Flow with necessary fields to enter the data, required to move to predefined PDF Format. Here I have taken the following fields.

img-01

Create another SharePoint Document Library with name Test-PDF-Documents to store the generated PDF’s. 

Please note, while creating multi-line columns, make sure that  plain text is selected. 

Step-2

The Word Template 

Create a SharePoint Document Library named Test-PDF-Doc-Template. Create the same data fields created in the SharePoint List – Conversion-to-PDF-from-Flow. 

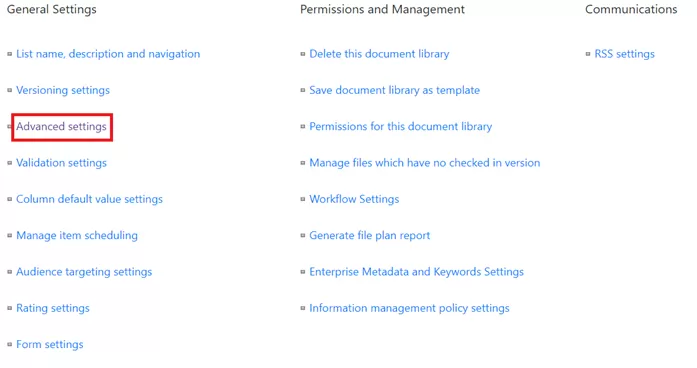
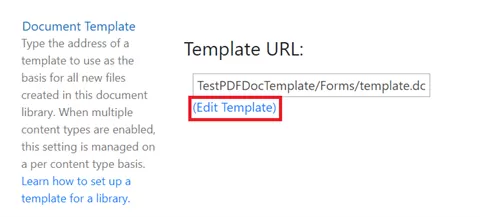
We would create a Document Template in the Library. We would also create the same data fields in the Library as we had created in the List named Conversion-to-PDF-from-Flow. Once we have created the same data fieldswe would go to Library Settings > go to Advanced Setting > Edit Template. 

img-02

img-03

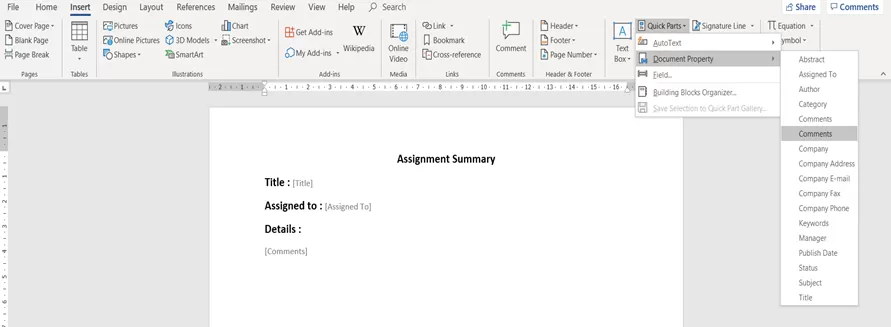
In previous approach, we used tokens. In this approach we would be using the Quick Parts from Insert tab. We can access or add them like Insert > Quick Parts > Document Property > Use the data column which would be used to replace the data inserted in it. 

img-04

One created the template would look like this, 

img-05

Once created, save it in .docx format.  

So the next time when you would try to edit the template it would have to be saved in .docx format. 

Step-3

Creating the Flow 

  • Create the Flow with trigger – When an item is created of SharePoint connector. Select the Site collection address and List’s name. 

img-06

  • Add an action – Get File Content of SharePoint connector. Select the Site collection address and the File from which the template would be taken and used to create the file.  

img-07

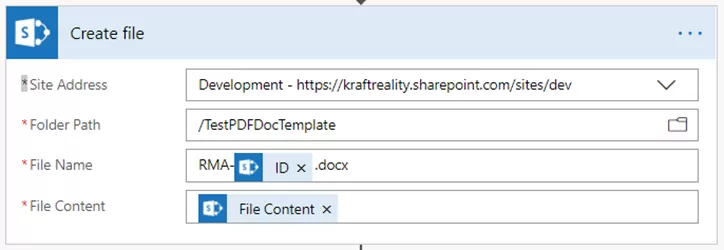
  • Add an action – Create File of SharePoint connector. Select the Site collection address, folder path to the template saved, Create a File name as required and select the file content from the dynamic content window from the previous action 

img-08

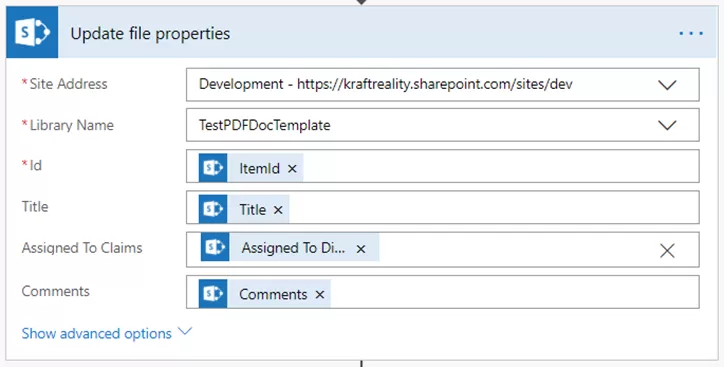
  • Add an action – Update File Properties, select the Site collection address, Library name, Select the ID as ItemID from previous action Create File action and select the data fields linked to each other. 

Additional Read

How to Migrate File Server to SharePoint Online [Expert Guide]

img-09

  • Add an action – Get File Content of SharePoint connector. Select the Site Collection address, and the file identifier, set the file identifier as file identifier from the previous action. 

img-10

  • Add an action – Create File for the OneDrive connector. Select the Folder path to save the file, name of the file and the file content as file content from previous action from dynamic content. 

img-11

  • Add an action – Convert File for the SharePoint connector. Select the File as ID from the precious action. 

img-12

  • Add an action – Create File for the SharePoint connector. Select the Site collection address, folder path to save the file, name of the file with an extension .pdf and file content as File Content from previous action of Convert File.  

img-13

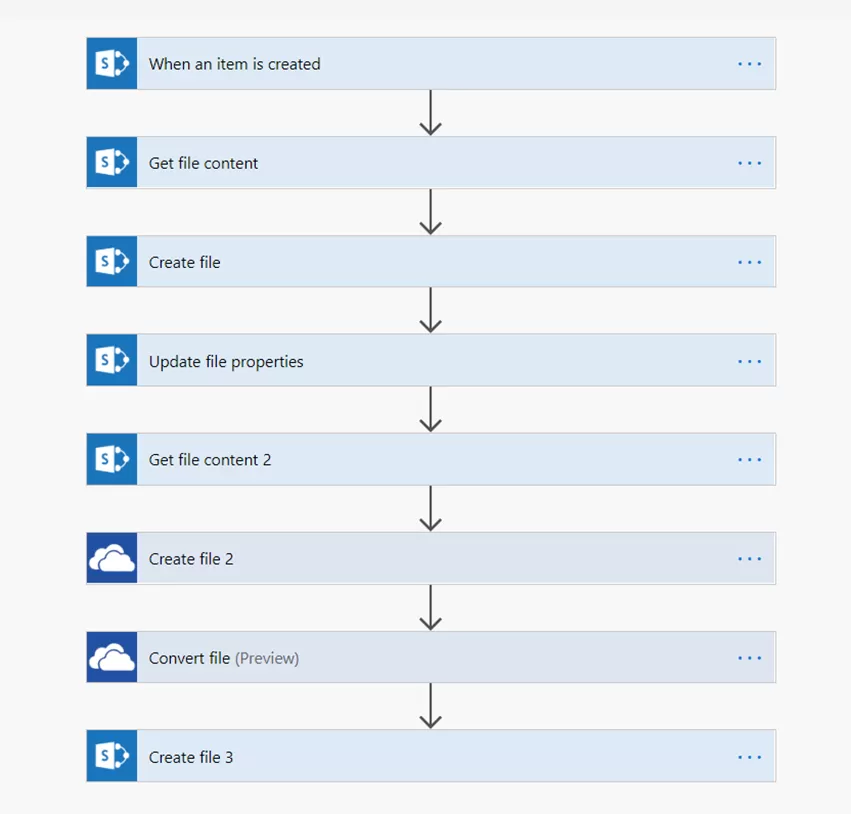
Once the Flow is created, it would look like this: 

img-14

Let’s enter data in our SharePoint Custom List Conversion to PDF from the Flow: 

img-15

The document that gets created in the Library named Test-PDF-Doc-Template while the Flow runs would appear like this: 

img-16

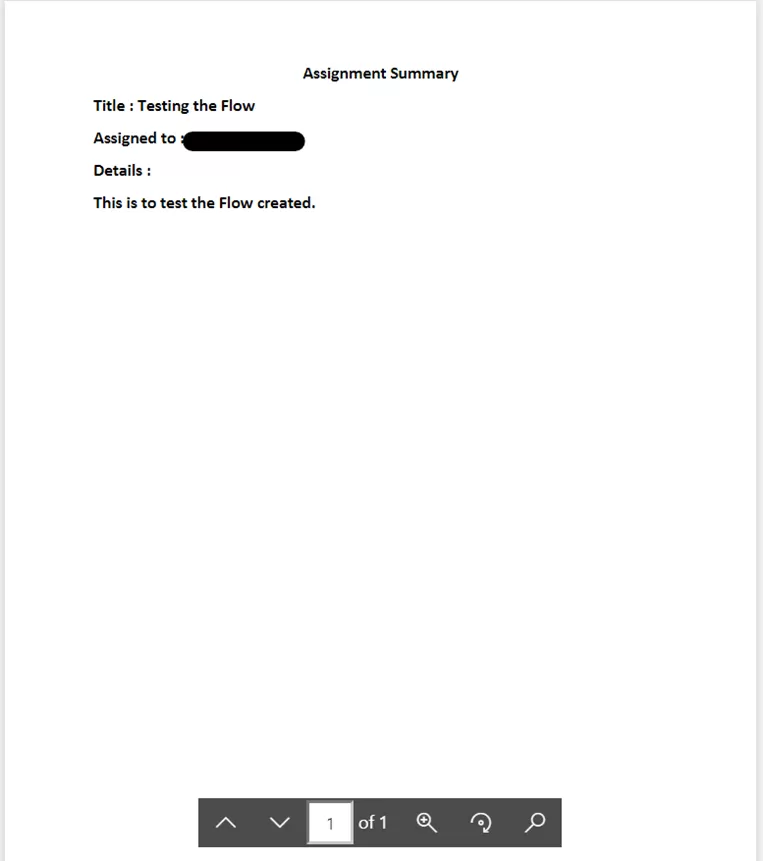
The document that would be created inside the Library Test-PDF-Documents after the Flow runs would appear as: 

img-17

The file content would look like this: 

img-18

Are you in need of assistance? We can help!

Book a live 1-on-1 call with the experts of Reality Tech to find out how we will help you to achieve your goal. You’ll find our solutions robust, scalable, and dependable. Let’s talk!

Please post your question, if you will find while implementing this process. Thank you.

How to Migrate File Server to SharePoint Online [Expert Guide]

Switching to SharePoint entails more than simply transferring all of your data to a cloud server: it’s a completely new browser-based environment linked to your company’s Microsoft 365 account.

While this offers many new features and capabilities, it also has an impact on every aspect of file use, and collaborative task and effort that relies on direct access to a network file.

Migrating to SharePoint Online may necessitate the utilization of a professional SharePoint online migration service provider.

As an end-user, you’ll most likely notice changes. The navigation system is designed differently because you’re accessing via the cloud, and load times are going to be somewhat impacted.

These variances are less likely to pose serious issues, but they’re still worth thinking about: Does a lag time of even 1-2 seconds have an effect on your workflow?

Before you migrate, you should consider all of these factors.

What is a File Server? (And What are the Drawbacks?)

SharePoint Online is a cloud-based file storage and collaboration platform that allows users to share, manage, and collaborate on documents in real time.

SharePoint Online differs from an on-premises file server in that it saves your files in the Microsoft cloud, whereas a file server normally stores them on your onsite network or in an offsite data center for enhanced protection.

Businesses have traditionally utilized on-premises file servers to allow employees to store and access data on a shared drive rather than on their own hard disks.

While this was a significant advancement in business technology at the time, there are various disadvantages to having a shared drive, including duplicate documents, limited metadata, no ability for end-users to adjust permissions, and a lack of search options.

As a result, a solution to boost both efficiency and productivity was required — Microsoft SharePoint.

Traditional file servers have gaps in collaboration; the files are frequently copied and duplicated, outdated versions are mistaken for the most recent rendition, and so on.

All of these things stymie teamwork; they produce communication snafus and can seriously jeopardize the efficiency of the company’s work processes, impacting the bottom line of key knowledge worker efficiency.

Additional Read

SharePoint for Enterprise Content Management – Why Should Choose?

It’s critical to plan your migration result by doing an assessment of your present source environment before you begin.

What you learn will have an impact on your entire strategy and timeline, including:

  • a) The mapping between source and target systems, as well as the architecture of the target environment.
  • b) The quantity of data you’re migrating. Determine if the material is outdated, redundant, or still relevant.

Make user onboarding a part of your initial planning. Inform your users about the move and how it will affect them as soon as possible.

Don’t put off preparing them for the change until go live.

How to Migrate from File Server to SharePoint Online?

Step 1: Do Your Homework First

Yes, there is an appeal to just pushing the Migrate button and informing your employer that you’ve done it, but one can’t migrate content without considering the information architecture, among other things.

We couldn’t possibly express all that needed to be accomplished in a single paragraph.

We have written a great deal about this in the past. At a high level, one must ensure that there is an understanding of how the envisioned SharePoint Information Architecture will function.

Lastly, the sites, document libraries, and metadata need to be realized and surfaced for end-user utilization.

Additional Read

Your Complete SharePoint Migration Guide (Step-By-Step)

Step 2: Select and Configure a Migration Tool

There is a range of commercial 3rd party tools available for content migration.

The selection of the appropriate tool depends on the content source, the volume of content, permissions needs, reporting needs, metadata tagging requirements, and budget.

For guidance in selecting the appropriate migration tool, consider consulting a reliable SharePoint development company like Reality Tech.

There is then the server sizing and configuration and license management of the migration tool.

 Step 3: Perform Your Test Migration

The initial test migration enables one to baseline throughput. With this information, the actual migration of these metrics is key and reflects both the existing network throughput as well as Office 365 SharePoint throughput.

The migration process should always begin with a test migration, as a sanity test on the network, latencies, tools, environment, configuration, throughput, and end-user experience.

The primary risk of the migration is Office 365 throttling.  This occurs in both reading from the source and writing to the destination.  To some extent, this can be optimized by extended efforts, especially during off-peak hours.

Additional Read

How to Activate SharePoint Publishing Infrastructure

Step 4: Plan the Migration

If the volume of content exceeds the throughput that can be migrated in a single weekend as determined during baseline migration testing, then migration in phases is recommended.

Migration in phases allows content map creation, which ensures that each team understands the content transformation as it migrates from the source file server to the new SharePoint environment.

The process of migrating a single group of content as a discrete phase is not only manageable but also reduces the limitations for larger migrations and reduces the number of users impacted on any given weekend cutover.

The following activities are part of the migration planning process:

A. Inventory

In order to migrate, we need to identify what will be migrated, and what will be left in place or archived and not migrated.

This leads then to the design of mapping, from source to proposed destination.

B. Long URL analysis

Efforts to the surface where long URLs may be an obstacle.  Approaches to remediate and address found instances.

These may include proposed hierarchy flattening, or shortening/renaming key folder nodes.

C. Orphan Accounts

Review of handling of accounts that are inactive. Disabled accounts are a known challenge for migration on tagging documents during migration.

This will require some discussion and review of options and setting expectations.

D. Exception Planning

Planning for an approach to handle exceptional situations is needed in advance. One aspect is simply planning for end-user coordination, as well as a general approach to handling with or without user involvement.

This covers topics such as:

  • Blocked File Extensions
  • Very Large Files

E. Site Architecture

Planning for a Site Collection approach, for the appropriate granularity in support of the migration in planned phases:

  • Site Collection granularity, in planning for long-term future growth
  • URL design
  • Site Template
  • Possible site hierarchy
  • Possible security consolidation and simplification
  • Navigation, and possible use of Hub site(s)

F. Project Planning

  • Migration planning, sequence, cut-over planning, and communication
  • Identification of critical path and optimized sequencing of efforts

G. Risk Management

Identification of key risks and mitigation activities

H. Estimation of Remaining Migration Stages

Refined estimation of effort and duration for migrating each department (LOB)

The changeover process in a SharePoint migration plan includes:

  • Stopping workflows that are identified for migration
  • Initial migration
  • Delta migrations
  • Changing the setting of the source to read-only

Are you in need of assistance? We can help!

Book a live 1-on-1 call with the experts of Reality Tech to find out how we will help you to achieve your goal.

Step 5: Initial Migration

The initial migration surfaces migration issues and related migration failures, that are successively addressed.

Once a successful initial migration is completed, changes are made at the source, and any remaining errors, are addressed in the delta migrations.

Typically a delta migration is done daily, up until the migration cutover.

The actual delta frequency is determined by the content sizing, and duration to both analyze the prior migration results and duration to execute the delta migration.

The bulk of the project duration will be on the migration of content.

The approach is to initially move the maximum amount of content, and only when close to cutover, do the final updates to the destination known as the “Delta” migration. This Delta is the final sync-up of content.

Step 6: Delta Migration

The final true-up of content is done and finalized and prepared for the transition.  This is done repeatedly leading up to the cutover.

Typically the delta is applied based on the date of the initial migration (or prior delta).

 Conclusion:

It is recommended but time-consuming to migrate from old-school file sharing to SharePoint. The majority of the work is in the analysis.

Migration is an opportunity to examine all of the content on your file shares in detail and make careful decisions on what to migrate, what to archive, and what to eliminate.

Speak with Professional SharePoint experts about archiving or removing outdated or duplicate material, restructuring for a more coherent organization of content, creating an information architecture in SharePoint, and utilizing all of SharePoint’s and Microsoft 365’s great new capabilities!

Why Migrate to SharePoint Online and Tips for Migration

SharePoint was first released as a portal and collaboration platform as SharePoint 2001.

It has gradually evolved to cover a broader range of content management and collaboration platforms into a document and records management enterprise environment.

SharePoint has grown into a world-class powerful collaboration and content management tool over time.

SharePoint is a safe way to store, organize, and share information that can be viewed from any device from a web browser.

A vast majority of companies have moved to or are considering moving to the cloud. Of course, the latest evolution of the SharePoint platform is the move to the cloud as part of Office 365.

SharePoint Online is more flexible and more fully adopted than the original on-premises versions. Consequently, Office 365 has become Microsoft’s fastest-growing commercial product.

What are the Benefits of SharePoint Online Migration?

1. Complete Access, Always

Employees will have easier access to their content once you migrate your files to SharePoint.

You can access your files on any mobile or personal computing device and from anywhere around the globe, whether at home, at work, or on your way to a meeting.

This is something that ordinary file sharing struggles to match.

2. Co-authoring

A key capability in SharePoint is the ability for multiple authorized users to concurrently edit documents. This enables much faster and interactive efforts and avoids sequential editing of critical documents.

3. Versioning

Every time a document is edited in SharePoint, a version is created. Users can view prior versions, compare versions and even roll back to prior versions.

This offers a safety net, enabling easier trust to end users, given the ability to review and roll back if needed.

Additionally, both minor and major versioning is available, allowing for the option of approval prior to publishing a major version.

Lastly, access for broader users can be restricted to major versions, thereby enabling draft editing in place, prior to making a version broadly available.

4. Alerts

Get notified when key documents are updated.  Notifications are done on your schedule.

You can choose monthly, weekly, daily or even in Real-Time.  Select the kind of updates, such as document creation, editing, or deletion.

Even add others to receive the notifications.  Get notified via email or mobile; the choice is yours.

5. Search Muscles

Perhaps one of the most important reasons to include file shares in your SharePoint online migration is search performance for finding files.

Search for a document name or keyword and get related results in milliseconds.  Search capabilities include filtering by time range, author, and even custom metadata.

Search is highly customizable, allowing for an extraordinary ability of users to find the specific document for which they are searching.

Search refiners that allow drill-in search and search verticals.

The possibility of integrated and consolidated search with emerging MS-Graph capabilities allows Windows Search and Bing Search to surface a consolidated and security-trimmed search experience, including both Internet and SharePoint online content.

6. Data Loss Prevention (DLP)

Policies can be set across Office 365 to manage and monitor for Data Loss Prevention (DLP).

This allows enterprise management of data to be following enterprise standards and provide solid assurance to avoid data loss.

7. Information Rights Management

The ability to restrict access, limit download, limit screenshots, limit printing, and retain control over documents even after a local download are possible.

These capabilities allow centralized license management of documents, allowing restricting or removing access, even if a document has left the enterprise.

8. Workflows

Automate the processes behind documents by enabling workflows that assign tasks to users, remind users and escalate in the associated tasks are delayed; collect feedback on documents and acquire approvals for a document.

9. Auditing

Edit, delete, create, and security change auditing and reporting are all available for enterprise tracking and compliance.

10. Check-in and check-out

Frequently, you’ll be working on files and papers with numerous co-workers.

Knowing who is working on the same document as you or who has to make a few last-minute adjustments before starting your assignment can be a pain.

You can check out a file in SharePoint so that no one else can access it, ensuring that everyone knows who has the most recent version of the document. This keeps you from sabotaging each other’s efforts.

11. Information Policy

Fine-grained tuning of an Information Policy is possible, including centralized enterprise definition, management and control of:

  • Document Retention Policy
  • Legal Holds
  • Document Disposition
  • Document lifecycle

The Information Policy can be refined in close coordination and input from Legal and Compliance.

The goal is to meet the organization’s objectives while designing an Information Policy that is both feasible and manageable.

12. No Waiting Time for New Features and Updates

Microsoft has a proactive communication approach for new features and upgrades.

Users of the Office 365 version have an advantage over those who use SharePoint on-premises to obtain early updates on new releases and upgrades.

13. Pay for What You Need and Scale-Up Easily

You can pay for only what you need with the Office 365 environment. You may add and delete members using the monthly subscription model as your company grows. Consider the case where a user leaves the firm.

You can either reassign or delete the license. The same scalability applies to Office 365 data storage, where you only pay for the storage, use what you need, and pay only for what you need, and quickly scale up with a few clicks.

14. Limit Your Maintenance Overhead

Backups, OS maintenance, SharePoint patching, and other duties are avoided while transitioning from SharePoint On-Premise to SharePoint Online.

Your IT personnel may devote their attention to long-overdue intranet updates or other critical activities.

Because there is no hardware to purchase, SharePoint Cloud helps you save money on internal resources.

15. Improvements to OneDrive For Business

OneDrive for business is a highly practical tool for storing and sharing data. A user may create a document in OneDrive for Business and simply share it with internal and external users to gain ideas, feedback, and expertise.

This is essentially your cloud “My Documents” folder. When a document is ready to publish, there’s a capability in OneDrive for Business that allows you to move/copy it to a SharePoint team site for wider distribution.

You can also sync files from your OneDrive for Business and SharePoint sites with the new “Sync client” function, and the new OneDrive app is mobile-friendly.

Are you in need of assistance? We can help!

We help companies upgrade their on-premises SharePoint environment to the very latest for features, performance, security, and scalability.

Tips for Migrating to SharePoint Online

➔    Assess the Business Value of Existing Content

Before you start moving large amounts of company data, ask yourself these three questions:

  • Is it necessary to migrate specific documents to SharePoint Online, or may it be archived at a cheaper cost?
  • Do these documents benefit the company?
  • Are there any libraries that need to be rearranged, sites that need to be changed, or access controls that need to be changed?  Remapping and reconciling is possible.
  • Can the security be simplified, optimized and be brought into alignment with existing Active Directory groups?

Making these decisions ahead of time will save time, lower IT expenses in the long run, and help your company achieve its business goals through good information management.

➔    Identify Potential Technical Issues

SharePoint 2010/2013 and SharePoint Online are somewhat different. However, basic architectural differences might make the transition from on-premise to cloud more difficult than anticipated.

Consider the following scenario:

  • SharePoint Online may have different storage and capacity constraints than SharePoint on-premises. Before migrating, do some research to see how this may affect your company and plan for organic growth and scalability.
  • It’s possible that custom code won’t work with SharePoint Online. Work with business teams to develop a plan for keeping business operations running smoothly without requiring customization, such as by utilizing Microsoft add-ins.
  • Check for file types that are not allowed in SharePoint and plan for this content on an exception basis.  Executables and scripts are among the problem file types.
  • Your SharePoint Online transfer will be faster if more bandwidth is available. However, the opposite is also true.  Consider baseline migration timings to be able to project the migration throughput.

➔    Explore enterprise migration tools

3rd party migration tools can streamline migration efforts, reporting, reconciliation, and migration from unusual source systems.

Get expert advice on the best tool for your needs and budget, and ensure your project efforts are optimized.

➔    Selecting the migration approach and mapping

In the summary view, we retrieve and generate an inventory and assign an action to each item or group of items.

We map out what goes to folders, libraries or sites and how to optimize the migration.

Migrations are then mapped into waves or phases that align with departments and sizing that’s feasible for individual cutover weekends.

➔    Planning to make the source read-only

Avoid users inadvertently editing documents in the source after migration to the destination by setting the source to read-only.

This should be in line with the communication plan.  This avoids an inadvertent challenge of later reconciling documents that are updated simultaneously in both the source and destination.

Additional Read

Best Tips for SharePoint Infrastructure Monitoring and Health Check

Create an Effective Communication Plan for Your SharePoint Migration

Your new SharePoint’s migration adoption might hit resistance from users if you don’t have a solid and well-built communication plan on what will migrate, how it will look after migration, and accommodate training needs that could be needed to ensure users are comfortable and aware of the impending change.

Communication is essential and may be built quickly. Constant communication of planned changes is crucial.

We can provide end-user training or train-the-trainer training while also demonstrating new SharePoint online features that add value to the end-user collaboration and document management experience.

A knowledgeable user will be more likely to tolerate minor flaws in the user experience in some circumstances, provided they understand the overall benefit.

Knowing when and how this change will affect their employment and having access to training offers a lot of value and helps you boost acceptance.

Conclusion:

A file-sharing migration to OneDrive and SharePoint is a demanding operation. Still, with proper planning, preparation, communication and consistent execution, you can accomplish a successful project that encourages users to embrace the new platforms.

Engage with Reality Tech to lead your migration to SharePoint or upgrade. Our skilled team will help with the best-in-class migration services.

How Financial Process Automation Can Help Your Business


Finance automation is leveraging technology to automate critical finance tasks with minimal human participation, including accounting, integration, general ledger, reporting, expense management, and bank reconciliation. Financial automation enables tasks to be completed faster and more accurately.

The financial services business is heavily reliant on processes. These process-based operations constitute the lifeblood of financial institutions, from loan approvals to pre-trade clearances, reporting, analysis, approvals, and workflow bottlenecks that can significantly impact operating costs and impact output. Enterprises are compelled to adopt as competitors and organizations worldwide leverage new technology to streamline, speed, and improve their processes.

Finance Automation Definition:

The use of technology to execute activities with little or no human involvement is known as finance automation. This allows for better use of knowledge workers, with greater efficiencies, without actually supplanting them. It simply refers to automation to perform time-consuming, repetitive manual chores. Finance automation’s main purpose is to increase process efficiency by decreasing or eliminating non-value-added repetitive procedures and activities. Finance departments may then more sharply focus on producing value and driving strategy by automating these repetitive processes.

Gartner Definition

“Finance automation technology integrates machine learning and artificial intelligence for use in areas such as financial analysis, payroll administration, invoice automation, collections action, and preparing financial statements. The use of such automated software reduces the need for human intervention in these activities.” 

How Financial Process Automation Helps Business Owners:

According to an EY analysis of how automation affects modern workplaces, automation benefits 80% of finance-related jobs, which is a higher proportion than for other industries studied. Financial functions, according to EY, are suitable for automation since they are rule-based and can be of higher volumes. In contrast, automation can only enhance 12% of activities when it comes to learning and development.

Financial process automation speeds up these common business processes:

  • Invoicing, including automated reminders for customers
  • Transaction processing
  • Approval management including heuristics
  • Accounts payable, such as paying invoices and handling approvals for expenses
  • Account reconciliation
  • Data capture and recording
  • Financial statement preparation
  • Employee expense reports
  • Expense management
  • Employee benefit management
  • Tax reporting and compliance

Automating these financial functions leads to:

  • Finance executives have more time to focus on efforts that require judgment and higher-level insights.
  • Every processing stage generates an automatic approval request, with forms distributed to each stakeholder in the correct sequence.
  • Data is sent instantly from one organization/department to another.
  • Forms that auto-populate with data from related databases.
  • More frequent periodic batch updates, leading to more real-time reporting

Key Processes in the Finance Function

The finance function consists of a range of procedures, that in aggregate directly influence the bottom line of the company. The following is a summary of an organization’s major financial process:

Budgeting: 

Finance reviews and approves each department’s budget. Aside from individual department budgets, the Finance department also develops a consolidated budget for the CFO’s approval. This procedure facilitates forecasting future activity using previous financial data.

Billing and Approval: 

Payments from customers and other organizations are aggregated and consolidated from approved expenditure requests. Manual request approvals may be one source of delays and manual efforts, leading to delays and process bottlenecks.

Accounts Payable: 

After the department heads and financial officials have approved invoices, payment is authorized and executed. If not automated, manual steps and approvals may introduce delays from these process bottlenecks.

Planning and Forecasting: 

Financial planning keeps budgets on track and balances cash flow and expenses against revenues. Future expenditures are forecasted using historical data collected from prior periods, in recurring planning cycles.

Bookkeeping and Financial close: 

In finance, accounting documents an organization’s financial transactions throughout a fiscal year. A final close of financial records is completed after the fiscal period. During the financial closing procedure, the accounts are consolidated and reconciled.

Auditing: 

Financial transactions and records are checked for compliance with the company guidelines and relevant laws during financial audits.

Data collection and reporting: 

All financial transaction data is kept on file. This information is published in reports based on corporate policy.

Are you in need of assistance? We can help!

Book a live 1-on-1 call with the experts of Reality Tech to find out how we will help you to achieve your goal.

What Are the Benefits of Finance Automation? 

Finance automation offers several benefits to businesses who implement it, including:

1. Cost savings

According to an Ernst & Young analysis, adding robotic process automation may save companies from 20% to 60% of their baseline FTE costs.

2. Error reduction

Reducing the amount of manual labor required automatically reduces the risk of human errors. Financial, regulatory, and even reputational penalties can result from such errors.

3. Employee Satisfaction

Employees may devote more time and attention to problem-solving and strategic efforts since they are spared the drudgery of manual and repetitive tasks, resulting in higher employee satisfaction and ultimately retention.

4. Scalability

Every day more data enters organizations, which can be daunting to manage how to fully leverage it for analysis and insights if the data remains distributed, disjointed, and manually consolidated. Financial automation and Business Intelligence can aggregate data from sources, standardize and format it, and consolidate it so you can get the most out of it.

5. Transparency

Before being deemed complete, financial processes frequently pass through several hands. The steps involved to surface this information can slow the process, leading to stale data in reports to executives and stakeholders who need data near real-time to manage financial oversight and to make informed decisions.

Users who have access to an enterprise software solution visualize the data flow, and surface patterns, and evaluate real-time financial information in an optimal format.

How to Implement Financial Process Automation:

Automating your accounting and finance standards can help you better run your firm, resulting in greater knowledge of your organization’s financial process automation and insights and eliminating points of friction.

Here’s how you can get started:

Map out your financial process:

Account for each step and stakeholder engaged in your financial operations, whether through a rigorous, company-wide critical eye at every stage of your financial processes or start top-down with one extended and expanded brainstorming session. Start building a flowchart to document how financial data is collected and reported, and then identify the most compelling steps that can be automated.

Tie automation to business objectives:

Although it would be ideal to automate every financial operation simultaneously, this may not be feasible. Instead, prioritize your most important demands while implementing automation in phases. If your company is challenged by monthly financial form deadlines, start by transforming those responsibilities and guiding your staff through the refinements.

Find an automation solution for your business:

Automation may be made simple with the correct software solution. Reality-Tech provides a range of options. For example, Reality-Tech offers a variety of business intelligence solutions, workflows, finance templates, and automation, including program management, budgets, and reporting, to help you get started with financial process automation.

Workflows can serve as the foundation for some financial operations, which can be automated. This automation can consolidate, capture, document, and report, and streamline many financial approval processes that keep stakeholders and workers informed and accountable for approvals.

Financial process automation enhances your company’s money management. You won’t have to raise a finger if things operate smoothly in the background.

A future with financial automation:

Although AI and machine-learning algorithms are still in their infancy, they are available and offer benefits today. New opportunities continually emerge due to the exponential expansion of structured data fueled by enterprise resource planning (ERP) systems and the lowering cost of computer power and the increased ability of AI, and machine learning on top of Business Intelligence solutions.

Additional Read

Why You Should Use SharePoint for Document Management System

Conclusion:

Financial automation has a bright future ahead of it, and it is already reshaping how financial processing is done within enterprises in both large and small businesses. Automation might appear overwhelming since numerous activities, and organizational adjustments go into deploying new technology and procedures.  Low-hanging fruit is available for organizations that are looking to streamline and optimize financial processes.

Reality-Tech is a pioneer in Financial Workflow Automation Solutions.