How to Set Up SharePoint Document Management – The Step-By-Step Guide!

Managing a large volume of documents in an enterprise can be time-consuming, labor-intensive, and error-prone.  For document management to be viable, all documents must be easily and quickly accessible, as well as findable.

Every organization requires a strong system to keep its documentation safe and organized in a way that allows participants to quickly find them and work on them as needed in a collaborative fashion. For storing, maintaining, and sharing files, SharePoint is an excellent tool and framework for end-to-end enterprise-class document management.

The digitalization of the document lifecycle from formation to archiving by the SharePoint document management system can dramatically boost worker productivity and lower operating costs significantly.

This article will cover a variety of topics, including what SharePoint is relative to document management, how to create a SharePoint document management system, why you should use it, and much more. Let’s look further.

What is the SharePoint Document Management solution?

SharePoint serves more purposes than just storing documents. It is an effective tool for managing data and collaborating across calendars, tasks, lists, intranet pages, and more in a secure and accessible manner. SharePoint can be utilized as a system for managing data and resolving collaborative challenges in conventional data sharing.

Finding a document stored on a traditional Windows share on a file server with a lot of files can take time and effort.  File shares tend to grow organically, gathering in size as inactive areas grow over time, leading to an overgrown unmanageable set of endless nested folders that are daunting for new users to navigate.

For the fourth time in a row, SharePoint is positioned as a Leader in Gartner’s Magic Quadrant for Content Services Systems in 2020. More than 850,000 large and medium-sized organizations are currently using SharePoint as a document management tool.

If you want your SharePoint environment to be flexible enough to accommodate the expansion of your business, you should configure it carefully to allow the growth of documents, sites, and libraries without overloading areas beyond best practice metrics.

You should take into account a variety of factors, including the proper organization of sites, lists, and library resources, the development of your types of content (Content Types), the use of folders, privileges, workflows, search, retention, document disposition, metadata, and more. That is why it is critical to create a scalable, extensible and adaptable SharePoint Document Management system centered on a consistent Information Architecture designed around your business.

Additional Read

Mirroring SharePoint Document Library Contents to Multiple Sites

1. Checking out the types of Document Management systems.

Choose the different documents you want to keep in your SharePoint DMS. It is not a good idea to consolidate all of your company’s files into a single SharePoint Document Library. SharePoint DMS’s main goal is to group slightly related records with the same security controls.  There are significant limits on library size.  A common error is to overload a single library, eventually resulting in both poor performance and sporadic errors.

You should avoid storing documents from different departments in the same document library or DMS without forethought because they will have specific demographics, audiences with other permissions, and varying levels of security.

Instead, you should divide the libraries up into sites, subsites, and libraries.

2. Design metadata for each of the types of categories

In SharePoint, we use metadata to make it more navigable, searchable, effective, and accessible, in contrast to the conventional configuration of folders and sub-folders that consume enormous memory but still don’t keep it all organized as expected.  In reality, it’s a combination of folders and metadata that allows the end user experience to shine.

Folders can be configured to allow for location-based tagging, so the best of both worlds (folders and metadata) can be provided at the same time and with the same user underlying activities.

In addition to a file’s information is its metadata. If you have a lot of content on your SharePoint site, use metadata to categorize the documents, facilitate quick searches, and speed up navigation. File categories can each have their own specific metadata properties.  There’s no real limit to the amount of metadata, but we want to be judicious in the selection, so the metadata serves specific end-user purposes, and is manageable.

So, this is how we configure SharePoint to use metadata. Thus, keyword searches produce the most precise results.

There’s a vast set of metadata types available, from text, lookups, numbers, and currency, to centralized multi-level and multi-lingual enterprise taxonomies.

3. Generate columns for different metadata!

Each metadata field can be separately defined using the Describe the type of that column for every metadata property.

Although it is always considered a recommended practice to generate columns at the site level, you can also generate your column at the library level. You can repurpose your columns on other websites and library resources in this way. Go off to Site Gear Icon > Site Setups > Site Columns (under Web Designer Galleries) > Create to develop columns.

4. Content Type Syndication Hub

The best practice of all is to generate metadata centrally and publish it across the enterprise.  We can configure this for your company, allowing for metadata definitions to be published and propagated across all site collections in the enterprise.  This applies to any metadata, and not simply just managed metadata taxonomies.

Additional Read

Creating A Custom Site Template in SharePoint Online

5. Develop Content Types

As was already mentioned, metadata aids in the organization of content in content libraries and on SharePoint sites. For example, column groups designated for specific types of content can be grouped into something known as a Content-Type. This carries additional information, such as document retention, and disposition policies carrying the full prescriptive lifecycle for associated documents.  Once applied to a library, once you publish a document to a SharePoint library, you can choose the metadata; if there are multiple Content Types in a library, that can be selected, which drives which fields are available and required for a given document.

6. Create custom content types groups

To make management easier, assign your personalized types of content to new meaningful groups. For instance, you can categorize types of content by departments like HR, finance, IT projects, and others.

In order to make sure that the custom content type groups are at the top of the list of site types of content, groups are set up so that they can be arranged alphabetically.

Generate all of your personalized content types based on the pre-built SharePoint content types. It will enable you to update SharePoint in the future without losing personalization.

The recommended approach is to use a multi-level parent-child hierarchy because it enables you to repurpose content types and build out additional granular content types that each inherit all fields and properties from the parents.  There’s no limit to the depth of hierarchy for Content Types.

Are you in need of assistance? We can help!

Book a live 1-on-1 call with the experts of Reality Tech to find out how we will help you to achieve your goal.

7. Add up custom columns to the document directory.

You should now update the library with new custom content types.  This can be done manually, or programmatically across a vast number of libraries using automation, including PowerShell.

  •   To get started, return to the settings page for the library.
  •   On the page’s bottom, click add different types of content from the actual site.
  •   Pick the content types you’ve generated from the lineup on the left side of the web interface and press the Add > button. To save your changes, press OK.

8. Enable Metadata navigation

We have nearly finished with our SharePoint DMS; however, metadata navigation and filtration are unavailable by default and may be enabled manually.  This enables more features to be surfaced for end-users that allow navigation within the library, using a pure metadata approach.

Click Manage site features in the Site Actions segment of the site settings.

9. Locate Metadata Navigation and Filtration on this site, then click Activation process.

This option displays a brief comment, and for SharePoint document management, you should enable metadata browsing and filtration.

  •   Visit the library configurations
  •   Navigate to Metadata settings by clicking.
  •   In the left list, choose the necessary hierarchy fields, then click Add.
  •   Configure fully automated column indexing and click OK to save changes if necessary.

Additional Read

SharePoint for Enterprise Content Management – Why Should Choose?

Features Of SharePoint Document Management System

 1Metadata

SharePoint offers comprehensive details on a file’s current status, including the date the file was created, and modified, who made the alteration, whether the most recent modification was accepted or not, version number, and more. Every business stockholder who has direct exposure to the file benefits from having such a thorough understanding of the document’s status and history.

 2Seamless workflow management

SharePoint supports multiple workflows in an organization. As a result, handling documents for your staff is simple because the document end environment effectively handles the workflow itself. They only need to apply predetermined processes or process tasks assigned to them.

Your company could have many different categories and types of documents, such as contracts, tasks, documents, and more. You can organize these materials in a hierarchy in SharePoint based on your needs.

3. Sophisticated coauthoring

Your SharePoint document management system can acquire some impressive features from the Fluid Framework, making the process quick and easy to manage.

The second benefit is that it offers a componentized document model, allowing the author to divide the content into smaller pieces that can be used as building blocks for other documents, new applications, or projects. As a result, it greatly simplifies data selection throughout your organization.

Thirdly, Microsoft offers intelligent agents that can fetch text for you, translate paperwork, cross-check compliance requirements, and perform other tasks if you are addressing customers in different countries. It will be accessible through Outlook and Teams as well as the entire Microsoft 365 suite.

Additional Read

Best Tips for SharePoint Infrastructure Monitoring and Health Check

4. Convenient Integration

Any of Microsoft’s currently available apps can be integrated with SharePoint using PowerAutomate, creating opportunities for more effective collaboration. For ease and convenience, this compatibility is also available on a variety of devices, including mobile ones. SharePoint is also very adaptable, making it simple to alter or remove specific features to meet the needs of your business.

5. End-to-End security

Your data is securely stored by SharePoint. SharePoint automatically saves different iterations of your document information. For instance, you can access a previous version of a document that has since been updated. If a mistake needs to be fixed, this is a great solution for end-user self-service. More restrictions on use allow you to control who sees potentially confidential documents.  Azure Information Rights Management provides an even more robust and fine-grained security control, including the ability to print and restrict access to documents for which rights are later revoked.

Conclusion

The ideal document management system strengthens your powerful arsenal and makes your working teams more effective. However, the discussion above demonstrates why SharePoint is a great option, yet needs carefully considered configuration to bring out the very best for your enterprise.

We hope this blog has helped you learn more about SharePoint document management, including its notable characteristics and step-by-step setup guides.

Feel free to reach out to our knowledgeable staff if you are still unsure about setup, configuration, and best practices. Contact us now, we would be happy to help you.

How Enterprise Web Application Development Benefits Your Business

A set of web pages with a single domain name representing your business is one way to define a business website. The website provides you with an online presence and helps you reach a larger audience. Corporate websites differ from traditional websites in that they require a variety of features and tools to build and own a unique content management system, which we call enterprise content management (ECM).

The company’s web application sets the stage for digital transformation and assists you in meeting the new business demands of today’s digital environment. It’s apps that help you manage your company’s internal and external demands and activities are known as enterprise web applications. It is worth noting that an enterprise web application might be confined to internal use, such as intranets, and inter-departmental communication, or it can provide a wide variety of external services, such as customer relationship management (CRM).

Why You Need Enterprise Web Application


For large enterprises, enterprise web application or software development is often necessary to achieve the precisely desired functionality, enhance productivity and create the desired business functionality. Enterprise web apps are in demand, whether for internal usage or the benefit of consumers.

Because it must interface with current enterprise applications and be deployed on the internet, intranet, or corporate networks while satisfying high-security standards, such software and its integrations can be complex.

Enterprise-level web apps that are successful and effective automate regular activities and/or deliver demonstrable value to the end-user. Let’s explore some of the additional advantages these solutions offer and some of the distinguishing qualities of business web development.

Are you in need of assistance? We can help!

Book a live 1-on-1 call with the experts of Reality Tech to find out how we will help you to achieve your goal.


Enterprise Web Application Development Features That Benefit Your Business:


1. Increased Productivity:

The primary foundation of effective remote work is a reliable connection and a well-coordinated workflow. Enterprise web services provide communication across divisions and between internal and external activities. Additionally, your staff may require access to sensitive company data while offline, which represents a delicate tradeoff of seamless access with security controls.

2. Reduced Technical Complexity:

A growing percentage of high-level businesses find it difficult to adapt to new technology, given the pace of new technology solutions, staff aptitude, and resistance to change. Ready-made solutions can fail to meet contemporary company demands due to a lack of training and system incompatibility. Enterprise web apps can solve these problems by combining the features of numerous different programs into a single, user-friendly interface.

3. Reduced Costs:

Businesses place a high priority on cost-effectiveness. A business app is designed to automate repetitive activities and save money on operations. Web applications also run on a single operating system and server, making them more integrated, seamless, and accessible to a broader range of consumers.

4. Improved Marketing:

Enterprises can make the most out of web apps by formulating productive marketing strategies like websites. You can promote your products and services. New customers can more easily discover your company’s services.  Companies that develop web applications to achieve organizational goals have a competitive advantage.

5. Easy Interfacing and Integration:

A web app is developed to interface and integrate with an enterprise’s existing application or systems. It ensures high interoperability between people, systems, and devices.

6. Great Performance:

It is needless to say that the Performance of an enterprise web app/software has to be exceptional. A large-scale enterprise cannot afford the downtime that halts business processes. A web app can only offer organizational profits and higher ROI through great Performance and scalability.

7. Custom Functionality:

The creation of an enterprise web application or software has at its essential objective, to increase Productivity and business functionality. A well-designed web app or software serves as a tool or solution that enables firms to establish strong and efficient techniques and processes.

8. Flexibility:

Employees may access and communicate business information from anywhere, making it simple for employees to travel or work from home to work uninterrupted and even taking care of urgent business to guarantee timely execution.

9. Data Security:

All company and customer data are kept private since web apps are installed and hosted on secure and dedicated servers that security professionals manage.

The Right Web Application Framework:

Frameworks have become a crucial aspect of web development as the complexity of the technology required for online applications continues to rise. As a result, developing complex and interactive online apps with frameworks backed by thousands of developers across the world is a crucial and significant strategy that requires serious investment. It would be suboptimal to recreate the wheel for such advanced capabilities, without exploring cost-effective framework options.

The five frameworks you should consider are:

  • Angular
  • React
  • Vue
  • Ember
  • Svelte

 The Suitable Web Application Lifecycle Model and Process:

The web app lifetime model is another important consideration in business web development. It’s a step-by-step procedure for developing software, and each model has its approach to development, testing, and deployment. For example, today’s business software engineers want to use an agile methodology. Web app development is taken care of once you’ve chosen the proper model and have your tech stack in place.

Additional Read

SharePoint for Enterprise Content Management – Why Should Choose?


Conclusion: 

Businesses worldwide are gaining confidence in their ability to use a third-party organization that specializes in producing clever, high-performing, and intuitive apps. Many software products are marketed as corporate software but don’t get caught on the treadmill of customizing off-the-shelf software that can restrict upgrades. Contact the enterprise application developmentexperts now to avail free consultation.

Migration From SharePoint 2013 to SharePoint Online – Best Practice

Microsoft SharePoint has been the best collaborative and content management solution for literally decades. When Microsoft released SharePoint Server 2013, it had several breakthrough features still in use today, such as connection with OneDrive for Business, the launch of Community Forums, and microblogging features.

Like other perpetual license software providers, Microsoft will cease long-term support for Microsoft SharePoint customers in April 2023. While upgrading to the most recent SharePoint Server 2019 is conceivable, there is no direct path to migration from SharePoint 2013. SharePoint migration is the process of migrating all of the content from the current file server or SharePoint to a new and existing environment.  In this article, let us look at the advantages of migration from SharePoint 2013 to SharePoint Online.

Why Migrate from SharePoint 2013 to SharePoint Online?

Migration from SharePoint 2013 to SharePoint Online provides you with many advantages, which are listed below:


  •   SharePoint Online has no “End of Support,” typically at most ten years in the case of Microsoft SharePoint Servers with everlasting subscriptions.
  •   Site proliferation can be better managed, saving engineering time and money while boosting security and technical adaptability.
  •   It is constantly updated, so the user would not have to wait for new features or security updates.
  •   Microsoft manages it, so administrators rely less on it for infrastructure and updates.
  •   It consolidates sites and content into a single Office 365 tenancy, reducing the number of different farms.
  •   Avoid the licenses and expense of maintaining on-premises servers and software.
  •   Server, site, and disaster recovery are built-in and inherent to the Microsoft cloud.

Are you in need of assistance? We can help!

Book a live 1-on-1 call with the experts of Reality Tech to find out how we will help you to achieve your goal.

What Is the Procedure for Migrating from SharePoint 2013 to SharePoint Online?

The migration from SharePoint 2013 Server to SharePoint Online goes through the two-step procedure: planning of migration and execution of migration. The two-step procedure is described in brief as below:

Planning of migration from SharePoint 2013 Server to SharePoint Online

The migration from SharePoint 2013 to SharePoint Online begins with an audit of the current sites and portals. Their number and nature would determine the migration strategy, which may range from simply shifting sites and portals to starting fresh in the cloud. We refer to this as mapping.

After identifying the sites to be moved from SharePoint 2013 to SharePoint Online, the second step is to evaluate governance before migrating the sites. It includes determining how much authority different stakeholders have over the transfer and accessibility, matching on-premises provided based on the cloud, and developing policies for utilizing Microsoft SharePoint in the cloud. Following the establishment of the governance plan, enterprises must determine where they must migrate all the workloads to the cloud.

Executing Migration from SharePoint 2013 Server to SharePoint online

The execution of migration from SharePoint 2013 Server to SharePoint online should go through a process as described below:

  •   Rather than moving outdated SharePoint 2013 sites, build new sites with the correct template, corresponding to how they would be used in SharePoint Online.
  •   Permissions are reviewed, simplified, or flattened where possible and configured in the destination.
  •   The on-premises SharePoint 2013 taxonomy and metadata structures are consolidated where possible and replicated in SharePoint Online.
  •   Root site information is consolidated and updated with SharePoint Online content.
  •   Where sensible, site collections are grouped into Hub(s) for common theme and navigation.

Additional Read

SharePoint for Enterprise Content Management – Why Should Choose?

Key Features of SharePoint Migration Tool

  • The SharePoint Migration Tool allows you to effortlessly transfer data from Microsoft SharePoint on-premises documents library or your on-premises file shares to SharePoint or OneDrive in Office 365.
  • The utility will run automatically and will not affect the production environment.
  • The tool will take about two days to scan your area. The utility will report progress in the terminal window throughout this time. When the scan is finished, you can find the result files under the Logs directory.
  • Provide a valuable report for existing and finished migrations and task reports to assist in identifying and resolving any issues that may have arisen during the transfer process.
  • It has a very user-friendly interface.
  • It enables batch transfer from the Share folder, SharePoint on-premises, and CSV files.
  • It supports small-scale migrations as well as large-scale migrations.

Post Migration and Pre-Launch Activities

Complex processes, workflows, integrations, and workloads, such as dashboards and ETL for Business Intelligence, must be re-linked just after content is migrated. Review the necessary endpoints, prerequisites, and permissions before utilizing SPMT. You must join Microsoft 365 as a Global or SharePoint admin to migrate at the organizational level. You must be the site administrator for that site collection to transition to the traditional project level. Both SharePoint and file share migrations do not support proxy connections. HTTP connections would fail if Web Browser proxy is configured since SPMT by default does not use system proxy credentials.

You might see problems like “SharePoint login failed” or “can’t load document library,” for instance. You can, however, change the SPMT app’s configuration file so that it uses the system proxy settings. The source SharePoint 2013 and target SharePoint Online environments must be cross-referenced to determine whether the migration was successful.  Scripts may need to be built for specific operations, such as establishing and creating new sites from a request in a Microsoft SharePoint list.

Furthermore, Officials must watch changes in office 365 and SharePoint regularly to determine the impact on the SharePoint 2013 to SharePoint Online migration, mainly if it is a lengthy process. Microsoft has also created a simple command-line tool called “SharePoint Migration Assessment Tool (SMAT)” that will analyse the content of your Microsoft SharePoint to assist identify any issues with data that you plan to migrate to SharePoint Online.

Additional Read

Your Complete SharePoint Migration Guide (Step-By-Step)

Conclusion

You are strongly advised to move the Microsoft SharePoint Server 2013 to SharePoint Online before the support period expires. Many people who are still using SharePoint 2010 can use the same way to migrate from SharePoint 2010 to SharePoint Online.

Most organizations must examine a wide range of factors related to the wider Office 365/ Microsoft 365 ecosystem while moving from SharePoint 2013, because, while technically viable, SharePoint 2013 would not generally be transferred to SharePoint Online on its own.

SharePoint Migrator Tool is a professional migrator tool that can move an unlimited amount of domains, site collections, versions, workflow, metadata, list/libraries, and other items between two SharePoint accounts.

Mirroring SharePoint Document Library Contents to Multiple Sites

We had a use case where one of our clients had two different SharePoint sites. One SharePoint site was where team members create and modify content.

Another SharePoint site was used by the CEO where team members manually update the finalized content from their site since the CEO wants to only see finalized content.

This allowed for final published content aggregation for review by the CEO in one location.

This way the CEO did not need to go across multiple sites, allowing for a single location for making business decisions easily.

It is quite a tedious process to manually replicate and update content on the CEO’s site in real time. Our client was looking for a way to automate the whole process.

One option is to create a Power Automate workflow on a document library of the source site which will sync the data to the destination-defined document library.

This will work perfectly fine for one source document library. However, challenges will appear when we want to implement the same solution for more than one source document library.

It is not scalable or recommended to create a Power Automate workflow every time we create a new document library on multiple sites, so this approach would not easily be scalable.

There is no out-of-the-box or straightforward way to achieve the requirement of replication across a growing number of source document libraries.

We, therefore, implemented a reliable solution using SharePoint lists and Power Automate which can sync data from multiple document libraries and their folders across multiple sites to the destination folders (CEO Consolidated content).

By using this approach we are able to manage the replication of thousands of folders/files across multiple sources and destinations.

SharePoint Lists structure

  1. Create one central Mapping List. In this list, we are managing the source location of different sites and the destination location of the CEO Site.
  2. Add Source path and destination path in the central mapping list as per the below example
  3. Added an InternalID column in the destination library in which we will store the ID of the source’s folder/file. This InternalID will be used to check whether a folder/file exists or not at the destination location. This will be the key column between the source and the destination.

Power Automate Solution Structure

We need to create a Power Automate solution and will need to create three different Power Automate flows inside the solution as shown below. The Content Replication Parent Flow will run first and inside that flow, we will run two child flows for content replication and for cleaning up files

  • Content Replication Parent Flow (Parent Flow])
  • Content Replication (Child Flow)
  • Clean-up Files (Child Flow)

Power Automate Schedule

From an operational perspective, we schedule the Content Replication Parent Flow daily at midnight.

It will further call the Content Replication and Clean up Flows and will pass the current mapping ID in it.

Content Replication Parent Flow

This Flow extracts the active mappings from the Central Mapping List and loops through each active mapping.

This Flow passes the current mapping details to the Child Flows (Content Replication and Clean Up Flow) as seen in the image below.

Content Replication

  1. This Flow will Copy Content from the source to the destination based on the current mapping. It will receive the mapping details from the Parent flow.
  2. Loop through all folders/files of the source path mentioned in the mapping and fetches the folder/files modified after the date-time mentioned in the “LastFlowRunTime” column of the central mapping list. After getting all the folder/files it will check folder/file already exists on the equivalent destination path same as the source path using the Internal ID column which we created in the destination library
  3. If it exists, then we overwrite it.
  4. If it does not exist, then the Flow will create the folder/file

Clean-up Files

  1. This Flow will remove files from the destination which were deleted from the source
  2. Loop through all folders/files in the destination path mentioned in the mapping and will fetch the folder/files. After getting all the folder/files it will check whether the folder/file already exists in the equivalent source path using the Internal ID column.
  3. If the folder/file is not found in the source path, it means that the folder/file was deleted from the source, so we delete it from the destination.
  4. This way, it will delete all the files from the destination which were originally deleted from the source.

After implementing the solution, we found that when we move a folder/file to another folder then it does not modify the modified date of the moved subfolder or file.

So content movement between folders and libraries can cause an issue, where the updates don’t get reflected in the destination.

In practice, we found that the moved folder does not get captured in the next cycle of the Power Automate Flow, as we are only synchronizing the folders/file which was modified after the previous Power Automate Flow run, based on the timestamp which we store in “LastFlowRunTime” columns of the central mapping list, and therefore will not get synced to the destination equivalent location.

We had further optimized the solution to overcome this move folder/file issue and made the changes in the solution as shown below.

SharePoint Lists structure

  • Create Moved Mapping List (For Moved Folder/File: a complete replica of central mapping list)

Content Replication

  1. This Flow will Copy Content from the source to the destination based on the current mapping. It will receive the mapping details from the Parent Flow.
  2. Loop through all folders/files of the source path mentioned in the mapping and will fetch the folder/files modified after the value of “LastFlowRunTime”. After getting all the folder/files it will check whether the folder/file already exists on the equivalent destination path the same as the source path using the Internal ID column which we created in the destination library
  3. If it exists, then the Flow will overwrite it.
  4. f it does not exist, then a further check of the folder/file to see whether it exists anywhere in the destination library. If it exists somewhere in the destination library, then it seems the file has moved to another folder in the source location. If so, it will create an entry for the parent folder of the folder/file in a Moved Mapping List. If it does not exist in the library at all, then the Flow will create it as a new folder/file

Power Automate Solution Structure After adding Move functionality

  • Content Replication Parent Flow (Parent Flow)
  • Content Replication (Child Flow)
  • Clean-up Files (Child Flow)
  • Replicate Moved Content (Flow for moved folder/file attached on Moved Mapping SharePoint List on Item create the event)

 Replicate Moved Content

  1. This Flow is a complete replica of the Content Replication flow. But it only triggers for the specific moved folder file which we created in the Moved Mapping list while executing the Content Replication Flow.
  2. Power Automate will trigger when any new item will be created in the Moved Mapping list and move the folder/file to the destination path mentioned earlier.

In Conclusion, Mirroring the SharePoint document library contents to multiple sites is an important task that needs to be done with care, and having a reliable SharePoint development company with expertise in Microsoft Sharepoint services is crucial for efficient and smooth mirroring.

Part 1: Expand-Collapse rows in PowerApps Canvas App Gallery

Summary

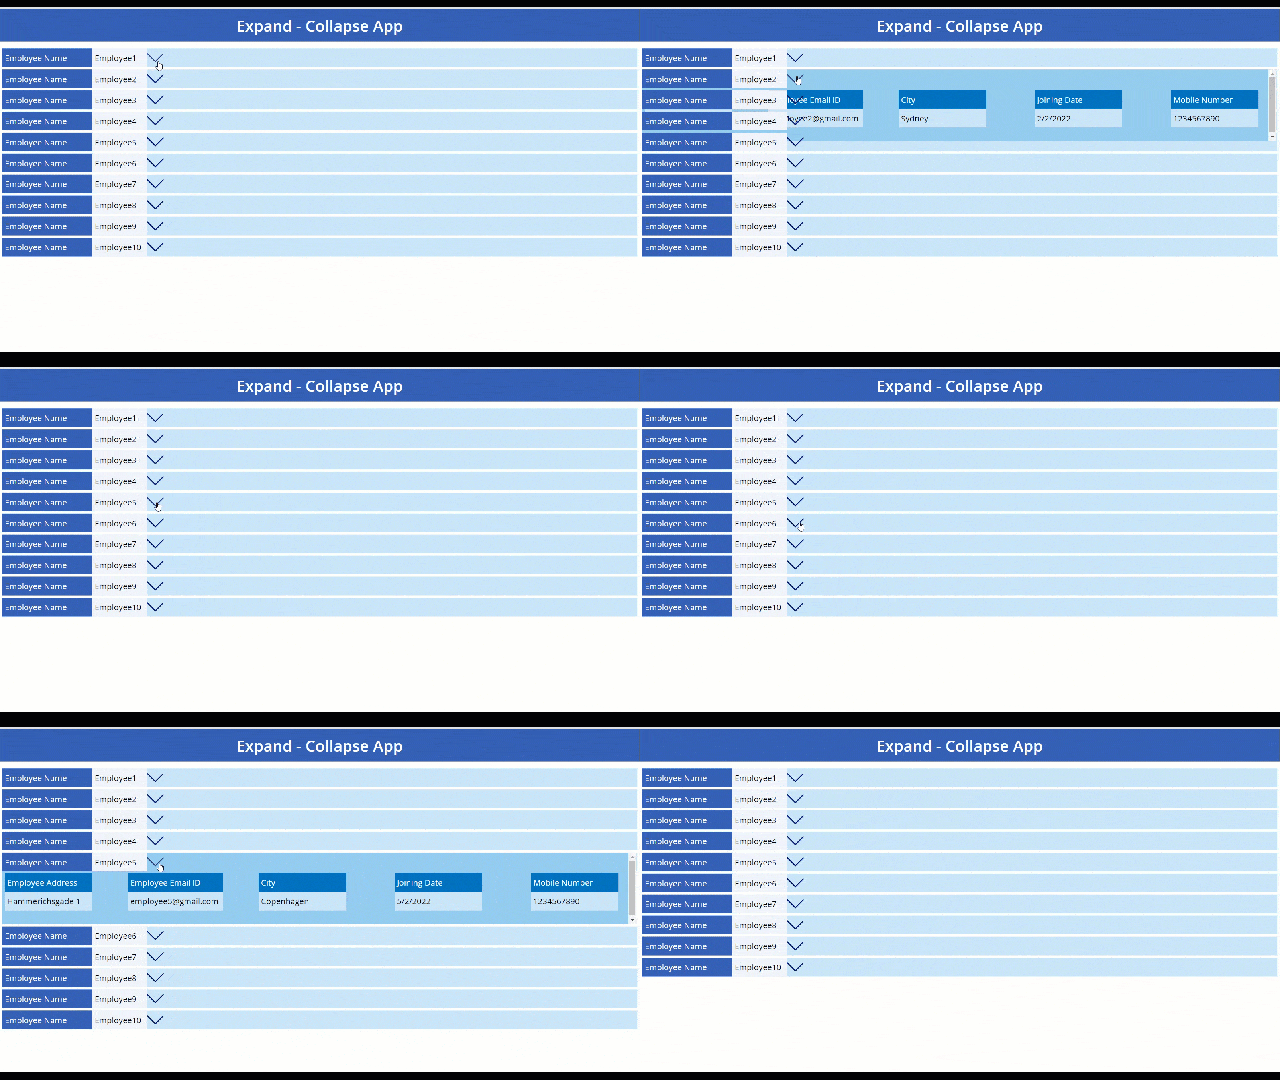
In this blog post, I share the steps for creating an expand-collapse gallery control in the PowerApps Canvas App. 

gif-01

Now, let’s start building the Gallery, for which we would have to create our list first and have the same loaded in a PowerApps App as a data source.  

Step-1

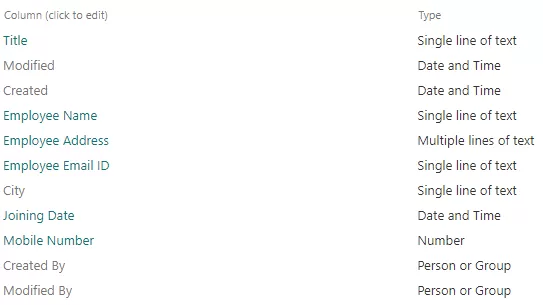
Create “Expand-Collapse Control” list with the following columns and their types 

img-01

Step-2

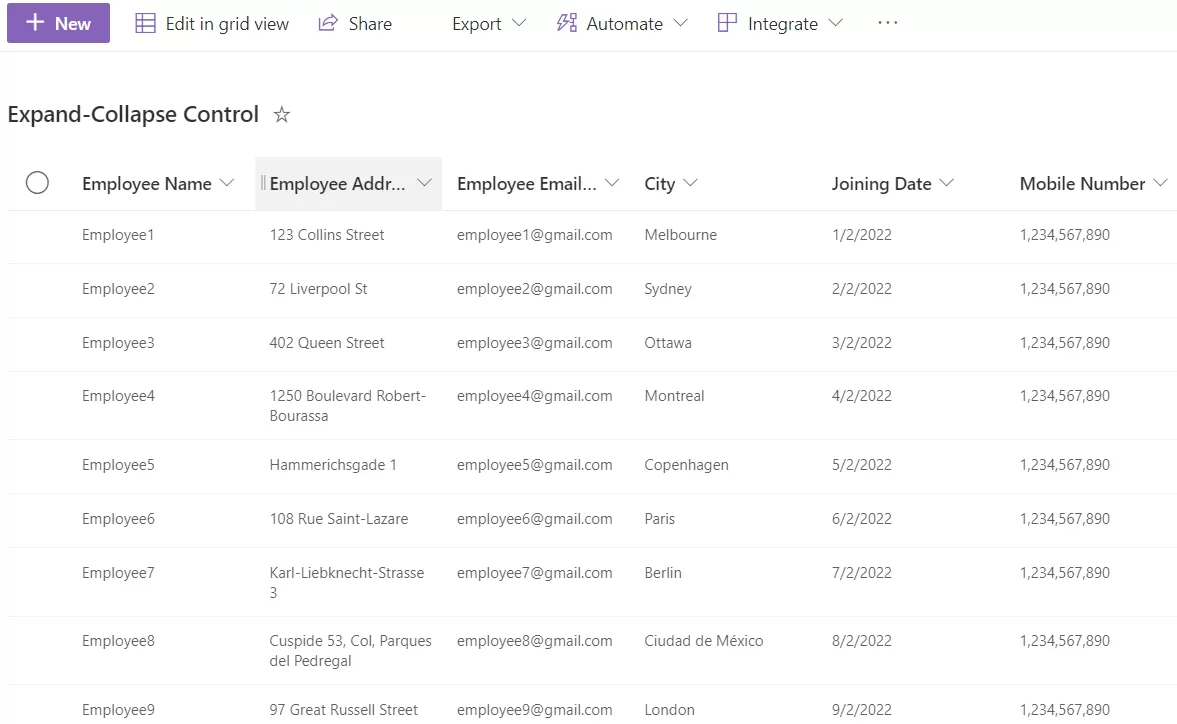
Add few entries in “Expand-Collapse Control” list 

img-02

Step-3

Create a Canvas App and name it “Expand-Collapse App” 

  1. Add a new Blank screen 
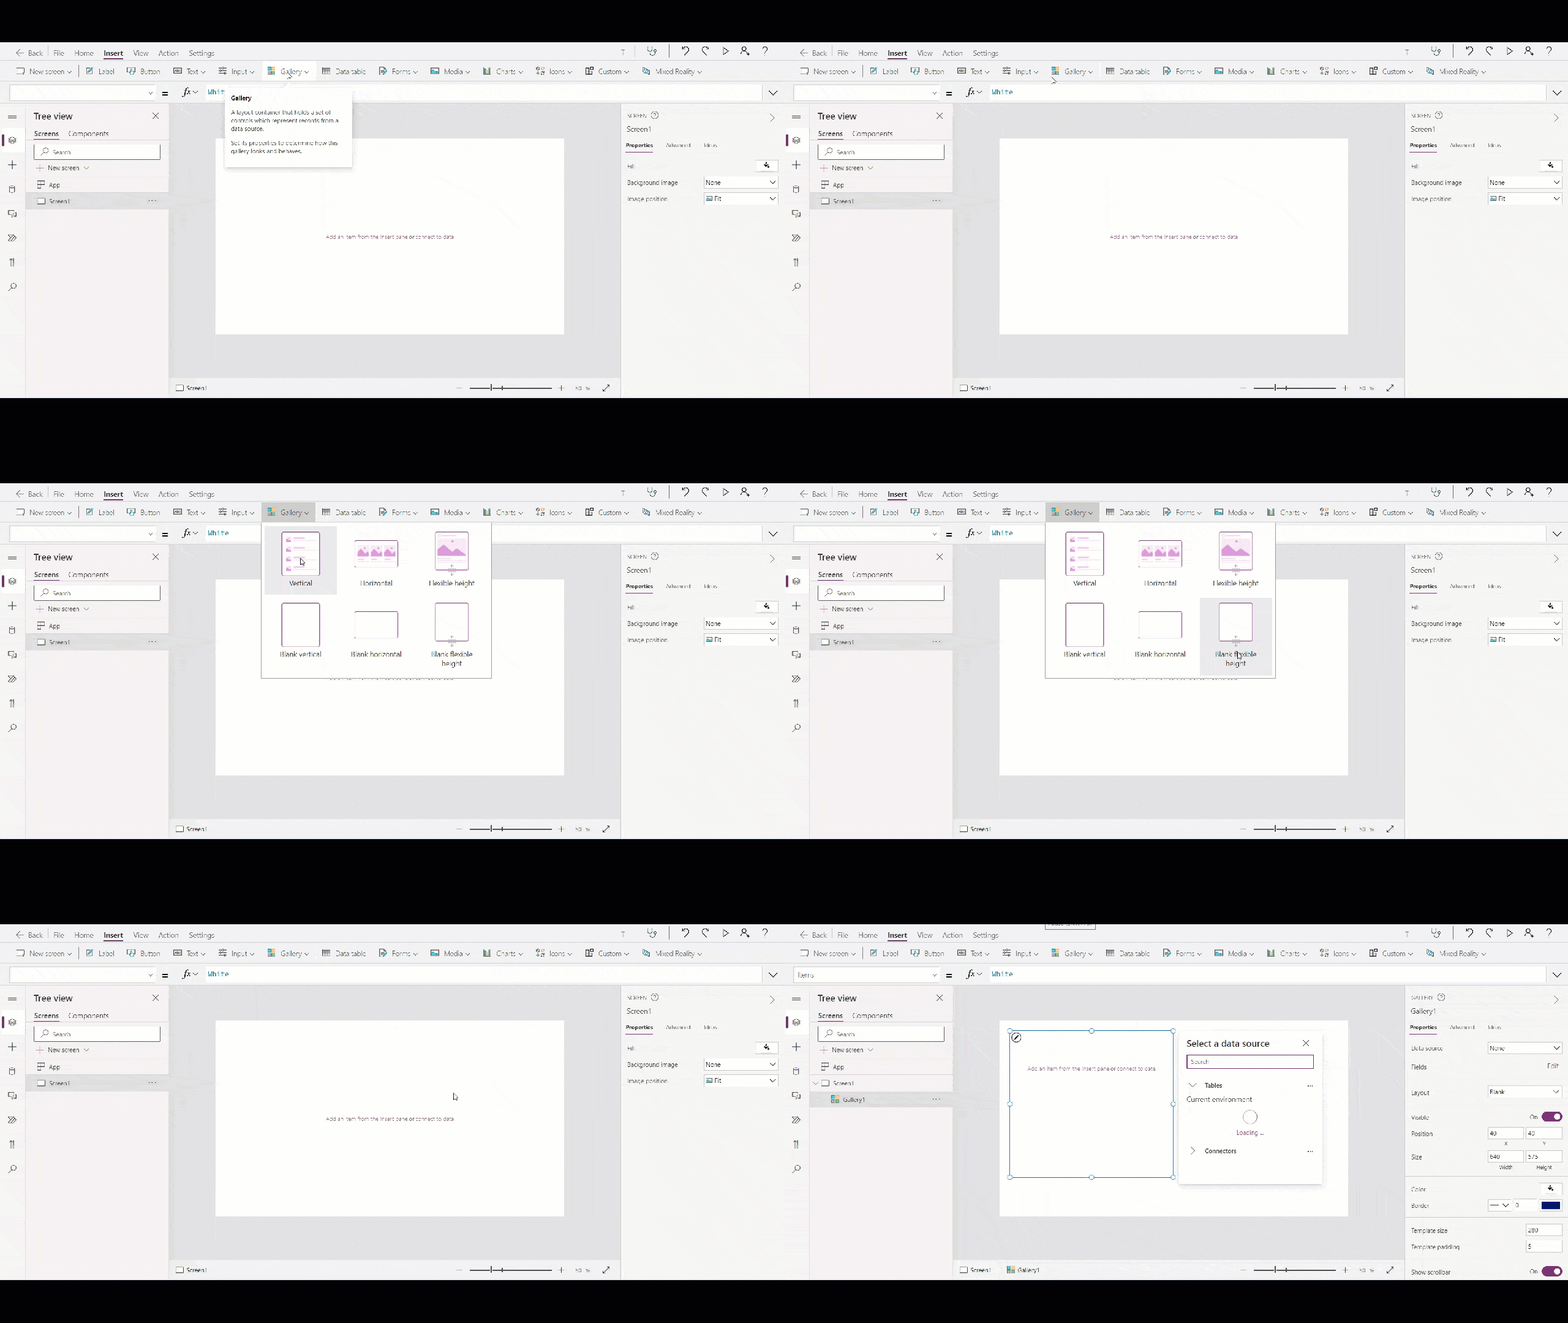
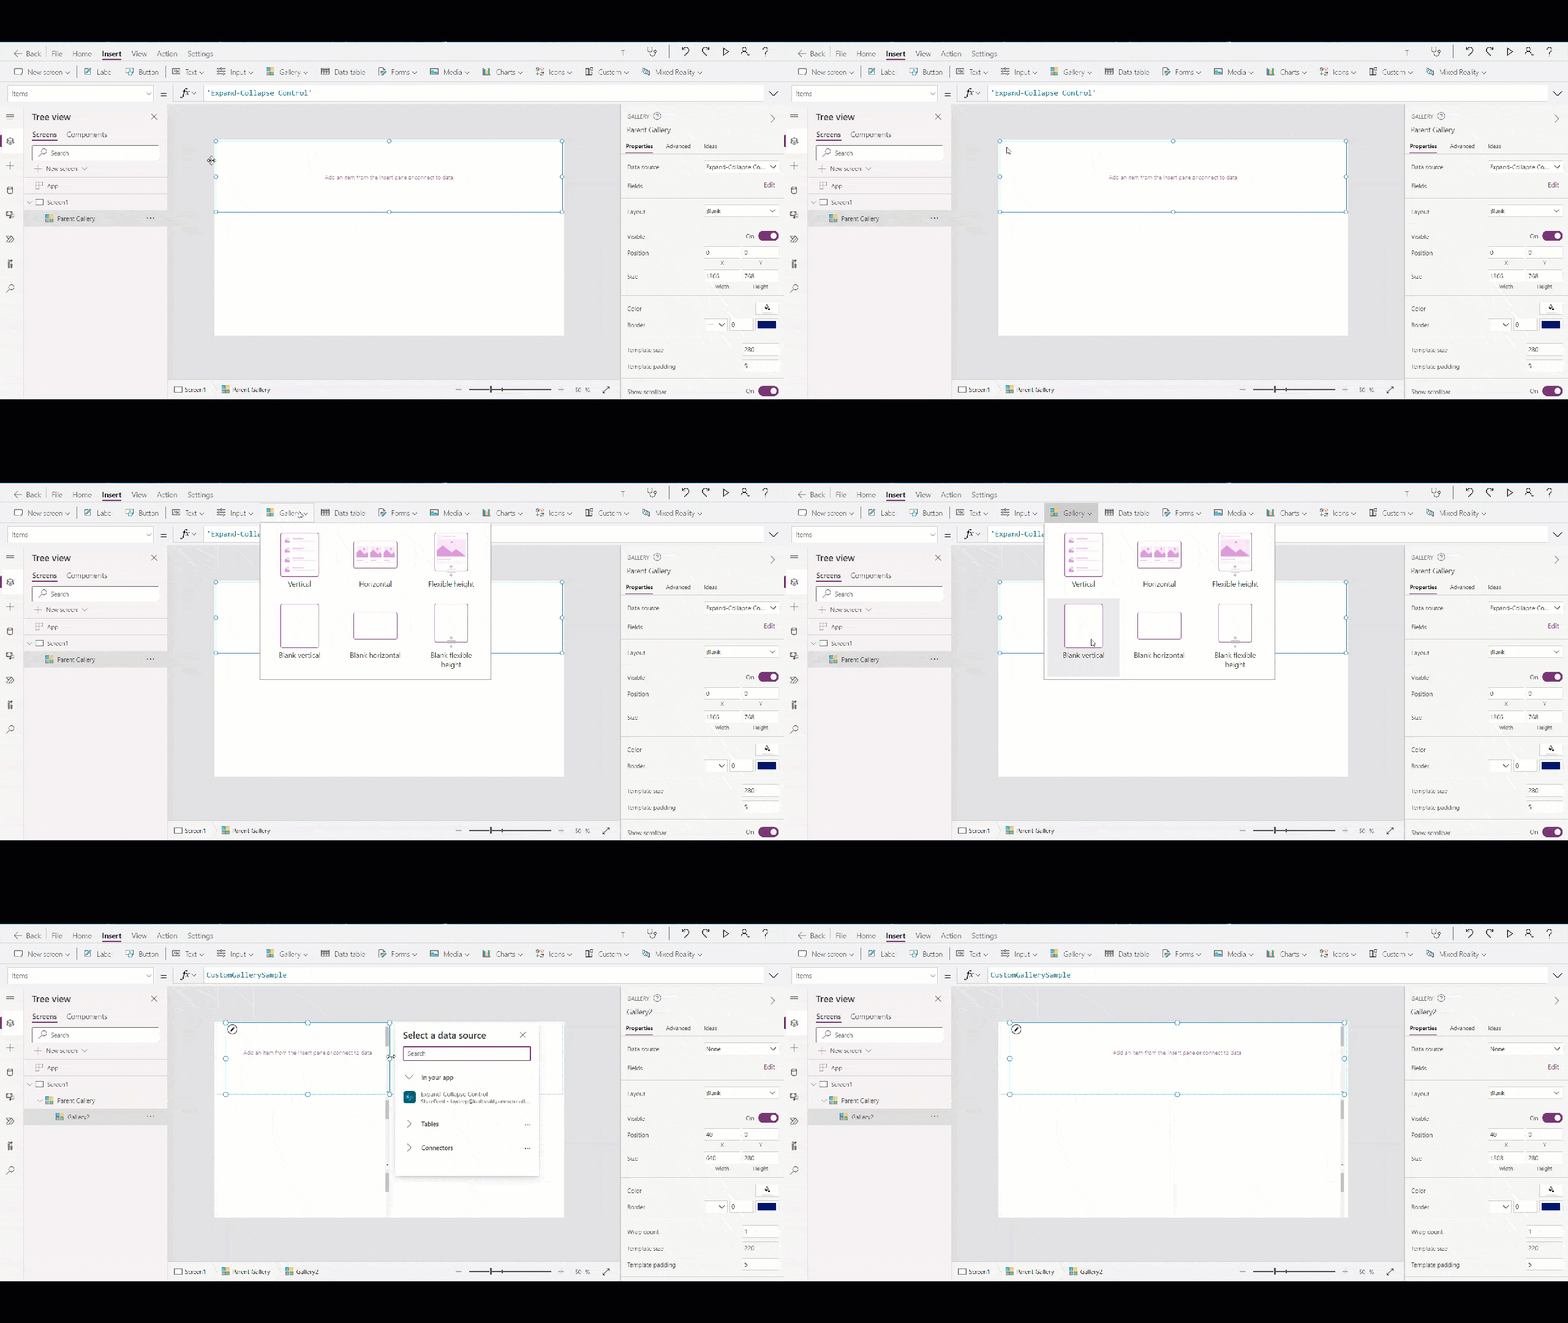
  2. From the Controls section on the top in Insert tab, add a “Blank flexible height” gallery – which would be our Parent Gallery
  3. And add a “Blank vertical” gallery in “Blank flexible height” gallery  which would be our Child Gallery 
  • Parent Gallery 

gif-02

  • Child Gallery 

gif-3

Step-4

Adding the data source to Gallery 

In the Parent Gallery add “Expand – Collapse Control” list data 

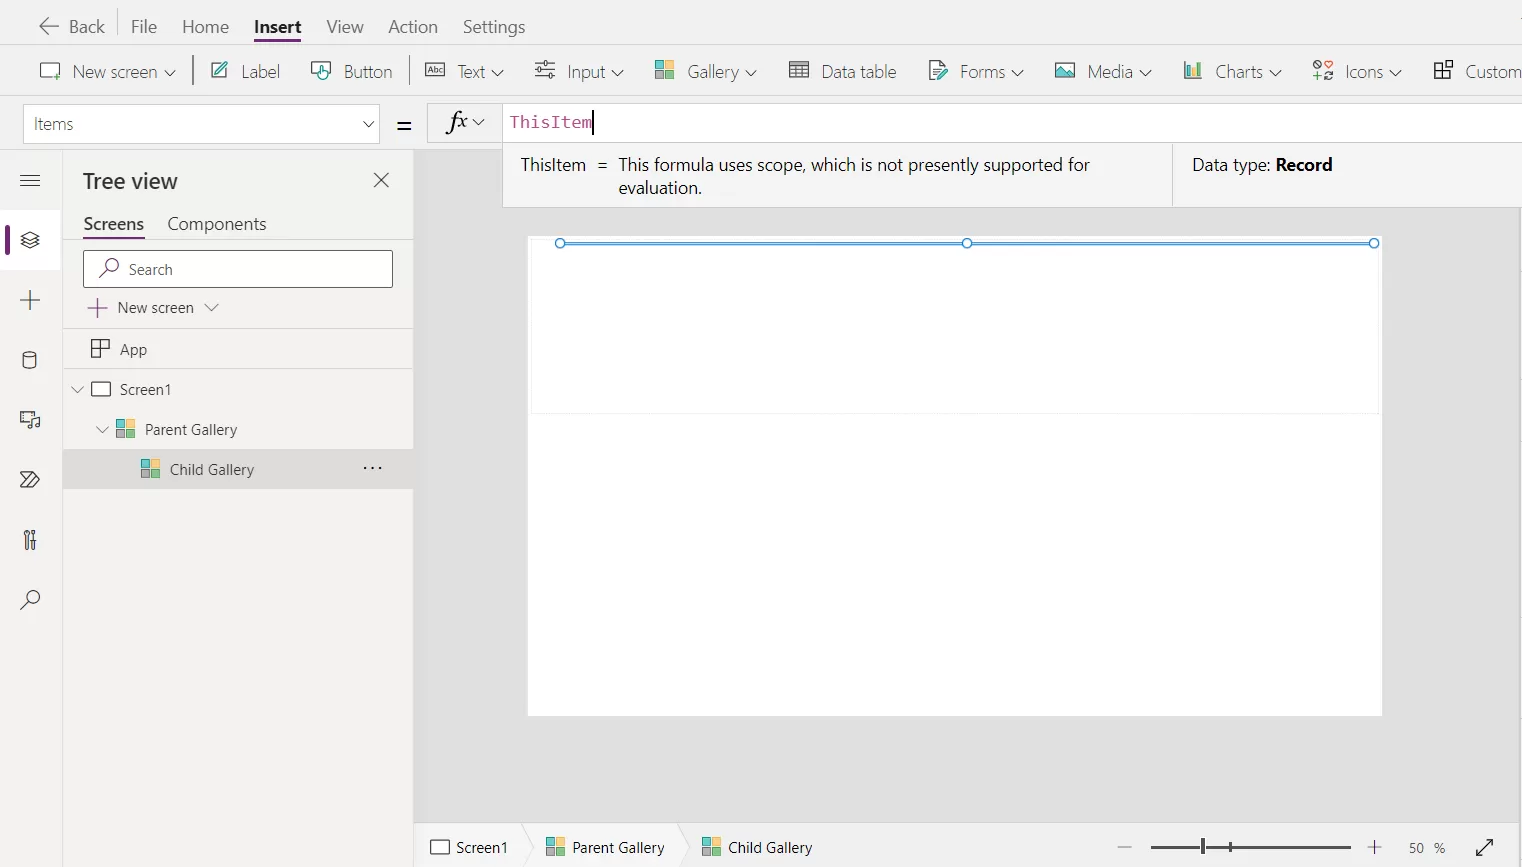
For Child Gallery in “Items” property add code – ThisItem 

img-03

Step-5

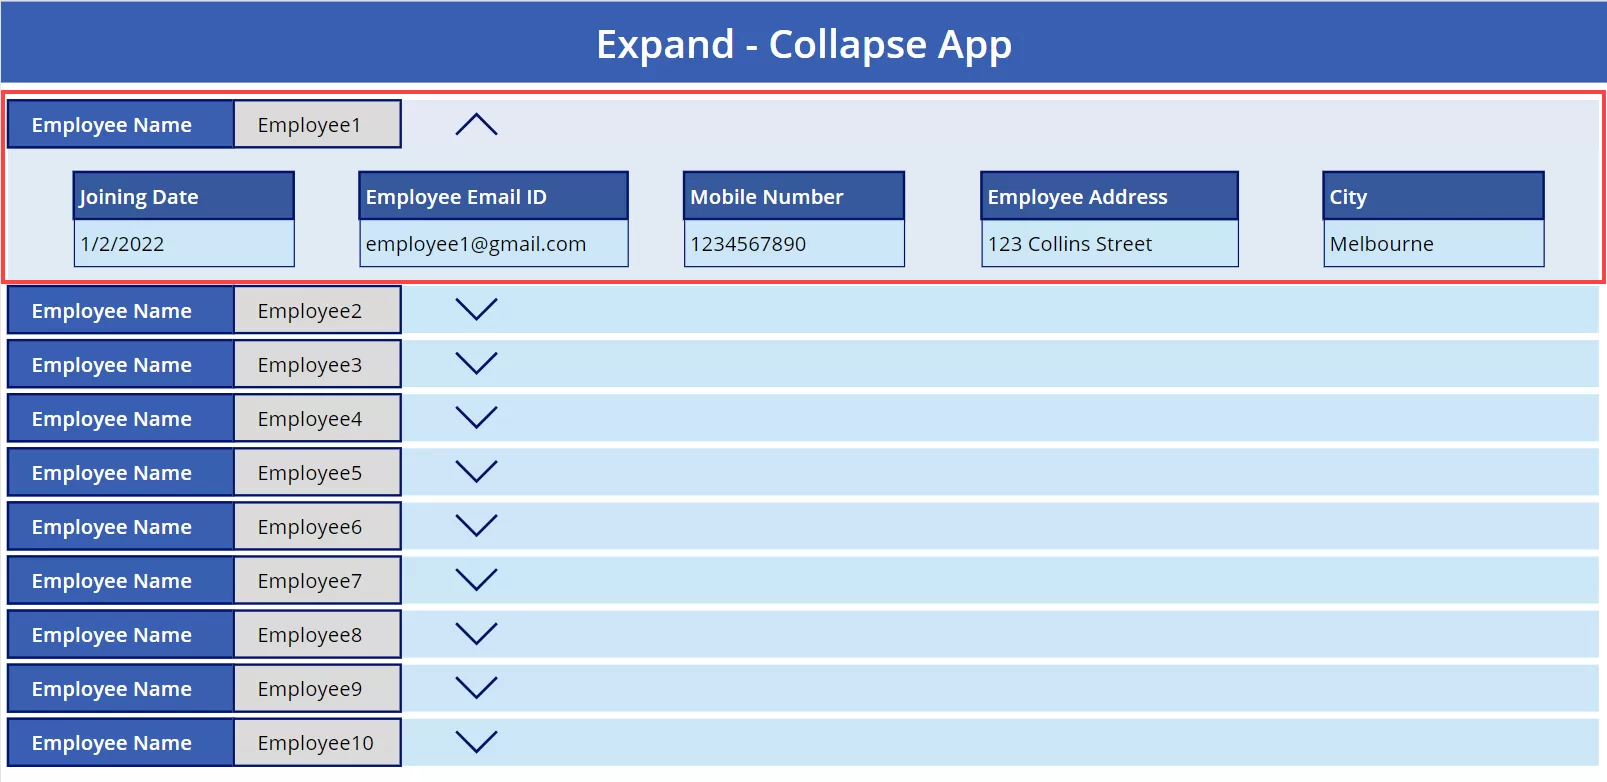
Add labels according to the list’s columns and add show data 

img-04

Step-6

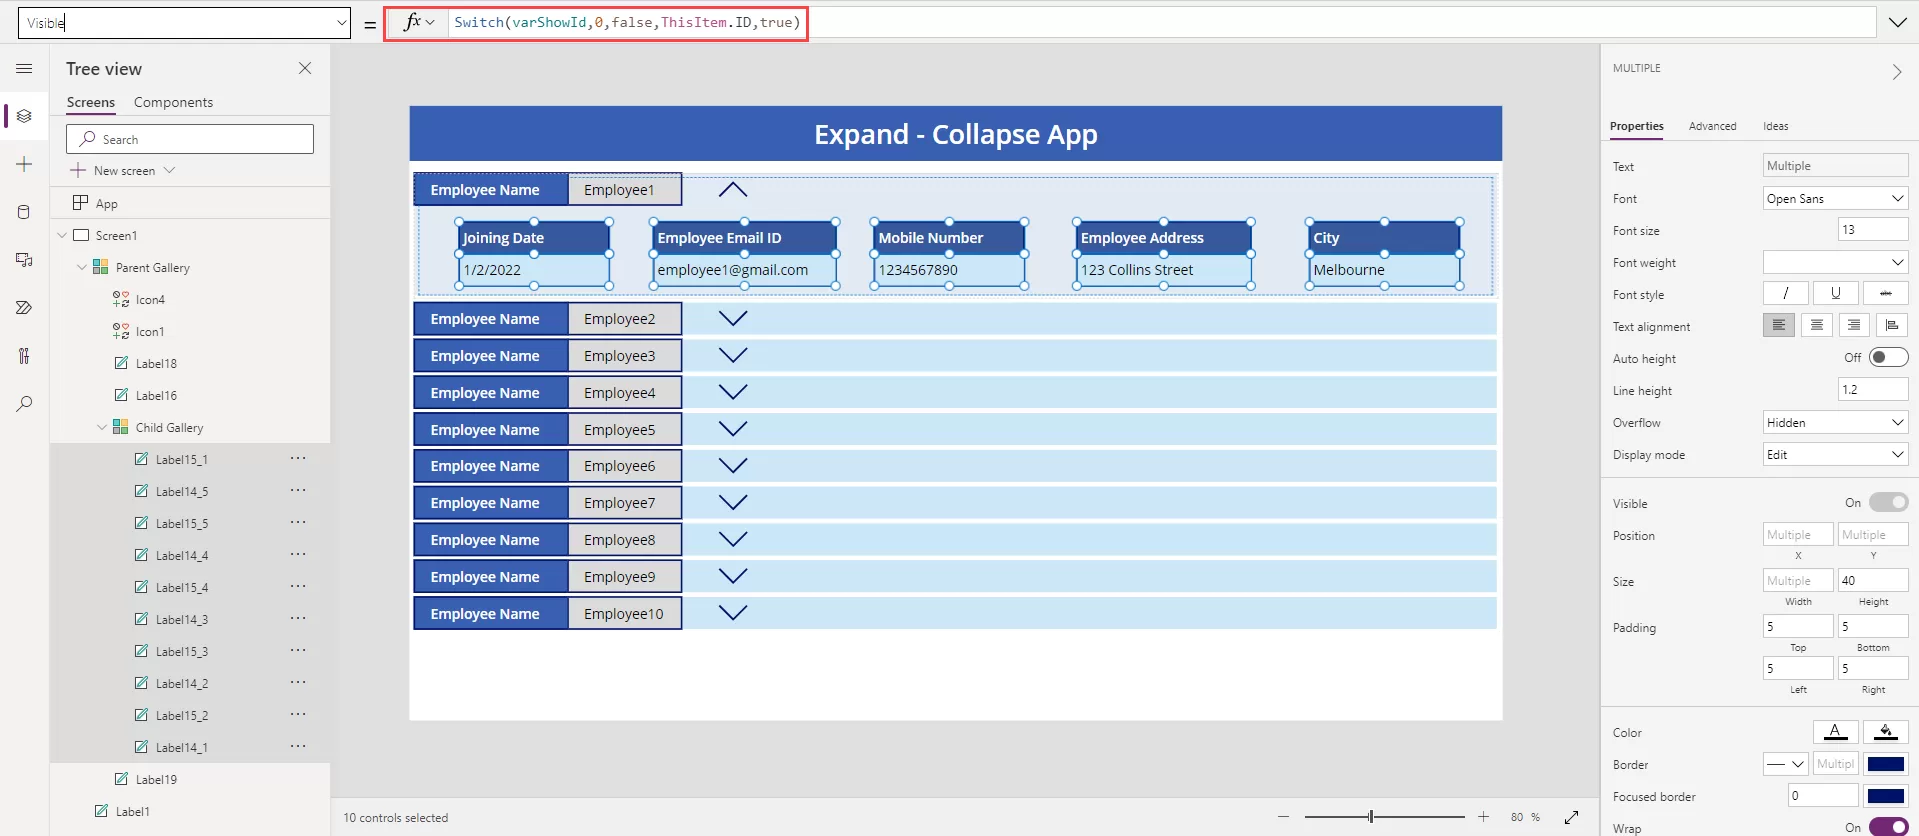
Add code on all label’s “visible” property which are added in “Child Gallery”Also, to have the Child Gallery show when button is clicked, we have to add code in Child Gallery’s on “Visible” property  

“Visible” property – Switch(varShowId,0,false,ThisItem.ID,true)

img-05

Step-7

Add down arrow icon and up arrow icon. 

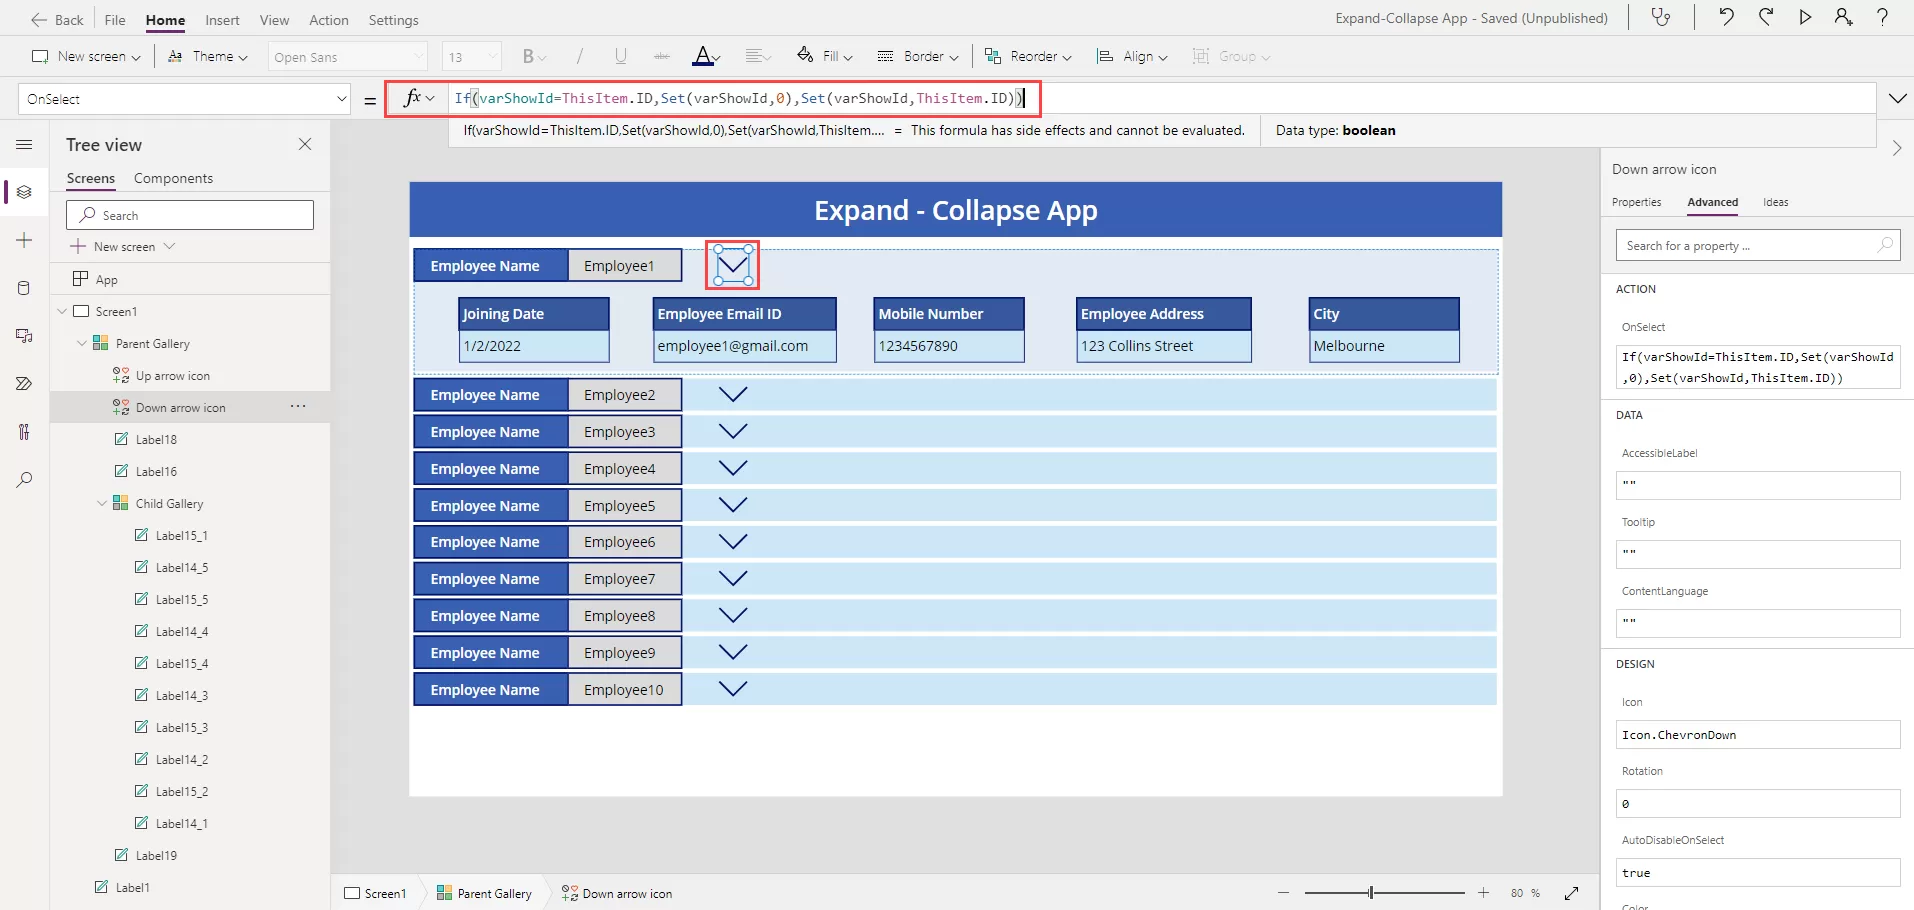
Then first write code for the down arrow icon(Down arrow icon) on its “OnSelect” property –

If(varShowId=ThisItem.ID,Set(varShowId,0),Set(varShowId,ThisItem.ID)) 

img-06

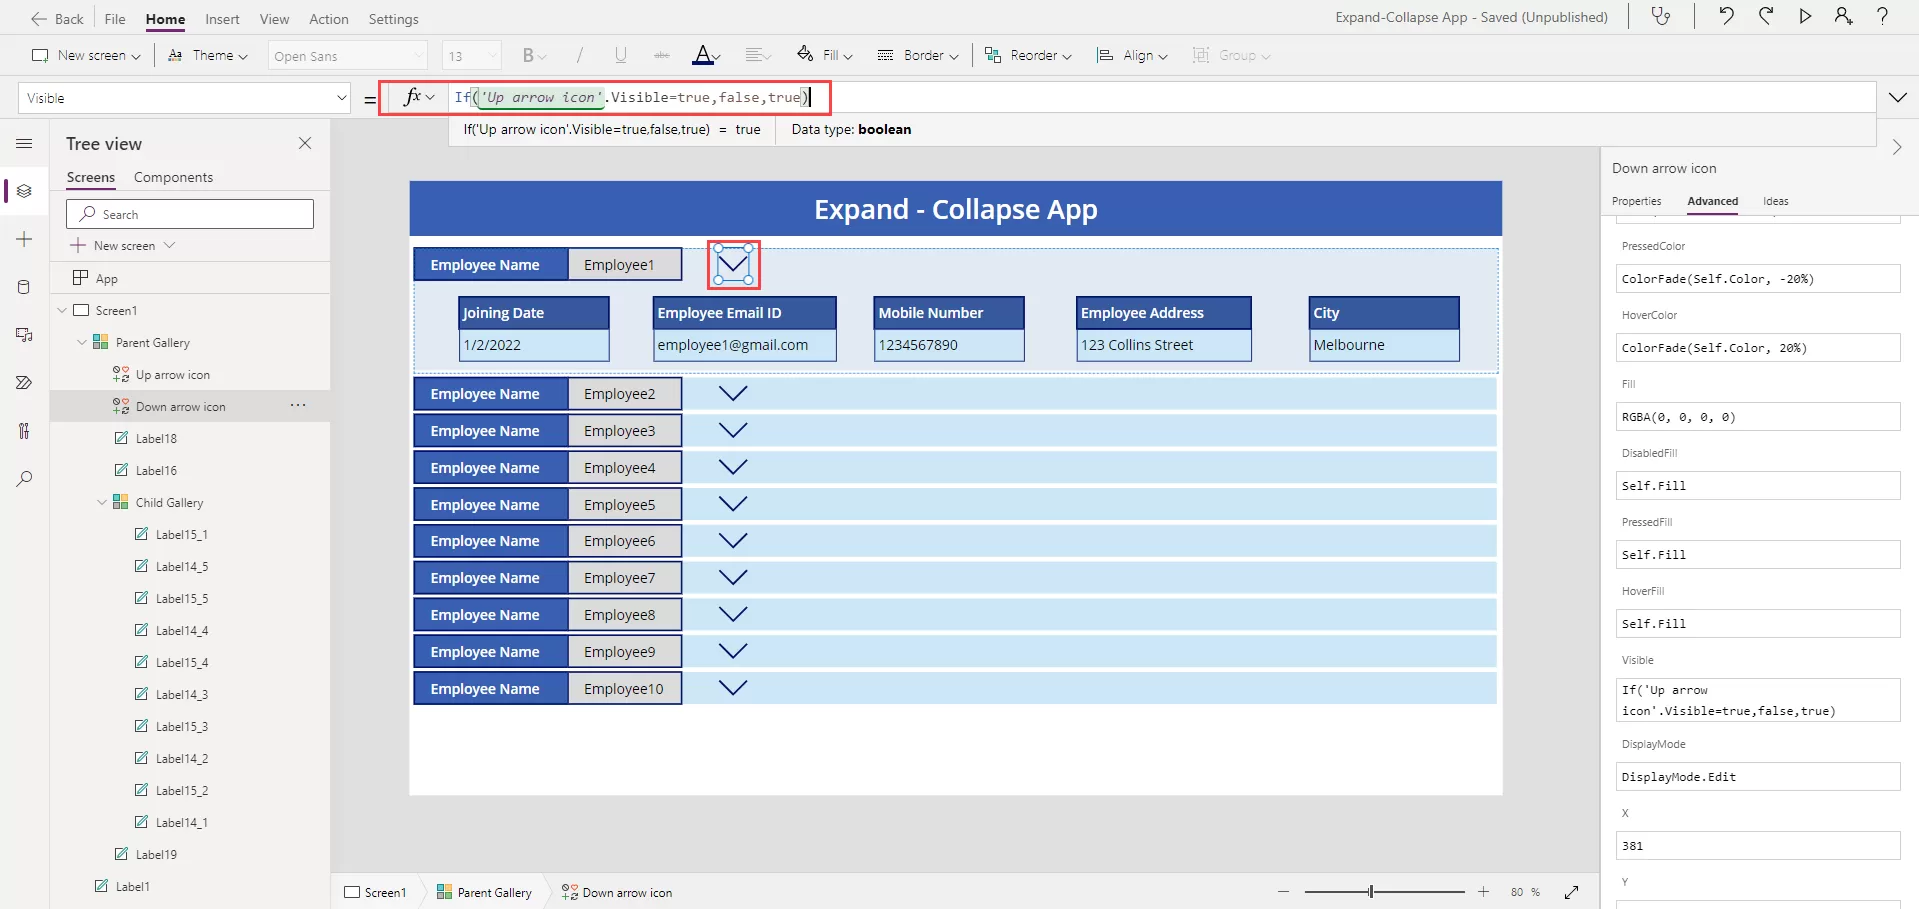
And add code on visible property – If(Up arrow icon.Visible=true,false,true) 

img-01

Step-8

On  the down arrow icon and write code on it’s “OnSelect” property –

If(varShowId=ThisItem.ID,Set(varShowId,0),Set(varShowId,ThisItem.ID)) 

img-07

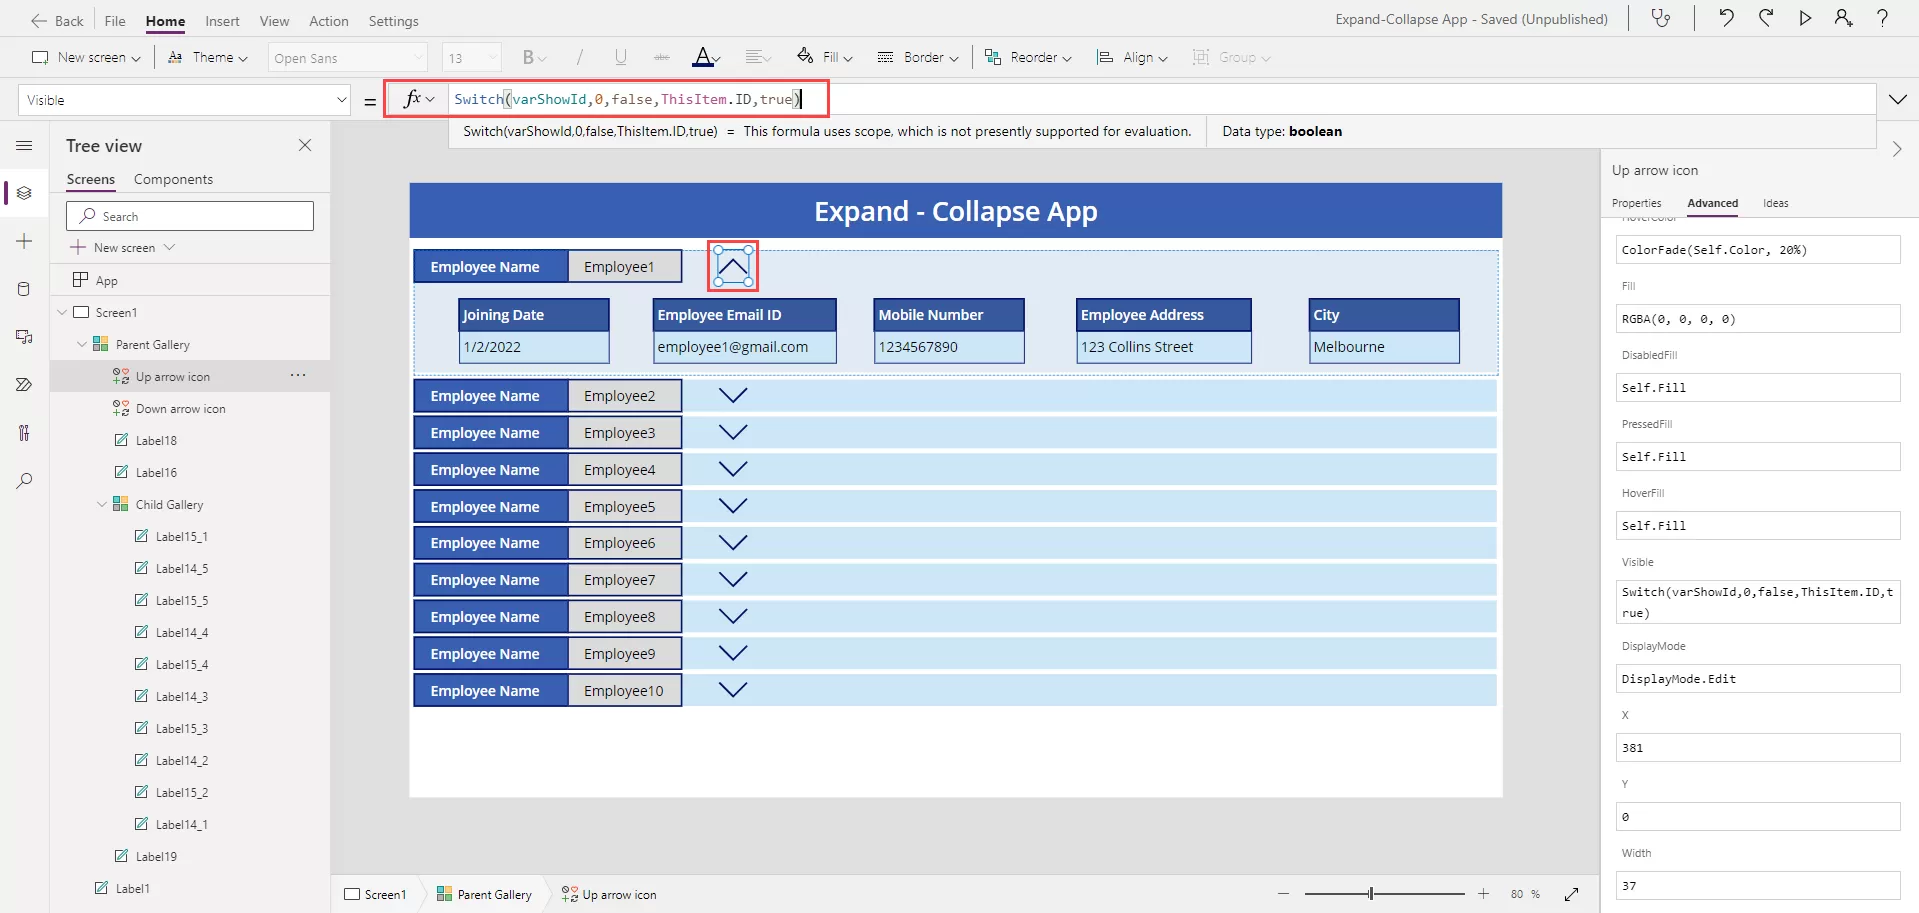
And write code on its “Visible” property –

Switch(varShowId,0,false,ThisItem.ID,true)

img-07

Please post your question, if you will find while implementing this process. Thank you.
In this tutorial, we explored how to create an Expand-Collapse feature in a Microsoft PowerApps Canvas App Gallery.

By following the step-by-step guide, you can enhance the user experience of your PowerApps solutions by allowing users to efficiently navigate and interact with data.

Implementing features like Expand-Collapse rows can greatly improve the usability and functionality of your Canvas Apps, providing a more intuitive interface for users to work with.

We hope this tutorial has been helpful in expanding your understanding of building dynamic interfaces in PowerApps.

Stay tuned for more insights and tutorials on optimizing your Microsoft PowerApps solutions for enhanced productivity and user satisfaction.

Reach out to Reality Tech for getting help in optimizing the Microsoft PowerApps solutions

PowerApps – Role Based Security Using SharePoint Group

Table of Contents

Summary

While creating a PowerApps app, we needed to add a button that would be visible only for a particular set of users who were present in a specific group in SharePoint. This was accomplished with the help of Flow.  

We would check with the help of Flow that the user that is trying to access the App, is present in the group or not. If yes, the button is available and if not, the button won’t be. 

The approach goes like, 

Step-1

Create a SharePoint Security Group and add the users who would have the access to the button in PowerApps App.

And enable the access to view the members of the Group to Everyone, so that when the user tries to login, not all users would be in the group.  

img-01

Step-2

Creating the Flow 

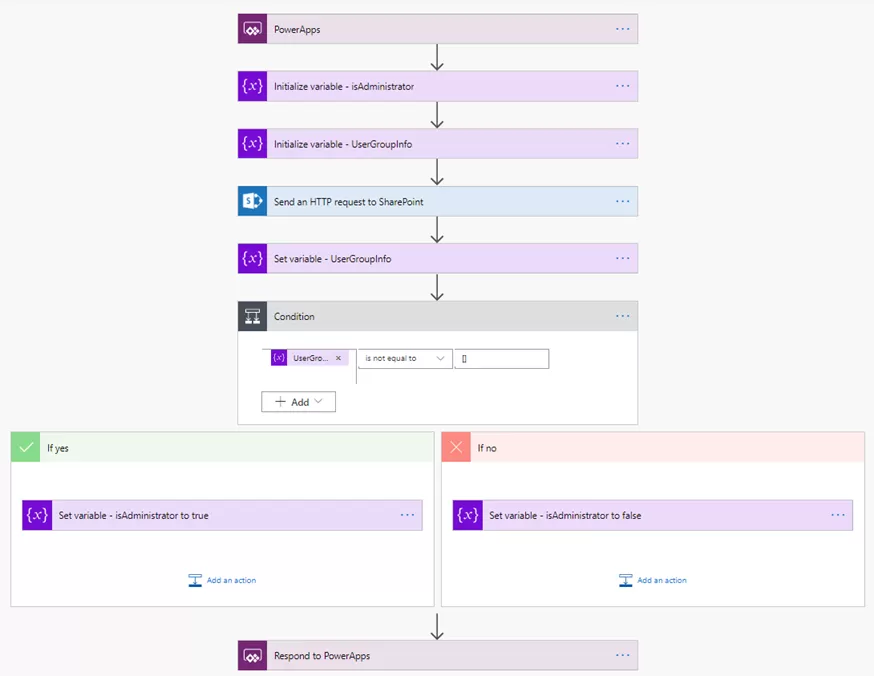
  • Create the Flow, with the trigger PowerApps of PowerApps connector. 

img-02

  • Add an action, Initialize variable of Variables connector. Set the name as isAdministrator to store a Boolean value.

img-03

img-04

  • Add another Initialize variable of Variables connector. Set the name as UserGroupInfo to store a Boolean value. 
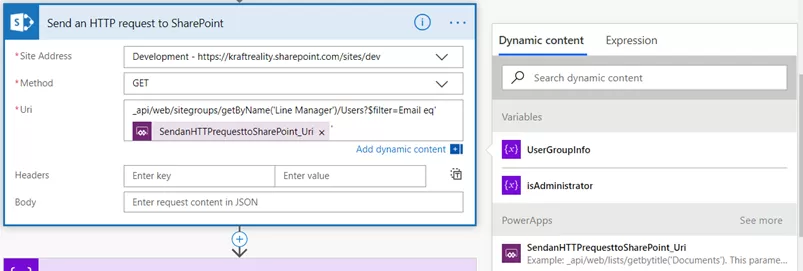
  • Add an action, Send an HTTP request to SharePoint of SharePoint connector.  
Site Address – Select the site address where the security group is created 

Method – GET 

Uri – api/web/sitegroups/getByName(‘SharePoint Group’)/Users?$filter=Email eq ‘’ 

Replace the SharePoint Group with the name of the group created in Step-1. Here I had created the group ‘Line Manager’.  

Put the cursor pointer in between the single quotes and select the option from PowerApps, SendanHTTPrequesttoSharePoint_Uri from dynamic content window.

img-05

  • Add an action, Set Variable of Variable connector. Select the variable UserGroupInfo in Name and value as Body from Send an HTTP request to SharePoint from dynamic content. 

img-06

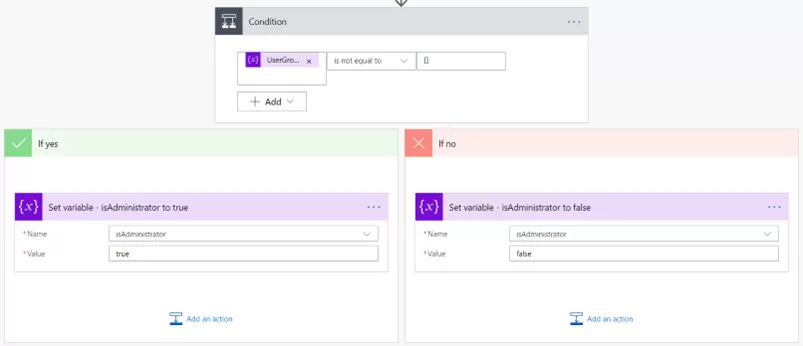
  • Add an action, Condition of Control Connector. Set the conditional value as variable UserGroupInfo and select the condition is not equal to and in value  to be compared as ‘[]’. 

     Inside the if yes and if no options, 

 For the option if yes, add an action Set Variable of Variable connector. Select the variable  isAdministrator and set the value as true, 

         For option if no, add an action Set Variable of Variable connector. Select the variable isAdministrator and set the value as false. 

img-07

  • Add an action, Respond to PowerApps of PowerApps connector. Select the text option for the output. Set the variable as isAdminUser and the value as isAdministrator from the Dynamic content. 

img-08

The final look of the flow would be like this: 

img-09

Step-3

Implementing the Flow with PowerApps App 

After the Flow is ready, lets configure the same with the App to test it. 

On the first screen that would be visible when you run the App, on its OnVisible Property, set the variables as below: 

img-10

First, we take the variable isAdmin and set it as false.  

Secondly, we would check with the flow to set the variable UserGroupInfo as the flow’s outcome.   

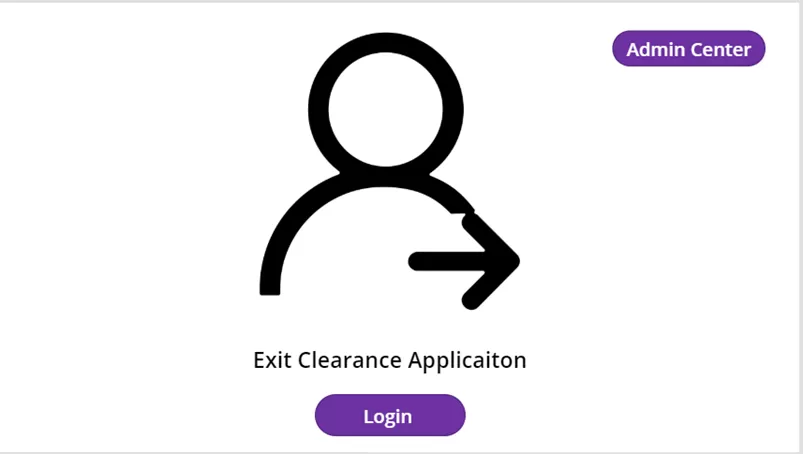
On the button’s visible property, set it as If(isAdmin, true). SO that if the user is in the SharePoint Group the button would be visible else it would not. 

So when a user is inside the SharePoint Group, the screen would display the button: 

img-11

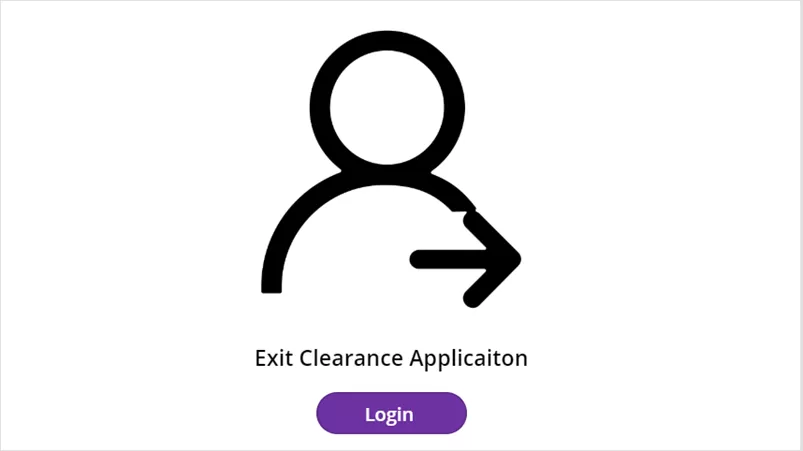
And when the user is not, we display: 

img-12

Additional Read

SharePoint for Enterprise Content Management – Why Should Choose?

In conclusion, leveraging PowerApps in conjunction with SharePoint groups provides a dynamic solution for implementing role-based access control within your applications.

By utilizing the capabilities of Flow, we have demonstrated how to seamlessly manage user permissions, ensuring that only authorized individuals can access specific features or functionalities.

With Microsoft PowerApps solutions, organizations can not only enhance security measures but also streamline workflows and improve overall efficiency.

Whether it’s creating custom apps tailored to unique business requirements or integrating with existing systems for seamless collaboration, PowerApps empowers businesses to unlock the full potential of their digital ecosystems.

By following the steps outlined in this guide, you can effectively implement role-based security measures in your PowerApps applications, providing a tailored and secure user experience for your organization.

Incorporating Microsoft PowerApps solutions into your development toolkit opens a world of possibilities, enabling you to drive innovation, maximize productivity, and achieve your business objectives with confidence.

Please post your question, if you will find while implementing this process. Thank you.
Publish Power App To The Teams App Store

Summary

In this blog, I am performing the steps one should follow to publish your PowerApps to the Teams App Store.  

Let’s get started- 

Step-1

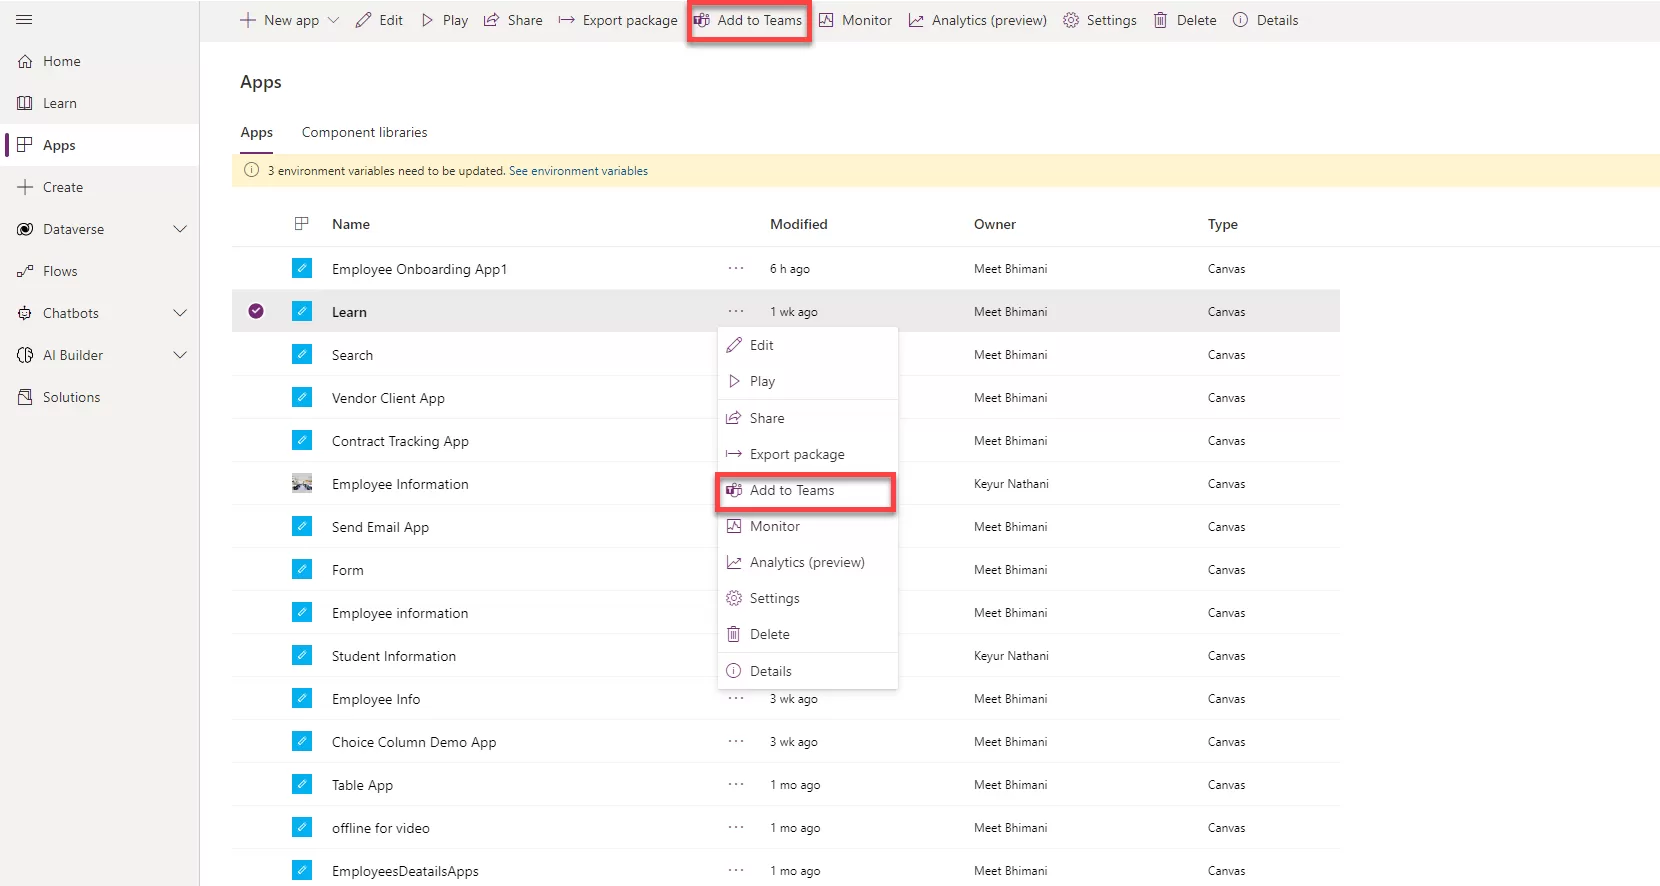
From the PowerApps portal, Click Apps in the app bar.

Step-2

To the right of your app name, Click the menu then select Add to Teams.

img-01

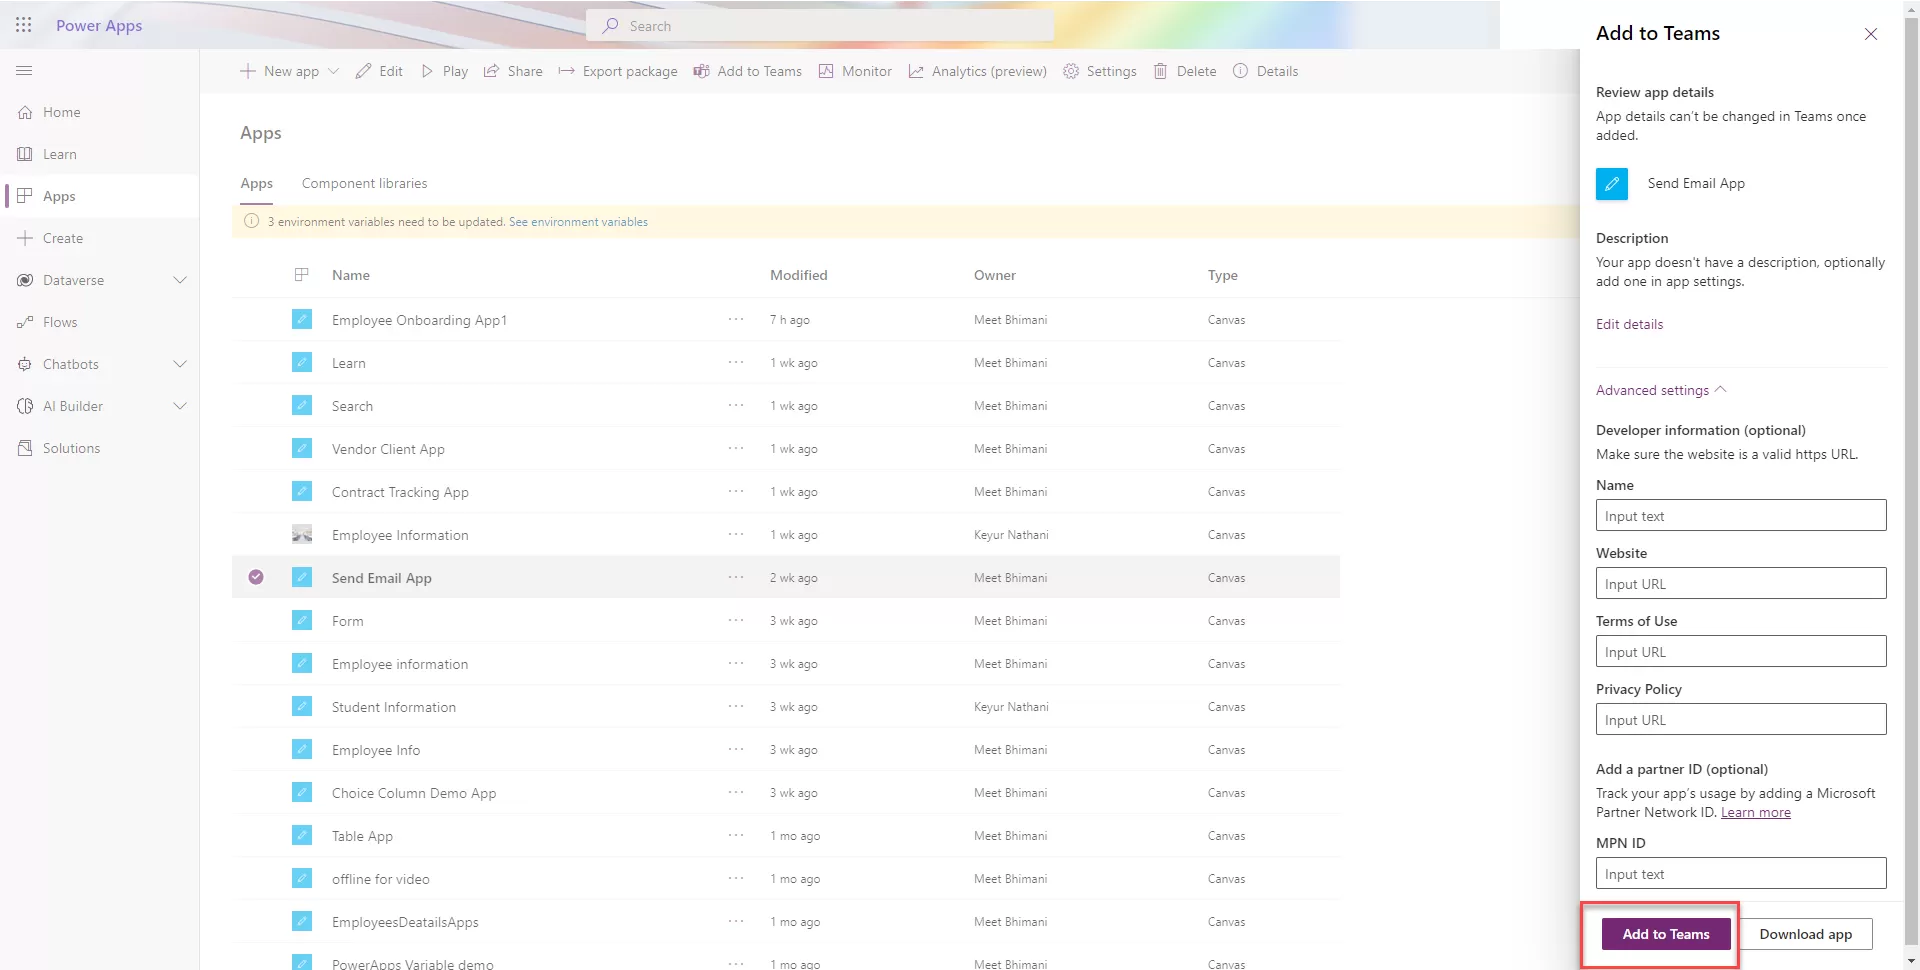
Step-3

In the Add to Teams pane, click Add to Teams. 

Note: you may want to first click Edit details to add a short description, so your users know what‘s expected when using this app. You can also expand the Advanced settings to add further information. For example, you can include a link to instructions if you‘d like. 

img-02

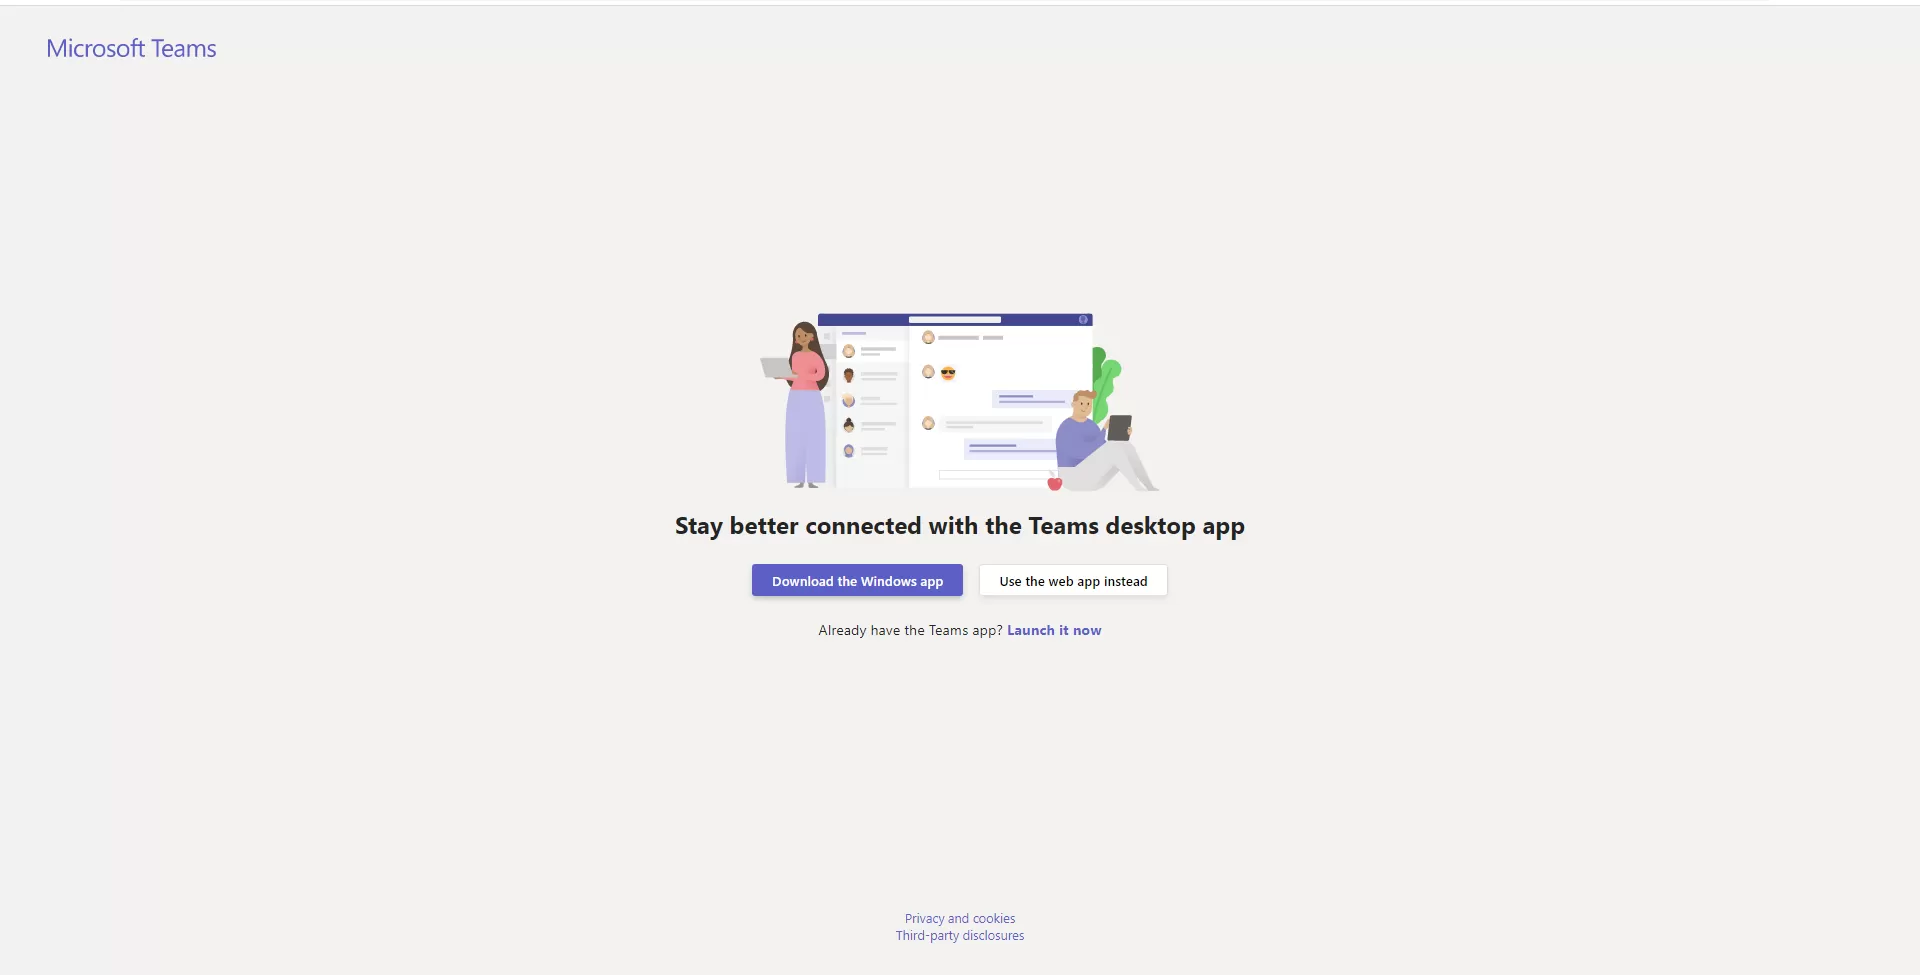
Step-4

Power Apps will open Teams. Your browser may request access to open in the desktop app. If you prefer that, allow it. If not, click Cancel then click Use the web app instead. 

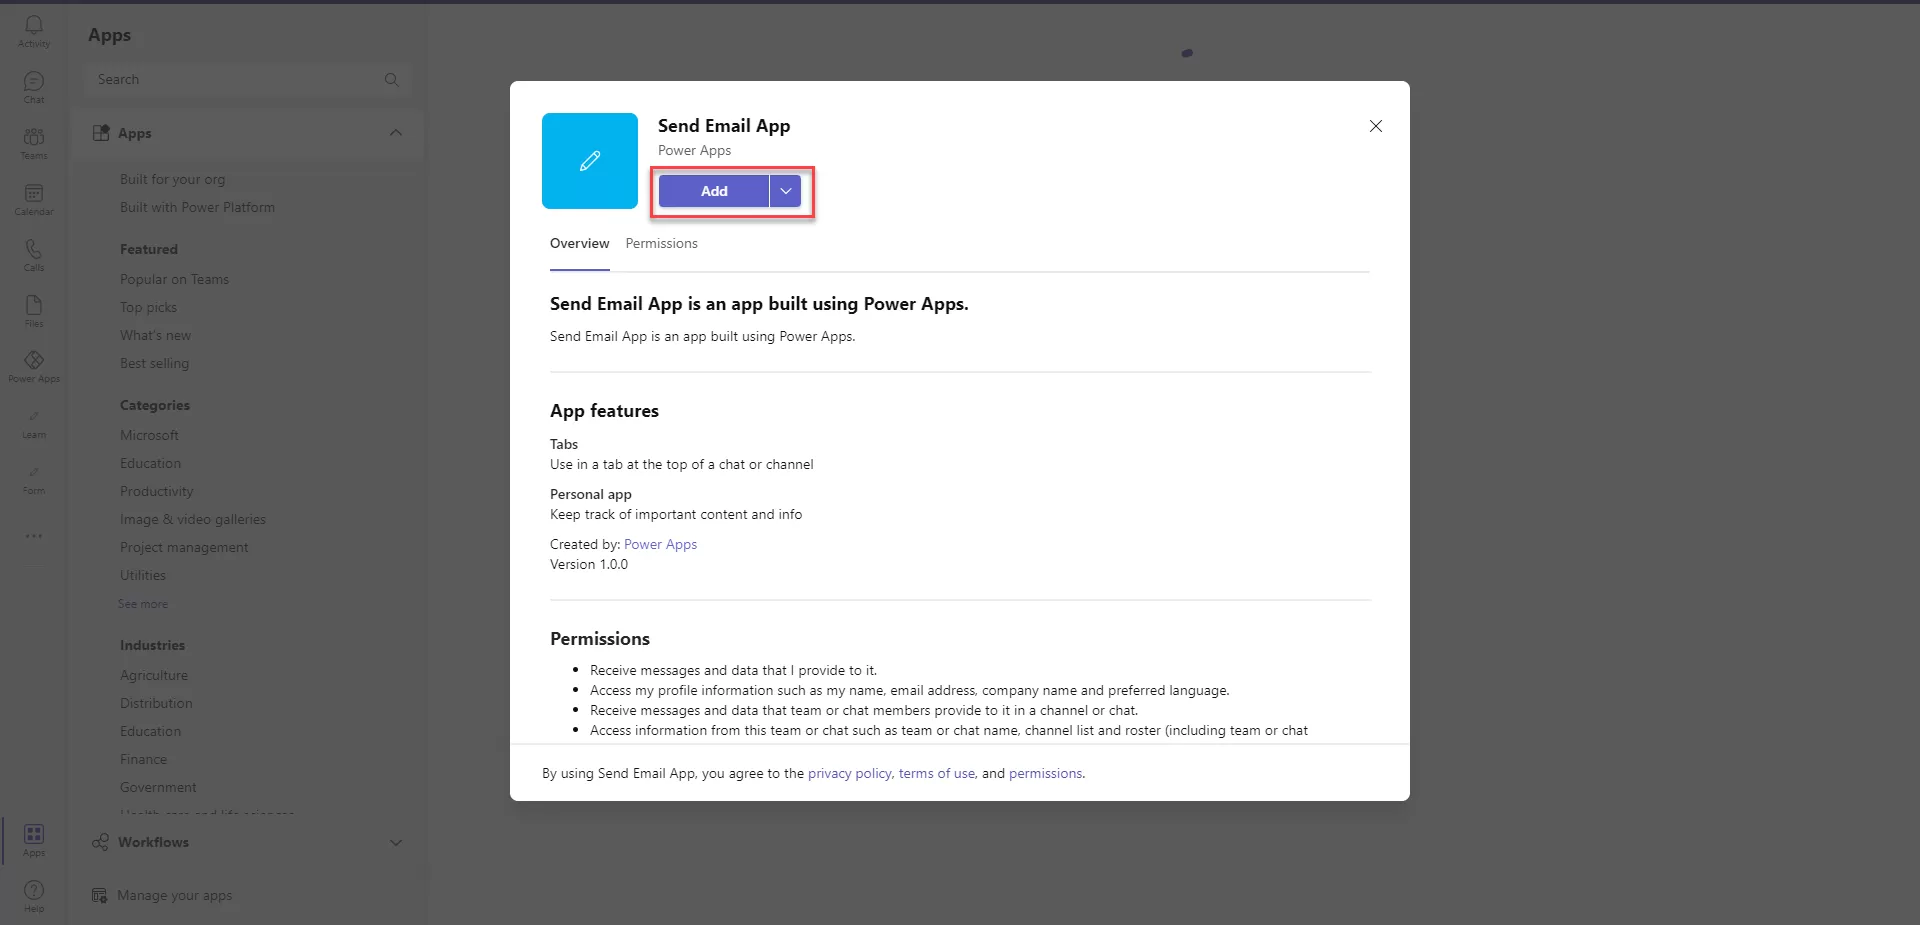
img-03

Step-5

Once Teams opens to the app details page, click Add.

img-04


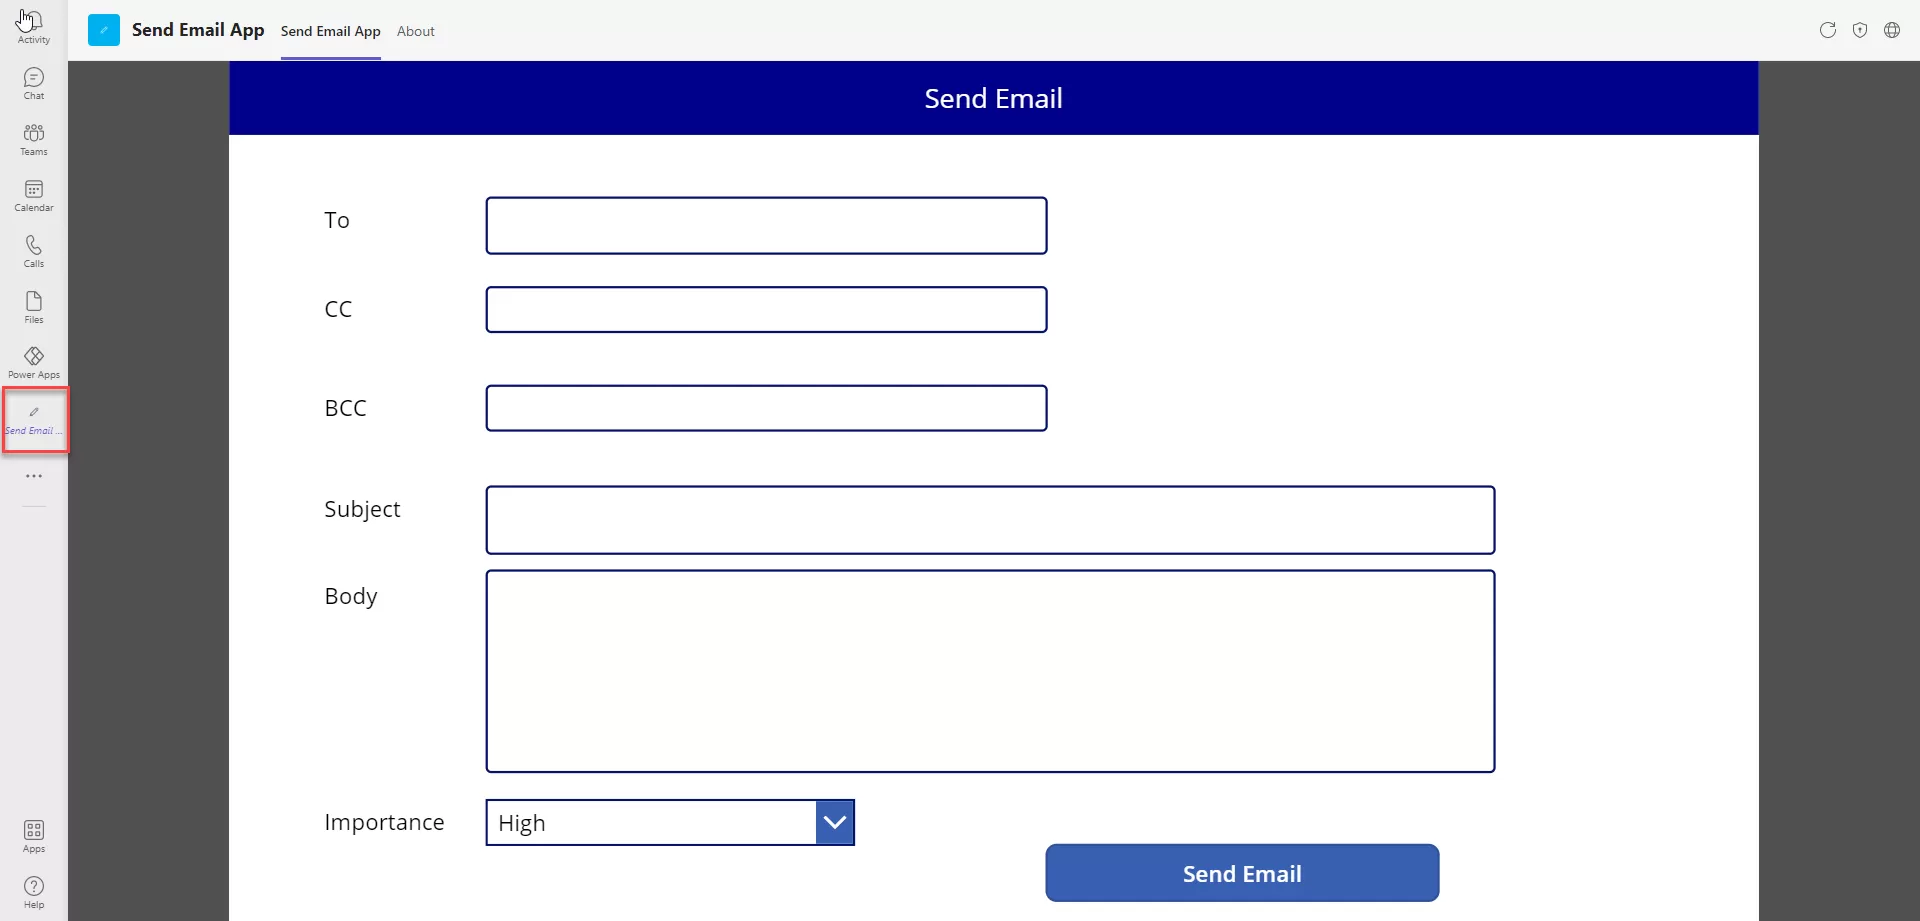
Step-6

The app opens from the Teams app bar. 

img-05

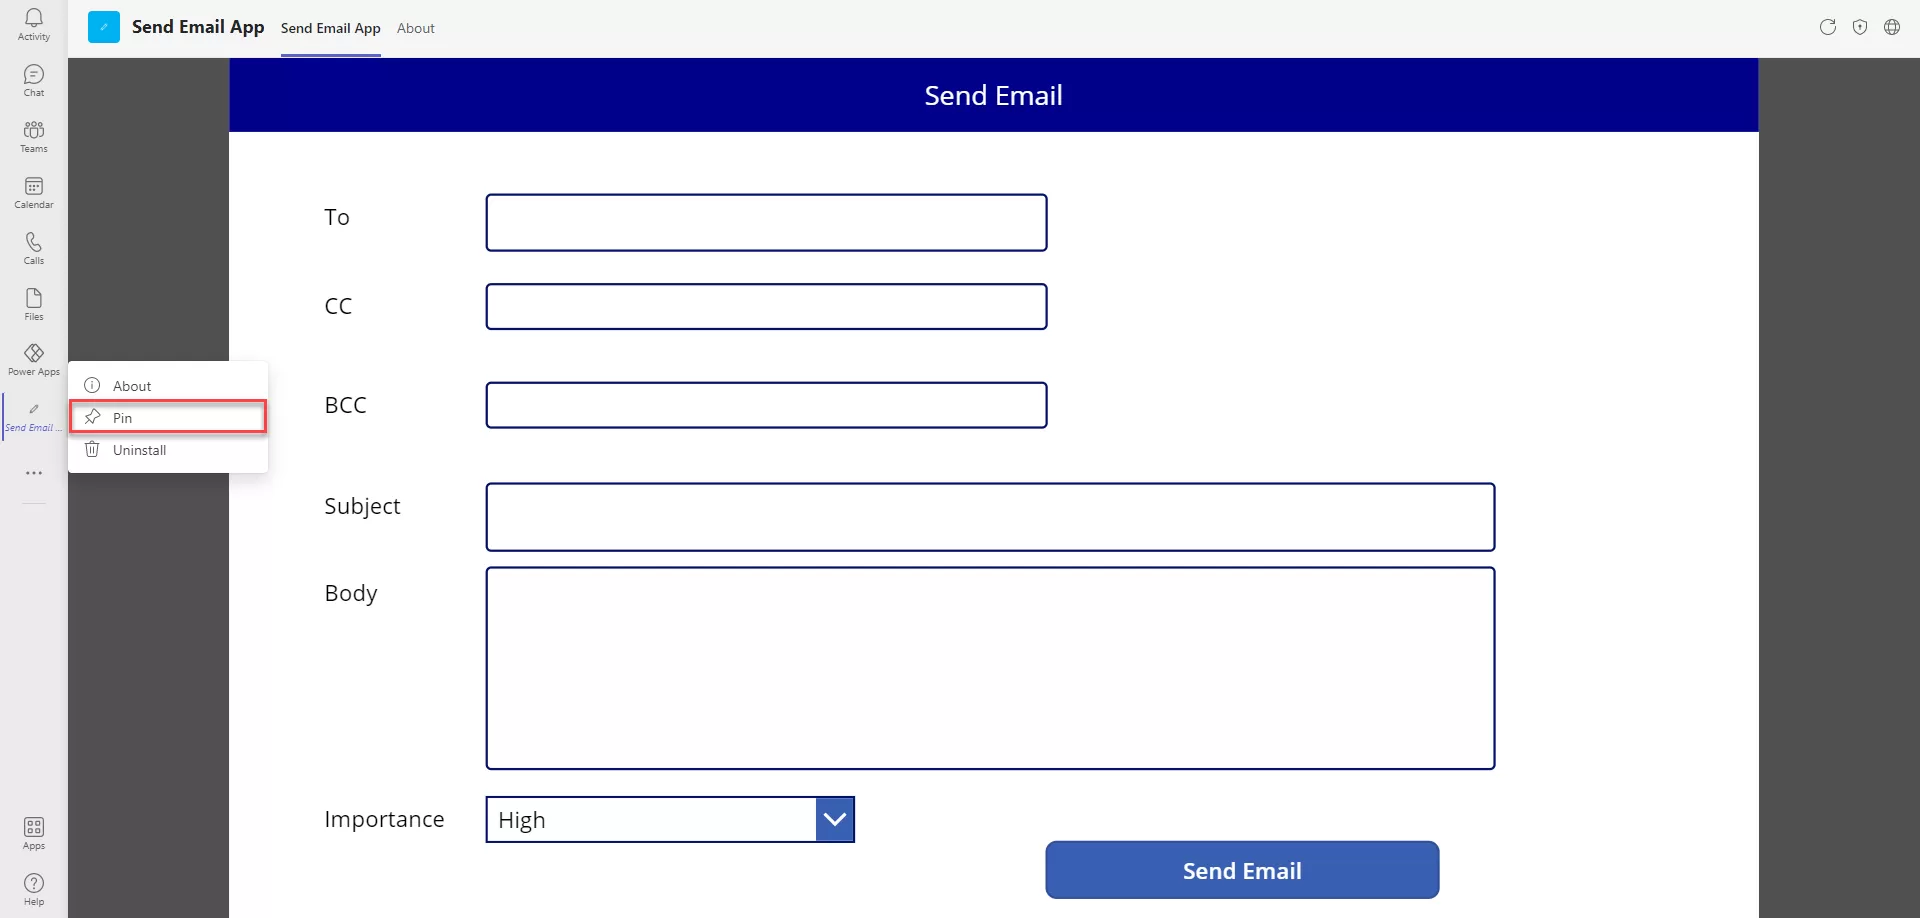
Step-7

Right-click the app icon to pin it to stay.

img-06

Additional Read

SharePoint for Enterprise Content Management – Why Should Choose?

Please post your question, if you will find while implementing this process. Thank you.
Generate a PDF from Microsoft Automate Method – 1

Summary

Recently while working for one of the client’s requirements, in which they wanted to generate a PDF saved in SharePoint Document Library once the user submits a Form. The PDF had to be in a pre-defined format that they were using as Word Document.

This was achieved with 2 different approaches –

Generate a PDF of SharePoint List Data Through HTML Template from Microsoft Flow

In this approach we created a html of the document and upload as a Template, used the template in Flow to create html file in OneDrive and then converted the file to PDF and saving it in SharePoint Document Library.

Generate a PDF of SharePoint List Data with Word Template from Microsoft Flow

In this approach we used the predefined format as Template in SharePoint Document Library, then updated the file properties and created a template in OneDrive then converting that template to PDF and saving in SharePoint Library.

Part-1

Generate a PDF of SharePoint List Data Through HTML Template from Microsoft Flow.

Step-1

Create a SharePoint Custom List named Conversion-to-PDF-from-Flow with necessary fields to enter the data, required to move to predefined PDF Format. Here I have taken following fields  

img-01

Create another SharePoint Document Library with name Test-PDF-Documents to store the generated PDF’s. 

Please note, while creating multi-line columns, make sure the plain text is selected. 

Step-2

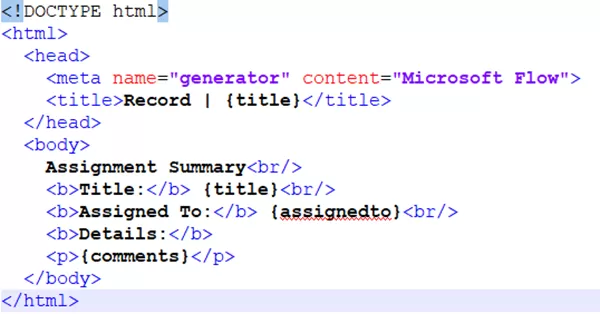
The HTML Template

Create a html format of the data you want, here is the format I used, the structure used here contains {tokens} that would be used in Flow compose actions to perform text replacements.  

img-02

This is a simple document, for creating more styled document, you can add CSS as per the requirements. 

Create a SharePoint Document Library named Templates to store the template in html format.

img-03

Step-3

Creating the Flow 

  • Create the flow with the trigger, when an item is created of SharePoint connector. Select the site collection address and List’s name. 

img-04

  • Click on + sign or next step, add Get Item action of SharePoint connector. Select the Site Collection address and List’s name and select ID parameter from Dynamic content window from When an item is created section. 

img-05

  • Add an action, Current time of Date Time connector. We would use the same in compose action while creating the file name.  

img-06

  • Add an action, Get File content of SharePoint connector. Select the Site collection address and the File Template, in this case I created a Library named Templates, and Template is the name of the template, we would be using  

img-07

  • Add an action Compose from Data Operations connector, in this action we would replace the token of template with the data from the list. The Expression we would use would be, replace. 

The expression would look something like this,

 @{replace(body(‘Get_file_content_-_HTML_Content’),'{title}’,body(‘Get_item’)[‘Title’])}

The title token, would be replaced by the Title that we would get from Get Items action.

img-08

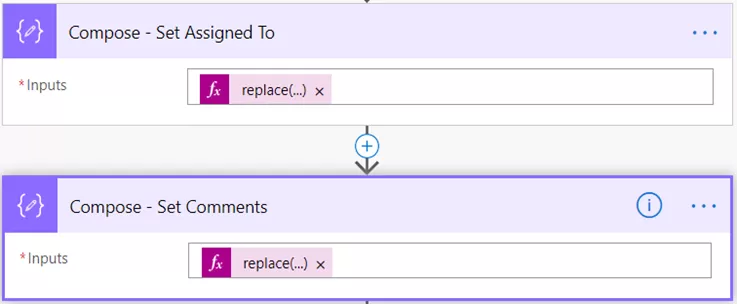
  • Similarly, we would add 2 compose actions to replace Assigned to and Comments section with the following expression respectively. 
        @{replace(outputs(‘Compose_-_Set_Title’),'{assignedto}’,body(‘Get_item’)? [‘AssignedTo’]?  [‘DisplayName’])}  
 
        @{replace(outputs(‘Compose_-_Set_Assigned_To’),'{comments}, body(‘Get_item’)? [‘Comments’])}

img-09

  • Add another Compose action to set the file name. We can set the name as we want, here I have taken Name from the SharePoint list and Current time to differentiate the files.  

img-10

  • Add an action, Create File of OneDrive for business connector. Select the Folder path, set the file name from the output of the File Name and add .html at its end, select the File Content from the output of action Compose- Set Comments 

img-11

  • Add an action, Convert File of OneDrive connector. Select the ID from the previous action of Create File  

img-12

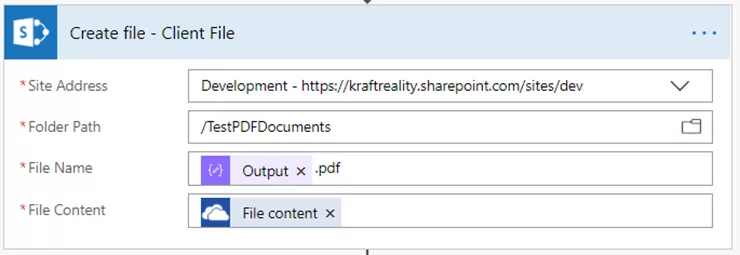
  • Add an action Create File of SharePoint connector. Select the Site collection address, select the Folder path as the Library where you would like to store the file, set the File Name as the output of action Compose- File Name and add .pdf at its end, set the File Content as the File Content from Dynamic Content of previous action Convert File 

img-13

  • Add an action to Delete the File created in OneDrive folder, Add Delete File of OneDrive for business connector. Select the ID as the ID that was used to create file from previous Create File action. Save the Flow. 

Additional Read

How to Migrate File Server to SharePoint Online [Expert Guide]


img-14

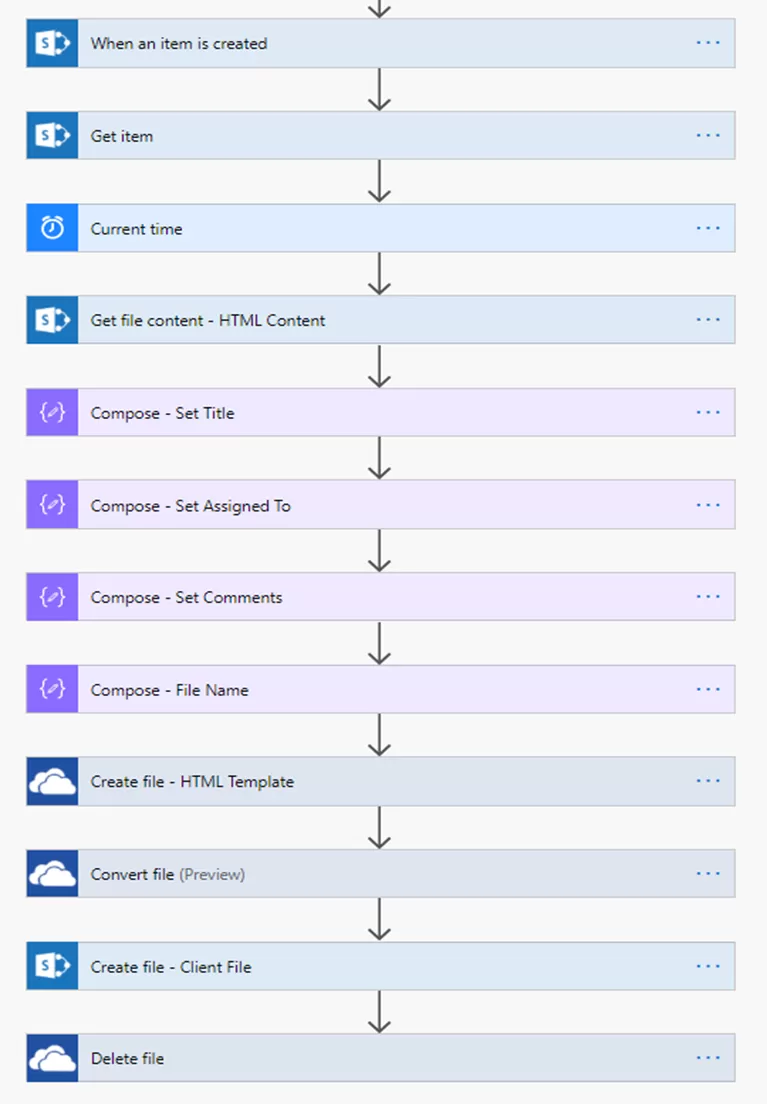
The final look of flow would be like this, 

img-15

Let’s enter data in our SharePoint Custom List Conversion to PDF from Flow,  

img-16

The document that would be created inside the Library after the Flow runs would come up as, 

img-17

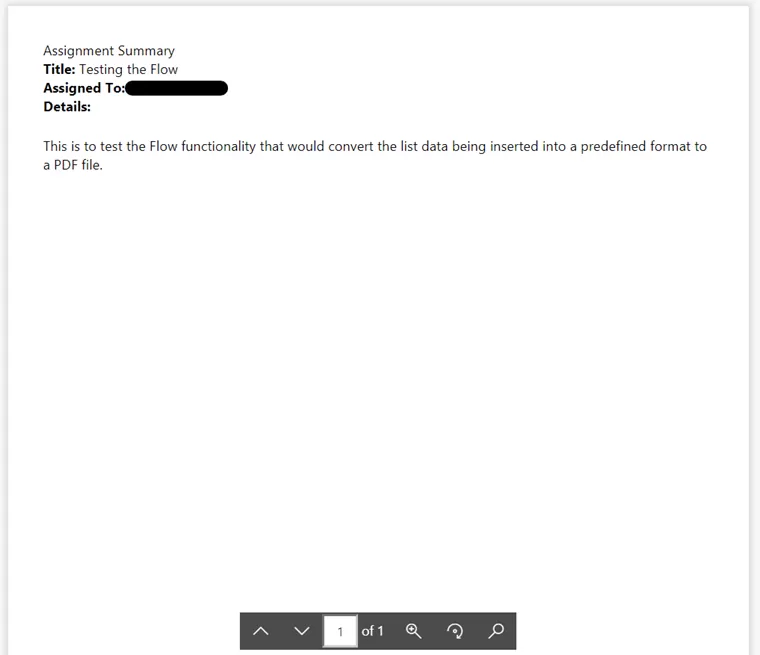
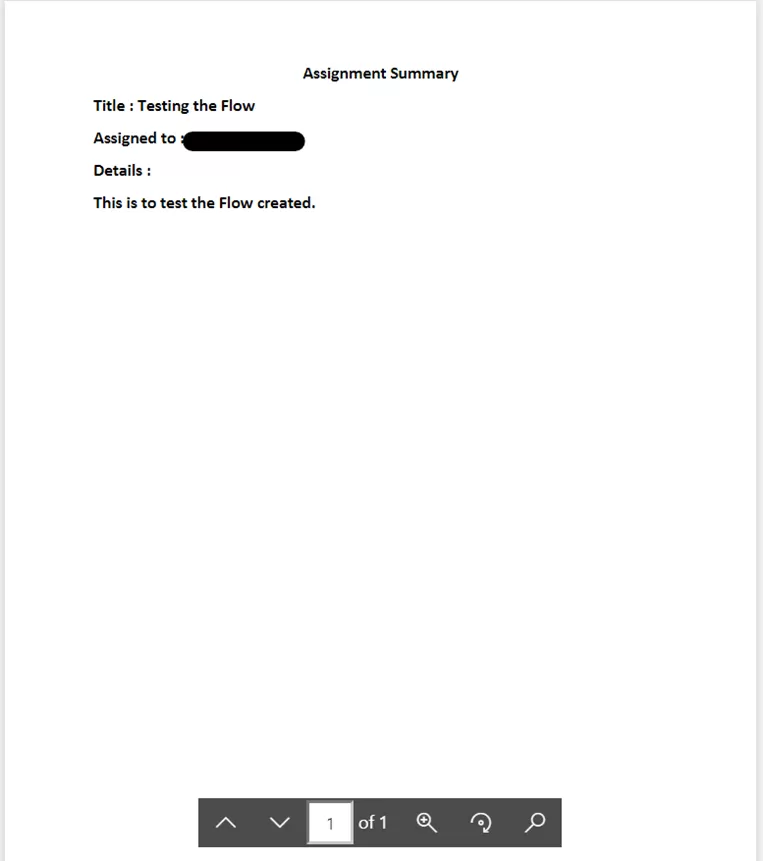
The file content will come up like this, 

img-18

Are you in need of assistance? We can help!

Book a live 1-on-1 call with the experts of Reality Tech to find out how we will help you to achieve your goal. You’ll find our solutions robust, scalable, and dependable.

Let’s talk!

Please post your question, if you will find while implementing this process. Thank you.

Generate a PDF from Microsoft Automate Method – 2

Table of Contents

Summary

In previous blog, we discussed Generating the PDF from Microsoft Flow with two approaches. The First one with an HTML Template can be accessed from here –link—
Let’s start with the Second approach,

Part-2

Generate a PDF of SharePoint List Data with Word Template from Microsoft Flow

This is the second approach for generating the PDF from SharePoint List data that is using the predefined format as Template in SharePoint Document Library, then updated the file properties and created a template in OneDrive then converting that template to PDF and saving in SharePoint Document Library.
The approach is described below:

Step-1

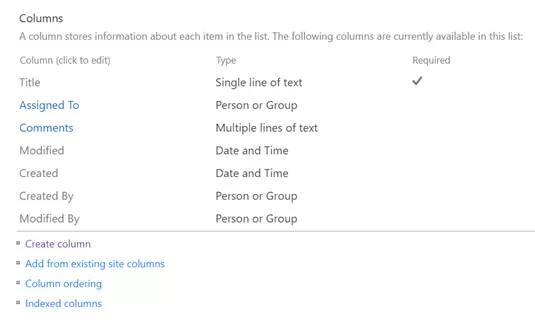
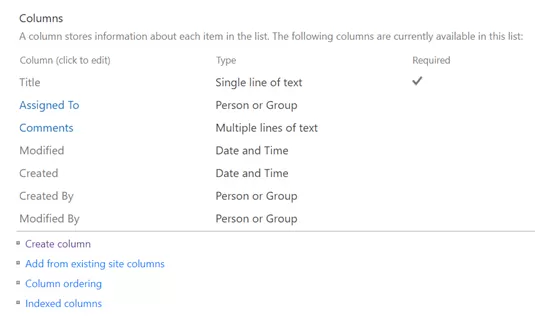
Create a SharePoint Custom List named Conversion-to-PDF-from-Flow with necessary fields to enter the data, required to move to predefined PDF Format. Here I have taken the following fields.

img-01

Create another SharePoint Document Library with name Test-PDF-Documents to store the generated PDF’s. 

Please note, while creating multi-line columns, make sure that  plain text is selected. 

Step-2

The Word Template 

Create a SharePoint Document Library named Test-PDF-Doc-Template. Create the same data fields created in the SharePoint List – Conversion-to-PDF-from-Flow. 

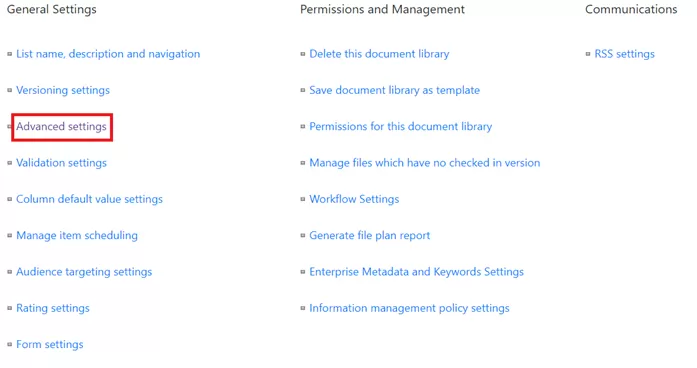
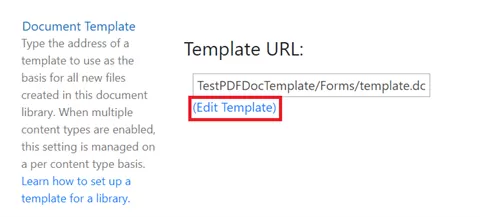
We would create a Document Template in the Library. We would also create the same data fields in the Library as we had created in the List named Conversion-to-PDF-from-Flow. Once we have created the same data fieldswe would go to Library Settings > go to Advanced Setting > Edit Template. 

img-02

img-03

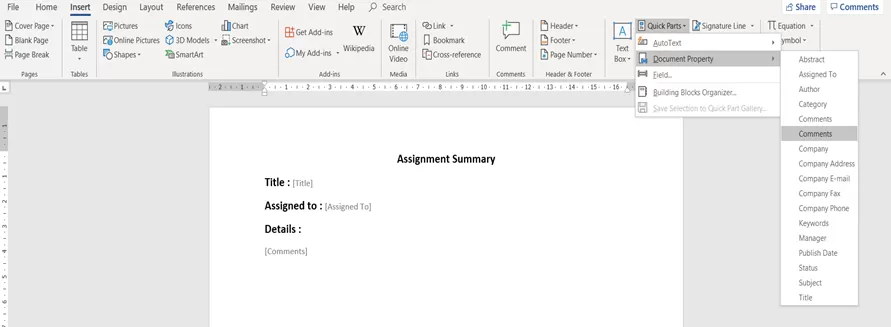
In previous approach, we used tokens. In this approach we would be using the Quick Parts from Insert tab. We can access or add them like Insert > Quick Parts > Document Property > Use the data column which would be used to replace the data inserted in it. 

img-04

One created the template would look like this, 

img-05

Once created, save it in .docx format.  

So the next time when you would try to edit the template it would have to be saved in .docx format. 

Step-3

Creating the Flow 

  • Create the Flow with trigger – When an item is created of SharePoint connector. Select the Site collection address and List’s name. 

img-06

  • Add an action – Get File Content of SharePoint connector. Select the Site collection address and the File from which the template would be taken and used to create the file.  

img-07

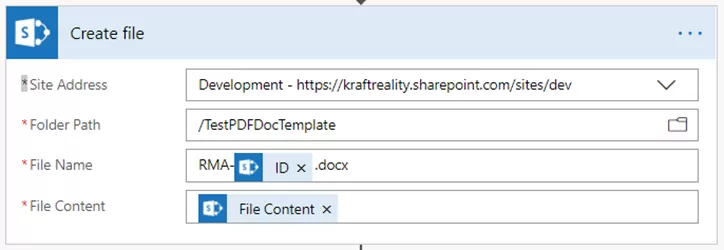
  • Add an action – Create File of SharePoint connector. Select the Site collection address, folder path to the template saved, Create a File name as required and select the file content from the dynamic content window from the previous action 

img-08

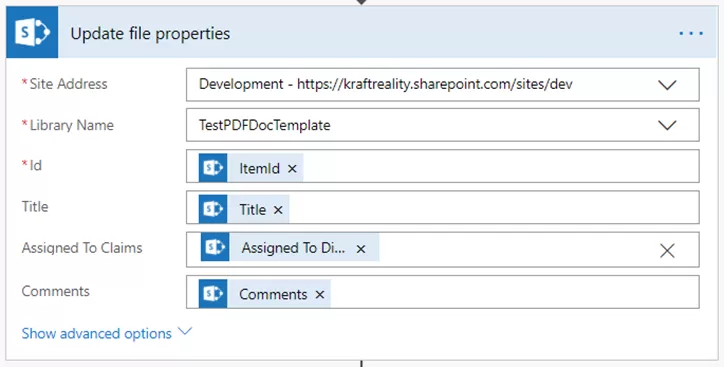
  • Add an action – Update File Properties, select the Site collection address, Library name, Select the ID as ItemID from previous action Create File action and select the data fields linked to each other. 

Additional Read

How to Migrate File Server to SharePoint Online [Expert Guide]

img-09

  • Add an action – Get File Content of SharePoint connector. Select the Site Collection address, and the file identifier, set the file identifier as file identifier from the previous action. 

img-10

  • Add an action – Create File for the OneDrive connector. Select the Folder path to save the file, name of the file and the file content as file content from previous action from dynamic content. 

img-11

  • Add an action – Convert File for the SharePoint connector. Select the File as ID from the precious action. 

img-12

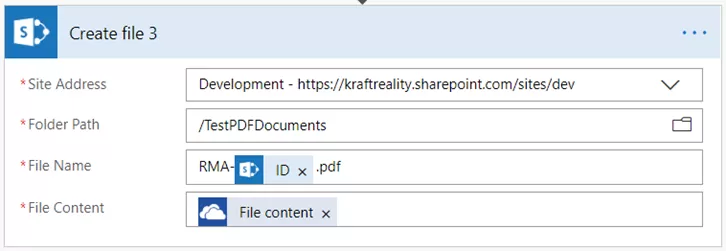
  • Add an action – Create File for the SharePoint connector. Select the Site collection address, folder path to save the file, name of the file with an extension .pdf and file content as File Content from previous action of Convert File.  

img-13

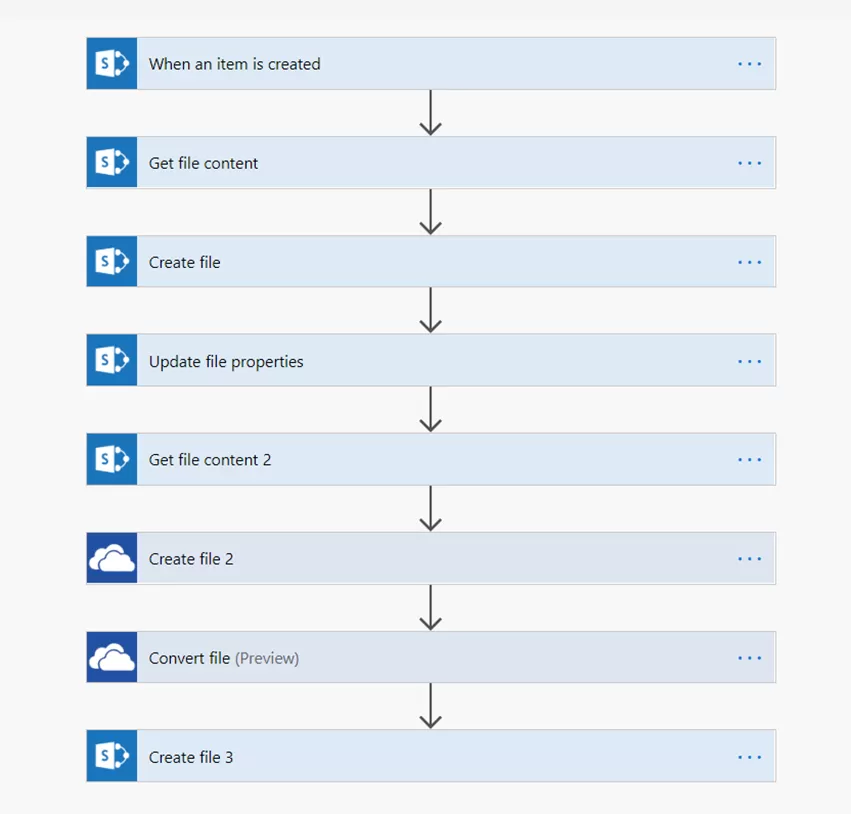
Once the Flow is created, it would look like this: 

img-14

Let’s enter data in our SharePoint Custom List Conversion to PDF from the Flow: 

img-15

The document that gets created in the Library named Test-PDF-Doc-Template while the Flow runs would appear like this: 

img-16

The document that would be created inside the Library Test-PDF-Documents after the Flow runs would appear as: 

img-17

The file content would look like this: 

img-18

Are you in need of assistance? We can help!

Book a live 1-on-1 call with the experts of Reality Tech to find out how we will help you to achieve your goal. You’ll find our solutions robust, scalable, and dependable. Let’s talk!

Please post your question, if you will find while implementing this process. Thank you.

How to Migrate File Server to SharePoint Online [Expert Guide]

Switching to SharePoint entails more than simply transferring all of your data to a cloud server: it’s a completely new browser-based environment linked to your company’s Microsoft 365 account.

While this offers many new features and capabilities, it also has an impact on every aspect of file use, and collaborative task and effort that relies on direct access to a network file.

Migrating to SharePoint Online may necessitate the utilization of a professional SharePoint online migration service provider.

As an end-user, you’ll most likely notice changes. The navigation system is designed differently because you’re accessing via the cloud, and load times are going to be somewhat impacted.

These variances are less likely to pose serious issues, but they’re still worth thinking about: Does a lag time of even 1-2 seconds have an effect on your workflow?

Before you migrate, you should consider all of these factors.

What is a File Server? (And What are the Drawbacks?)

SharePoint Online is a cloud-based file storage and collaboration platform that allows users to share, manage, and collaborate on documents in real time.

SharePoint Online differs from an on-premises file server in that it saves your files in the Microsoft cloud, whereas a file server normally stores them on your onsite network or in an offsite data center for enhanced protection.

Businesses have traditionally utilized on-premises file servers to allow employees to store and access data on a shared drive rather than on their own hard disks.

While this was a significant advancement in business technology at the time, there are various disadvantages to having a shared drive, including duplicate documents, limited metadata, no ability for end-users to adjust permissions, and a lack of search options.

As a result, a solution to boost both efficiency and productivity was required — Microsoft SharePoint.

Traditional file servers have gaps in collaboration; the files are frequently copied and duplicated, outdated versions are mistaken for the most recent rendition, and so on.

All of these things stymie teamwork; they produce communication snafus and can seriously jeopardize the efficiency of the company’s work processes, impacting the bottom line of key knowledge worker efficiency.

Additional Read

SharePoint for Enterprise Content Management – Why Should Choose?

It’s critical to plan your migration result by doing an assessment of your present source environment before you begin.

What you learn will have an impact on your entire strategy and timeline, including:

  • a) The mapping between source and target systems, as well as the architecture of the target environment.
  • b) The quantity of data you’re migrating. Determine if the material is outdated, redundant, or still relevant.

Make user onboarding a part of your initial planning. Inform your users about the move and how it will affect them as soon as possible.

Don’t put off preparing them for the change until go live.

How to Migrate from File Server to SharePoint Online?

Step 1: Do Your Homework First

Yes, there is an appeal to just pushing the Migrate button and informing your employer that you’ve done it, but one can’t migrate content without considering the information architecture, among other things.

We couldn’t possibly express all that needed to be accomplished in a single paragraph.

We have written a great deal about this in the past. At a high level, one must ensure that there is an understanding of how the envisioned SharePoint Information Architecture will function.

Lastly, the sites, document libraries, and metadata need to be realized and surfaced for end-user utilization.

Additional Read

Your Complete SharePoint Migration Guide (Step-By-Step)

Step 2: Select and Configure a Migration Tool

There is a range of commercial 3rd party tools available for content migration.

The selection of the appropriate tool depends on the content source, the volume of content, permissions needs, reporting needs, metadata tagging requirements, and budget.

For guidance in selecting the appropriate migration tool, consider consulting a reliable SharePoint development company like Reality Tech.

There is then the server sizing and configuration and license management of the migration tool.

 Step 3: Perform Your Test Migration

The initial test migration enables one to baseline throughput. With this information, the actual migration of these metrics is key and reflects both the existing network throughput as well as Office 365 SharePoint throughput.

The migration process should always begin with a test migration, as a sanity test on the network, latencies, tools, environment, configuration, throughput, and end-user experience.

The primary risk of the migration is Office 365 throttling.  This occurs in both reading from the source and writing to the destination.  To some extent, this can be optimized by extended efforts, especially during off-peak hours.

Additional Read

How to Activate SharePoint Publishing Infrastructure

Step 4: Plan the Migration

If the volume of content exceeds the throughput that can be migrated in a single weekend as determined during baseline migration testing, then migration in phases is recommended.

Migration in phases allows content map creation, which ensures that each team understands the content transformation as it migrates from the source file server to the new SharePoint environment.

The process of migrating a single group of content as a discrete phase is not only manageable but also reduces the limitations for larger migrations and reduces the number of users impacted on any given weekend cutover.

The following activities are part of the migration planning process:

A. Inventory

In order to migrate, we need to identify what will be migrated, and what will be left in place or archived and not migrated.

This leads then to the design of mapping, from source to proposed destination.

B. Long URL analysis

Efforts to the surface where long URLs may be an obstacle.  Approaches to remediate and address found instances.

These may include proposed hierarchy flattening, or shortening/renaming key folder nodes.

C. Orphan Accounts

Review of handling of accounts that are inactive. Disabled accounts are a known challenge for migration on tagging documents during migration.

This will require some discussion and review of options and setting expectations.

D. Exception Planning

Planning for an approach to handle exceptional situations is needed in advance. One aspect is simply planning for end-user coordination, as well as a general approach to handling with or without user involvement.

This covers topics such as:

  • Blocked File Extensions
  • Very Large Files

E. Site Architecture

Planning for a Site Collection approach, for the appropriate granularity in support of the migration in planned phases:

  • Site Collection granularity, in planning for long-term future growth
  • URL design
  • Site Template
  • Possible site hierarchy
  • Possible security consolidation and simplification
  • Navigation, and possible use of Hub site(s)

F. Project Planning

  • Migration planning, sequence, cut-over planning, and communication
  • Identification of critical path and optimized sequencing of efforts

G. Risk Management

Identification of key risks and mitigation activities

H. Estimation of Remaining Migration Stages

Refined estimation of effort and duration for migrating each department (LOB)

The changeover process in a SharePoint migration plan includes:

  • Stopping workflows that are identified for migration
  • Initial migration
  • Delta migrations
  • Changing the setting of the source to read-only

Are you in need of assistance? We can help!

Book a live 1-on-1 call with the experts of Reality Tech to find out how we will help you to achieve your goal.

Step 5: Initial Migration

The initial migration surfaces migration issues and related migration failures, that are successively addressed.

Once a successful initial migration is completed, changes are made at the source, and any remaining errors, are addressed in the delta migrations.

Typically a delta migration is done daily, up until the migration cutover.

The actual delta frequency is determined by the content sizing, and duration to both analyze the prior migration results and duration to execute the delta migration.

The bulk of the project duration will be on the migration of content.

The approach is to initially move the maximum amount of content, and only when close to cutover, do the final updates to the destination known as the “Delta” migration. This Delta is the final sync-up of content.

Step 6: Delta Migration

The final true-up of content is done and finalized and prepared for the transition.  This is done repeatedly leading up to the cutover.

Typically the delta is applied based on the date of the initial migration (or prior delta).

 Conclusion:

It is recommended but time-consuming to migrate from old-school file sharing to SharePoint. The majority of the work is in the analysis.

Migration is an opportunity to examine all of the content on your file shares in detail and make careful decisions on what to migrate, what to archive, and what to eliminate.

Speak with Professional SharePoint experts about archiving or removing outdated or duplicate material, restructuring for a more coherent organization of content, creating an information architecture in SharePoint, and utilizing all of SharePoint’s and Microsoft 365’s great new capabilities!