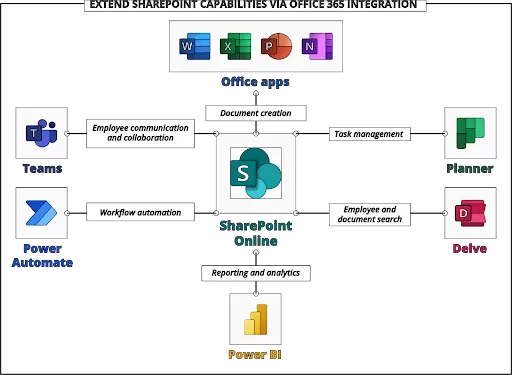
Safeguarding Collaboration Through Sensitivity Labels Across Microsoft Teams, Microsoft 365 Groups, and SharePoint Sites

Beyond safeguarding documents and emails, sensitivity labels offer protection for content within various containers like Microsoft Teams sites, Microsoft 365 groups (previously Office 365 groups), and SharePoint sites. These labels can be applied to manage settings such as:

  • Privacy (public or private) of team sites and Microsoft 365 groups
  • External user access, external sharing from SharePoint sites
  • Access from unmanaged devices
  • Authentication contexts
  • Default sharing links for SharePoint sites (configuration via PowerShell only)
  • Site sharing settings (configuration via PowerShell only) and default labels for channel meetings.

Safeguarding Collaboration: Implementing Sensitivity Labels Across Microsoft Teams, Microsoft 365 Groups, and SharePoint Sites

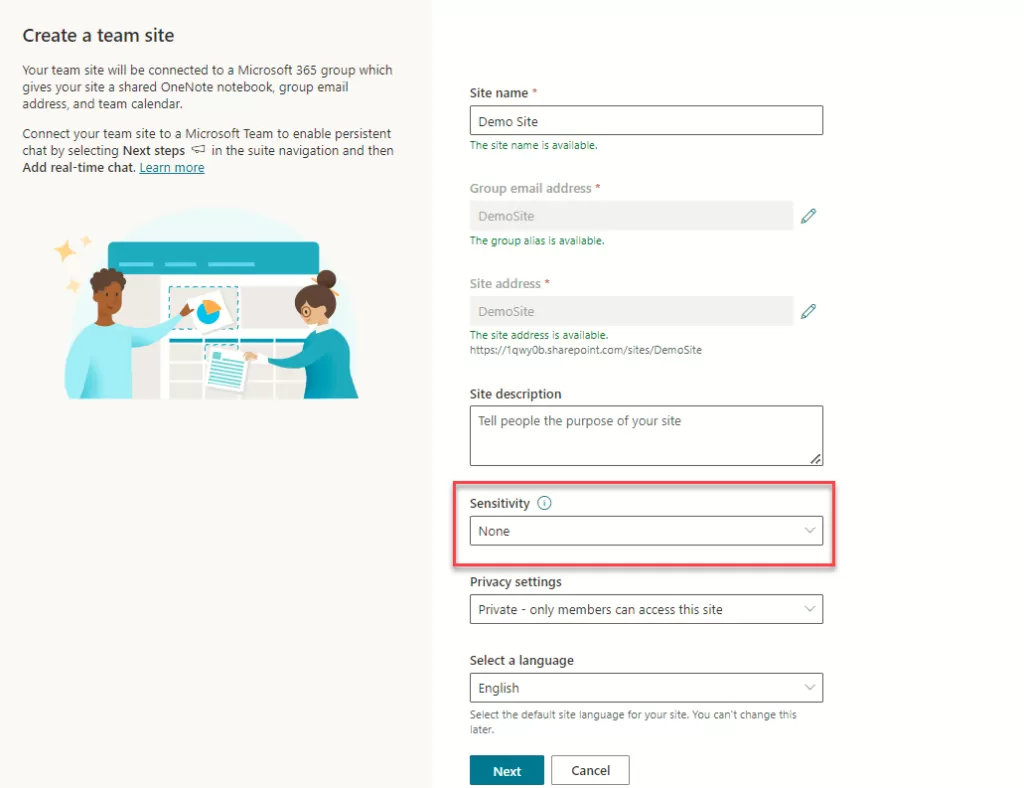
Once sensitivity labels for containers are set up, users can view and use them for Microsoft team sites, Microsoft 365 groups, and SharePoint sites. For instance, when making a new team site in SharePoint.
img-01

Once a sensitivity label has been assigned to a site, changing that label in SharePoint or Teams requires specific roles:

  • For a group-connected site: Microsoft 365 group Owners
  • For a non-group-connected site: SharePoint site admin
  • Learn the process of activating sensitivity labels for containers and ensuring label synchronization.

If you haven’t yet enabled sensitivity labels for containers, do the following set of steps as a one-time procedure:

Ensure that this PowerShell snippet is executed with Global Administration privileges.

 
Import-Module AzureADPreview
Connect-AzureAD

#Run the code snippet below if you don't have directory settings
Get-AzureADDirectorySettingTemplate

$TemplateId = (Get-AzureADDirectorySettingTemplate | where { $_.DisplayName -eq "Group.Unified" }).Id

$Template = Get-AzureADDirectorySettingTemplate | where -Property Id -Value $TemplateId -EQ

$Setting = $Template.CreateDirectorySetting()

#Use URL of Your Tenant
$Setting["UsageGuidelinesUrl"] = "https://Tenant.sharepoint.com/_layouts/15/sharepoint.aspx"

$Setting["EnableMIPLabels"] = "True"

New-AzureADDirectorySetting -DirectorySetting $Setting

$Setting.Values

#For existing settings
#$Setting = Get-AzureADDirectorySetting -Id (Get-AzureADDirectorySetting | where -Property DisplayName -Value "Group.Unified" -EQ).id
#$Setting.Values
#$Setting["EnableMIPLabels"] = "True"
#Set-AzureADDirectorySetting -Id $Setting.Id -DirectorySetting $Setting

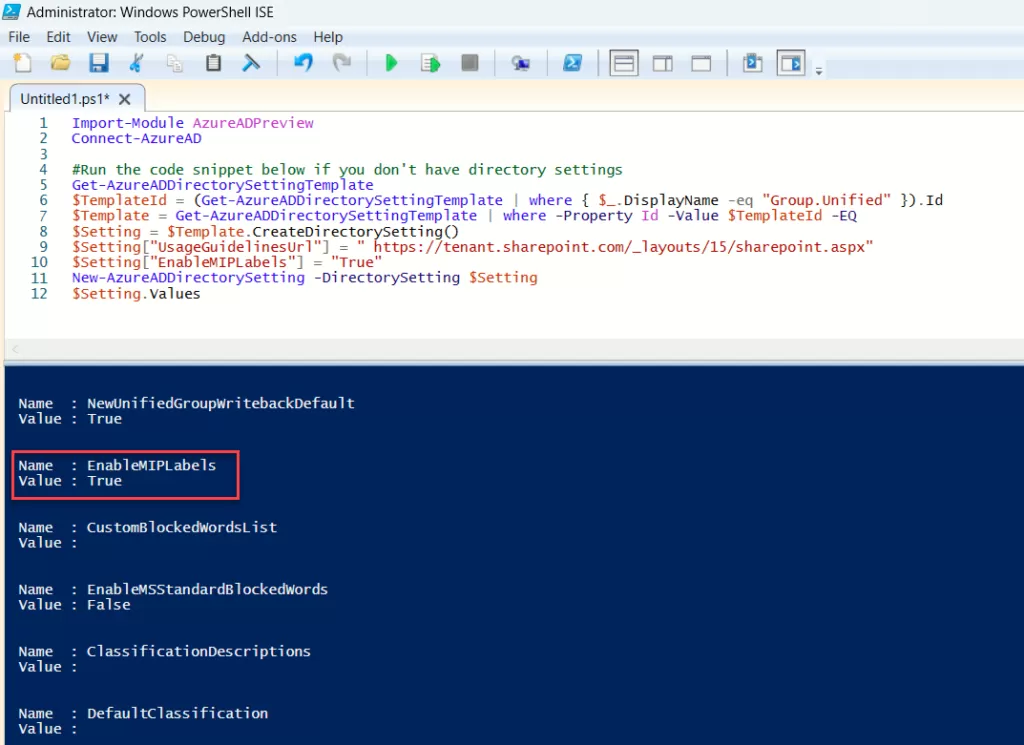
Once you run this script in Windows PowerShell (run ISE as an Administrator), a pop-up will appear prompting you to input the credentials of the “Global Administrative Account”. Following that, review the highlighted outcome below. (Name: EnableMIPLabels Value: True)
img-02

Optimizing Group and Site Settings: A Configuration Guide

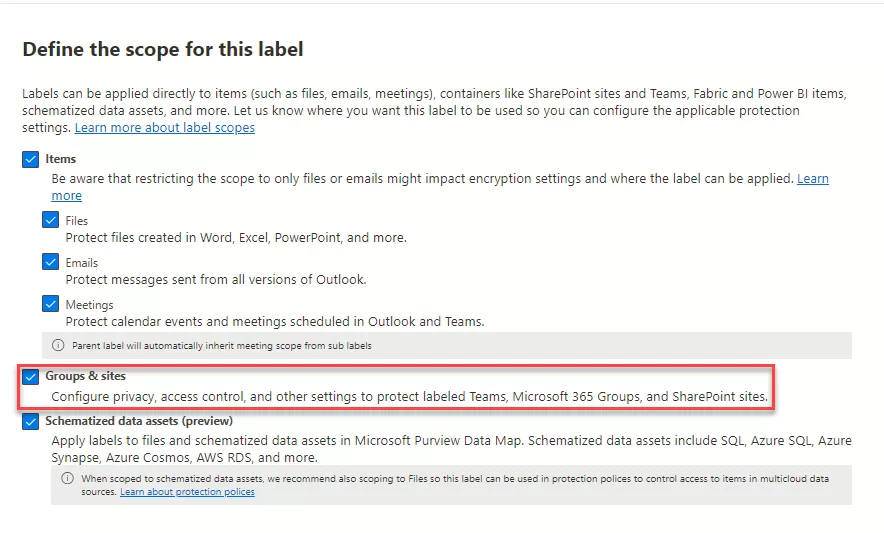
Once sensitivity labels are activated for containers as detailed earlier, you can now establish protection settings for groups and sites within the sensitivity labeling setup. Access Microsoft Purview > Information Protection > Labels > Create Label. You’ll notice that the option for “Group & sites” in the label scope is now enabled.

To access Microsoft Compliance, click here Microsoft Purview
img-03

Next, within the “Define protection settings for groups and sites” page, choose either or both provided options:

  • Adjust the “Privacy and External user access” settings to configure Privacy and External user’s access.
  • Adjust “External sharing and Conditional Access” settings to configure Control external sharing from labeled SharePoint sites and Use Microsoft Endpoint Conditional Access to protect labeled SharePoint sites settings.

img-04

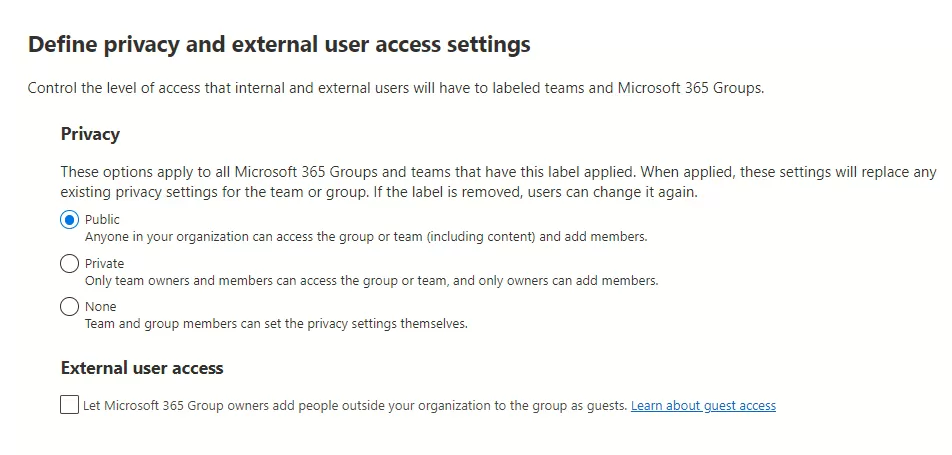
For “Privacy and external user access settings”:

  • Public: Allows anyone in your organization access to the labeled site or group.
  • Private: Limits access to approved members only within your organization.
  • None: Protects content with the sensitivity label while enabling users to adjust privacy settings themselves.

Your chosen setting replaces prior privacy configurations and locks it. Changing requires removing the sensitivity label first. Once removed, the labeled privacy setting remains, and users regain control.

  • External user access: Manages the group owner’s ability to add guests to the group.
img-05

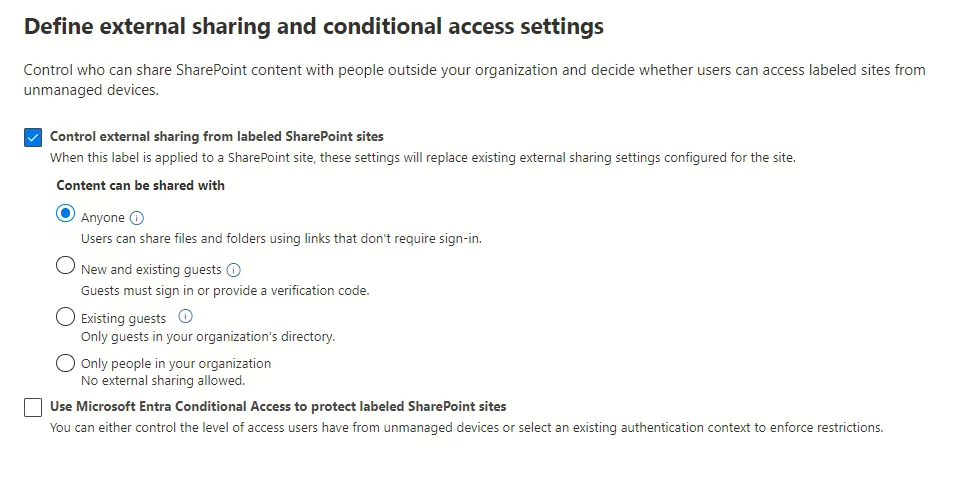
If you’ve chosen External Sharing, proceed to adjust these options:

  • “Control external sharing from labeled SharePoint sites”: Choose from external sharing options like anyone, new and existing guests, existing guests, or only internal users.
  • If your sensitivity label hasn’t been published yet, proceed by adding it to a sensitivity label policy. Users assigned to this policy, encompassing this label, will gain the ability to choose it for sites and groups.
img-06


Select this option: If you want to:
Anyone Allow site owners and others with full control permission to share the site with people who authenticate. Allow site users to decide when sharing files and folders to require authentication or allow unauthenticated people to access the item. Anyone links to files and folders can be freely forwarded.
New and existing guests Allow site owners and others with full control permission to share the site with people outside the organization. These people will need to sign in and will be added to the directory. Allow site users to share files and folders with people who aren’t in the organization’s directory.
Existing guests Allow sharing with only people already in your directory. These users may exist in your directory because they previously accepted sharing invitations or because they were manually added. (These users have #EXT# in their user’s principal name.)
Only people in your organization Prevent all site users from sharing any site content externally.

Power Automate Using Copilot

What is Power Automate Copilot?

Microsoft’s Power Automate AI Copilot is a solution designed to streamline complex tasks and procedures.

Its primary function is to utilize artificial intelligence to recognize user queries and provide the best possible results.

To take advantage of the Power Automate AI Copilot, you must have access to a Power Automate environment that is in the United States or Europe through a work or school account that has been granted authorization.

How Copilot Feature Works in Power Automate?

  • Power Automate transcends the conventional workflow design by integrating AI-driven conversations, primarily through Copilot. Seamlessly embedded within Power Automates flow studio, Copilot acts as a guiding force, offering support and direction during the creation or modification of flows.
  • Within Power Automate, Copilot introduces an interactive, conversational element to the flow-building process. Users can engage in open-ended discussions, seeking assistance or clarification while constructing flows. Crucially, Copilot’s natural language processing eliminates the need for specialized knowledge of Power Automate’s intricacies, allowing users to create workflows, from simple processes to complex enterprise-wide procedures.
  • This user-friendly approach ensures inclusivity, enabling users of varying expertise levels to build robust, effective flows collaboratively and confidently with Power Automate’s Copilot.
  • There are many methods to generate the flow using copilot features.
    • This inclusive and user-friendly approach ensures that users, regardless of their level of expertise, can confidently and collaboratively build robust and effective flows with Power Automate Copilot.

Method – 1: Upon accessing Power Automate, you will notice a description box displayed on the homepage, as depicted in the image below.

img-01

Method – 2:  An alternative method is available on the left panel of the homepage where you can select “Create.” This action will prompt the appearance of options on the right side, including the “Describe it to design it” feature, as illustrated in the image below. Subsequently, upon selecting this option, a new window opens allowing you to input your description.

img-02

Example – 1

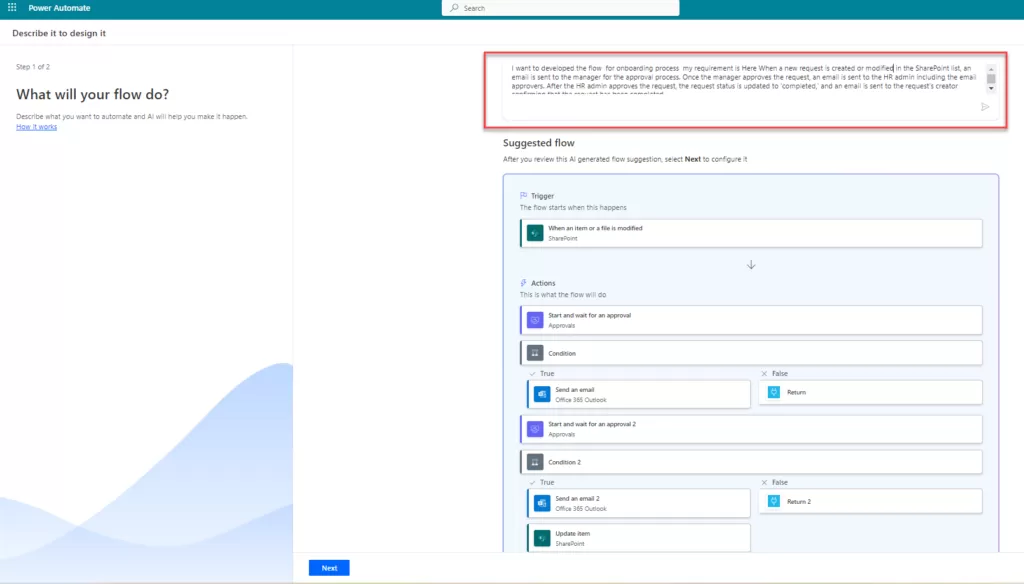
 Let’s build the onboarding Approval process using Copilot.

Sample Prompt: I want to develop the flow for the onboarding process my requirements is here When new request is created or modified in the SharePoint list, an email is sent to the manager for the approval process. Once the manager approves the request, an email is sent to the HR Admin including email approvers, After the HR admin approves the request, the request status is updated to ‘Completed’, and email is sent to the request creator to be conforming that the request has been completed.

img-03

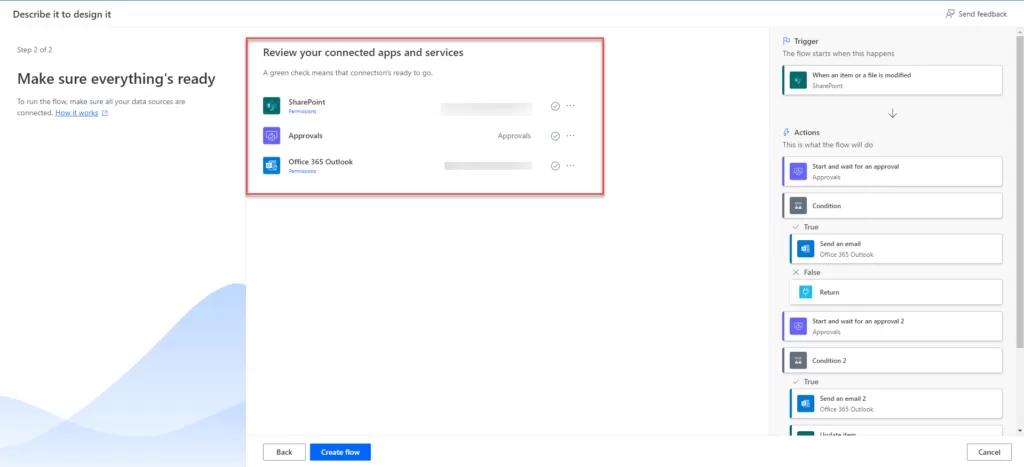
  • Click on the next button you can see that all required power automates connectors required in the automatically add as show in the below image.

img-04

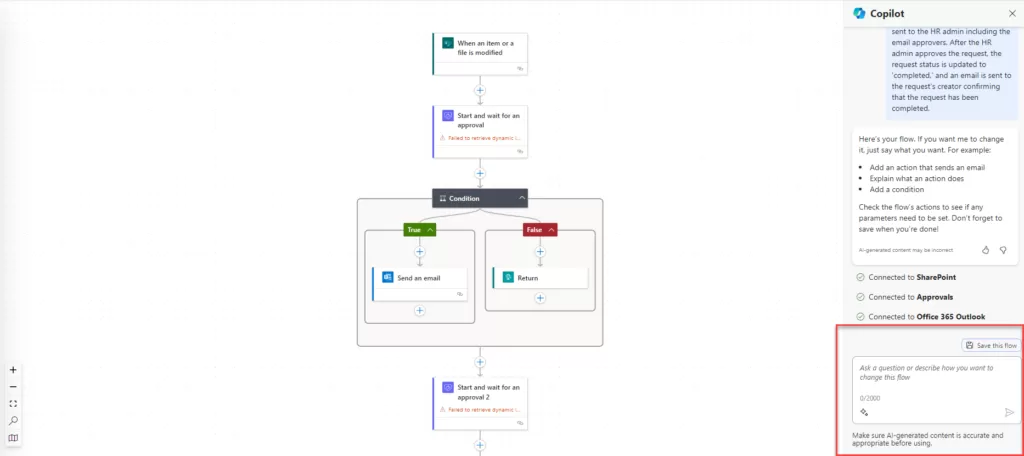
  • When Click on the ‘Create flow’ button, Power Automate AI Copilot uses its AI development function to find and execute relevant activities, which automatically creates the flow.

img-05

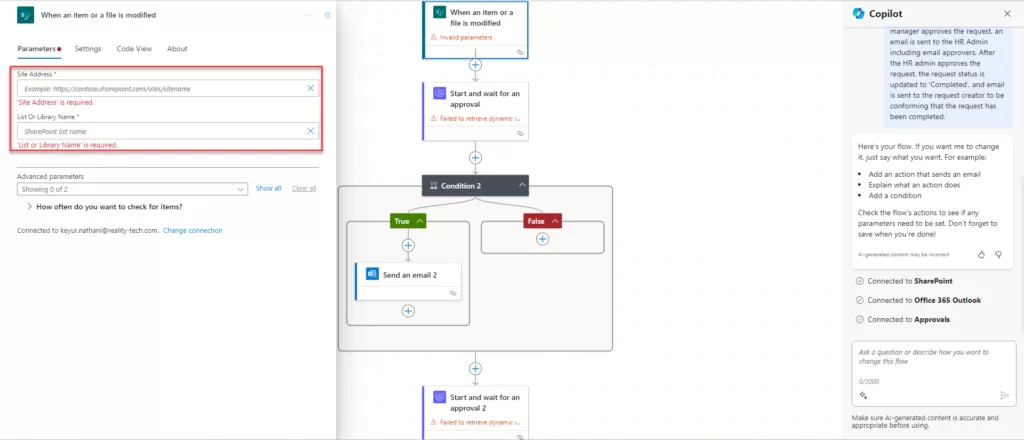
  • When you click the trigger, a pop-up will appear on the left-hand side, prompting you to select the relevant information needed to complete a specific task. The SharePoint trigger “When item is created or Modified” is available in this scenario, and it requires two primary parameters: the site address and the List or Library name. As an example, consider the following:

img-06

  • Similarly, you must include all specific actions, necessary items, and relevant steps required for the onboarding approval process.
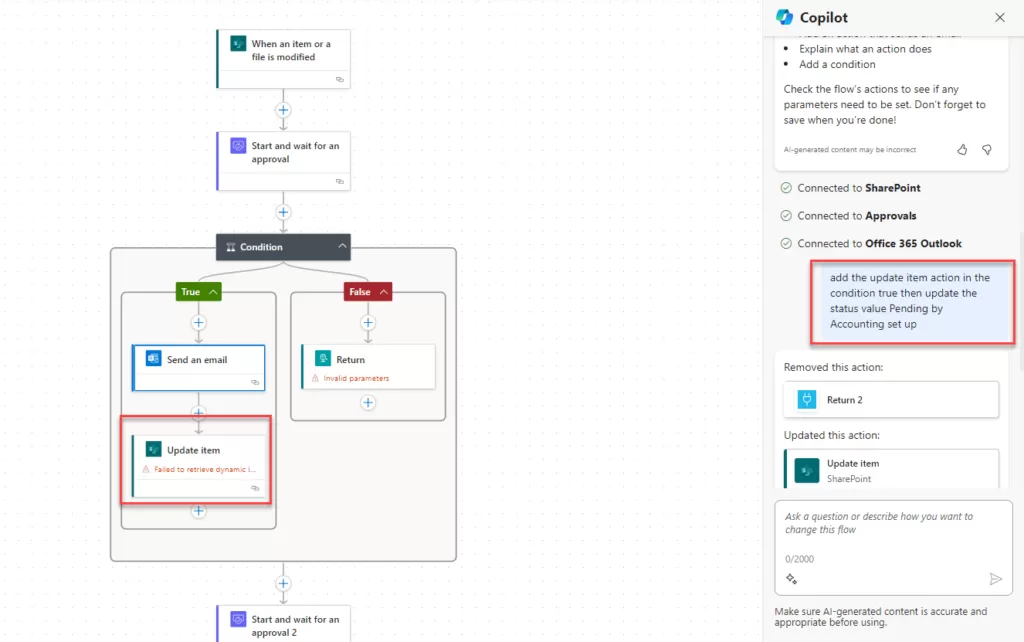
  • You may also include actions based on your individual needs by typing into the Copilot function. For example, if you wish to add an “update item” action under a specific condition, enter the following question, as seen below.
    Sample prompt “add the update item action in the condition true then update the status value Pending by Accounting set up”.

img-07

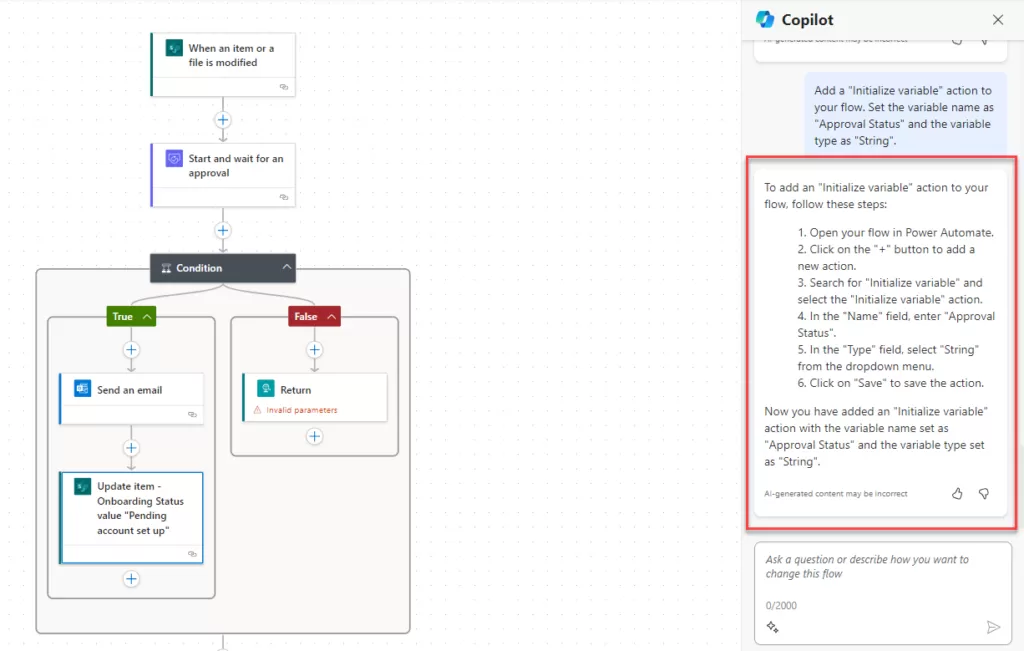
  • If the copilot does not add the certain action, then it’s also provided the suggestion to how you can add the action and performed your task as show in the below image:

img-08

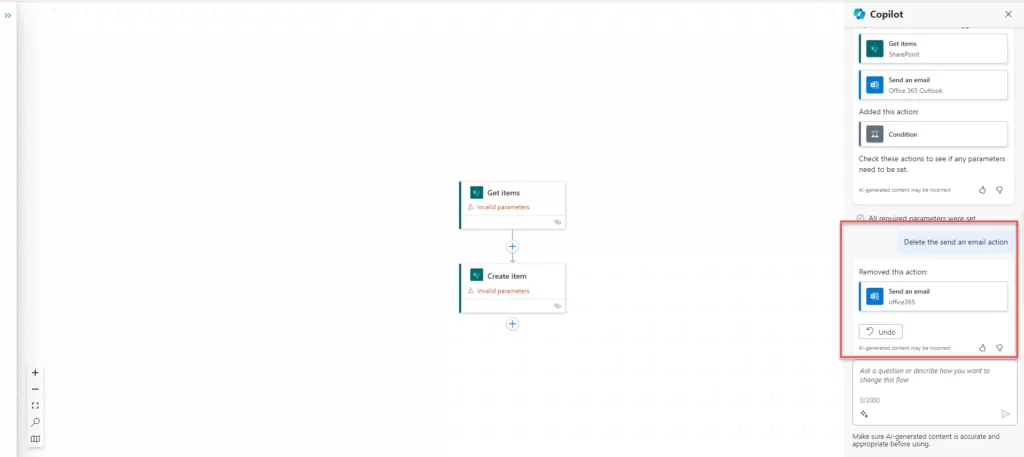
  • If users wish to remove a specific action, they can achieve this by entering the command “Delete the Send an email action” into the AI-generated box. This input serves as an instruction for the artificial intelligence system, prompting it to identify and subsequently eliminate the specified “Send an email” action from the process or workflow. Users can use this straightforward command to communicate their intent to the AI, enabling a seamless and efficient removal of the designated action.

Example – 2

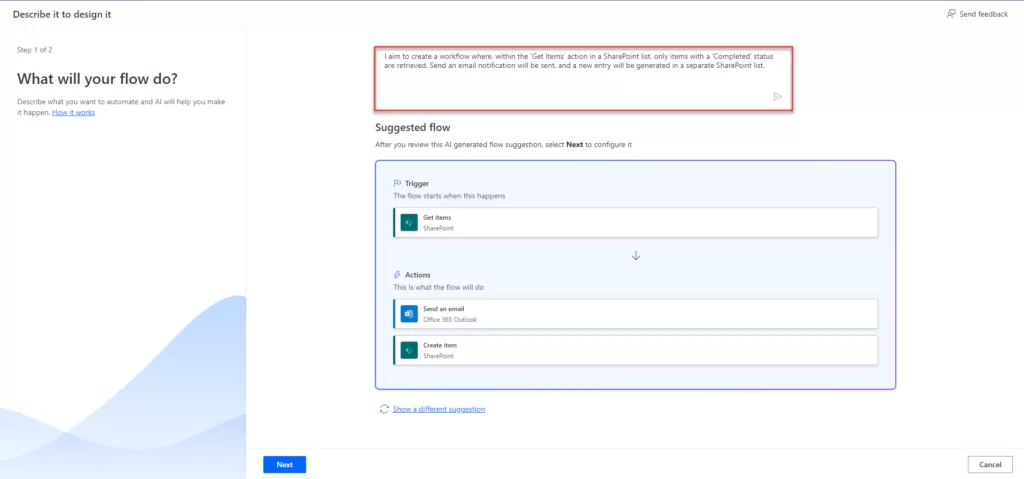
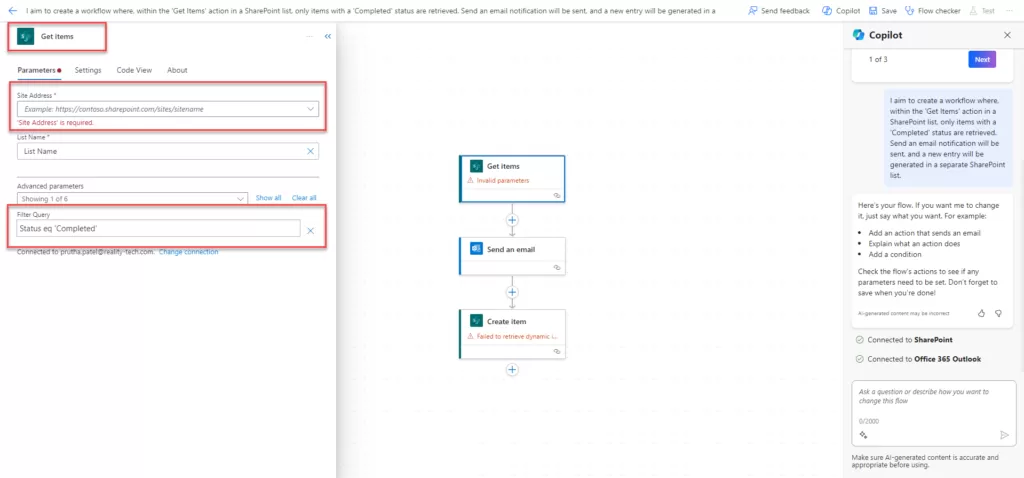
Sample Prompt: I aim to create a workflow where, within the ‘Get Items’ action in a SharePoint list. only item with a ‘Completed’ status are retrieved. Send an email notification will be sent, and a new entry will be generated in a separate SharePoint list.

img-09

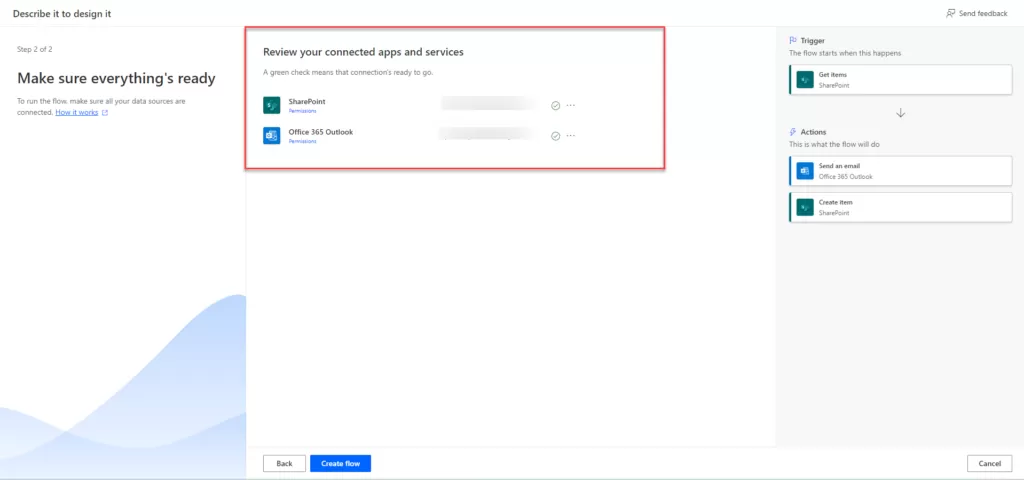
Proceed to the next stage by clicking on the “Next” button. Take a moment to attentively observe the smooth integration of Power Automate actions, as they seamlessly become part of the workflow without manual intervention. For a more comprehensive understanding of this process, refer to the visual representation presented in the image below, as indicated by the user in the details box.

img-10

Users can customize conditions and logic based on their preferences. Select the ‘Get Items’ option and open the left-side box to observe the AI (Artificial Intelligence) independently generating a filter query for the ‘completed’ status, as previously mentioned. Additionally, users can include the site and list to establish the connection.

img-11

Users can change the filter query then users write in the AI- generated box and AI changed the filter query which user mention likewise, below example. Users have the option to modify the filter query by entering their specifications into the AI-generated box. The AI will then adjust the filter query based on the users provided.

If users wish to remove a specific action, they can achieve this by entering the command “Delete the Send an email action” into the AI-generated box. This input serves as an instruction for the artificial intelligence system, prompting it to identify and subsequently eliminate the specified “Send an email” action from the process or workflow. Users can use this straightforward command to communicate their intent to the AI, enabling a seamless and efficient removal of the designated action.

img-12

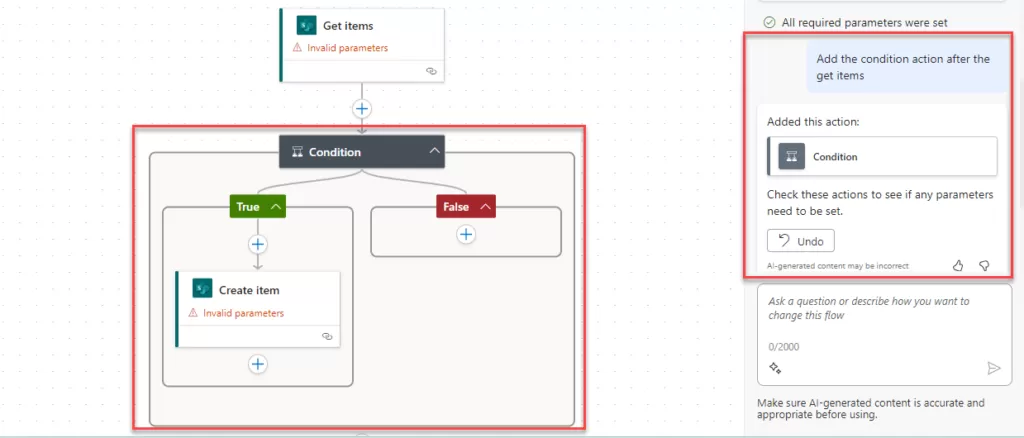
Users have the flexibility to incorporate the action at their preferred location, as demonstrated in the image below. This means that users can choose where within the provided context they would like to add or perform the specified action. The image serves as a visual guide, illustrating the diverse options or possibilities for integrating the action within the given framework.

img-13

Users have a complex task with multiple steps and uses need help understanding how it works. users would write down questions or instructions in the AI system’s input box. The AI would then analyse users input and provide you with a complete explanation of the task, including each step, any dependencies, and any other relevant information users might need to know. This explanation would be tailored to user’s specific needs and would help users understand the workflow in a comprehensive and easy-to-grasp manner.

The preview version of Copilot within Power Automate has certain constraints and boundaries.
  1. Limited Parameterization Support: Copilot’s current functionality might not fill in parameters for all actions, although it is available in certain connectors.
  2. Limited Support for Looping Constructs: Creating looping constructs like ‘Apply to each’ and ‘do until’ has limited support within Copilot.
  3. No Support for Solution Flow Using Connections Instead of Connection References: Copilot does not support using a solution flow with connections instead of connection references. It is recommended to utilize a connection reference instead.
  4. ncompatibility with Personal Microsoft Accounts: Copilot cannot be utilized with personal Microsoft accounts (e.g., someone@live.com). It requires a work or school account like someone@contoso.com.
  5. Language Support: Copilot currently only supports the English language for its models.
  6. A flow may include an unsupported hybrid trigger. Hybrid triggers operate without connections and are manually triggered from outside of Power Automate. Examples of such triggers include actions like selecting an item or selecting a row.

KWIZ & ProvisionPoint forge a strategic partnership with Reality Tech to revolutionize Microsoft Technology Solutions

KWIZ and ProvisionPoint, operating as a unified force and recognized as a distinguished provider of Microsoft SharePoint governance and technology solutions, have entered into a strategic partnership with Reality Tech, a leading SharePoint Services and solution provider. This collaboration empowers organizations with cutting-edge, efficient and user-centric Microsoft technology solutions.

A Unifying Vision: Enhancing Efficiency, Speed, and Agility

Reality Tech, known for its deep experience in SharePoint deployments, migrations, intranets, workflows, and custom solutions, has consistently delivered excellence, optimizing collaboration within the Microsoft ecosystem. Their commitment to tailored services perfectly aligns with their clients’ diverse and evolving needs.

This strategic partnership brings together the unique strengths of KWIZ & ProvisionPoint, and Reality Tech, offering organizations a comprehensive suite of Microsoft technology solutions. This suite is meticulously designed to elevate efficiency, accelerate processes, and instill a new level of agility in business operations.

Key Highlights of the Partnership:

  • Innovative Solutions: KWIZ & ProvisionPoint, and Reality Tech unite to enhance and extend the possibilities of Microsoft technology solutions.
  • Enhanced Efficiency: The partnership aims to transform processes, empowering organizations with streamlined workflows.
  • User-Centric Governance: Reality Tech, in collaboration with KWIZ and ProvisionPoint, is poised to contribute to effective provisioning, compliance and control over Microsoft 365 environments.
  • Customized Services: KWIZ, ProvisionPoint, and Reality Tech offer a blend of customized web parts and integrated solutions to provide clients with precision and agility.
  • Tailored Services: KWIZ & ProvisionPoint, and Reality Tech offer a blend of customized solutions and integrated tools aimed at delivering precision, increased productivity, enhanced user experiences and optimizing the utilization of existing software to its fullest potential.

Insights from the Partners:

“Efficiency is at the core of our partnership. By combining our strengths, we aim to revolutionize processes and empower organizations with streamlined workflows and governance processes,” emphasized Fadwa Elsaqa, Partner Manager, KWIZ & ProvisionPoint.

“Tailoring services to meet unique client needs is our forte. The partnership introduces a spectrum of customized solutions intended to offer clients precision, adaptability and immediate responsiveness” highlighted Joel Plaut, Principal Architect at Reality Tech.

This partnership represents a collective vision to introduce an integrated range of services and products, focusing on efficiency, speed and an enriched and enlightened user experience in the Microsoft technology solutions landscape.

KWIZ & ProvisionPoint, and Reality Tech invite organizations to embark on a transformative journey toward heightened productivity and enhanced user satisfaction. 

For more information, please also visit https://kwizcom.com/https://provisionpoint.com/.

Getting Started with Power Pages

Introduction

Power Pages are like a toolbox for making websites that help businesses grow. With Power Pages, we create websites that work smoothly on computers and phones. Using Copilot makes building websites easy. There are lots of different designs to choose from in Power Pages, so we can pick one and change it to fit what our business needs. This makes designing a website quick and easy.

img-01

What are Power Pages?

  • Microsoft Power Pages is a highly secure and robust low-code platform offered as a service. It enables the effortless development, management, and hosting of contemporary business websites intended for external use.
  • Power Pages offers diverse and adaptable templates, a user-friendly design studio for seamless visual creation, and a comprehensive learning center. These tools expedite the process of constructing tailored websites that cater specifically to your business requirements.
  • Power Pages is a sophisticated low-code SaaS (Software as a Service) solution for crafting, managing, and overseeing dynamic business websites aimed at external audiences.

Why are Power Pages Important?

  • Power Pages are like ultimate guides packed with valuable information on specific topics. They’re designed to captivate people with eye-catching visuals and thorough content, making them go-to sources in their respective fields. By being super informative and trustworthy, they help websites rank better on search engines, drawing in more visitors naturally. This boosts credibility and makes the brand more reputable online.
  1. Information Hub: Power Pages act as centralized repositories, providing extensive and detailed information on specific topics. They serve as valuable resources where audiences can access comprehensive insights, fostering better understanding and education on particular subjects.
  2. Enhanced Audience Engagement: With visually compelling and informative content, Power Pages captivate audiences’ attention, encouraging prolonged engagement. The depth of information and visually appealing elements keep visitors interested and involved, increasing the likelihood of them exploring the content thoroughly.
  3. Establishing Authority and Credibility: By showcasing expertise and comprehensive knowledge, Power Pages help establish the website owner or organization as an authoritative source within a particular niche or industry. This credibility encourages trust among visitors, enhancing the brand’s reputation.
  4. SEO Boost: Well-structured and content-rich Power Pages often rank higher in search engine results. Their depth and comprehensive nature appeal to search engine algorithms, leading to improved visibility and higher rankings. This, in turn, drives organic traffic to the website, expanding its reach and relevance.

Key Features and Benefits

  1. Swift Implementation: Quickly conceptualize and launch websites, slashing the time required to go live significantly. Refine and fine-tune your designs promptly through real-time previews.
  2. User Friendly: An easy-to-use, drag-and-drop interface for creating websites without extensive coding knowledge.
  3. Design Flexibility: Personalize layouts, infuse interactive components, and seamlessly integrate with diverse Microsoft services, ensuring websites are tailored to suit a wide range of requirements.
  4. Template Library: Pre-built templates for various industries or use cases, enabling quick website creation.
  5. Responsive Design: Ability to create websites optimized for various devices (desktops, tablets, smartphones) without manual adjustments.
  6. Security Measures: Built-in security features ensure data protection, compliance with regulations, and secure user access.
  7. Customization Options: Extensive options for customizing the look, feel, and functionality of websites to match specific brand requirements or user preferences.
  8. Support and Training: Access to resources, documentation, and possibly training materials to assist users in maximizing the platform’s capabilities.

How to Create a Site Using Power Pages: A Step-by-Step Guide

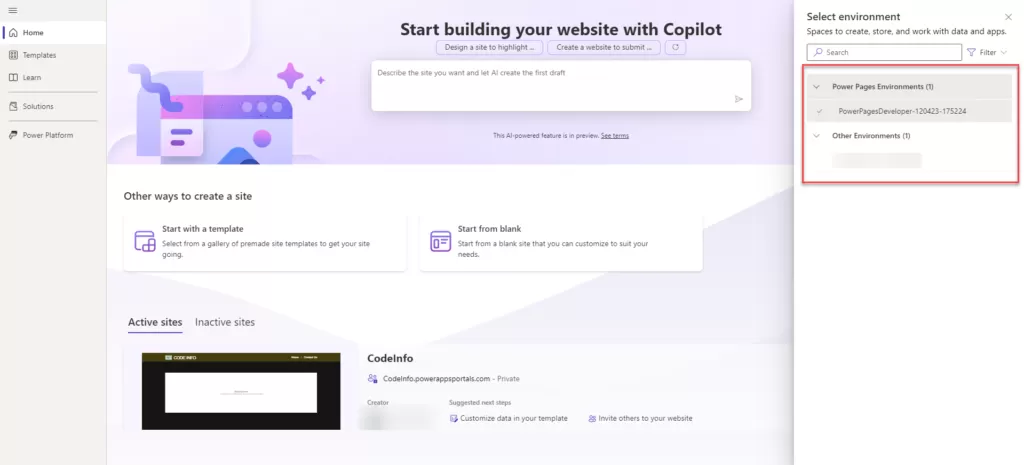
img-02

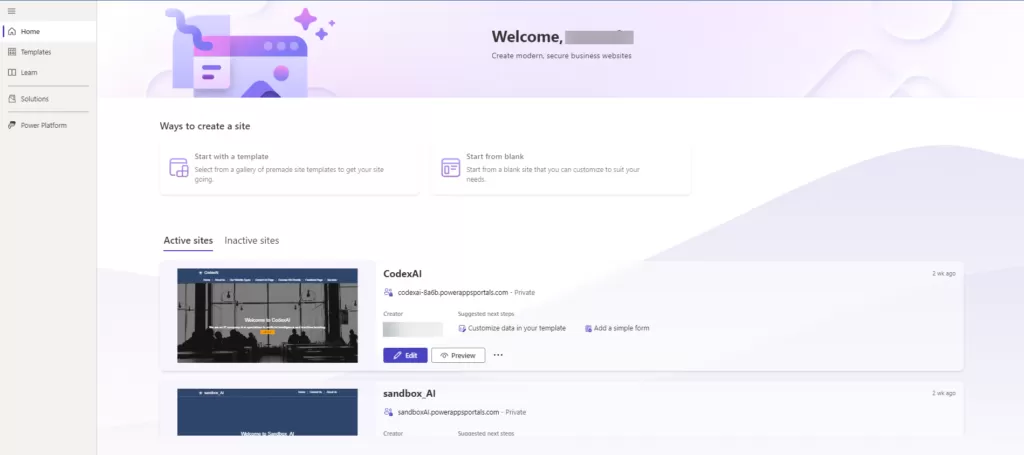
  • On the homepage, you’ll find two ways to create a site: “Start with a template” or “Start from blank.”

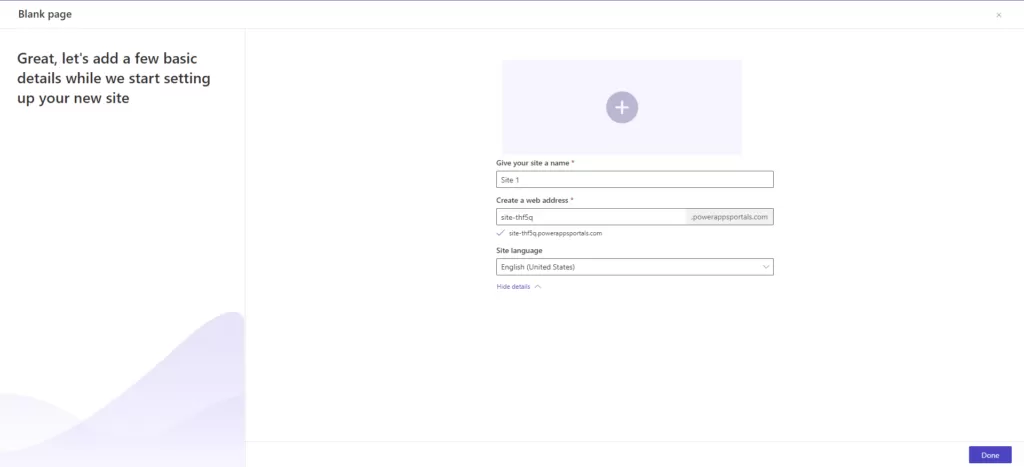
img-03

  • If you pick “Start from blank,” you’ll be asked to create a name for your site.

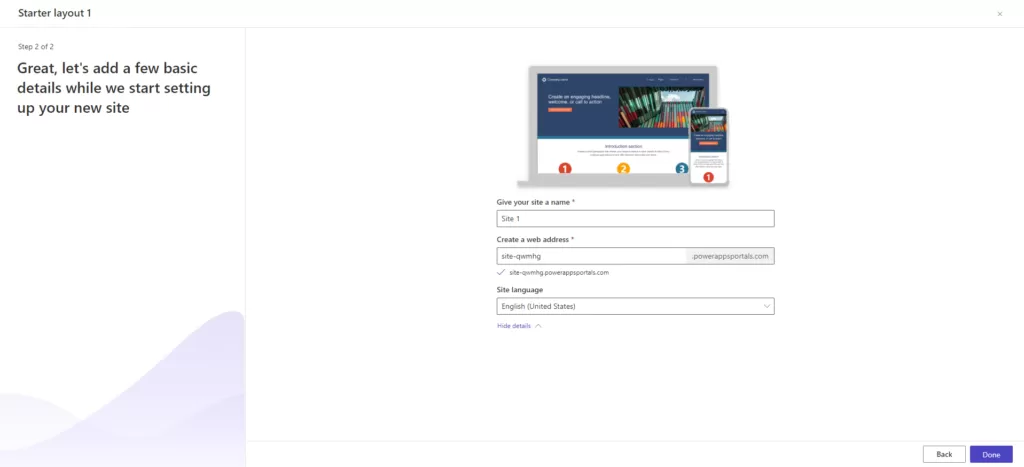
img-04

  • If you choose “Start with a template,” you’ll see various template designs to create your site. To learn more about each template, hover over it and click “Preview template.
  • Once you have found the best template for your needs, click on “Choose this template.”
  • Provide a site name and web address, then confirm your selection.

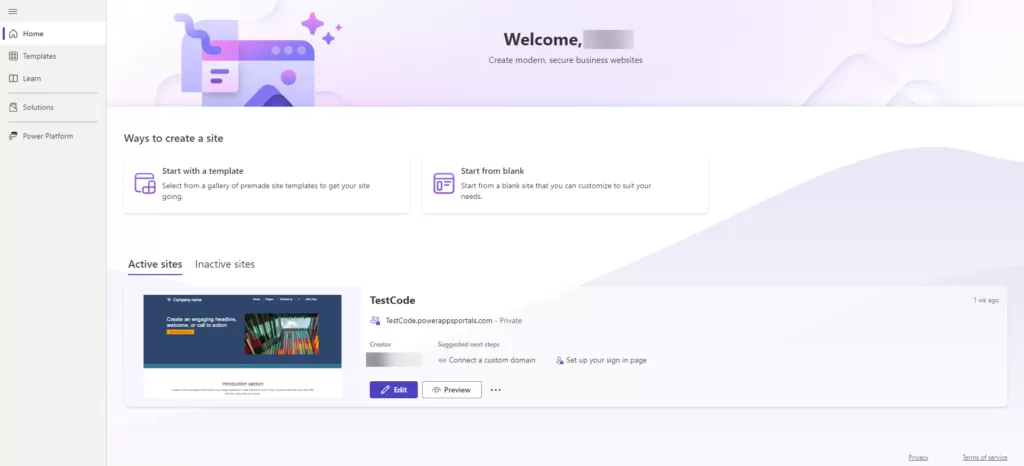
img-05

  • After creating the site, we can edit or preview it as needed.

img-06

Conclusion

Power Pages is a tool from Microsoft that makes building websites easier. It provides user-friendly tools and ready-to-use templates, making it simple to create engaging and trustworthy websites. It’s quick to set up, offers various design options, and ensures strong security through Microsoft Dataverse. Users can easily make custom websites by choosing templates or starting from scratch, making it much simpler to establish an online presence.

Copilot Studio Components – Building Intelligent Conversations

Copilot Studio, a part of the Microsoft Power Platform, is composed of several key components that work together to facilitate the creation and management of intelligent chatbots. Here are the main components of Copilot Studio:

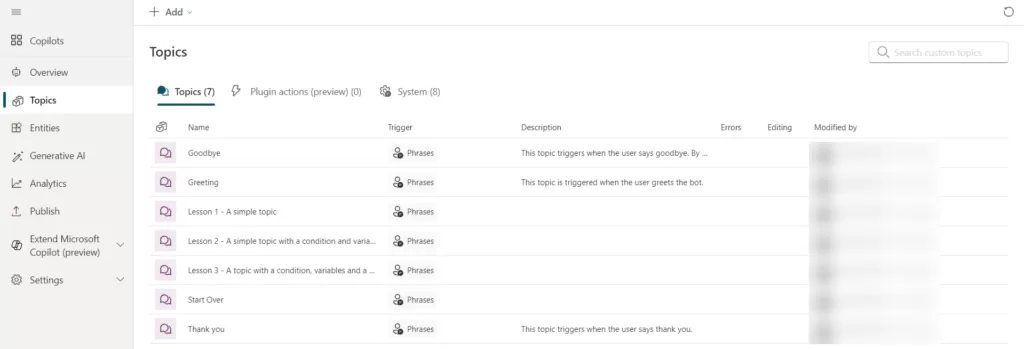
Topics: Navigating Knowledge Spaces

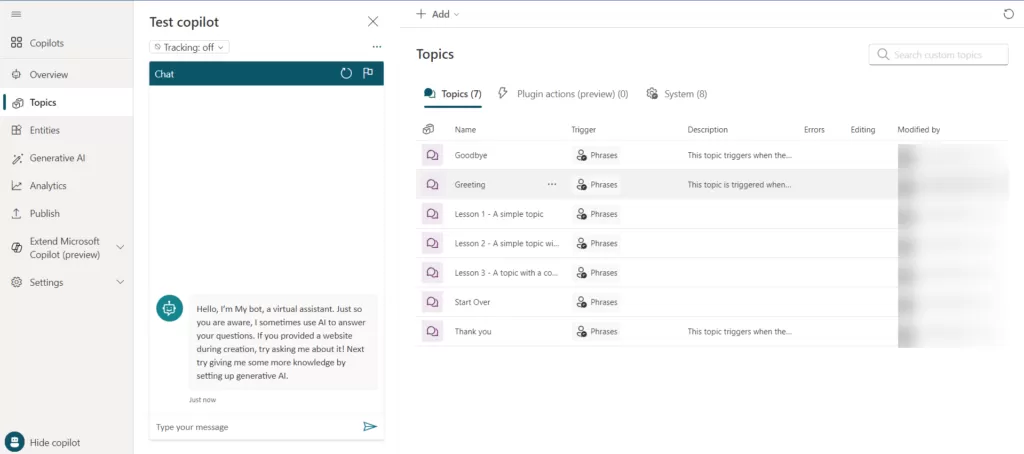
At the core of Copilot Studio lie “Topics,” which serve as the building blocks for the chatbot’s knowledge. Topics categorize and organize information, allowing the chatbot to respond intelligently to user queries. By defining specific areas of expertise, users can ensure that the chatbot is well-equipped to handle a variety of subjects, contributing to a more coherent and contextually relevant conversation.

img-01

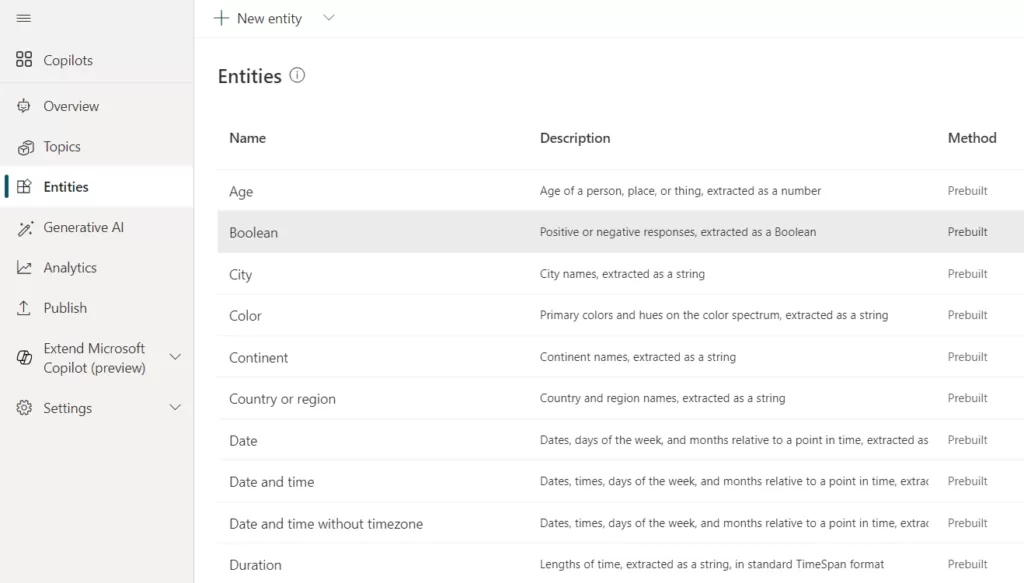
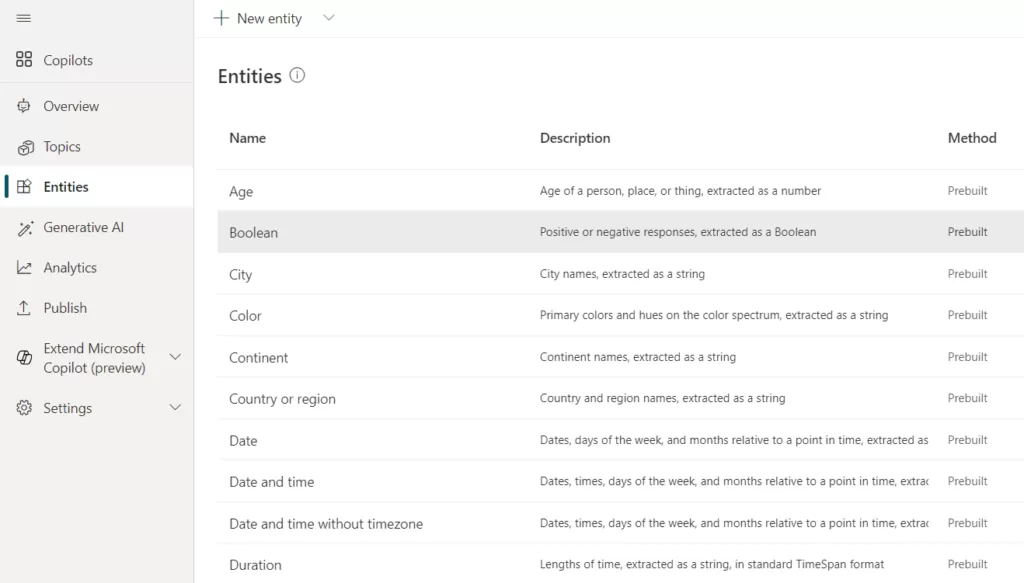
Entities: Extracting Meaningful Insights

Entities play a pivotal role in understanding and extracting specific pieces of information from user inputs. Whether it’s extracting a date, location, or any custom data, entities enhance the chatbot’s ability to gather relevant details. This functionality contributes to the personalization of responses, ensuring that the chatbot can tailor its interactions based on the unique information provided by users.

img-02

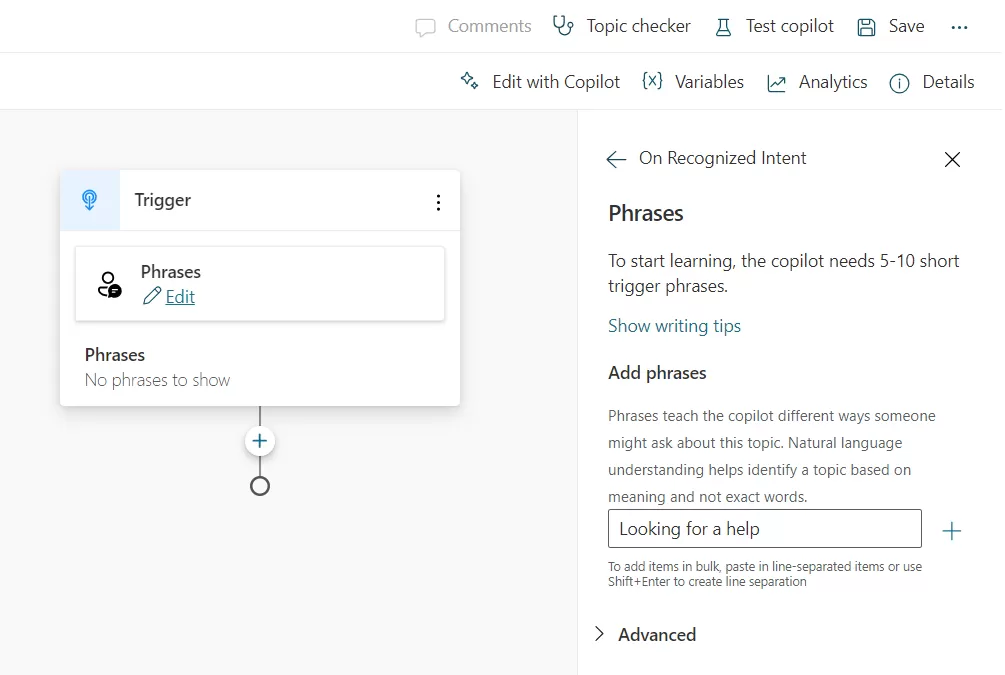
Triggers: Initiating Engaging Conversations

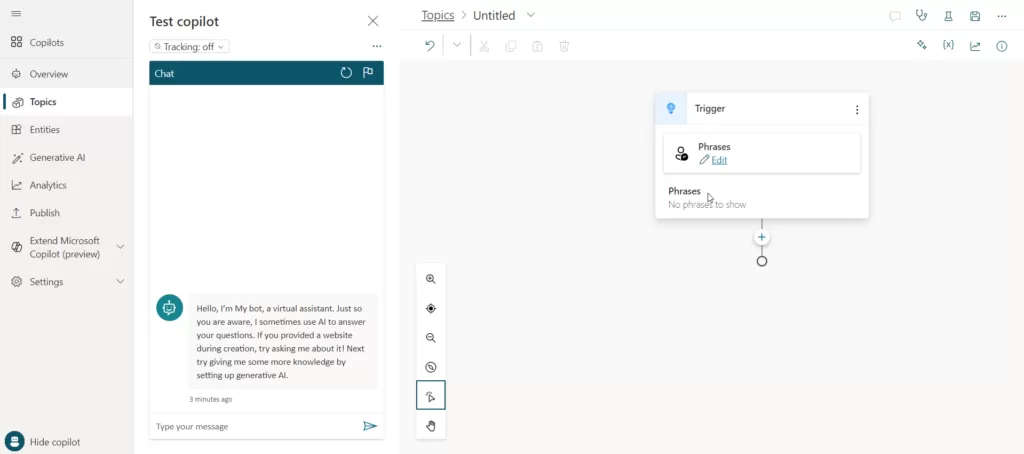
Triggers act as the catalyst for conversation flow, determining when the chatbot should become active and engage with users. By setting up triggers, users can define the conditions under which the chatbot initiates interactions, ensuring timely and contextually relevant responses. Triggers play a crucial role in orchestrating a seamless and dynamic user experience.

img-03

Power Automate Integration: Expanding Possibilities

The integration with Power Automate significantly extends the capabilities of Copilot Studio. It enables the chatbot to connect with external services and perform actions beyond basic conversation, such as sending emails or updating databases. This integration empowers users to create chatbots that not only provide information but also execute a wide range of tasks, contributing to enhanced productivity and efficiency.

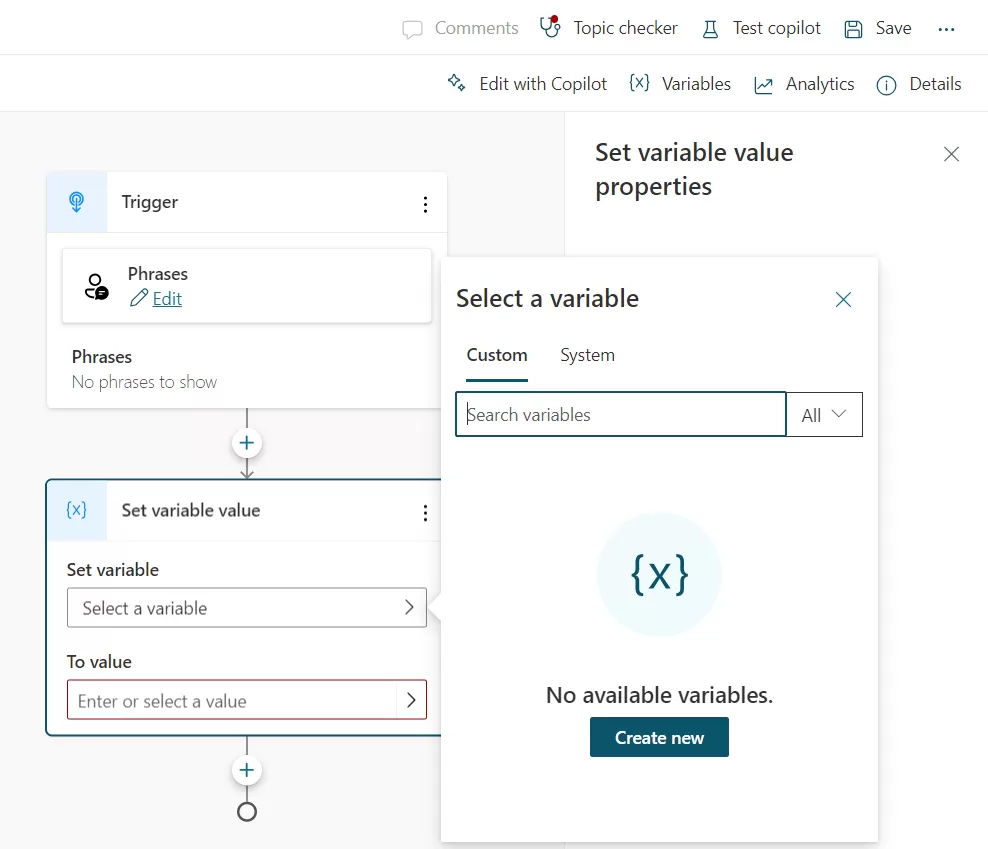
System Variables: Contextual Intelligence

System Variables are predefined elements that store information about the conversation context. They provide the chatbot with access to contextual information, enabling it to understand and respond in a way that aligns with the ongoing conversation. Leveraging system variables enhances the chatbot’s coherence and responsiveness, creating a more natural and user-friendly interaction.

img-04

Entities from Power Automate and Data: Data-Driven Insights

Copilot Studio enables the incorporation of entities from Power Automate flows and data stored in Microsoft Dataverse. This capability expands the chatbot’s understanding and data-handling capabilities. By leveraging data-driven insights, users can create chatbots that not only respond based on predefined knowledge but also adapt and learn from real-time information, contributing to more informed and intelligent interactions.

img-05

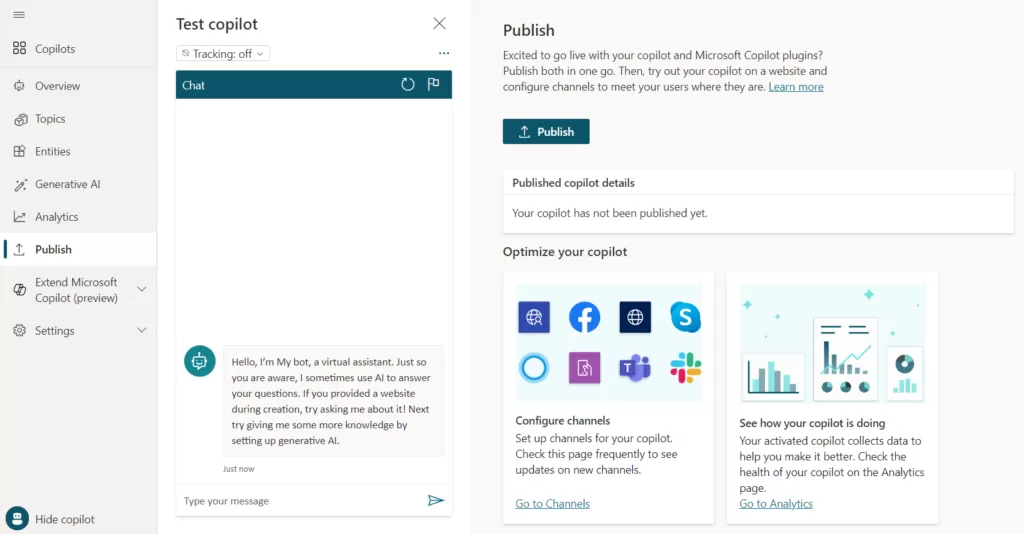
Publish: Chatbot on multiple platforms

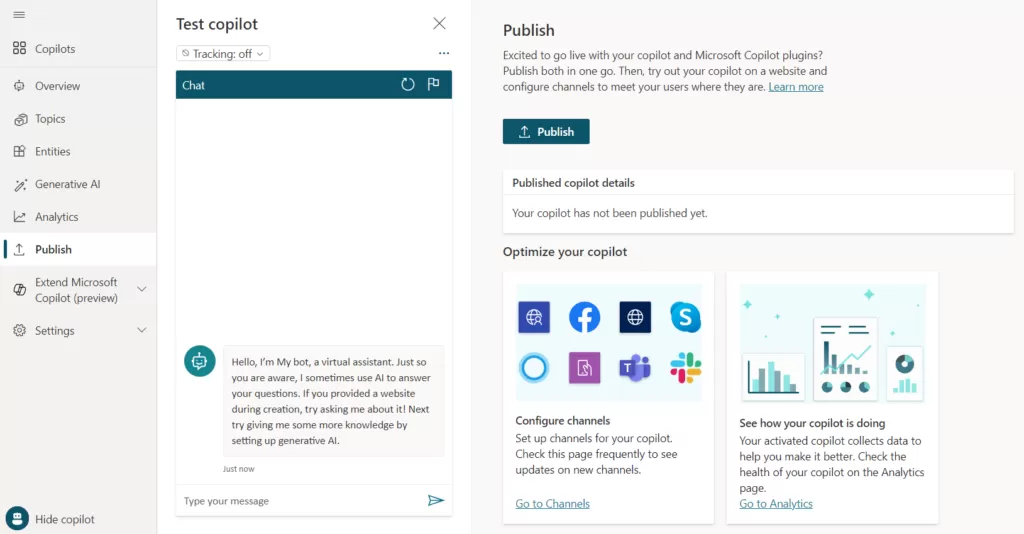
Effortlessly extend the reach of your chatbot by publishing it on various platforms, including websites, mobile apps, Facebook, Microsoft Teams, Skype, Cortana, and more. Copilot Studio offers a seamless and versatile deployment, ensuring your chatbots are accessible across a multitude of channels. Whether engaging users on websites or interacting within popular applications, the flexibility of publishing options enhances the impact and accessibility of your Copilot Studio chatbots.

img-06

Understanding and harnessing these Copilot Studio components empower users to create chatbots that transcend traditional conversational boundaries. By integrating these elements strategically, businesses can design intelligent chatbots that streamline processes, enhance user engagement, and unlock new dimensions of efficiency in the evolving landscape of conversational AI. Copilot Studio, with its versatile components, stands as a catalyst for innovation, providing a platform where the potential of AI-driven interactions is truly unlocked.

Empowering Interaction using Microsoft Copilot Studio

In today’s fast-paced digital landscape, businesses are constantly seeking innovative ways to enhance customer interactions and streamline processes. One technology that has gained significant attention for its potential to transform how we engage with customers is Microsoft’s copilot studio. This blog delves into the fundamental aspects of Copilot studio, guiding you on how to leverage their capabilities to transform and elevate your interaction strategies. 

Introduction to Copilot Studio

Copilot studio is a Microsoft product that enables individuals to create intelligent chatbots without extensive coding knowledge. These chatbots can be integrated seamlessly into various platforms and applications, offering a user-friendly interface for designing and deploying powerful conversational experiences. 

Why Copilot studio?

  1. Democratizing Conversational AI:
    Copilot studio democratizes the creation of chatbots, allowing individuals across different departments to contribute to the development of intelligent virtual agents. You don’t need to be a coding expert; the platform’s intuitive design empowers business users to build effective bots.
  2. Integration with Power Platform:
    As part of the broader Microsoft Power Platform, Copilot studio seamlessly integrates with other tools like Power BI, Power Apps, and Power Automate. This integration enables a holistic approach to process automation, data visualization, and application development.
  3. Rapid Development:
    Gone are the days of lengthy development cycles. With Copilot studio, you can create and deploy chatbots quickly, reducing the time and resources traditionally associated with building conversational interfaces.

Getting Started with Copilot studio

Setting Up Your Environment

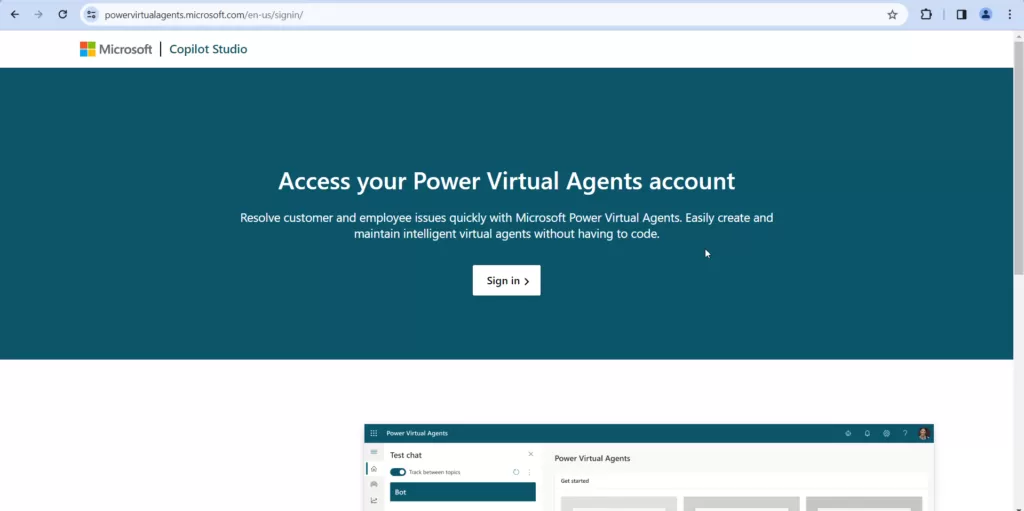
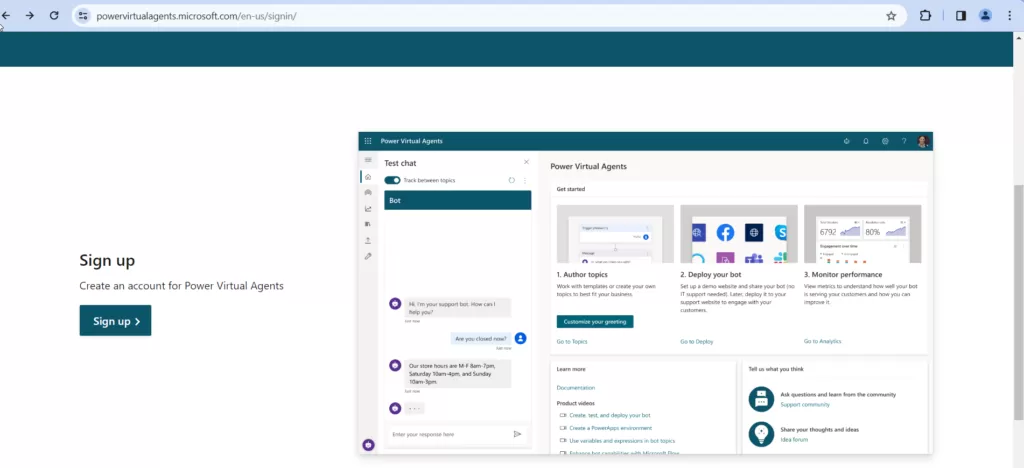
Begin by logging into the Copilot studio portal using your Microsoft credentials. If you don’t have an account, you can sign up for one.
URL: https://web.powerva.microsoft.com/ 

img-01

img-02

Creating Your First Bot
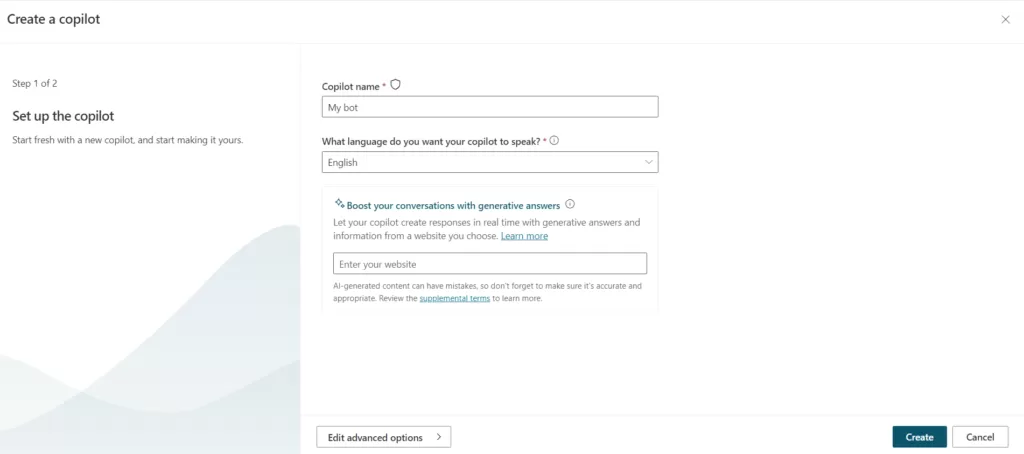
Click on “New copilot” option to initiate the bot creation process. Give your bot a name and description to set the stage for its purpose and functionalities.

img-03

img-04

Defining Topics and Triggers

Identify the key topics your bot will handle and set up triggers for each. Triggers define the user inputs that activate specific topics, guiding the flow of the conversation.

img-05

Building the Conversation Flow
Utilize the drag-and-drop interface to design the conversation flow. You can incorporate actions, conditions, and external system integrations to enhance the bot’s capabilities.

img-06

Testing and Deployment
Before deploying your bot, take advantage of the testing features within Copilot studio to simulate user interactions. Ensure that the conversation flow is smooth and meets your business objectives.

img-07

Realizing the Benefits

By implementing chatbot using Copilot studio, businesses can enjoy a myriad of benefits, including:

  • Improved Customer Engagement: Enhance customer interactions by providing instant, personalized responses to inquiries.
  • Efficient Task Automation: Automate routine tasks, allowing employees to focus on more complex and strategic responsibilities.
  • Data-Driven Insights: Leverage the analytics capabilities of Copilot studio to gain insights into user interactions and continually optimize the bot’s performance.

Copilot studio opens a world of possibilities for businesses looking to enhance their interactions with users. By democratizing the creation of chatbots, Microsoft has put the power of AI into the hands of those who know their business best. As you embark on your journey with Copilot studio, remember that the key to success lies in continuous refinement and adaptation based on user interactions. It’s time to empower your interactions and elevate your engagement game with Copilot studio.

Send SharePoint list item attachments in the email using Power Automate

The ability to efficiently send multiple attachments using power automate via email is crucial. This blog post will guide you through the detailed process of achieving this using the powerful capabilities of Microsoft Power Automate. Whether you’re sharing documents, images, or other essential files, this feature ensures a more versatile and streamlined communication experience. 

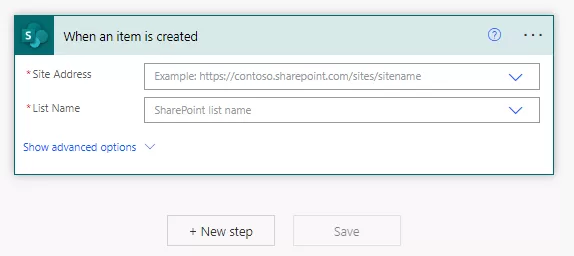
Step: 1 Add the “When an item is created” action.

Step: 2 Select the Site address and List name where an item, along with its attachments, will be added.

img-01

Step: 3 Add the “Initialize variable” action.

Assign a name to the variable, such as “AttachmentArray,” and specify its type as an array. This variable will be used to create an array containing all the attachments of the newly created item.

img-02

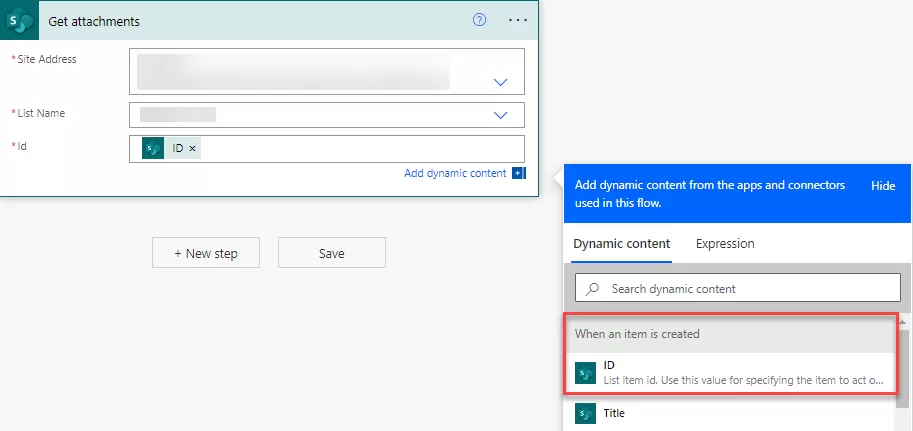
Step: 4 Add another action “Get attachments” and add the Site Address and List Name. Set the “Id” field to the ID of the “When an item is created” trigger using the Dynamic content available on the right, as shown below.

img-03

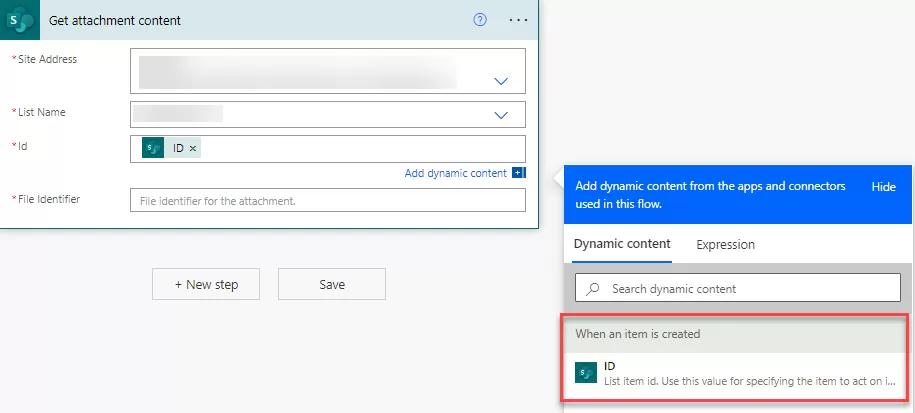
Step: 5 Add an action “Get attachment content” and select the Site Address and List name. Set the “Id” to the ID of the “When an item is created” trigger from the Dynamic content displayed on the right.

img-04

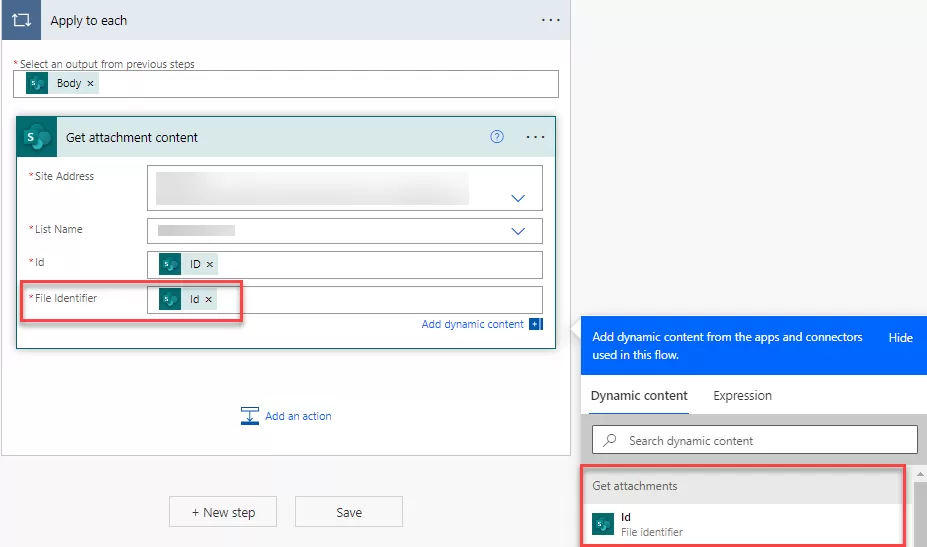
Step: 6 Set the file identifier to the ID obtained from the Dynamic content of the “Get attachments,” as illustrated below. Once users set the File Identifier, an “Apply to each” loop will be added automatically to retrieve the attachment content for each file.

img-05

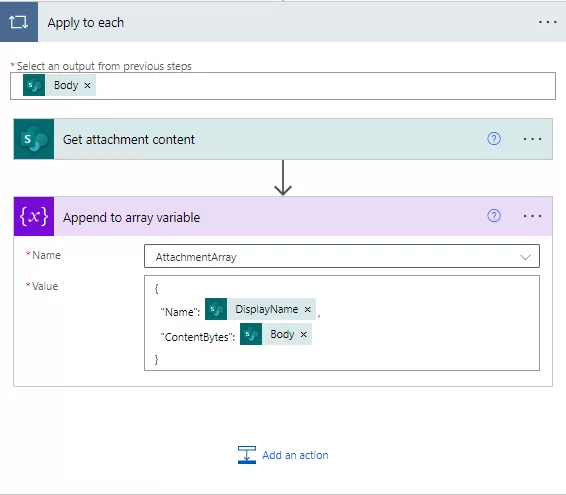
Step: 7 Insert the “Append to array variable” action after the “Get attachment” action, within the “Apply to each” loop. Choose the variable “AttachmentArray” as the name, which was created at the beginning of the flow.

Assign the Value to the following JSON structure:

  • Name: DisplayName of the “Get attachments”
  • ContentBytes: Attachment content of ‘Get attachment content’.

img-06

 
{

"Name": @{items('Apply_to_each')?['DisplayName']},

"ContentBytes": @{body('Get_attachment_content')}

}

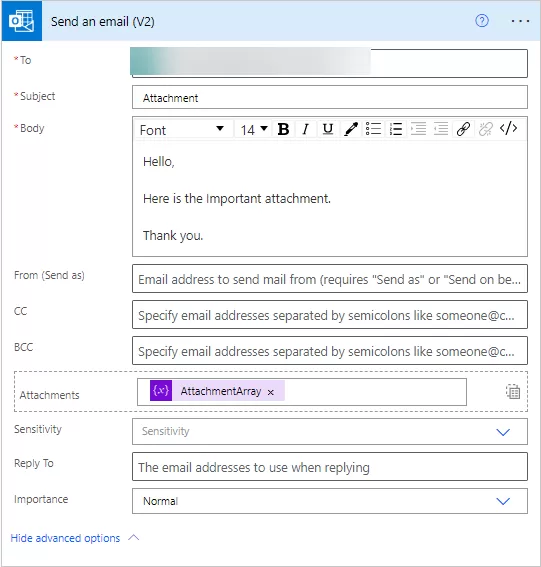
Step: 8 Last, add an action “Send an email”. Additionally, include the ‘Subject’ and ‘Body’ for the email.

Set the value of Attachments to AttachmentArray variable.

img-07

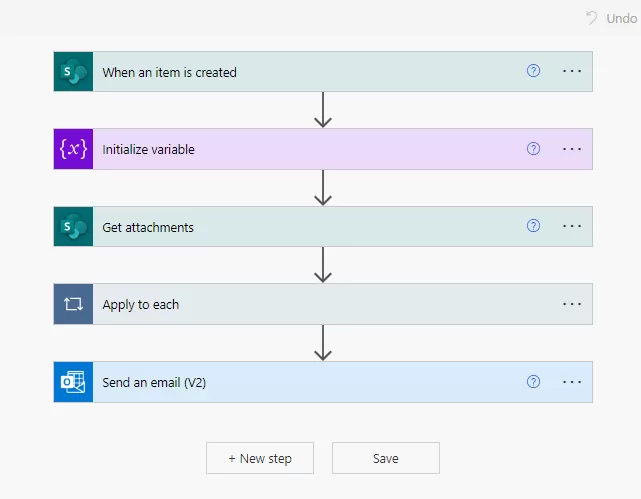
Step: 9 The setup of the flow concludes in just a few simple steps.

img-08

Step: 10 Generate a new entry in the SharePoint list and attach multiple files to it. An item has been created and three attachments have been added to it. Users will receive an email with the attachments, as illustrated below.

img-09

Conclusion: In conclusion, Power Automate offers a user-friendly and powerful solution for sending multiple attachments in emails. By following this step-by-step guide, you can enhance your email communication experience, making it more efficient and versatile.

Power Apps Development using Copilot

What is copilot in Microsoft 365?

Copilot, an AI-powered development assistance tool, is integrated into Power Apps, enabling app makers and end-users to build apps with data by describing requirements through multiple conversation steps, providing copilot-powered experiences from the first screen.

Microsoft has launched Copilot, designed to assist with day-to-day office tasks. Copilot is compatible with all Microsoft Office 365 applications, including other Microsoft applications such as Power Apps.

Microsoft Copilot is a cutting-edge feature that offers intelligent recommendations and suggestions while you work in Office applications like Word, Excel, PowerPoint, Outlook, OneNote, and Power Apps. It is an AI-powered software tool aimed to improve the efficiency and functionality for Microsoft 365.

Features of Microsoft Copilot for Power Apps

  1. Generating Formulas in App Development
    • Microsoft Copilot offers invaluable assistance by creating formulas, ultimately saving you substantial time and energy. This tool not only suggests formulas and expressions while you construct your application but also considers prevalent patterns and optimal methodologies. It guarantees the efficiency and dependability of the generated formulas by incorporating established best practices.
  2. Offering Intelligent Suggestions
    • When Copilot processes data in your application, it analyses the data structure. After that, it makes recommendations for appropriate fields, tables, and connections to be put into practice. This feature makes the data integration stage a lot easier, giving you more information to work with while designing the app.

What is the prerequisite for the AI features enable in power applications.?

  • Your environment must be in the United States region.

img-01

  • Your account must have English (United States) as the browser language.
  • Have a Microsoft Dataverse database in your environment.
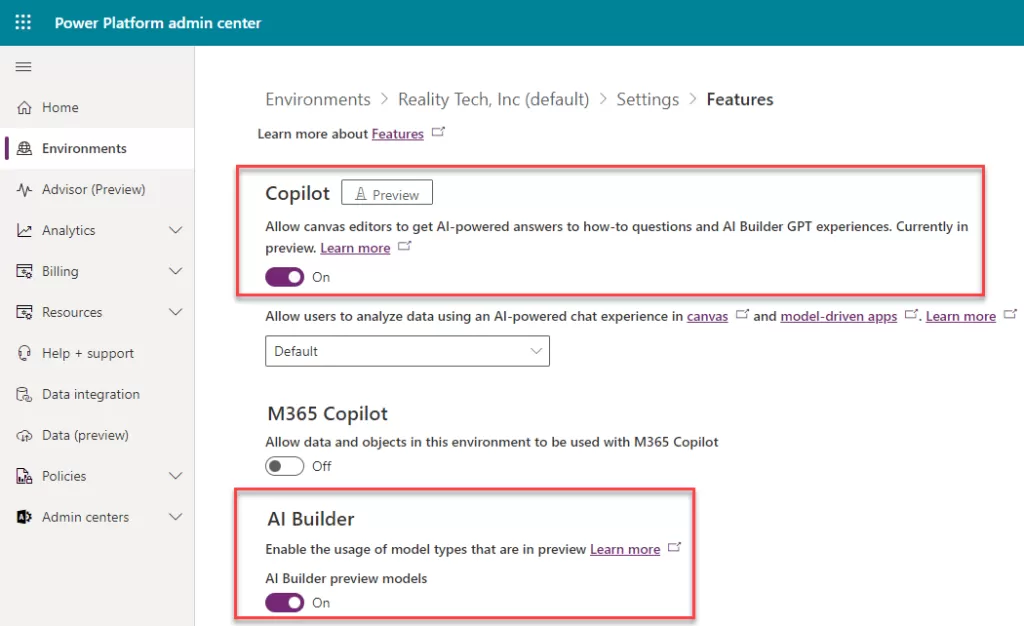
  • If your environment doesn’t show the preview the copilot features, you can follow the below steps to enable the copilot features.
  • Sign into the Power Platform admin center.
  • Inside the admin center, click on the Environments option in the left panel > Select specific environment > Click on settings > then click on Product > Click on Features > Turn on Copilot and under AI Builder, enable AI Builder preview models. By default, these features are enabled.

img-02

How to create power app canvas using the Copilot?

  • Now you open the power app environment you can see the AI assistance on the power app home page as seen in the below screenshot:

img-03

img-04

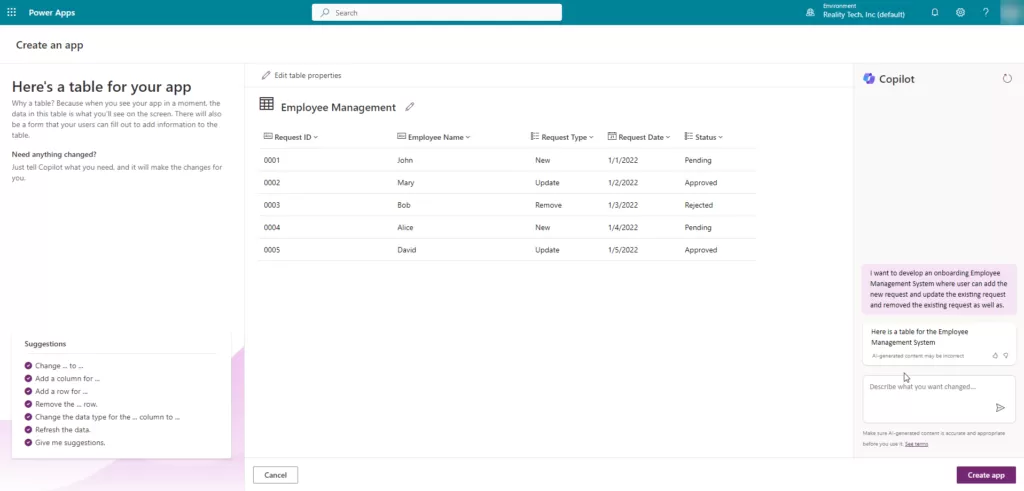
  • In the Description box you can enter your app description. Write: I want to develop an onboarding Employee Management System where user can add the new request and update the existing request and remove the existing request as well.
  • After providing the description, the AI builder creates a sample table for you with some sample data. You can modify this table according to your requirements, and it works like a conversation using natural language.

img-05

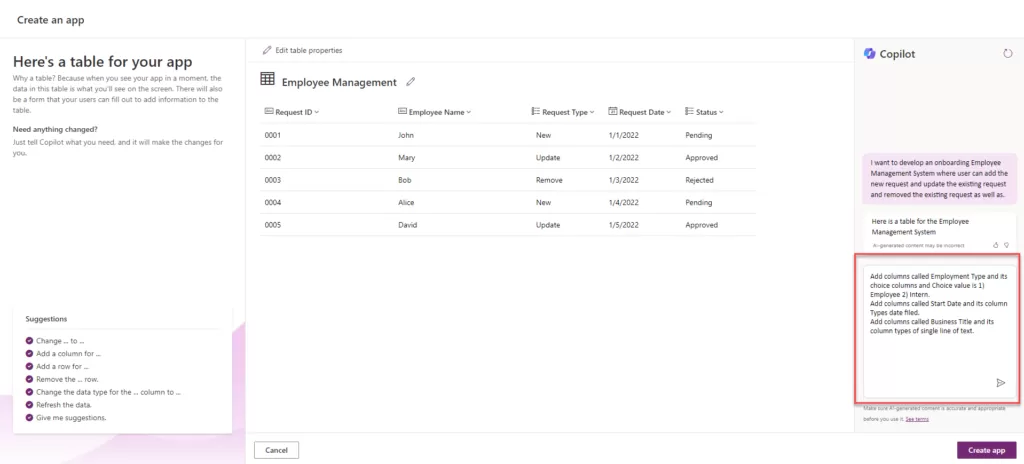
If you want to add the more columns, then here are the few examples as shown below:

Add columns: write the prompt as show in the below. I am adding the columns based on my requirement you can add your columns same as your requirement.

  • Add columns called Employment Type and its choice columns and Choice value is 1) Employee 2) Intern.
  • Add columns called Start Date and its column Types date filed.
  • Add columns called End Date and its column types of date filed.
  • Add columns called Business Title and its column types of single line of text.
  • Add columns called First Name and its column types of single line of text.
  • Add columns called Last Name and its column types of single line of text.

img-06

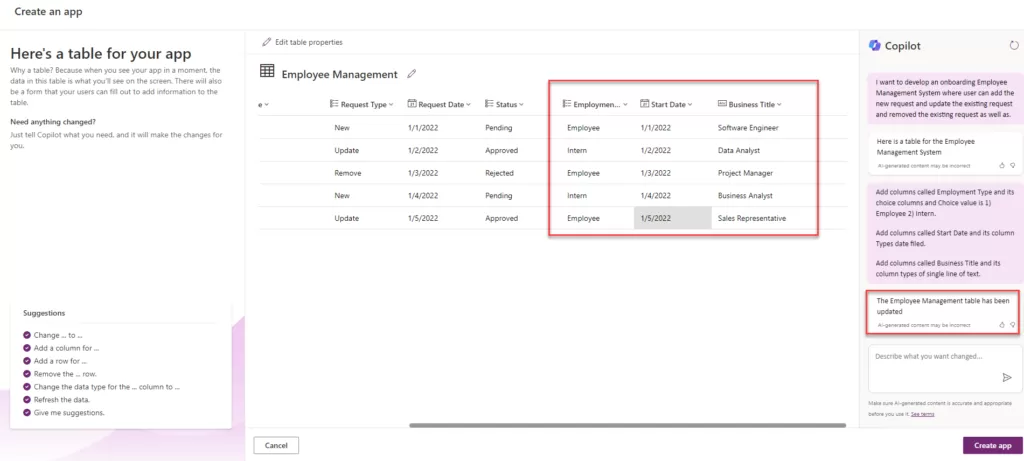
  • As shown in the image below, the mentioned columns have been added to our table. Once the columns are added in the Copilot section, you will find text like the following highlighted in a square box: ‘The Employee management table has been updated.

img-07

  • Change columns Datatype: if you want to change the columns datatype then you can also change the datatype based on your requirement. For the changing the data type here is the sample prompt text:
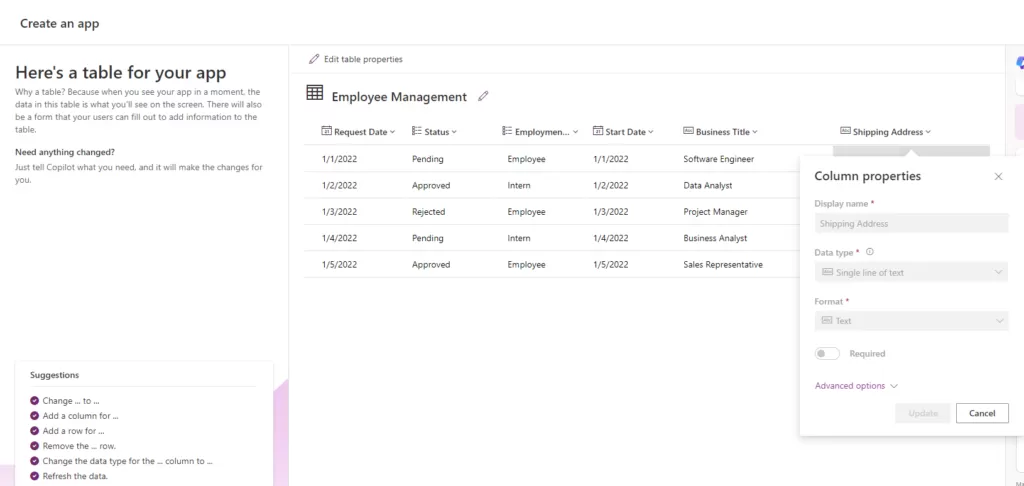
    “Change the data type of the columns “columns Name” to and “expected datatype” “ Let say I want to change my “Shipping Address” columns Single line of Text to Multiline of text.

img-08

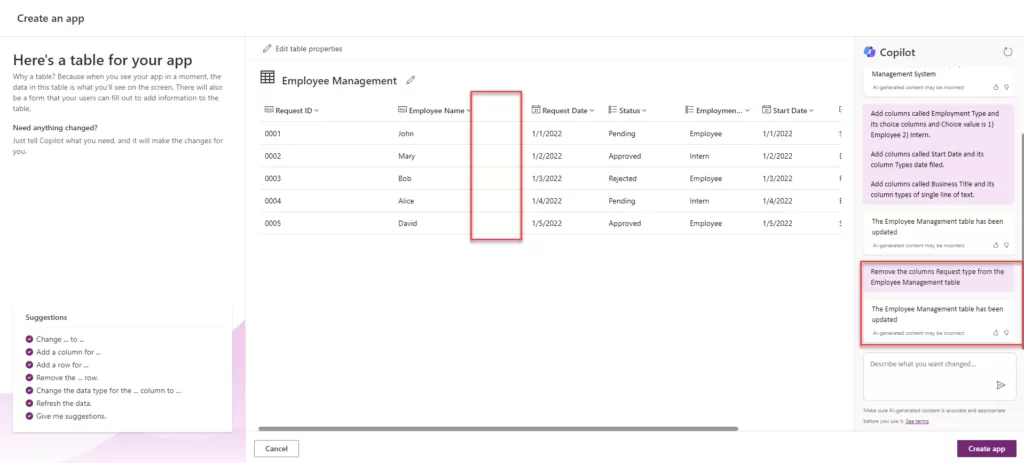
  • Remove the columns: To remove unnecessary columns from the table, you can simply type:
    ‘Remove the columns “Column Name” from the “Your Table Name” table.’ You can see in the image below that the ‘Request Type’ columns have been removed from the table.”

img-09

  • Adding new rows: You can add rows and adjust specific column values for a single employee. This manner, you can continue to customize the table to your liking.
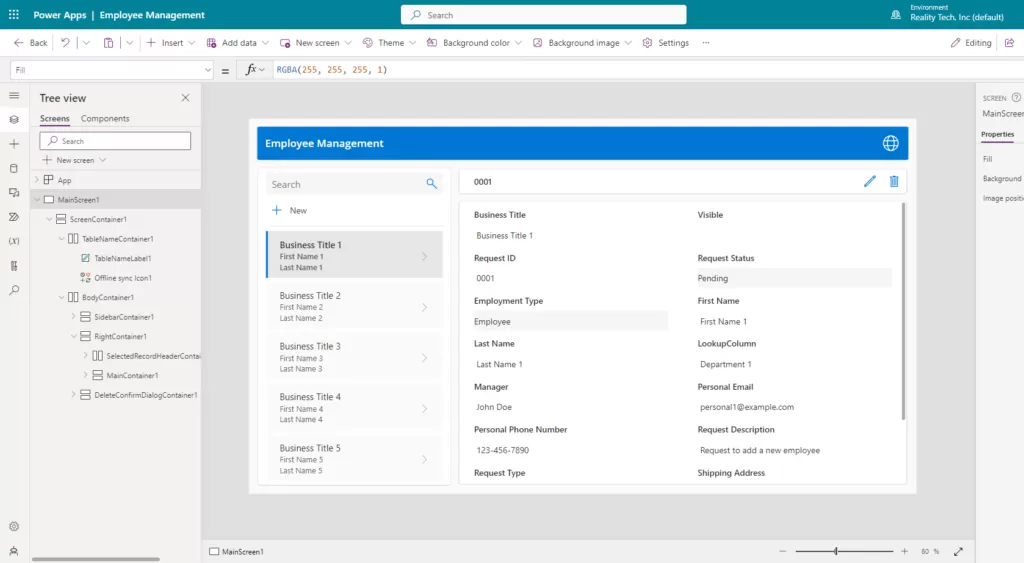
  • As seen in the image below, our app is now complete with the gallery and form control with search functionality.

img-10

Mastering Content Migration Challenges: Tzunami’s Solutions for Efficient and Cost-Effective Migrations

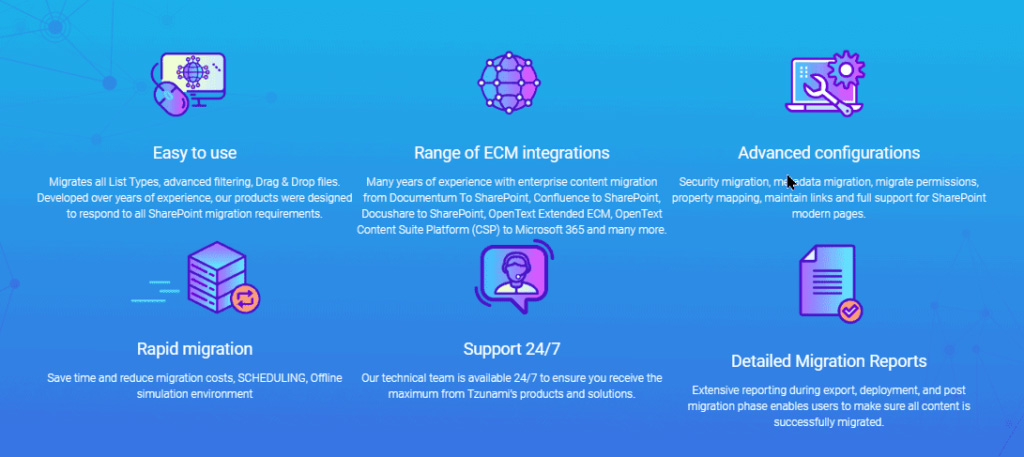
Content migration emerges as a formidable challenge in the intricate world of digital transformation. The seamless transition of vital information from one platform to another is not just a necessity but a strategic imperative for businesses navigating the ever-evolving digital landscape to consolidate onto a reliable standard platform. Yet, this seemingly straightforward task is riddled with complexities that can significantly impact operations, user experiences, and data integrity, especially when migrating from proprietary source systems.

In this digital age, efficiency and cost-effectiveness are more than benchmarks; they are the cornerstones of sustainable growth. Every minute lost and every dollar misspent can echo across an organization, affecting productivity and profitability. Recognizing these challenges, Reality Tech and Tzunami have forged a collaboration that stands as a beacon of innovative solutions in the realm of content migration.

Understanding Content Migration Challenges:

Content migration, in its essence, is akin to transplanting a vital organ. The data and content, often accumulated over the years, reside in intricate ecosystems of outdated or complex systems. The challenges encountered during this process are multifaceted. Outdated systems lack the agility to seamlessly integrate with modern platforms, causing disruptions in the very flow of information that businesses rely on. Complex systems, on the other hand, create a web of intricacies that demands intricate unraveling, from permissions, compliance, navigation, collaboration and formats

Data and content migration, in essence, is a delicate dance between preserving the integrity of information and ensuring a smooth transition and easy-to-use centralized consolidated storage. Outdated or incompatible systems often hinder this process, leading to disruptions, loss of data, and functionality, and diminished user experiences.

The need for solutions tailored to overcome these hurdles cannot be overstated. Generic approaches fall short when faced with the nuanced complexities of individual businesses.  Migration efforts can be significant, taxing the most capable of teams.  Tailored solutions, crafted with a deep understanding of both the technical intricacies and the unique operational demands of an organization, are the need of the hour.

1. The Challenge of Broken Links in Content Migration

During content migration, one of the most prevalent challenges is the phenomenon of broken links. These are not just hyperlinks; they are pathways critical for user experiences and data integrity. Broken links during content migration can disrupt workflows and compromise data integrity. The consequences of such disruptions echo across user experience and operational efficiency. Imagine a website, once harmonious in its navigation, now plagued by disjointed pathways, magnified by documents referencing the prior legacy location. This is the reality when links break. User experiences, carefully designed for intuitive interaction, crumble. Visitors, expecting seamless transitions, are met with dead ends, error pages and broken links inside documents. Moreover, beneath this disruption lies a deeper concern: data integrity. For organizations relying on accurate, real-time data, broken links mean distorted insights, leading to misguided decisions.

Introducing Tzunami’s Link Resolver Service: Fortifying the Bridges

Recognizing this challenge, our Link Resolver Service emerges as a beacon of reliability. This service isn’t content with merely transferring links; it meticulously studies, maps, and redirects them. What sets it apart is its ability to understand the intricate web of connections within an organizational landscape and preserve them during migration. This innovative and elegant solution ensures accurate link redirection post-migration, guaranteeing a seamless experience for users navigating the new digital terrain. Its benefits reverberate profoundly, particularly in SharePoint and Office 365 migrations, where precision is paramount.

How the Link Resolver Service Safeguards Data Integrity

At the core of our Link Resolver Service is a meticulous process of mapping and redirection. Every link and every piece of data is scrutinized, ensuring no information is lost in transition. This detailed approach safeguards the integrity of information post-migration, making certain that the organizational knowledge remains intact. By orchestrating this seamless digital transition, the Link Resolver Service becomes the guardian of data integrity, preserving the very essence of organizational wisdom.

Benefits of the Link Resolver Service

In the precision-demanding realms of SharePoint and Office 365, our Link Resolver Service shines brightly. It guarantees that every click post-migration lands precisely where it should, enhancing both user experiences and operational efficiency. The service doesn’t just preserve links; it elevates user interactions and ensures that the digital terrain of SharePoint and Office 365 is as familiar and functional as the previous platform. In these crucial migrations, precision is paramount, and our Link Resolver Service stands as the epitome of digital excellence.

2. Complexity URL Redirection Across Multiple ECM Systems

The challenges are vast when it comes to migrating content from various Enterprise Content Management (ECM) systems. Migrating content seamlessly from one ECM system to another is a challenge in itself. Different systems mean different structures, different URLs, and different linking methodologies. Managing this diverse array of URLs during migration is similar to navigating a maze without a map. Any misstep can lead to broken links, interrupted user experiences, and compromised data integrity.

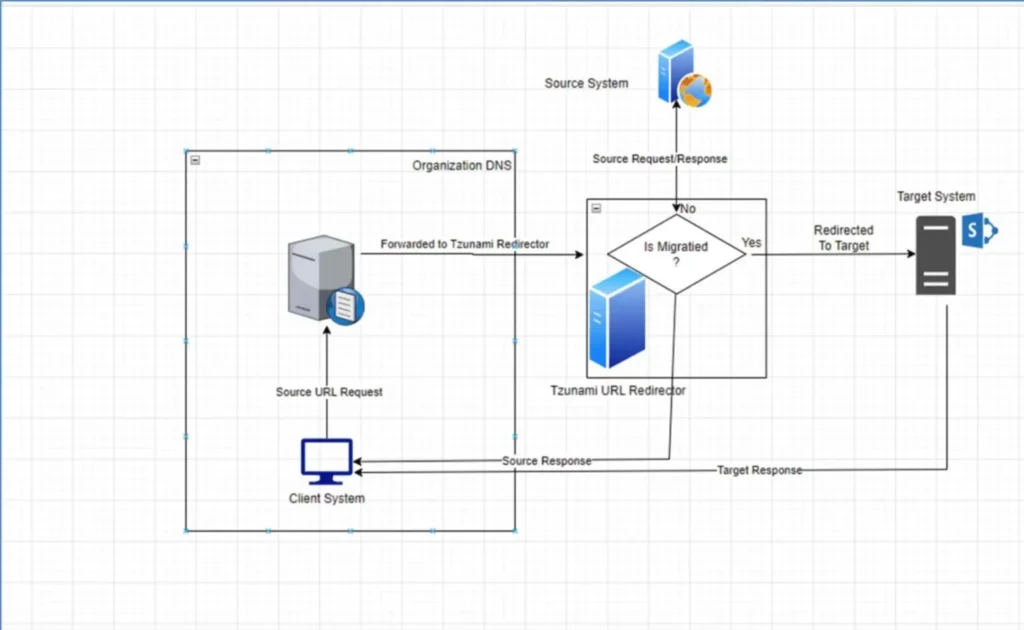
Tzunami’s Redirection Solution: Seamlessly Redirect URLs

Here, our URL Redirection Solution steps in as a game-changer. This tool is not just a solution; it’s a bridge between diverse ECM systems. Its versatility is unmatched, allowing it to adeptly handle the complexities of Open Text Livelink, Documentum, ERoom, Confluence, and Docushare. Imagine a tool that ensures uninterrupted access to content throughout migration. Every link, every piece of content and every URL is carefully preserved and redirected to its new home. This seamless process mitigates broken links, preserves the integrity of data, and makes the seemingly impossible task of ECM migration not only manageable but efficient. In the realm of ECM diversity, our URL Redirection Solution is the thread that weaves continuity.

img-01

How Tzunami’s Solution Supports Diverse Platforms

In the realm of Open Text Livelink, Documentum, ERoom, Confluence, and DocuShare, the solution acts as a translator, ensuring that URLs are understood universally. It seamlessly integrates with each platform, comprehending the unique language of URLs spoken by these systems. When migrating from Documentum, known for its intricate document management, to SharePoint, the solution deciphers Documentum’s URLs, ensuring that every link finds its new home accurately. Similarly, from Confluence, where collaboration is king, to the structured environment of SharePoint, the solution bridges the gap, preserving the integrity of URLs.

3. The Challenge of Migrating Extensive Volumes of Data

Migrating extensive volumes of data is like orchestrating a symphony with countless instruments. Each piece, each byte of data, demands meticulous handling to ensure a harmonious transition. Challenges abound; the sheer volume of information can overwhelm, leading to bottlenecks, errors, and delays. The stakes are high: any disruption can echo across the organization, affecting not just productivity but also the bottom line. Large-scale migrations are a battleground where efficiency and cost-effectiveness are the armor organizations need to emerge victorious; using enterprise-class robust migration tools.

Pre-migration analysis

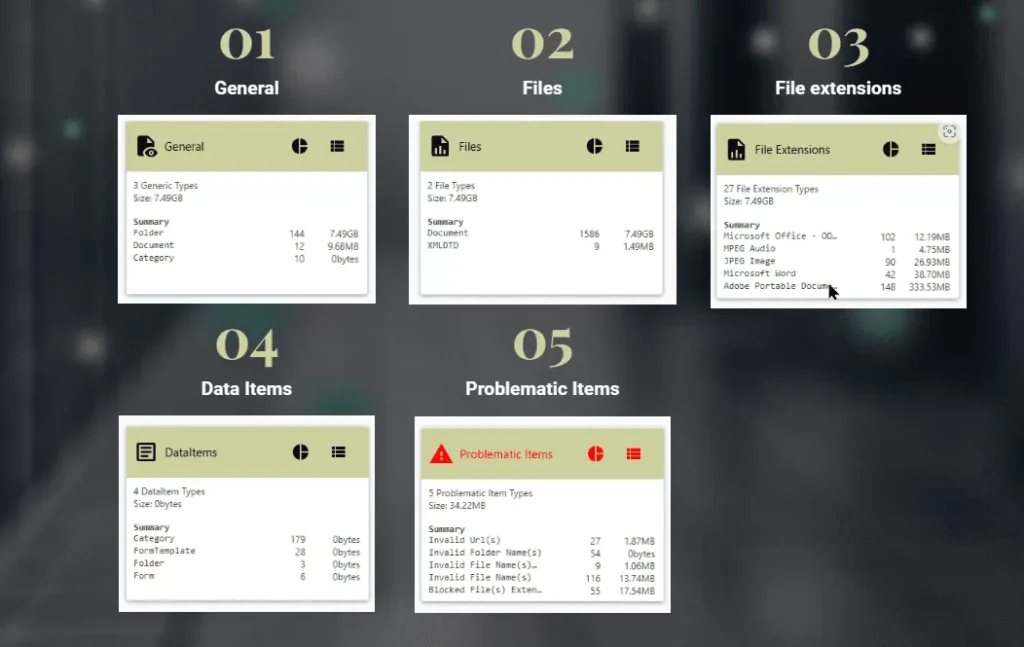
Some important pre-migration reports need to be generated as part of pre-migration, or discovery, which not only help us understand the complexity during migration but are also helpful to prepare a better time estimation.

Tzunami’s Migration Solution can help to achieve this. It scans your source system and provides five types of pre-migration reports:

img-02

Ensuring Data Security in Content Migration

Tzunami’s Migration Solution prioritizes data security during large-scale migrations, providing robust security features and compliance measures to protect sensitive data. This is crucial in industries like healthcare and finance. The solution ensures a secure transition for organizations.

The Delta Migration Solution: Streamlining Complexity & Reducing Costs

Tzunami’s Delta Migration Solution stands as the answer to these challenges. With a single click, this tool streamlines the migration process and reduces operational costs. By focusing on newly modified data, it optimises resources and ensures that the latest changes seamlessly integrate into the new SharePoint environment. This approach not only saves time but also significantly reduces the expenses associated with migration projects, making it a cornerstone of efficient content migration strategies.

img-03

Analyze

Reporting Excellence in Content Migrations

Effective content migration involves more than just the physical transfer of data; it requires comprehensive reporting capabilities. Tzunami’s Migration Solution offers robust reporting functionality, enabling organisations to track and monitor the progress of the migration in real-time. This feature provides detailed insights into what data has been successfully migrated, any potential issues encountered, and the overall status of the migration project. With access to this information, organizations can make informed decisions, troubleshoot any migration challenges promptly, and ensure the entire process is transparent and well-documented. This reporting functionality not only enhances the efficiency of the migration but also contributes to compliance, accountability, and overall project success.

The Power of Collaboration: Reality Tech and Tzunami

In the digital solutions world, the collaboration between Reality Tech and Tzunami emerges as a beacon of innovation. Reality Tech, with its profound industry knowledge, teams up with Tzunami, a specialist in migration tools, creating a synergy that addresses the most complex content migration challenges. By combining expertise and cutting-edge solutions, this partnership offers businesses a holistic approach to content migration, ensuring not only seamless transitions but also long-term stability and efficiency in the digital landscape.

img

How Businesses Can Benefit

For businesses seeking transformative content migration experiences, Reality Tech offers tailor-made solutions. By understanding the intricacies of each challenge, these collaborations craft precise, efficient, and cost-effective strategies. From resolving broken links to simplifying URL redirection and optimizing large-scale migrations, these solutions are designed to align seamlessly with business objectives. Engaging with this partnership means embracing not just solutions but enduring partnerships that guarantee long-term success in the digital sphere.

In the realm of content migration challenges, Reality Tech partnered with Tzunami and emerged as a pioneer, offering collaborative solutions that redefine the narrative. By tackling broken links, simplifying URL redirection, and optimizing large-scale migrations, this partnership ensures that businesses not only transition seamlessly but also flourish in the digital age. As industries evolve and challenges transform, this collaboration stands as a beacon of stability, offering businesses not just solutions but enduring strategies for content migration excellence. Embrace the future of content migration with Reality Tech and Tzunami, where challenges become opportunities and transitions pave the way for digital success.

SharePoint Customization: Tailoring Your SharePoint Environment To Fit Business Needs

In today’s rapidly evolving business landscape, where adaptability and efficiency are paramount, customization has emerged as a pivotal strategy to align digital platforms with unique organizational requirements.

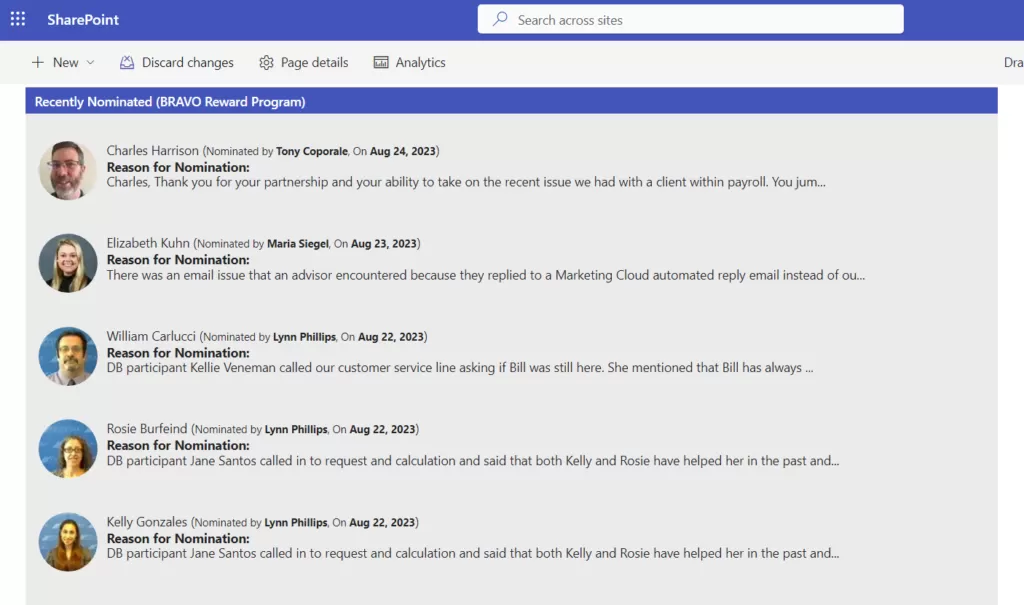
SharePoint Online Modern emerges as a versatile and responsive platform that offers an array of customization options to revolutionize how businesses collaborate, manage content, and achieve their goals.

This comprehensive blog delves deep into the realm of SharePoint Online Modern customization, providing an extensive exploration of tools, techniques, and best practices that empower organizations to harness the full potential of their SharePoint experience.

1.Introduction to SharePoint Online Modern Customization

Modern workplaces demand modern solutions. SharePoint Online Modern stands at the forefront of this evolution, providing a dynamic ecosystem for organizations to streamline their workflows, enhance communication, and boost productivity.

Through targeted customization, businesses can adapt SharePoint to their exact needs, creating an environment that seamlessly integrates with existing processes and workflows.

The role of customization in SharePoint Online Modern cannot be overstated. It bridges the gap between the out-of-the-box platform and the specific needs of an organization.

By tailoring SharePoint to align with business processes and user expectations, organizations can drive user engagement, simplify complex tasks, and ultimately elevate the efficiency of their operations.

img-01

2. Visual Site Branding and Theming

First impressions matter, even in the digital world. Modern site branding offers an opportunity to make a lasting impact.

By crafting visually appealing and consistent branding elements such as themes, colors, and logos, organizations can create an immersive digital experience that resonates with their brand identity.

A cohesive and attractive branding not only enhances user recognition but also contributes to a sense of professionalism and credibility within the platform.

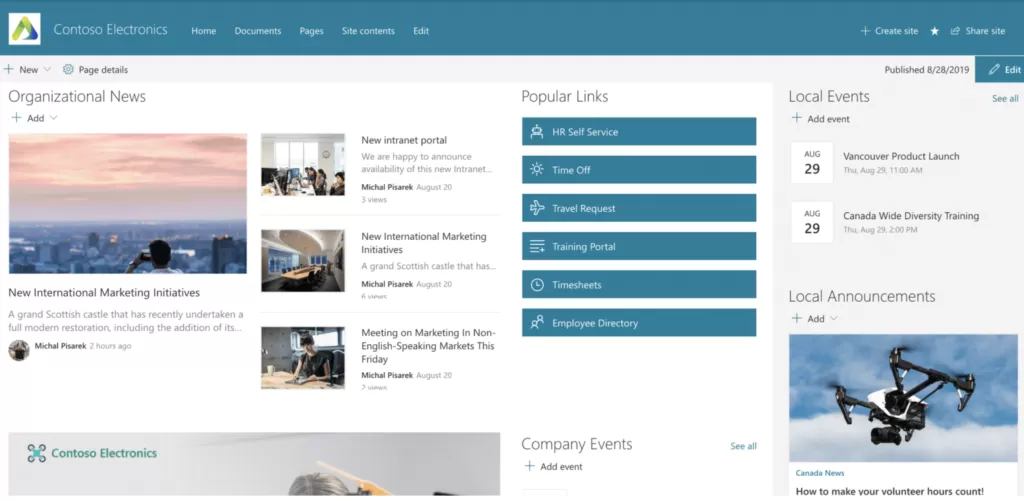
Before branding

img-02

after branding

img-03

Streamlined Navigation and Hub Sites

Intuitive navigation is the cornerstone of user-friendly experiences. SharePoint Online Modern enables organizations to tailor navigation elements, including global navigation, mega menus, and hub sites.

These customization options not only make navigation more intuitive but also facilitate the discovery of related content and resources.

Hub sites, in particular, play a pivotal role in connecting sites with shared themes or projects, promoting cross-collaboration and information sharing.

img-04

4.Crafting Engaging Page Layouts and Modern Page Designs

Content presentation can make or break user engagement. Modern page layouts offer a consistent and visually appealing way to present content.

By leveraging modern web parts, organizations can enhance page functionality and user interactivity.

These components are not only responsive but also empower content creators with diverse tools to craft engaging and dynamic pages.

img-05

5. Modern Communication Sites Customization

Communication is the lifeblood of collaboration. Modern communication sites offer customization options for layouts, headers, footers, and more, enabling organizations to create visually appealing and engaging communication platforms.

The integration of news and events using modern web parts maximizes the impact of important announcements.

6. Designing Site with Modern Scripts

Consistency is key in user experiences. Modern site designs provide a mechanism to provision consistent site structures and layouts.

Automation through modern scripting techniques ensures that site customization is efficient and scalable, reducing manual efforts and minimizing inconsistencies.

img-06

7. Dynamic Content with Modern Web Parts

Modern web parts form the backbone of SharePoint customization. These versatile components empower users to integrate dynamic content seamlessly into their sites

From displaying news and announcements to embedding rich media, modern web parts are the building blocks of interactive and engaging pages.

Their responsive design ensures that content looks stunning across various devices, catering to the modern workforce’s diverse needs.

img-07

8.Lists and Libraries Modern Customization

Data organization and presentation are central to business success. Modern lists and libraries offer various customization options to enhance data presentation.

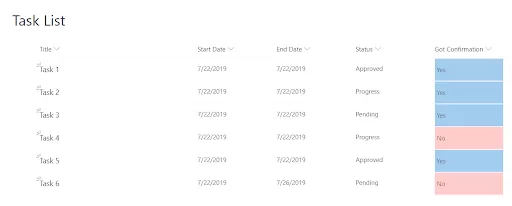
Column formatting and view customization improve data visualization, making information more accessible and actionable.

Integration of custom forms and Power Apps further streamlines data collection and management processes.

img-08

9.Enhancing Document Management

Effective content management requires efficient categorization. Modern document libraries with custom metadata columns facilitate easy content organization and discovery.

By configuring metadata navigation, organizations can empower users to quickly locate relevant documents, improving efficiency and productivity.

img-09

10. Managing Permissions and Security

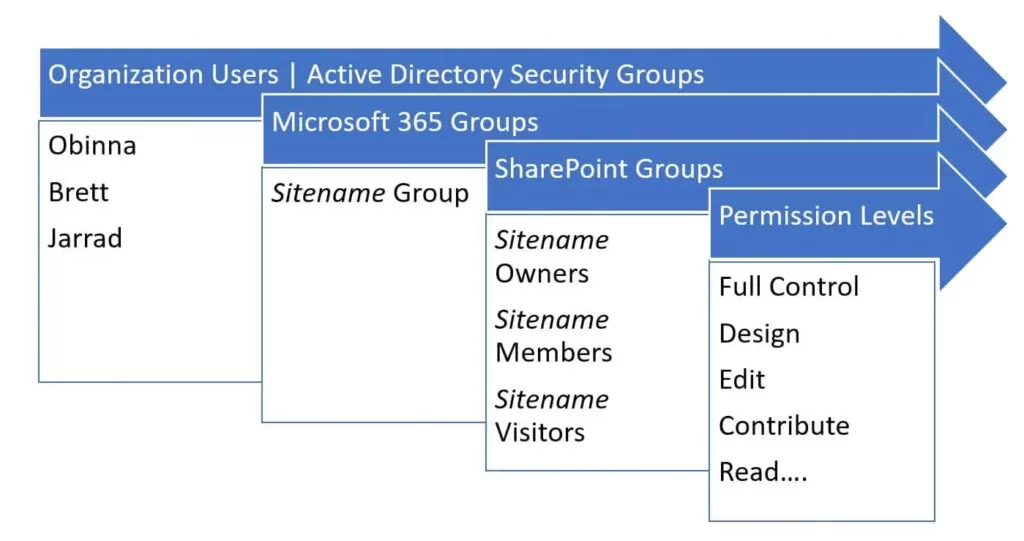
Security remains a paramount concern in digital environments. SharePoint Online Modern offers advanced permissions management, leveraging Office 365 groups to simplify access control.

By managing sharing settings and exploring external sharing options, organizations can strike a balance between collaboration and data security.

img-10

11. Optimizing Search Experience

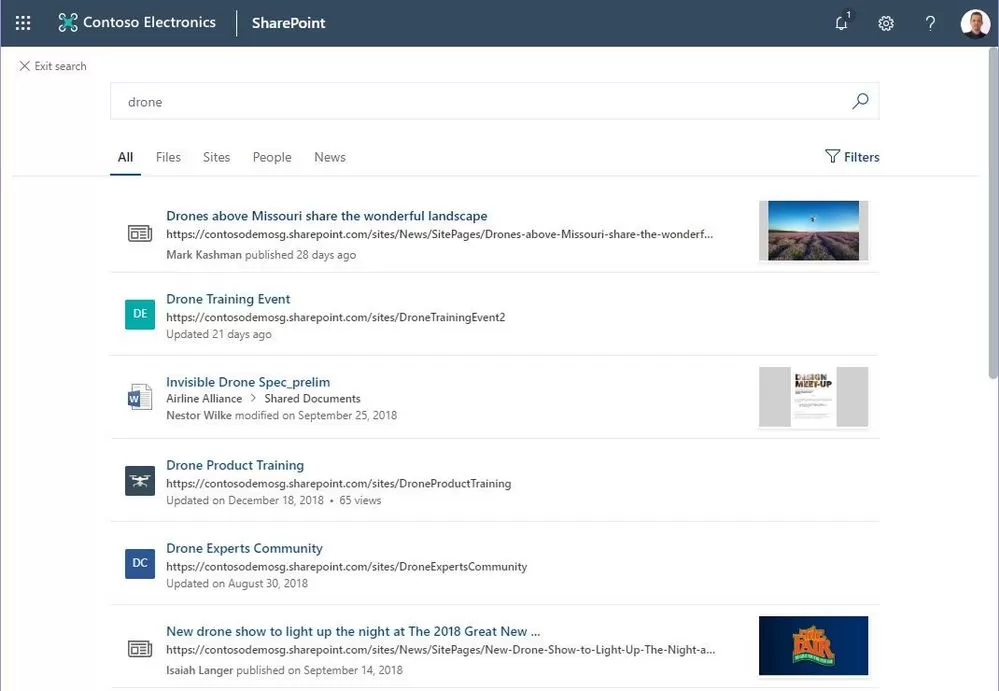
Efficient content discovery accelerates decision-making. Modern search configuration enhances the user experience by optimizing search settings.

Modern search web parts further empower users to discover relevant content quickly, leading to better-informed and more productive teams.

img-11

12. Real-time interaction with Webhooks and Remote Event Receivers

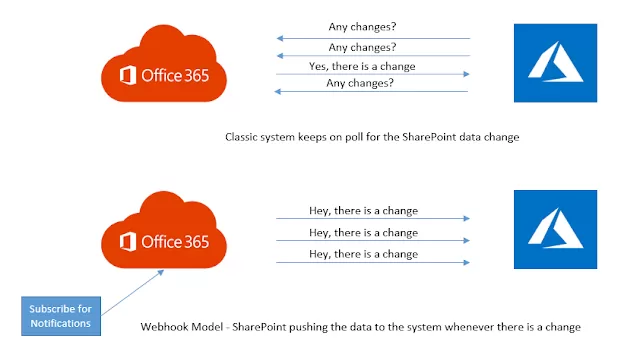
Real-time interactions drive seamless processes. Modern Webhooks facilitate external interactions, enabling real-time integration with other systems and services.

Remote Event Receivers streamline automation by triggering actions based on specific events, enhancing efficiency, and reducing manual intervention.

img-12

13. Building with SharePoint Framework (SPFx) 

Custom solutions enrich the SharePoint experience. SharePoint Framework (SPFx) empowers developers to craft custom web parts, extensions, and solutions tailored to specific business needs.

Integrating SPFx solutions seamlessly into modern SharePoint Online pages ensures a cohesive and unified user experience.

img-13

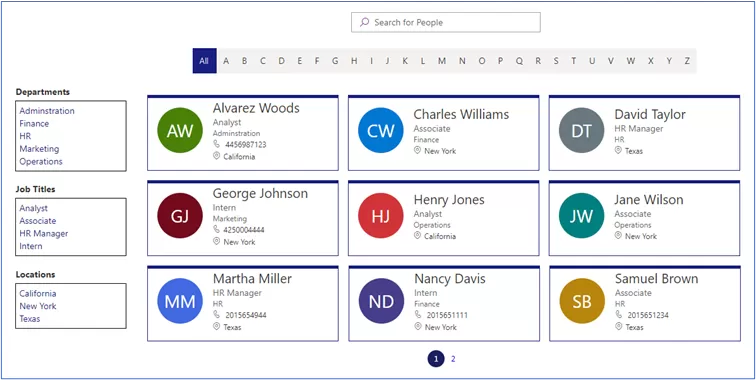
Employee Directory:
img-14

14. Customization with Power Apps, Power Automate, and Power BI

Microsoft’s Power suite amplifies customization possibilities. Power Apps enables the creation of custom applications and forms directly within SharePoint, streamlining processes and enhancing user experiences.

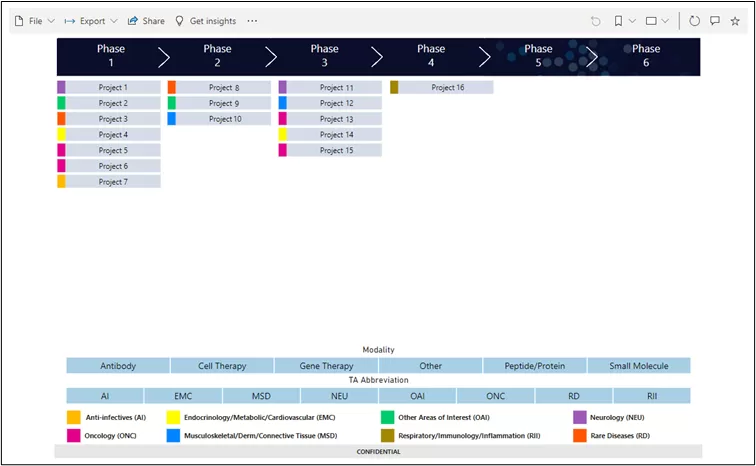
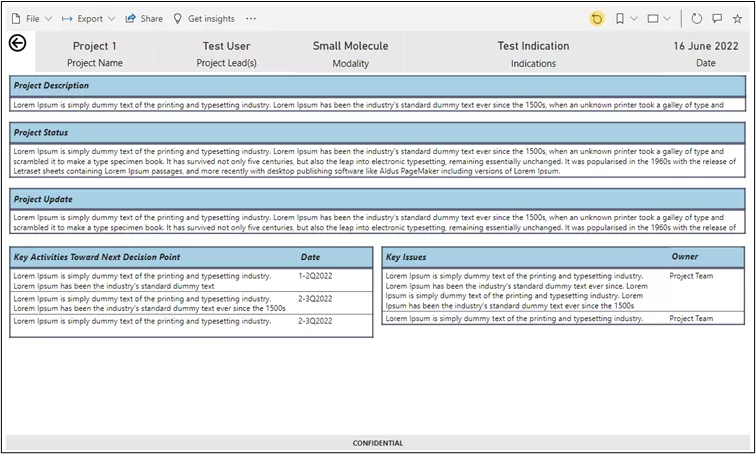
Power Automate automates workflows, reducing manual efforts and increasing efficiency. Power BI visualizes data and insights, empowering organizations to make data-driven decisions with the option to embed reports directly into SharePoint pages.

Power BI –

img-15

img-16

img-17

Power Automate –

Home Screen –

img-18

Login as an Employee –

img-19

New Leave Request Form –

img-20

Login As A Manager –

img-21

15. Seamless Integration with SharePoint

The Microsoft 365 ecosystem thrives on collaboration. Seamlessly integrating SharePoint with other Microsoft 365 apps enhances productivity and functionality.

Custom solutions built using Power Apps, Power Automate, and Power BI seamlessly enrich SharePoint’s capabilities, offering holistic and powerful solutions.

img-22

Conclusion: Embracing Modern Customization

In a digital era where adaptability drives success, SharePoint Online Modern customization emerges as a transformative force. Through customization, organizations optimize user experience, enhance productivity, and unleash the true potential of SharePoint Online.

With this being said, it’s time to migrate to SharePoint Online. Explore the reasons why you should migrate to SharePoint Online and Tips for Migration.

By embracing the full spectrum of customization options, businesses can create a SharePoint ecosystem that aligns perfectly with their goals, processes, and culture.

If you’re seeking the right partner to unleash the full potential of SharePoint for your business, look no further. Discover how to choose the right SharePoint services firm and embark on a journey of seamless collaboration, heightened productivity, and sustained success in the remote work landscape with Reality Tech.

From fine-tuning tenant settings and implementing central metadata to crafting an enterprise branding strategy and utilizing powerful customization tools, Reality Tech’s professional expertise unlocks the true potential of SharePoint Online.

By assisting clients in customizing SharePoint to precisely fit their business requirements, Reality Tech paves the way for seamless collaboration, heightened productivity, and sustained success in the remote work landscape.

Embrace the power of SharePoint customization and embrace a future of unparalleled success in remote collaboration with Reality Tech.