Safeguard Crucial Info Within Microsoft 365

Looking to Safeguard Crucial Info Within Microsoft 365? Dive into the Power of Sensitivity Labels! Explore how these labels protect data, enhance security, and drive productivity within Microsoft 365.

In today’s business landscape, safeguarding sensitive data within platforms like Microsoft 365 stands as a critical priority. The constant evolution of threats emphasizes the need for robust solutions like sensitivity labels. These labels not only categorize data but also fortify it against potential breaches while ensuring uninterrupted workflows.

Table of contents

  • What is sensitive data?
  • Securing data with sensitivity labels through Microsoft Information Protection (MIP)
  • Understanding Sensitive Data

    As businesses navigate an increasingly digital landscape, safeguarding sensitive information is non-negotiable. Sensitivity labels, embedded within Microsoft 365, offer a powerful defence against evolving cyber threats. Striking the delicate balance between security and productivity, these labels pave the way for a future where data protection is proactive, efficient, and integral to business operations.

    What is sensitive data?

    Sensitivity labels are a vital component of data protection strategies. They categorize information based on its confidentiality, ensuring appropriate handling and access control.

    Type of sensitive data?

    Sensitive data encompasses various forms, including personal, financial, or proprietary information, demanding heightened security measures.

    Importance of protecting sensitive data

    The implications of data breaches can be severe, ranging from financial loss to reputational damage, underlining the criticality of safeguarding sensitive information.

    WHAT ARE SENSITIVITY LABELS USED FOR IN M365?

    When it comes to safeguarding sensitive data, WHAT ARE SENSITIVITY LABELS USED FOR IN M365? holds the key. These labels play a pivotal role in tagging data and implementing diverse protective measures. Let’s explore the multifaceted uses and security applications of sensitivity labels within the Microsoft 365 suite.

    Understanding Sensitivity Labels

    Sensitivity labels serve as crucial identifiers, enabling organizations to categorize data based on its sensitivity level. This categorization facilitates robust auditing and reporting mechanisms.

    Labelling Content for Security

    One primary function of sensitivity labels is to tag content, allowing for easy identification of its sensitivity level. This tagging system is pivotal for effective auditing and regulatory compliance.

    Encryption for Content Protection

    To prevent unauthorized access, sensitivity labels facilitate encryption, ensuring that only authorized users can access and decipher the content. This robust security measure mitigates the risk of data breaches.

    Applying Content Markings

    Incorporating content markings, such as headers, footers, and watermarks like ‘Confidential,’ further fortifies the security of sensitive data. These markers serve as visual cues, signalling the sensitivity of the information.

    Protecting Content in Office and Third-Party Apps

    Sensitivity labels aren’t limited to Microsoft’s native applications; they extend their protective reach to third-party apps like Salesforce, Box, or Dropbox. This broad compatibility ensures a holistic safeguarding approach.

    Managing Containers in M365

    Efficient management of containers, including Teams, Microsoft 365 Groups, and SharePoint sites, is achievable through sensitivity labels. This feature bolsters data security within collaborative platforms.

    Securing Meetings and Chats

    Sensitivity labels bring a layer of security to meetings and chats by allowing labelling and optional encryption of invitations and responses. Teams-specific options further reinforce security protocols.

    Extending Labels to Power BI and Purview Data Map

    Innovatively, sensitivity labels transcend beyond conventional applications, extending their protective umbrella to Power BI and Microsoft Purview Data Map. This extension ensures data protection across diverse services.

    Steps to Expertly Set Up Your First Label in Microsoft: A Comprehensive Guide

    Setting up sensitivity labels is crucial for data security. Understanding these labels and their significance lays the foundation for robust data protection.

    Understanding Sensitivity Labels

    Sensitivity labels are metadata tags applied to documents or emails to control access. They offer various functionalities like encryption, watermarking, and more.

    Importance of Sensitivity Labels

    Their role in securing sensitive information cannot be overstated. Effective labels ensure data confidentiality, integrity, and availability.

    Types of Sensitive Information

    Diverse data categories exist, from financial details to personally identifiable information (PII). Identifying the type of information is pivotal.

    Creating Your First Label

    Initiate the process by crafting the label itself, defining its functionalities, such as applying headers, footers, watermarks, or encryption.

    Label Policy and Targeting

    Understanding label policies and their role in targeting users, groups, or sites ensures the right data protections are applied to the right content.

    Targeting Users/Groups/Sites

    Delve into the process of applying labels to designated users, groups, or sites, ensuring comprehensive coverage.

    Publishing Labels

    Implementing labels across the organization requires a strategic and careful approach to ensure seamless integration and functionality.

    Label Management and Updates

    Maintenance and updates are crucial in ensuring label efficiency and relevance over time, avoiding obsolescence or security gaps.

    Setting up your first label involves a comprehensive understanding of sensitivity labels, meticulous planning, and strategic implementation. Prioritize data security through effective label deployment and management.

    How to Create and Define Sensitivity Labels in Microsoft Purview

    Here, we’ll delve into the meticulous process of creating and defining these labels, empowering you to safeguard your data effectively.

    Step 1: Navigating to the Compliance Centre

    To initiate the creation process, begin by accessing the Compliance Centre within Microsoft Purview. Navigate through Information Protection and proceed to ‘Create New Label.’

    img

    Step 2: Crafting Label Details and Description

    Once within the ‘Create New Label’ section, meticulous attention to detail becomes paramount. Begin by entering fundamental information and crafting a descriptive overview for the label. Enter the fundamental information input, including Label Name, Display Name, Priority, and the comprehensive Description for both users and administrators, forms the crux of this phase.

    img

    Understanding Label Scope and Configuration in Microsoft 365

    These labels not only determine the parameters for data sensitivity but also dictate where and how these settings will be visible to users across diverse Microsoft 365 containers.

    Configuring diverse sensitivity label configurations within the Microsoft 365 compliance centre is paramount in today’s data-driven landscape. Understanding and leveraging the label scope functionalities – Files & Emails, Groups & Sites, and Azure Purview Assets – empower organizations to fortify data security across various levels and containers.

    Exploring Label Scope

    The label scope embodies the essence of sensitivity labels within Microsoft 365. It holds the key to two critical elements:

    1. Configurable Label Settings: The label scope determines which settings can be configured within a given label, defining the breadth of its protective capabilities.
    2. Visibility to Users: It also governs where the sensitivity label will be visible to users, ensuring the seamless application of data protection measures.

    img

    Configuration Options

    Microsoft 365 offers various configuration scopes catering to distinct needs:

    Files & Emails Scope

    The foundational scope, “Files & Emails,” serves as the bedrock of sensitivity labels. It encompasses settings to encrypt, mark, and protect labelled emails and Office files. This scope, selected by default, empowers users to configure encryption and content marking for documents and emails effortlessly.

    Interestingly, no additional licensing is required to configure settings within the “Files & Emails” scope, making it easily accessible to users by default.

    Files & Emails Scope Functionality: This scope primarily deals with encrypting and content marking for documents and emails, aligning with the traditional perception of sensitivity labels. By selecting the “Files & Emails” scope, users gain access to configuration settings that protect emails and documents effortlessly.

    Groups & Sites Scope

    Expanding beyond document and email protection, the “Groups & Sites” scope introduces a broader canvas for sensitivity labels. It allows configuration to safeguard content within Microsoft Teams sites, Microsoft 365 groups, and SharePoint Online sites.

    This scope presents a distinct facet by enabling protection settings at the container level. However, it necessitates the activation of capability before configuring protection settings for groups and sites. Once enabled, this scope is also selected by default, enhancing the security umbrella across these containers.

    Functionality of Groups & Sites Scope: In contrast, the “Groups & Sites” scope extends beyond individual documents or emails, focusing on the protection of containers such as Teams sites, Microsoft 365 groups, and SharePoint Online sites. The protection settings at this level include defining privacy (public or private) for team sites and groups, regulating external user access, managing access from unmanaged devices, and enabling external sharing from SharePoint sites (in preview).

    Azure Purview Assets Scope

    For a more comprehensive data security approach, the “Azure Purview Assets” scope steps into the picture. It extends sensitivity labels to assets within Azure Purview, encompassing SQL columns, files in Azure Blob Storage, and more. Once this feature is enabled, this scope, too, becomes the default selection for your tenant, fortifying security measures across diverse assets within Azure.

    Securing Labelled Items: Customizing Encryption and Content Marking Settings

    The intricacies of data protection involve not only encryption but also content marking settings. Understanding and customizing these aspects is crucial to ensure robust security measures within organizations.

    img

    Click the next button to proceed to the next page,

    img

    Configuring Encryption Settings

    On the Encryption page, configuring sensitivity labels enables tailored protection. Two primary options present themselves:

    1. Assign Permissions Now: This empowers administrators to precisely designate user permissions for labelled content, offering meticulous control over access.
    2. User-Assigned Permissions: Opting for this allows users themselves to assign permissions when applying labels, fostering flexibility in collaboration while maintaining security protocols.

    Assigning permissions to specific users or groups adds granularity to security measures. By individually designating permissions for labelled content, organizations fortify their data against unauthorized access.

    img

    Content Marking Settings

    Upon reaching the content marking page, three key options come into view:

    1. Adding a Watermark: This embeds a visible layer of identification, reinforcing the ownership and sensitivity of the content.
    2. Including a Header: A content header provides contextual information and further enhances content identification.
    3. Appending a Footer: Similarly, a footer complements the content by offering additional identification and context.

    img

    Protection Settings for Groups and Sites: Managing Access and Privacy

    In today’s digital landscape, safeguarding sensitive information within collaborative platforms like Microsoft Teams and group sites is paramount. The control over access levels and privacy settings becomes crucial to ensure data integrity and confidentiality. Let’s delve into the intricate details of configuring protection settings for groups and sites, specifically focusing on privacy and external user access, as well as external sharing and conditional access settings. Select the ones that you want to configure the settings:

    • Privacy and external user access settings
    • External sharing and conditional access settings

    img

    Understanding Privacy and External User Access Settings

    Configuring Access Levels

    When applying settings to groups, Microsoft Teams, or sites, administrators encounter pivotal decisions regarding access levels. The chosen settings significantly influence who can view, edit, and manage content within these collaborative spaces. The three primary options include:

    1. Public Access
    2. Private Access
    3. None (Customizable Access)

    img

    Managing Guest Access

    Another pivotal aspect of privacy settings involves enabling or disabling group owners’ capability to add external users as guests. This feature, when enabled, permits external collaborators to access specific teams, sites, or groups based on predefined permissions. Administrators must weigh the necessity of external contributions against the risks associated with granting guest access.

    External Sharing and Conditional Access Settings

    Mitigating Risks through External Sharing Controls

    Admins possess the authority to regulate external sharing of content and resources associated with labelled teams and sites. By defining stringent external sharing settings, organizations can fortify their defences against data leaks or unauthorized access.

    Conditional Access: Strengthening Security Measures

    Conditional access settings act as an additional layer of defence, implementing specific criteria for accessing sensitive information. By establishing conditions such as device compliance, location, or user roles, administrators bolster the security posture of collaborative platforms.

    img

    Enhancing SharePoint Security: Control and Protect Access Options

    The next page presents two crucial options, each holding the power to fortify SharePoint sites: Controlling External Sharing and Leveraging Azure AD Conditional Access.

    Understanding Control External Sharing from Labelled SharePoint Sites

    Configuring External Sharing Settings

    SharePoint administrators wield significant control over data sharing by configuring external sharing settings. This feature empowers them to dictate how content from labelled sites is shared with external entities. By opting for this setting, administrators can meticulously manage and monitor data accessibility beyond organizational boundaries.

    Configurable Replacements for Existing Settings

    The allure of this option lies in its ability to supplant existing sharing settings seamlessly. By configuring settings at the site level, administrators can override previous configurations, ensuring a more streamlined and secure sharing process.

    Implications of Enabling Control External Sharing

    Enabling this feature furnishes an added layer of control over data dispersion. It allows for a structured sharing environment, mitigating the risks associated with unauthorized external access while promoting seamless collaboration among permitted stakeholders.

    Utilizing Azure AD Conditional Access for Enhanced Protection

    Restricting Access from Unmanaged Devices

    In a dynamic workspace, user devices vary in terms of management and security protocols. Leveraging Azure AD Conditional Access enables administrators to enforce restrictions on access from unmanaged devices, curbing potential security vulnerabilities stemming from these endpoints.

    Authentication Context Configuration

    One of the pivotal aspects of this option is the ability to configure authentication contexts. By setting stringent authentication parameters, administrators can elevate the security posture of labelled SharePoint sites, ensuring that access is only granted under specified and verified contexts.

    img

    Guide: Publishing Sensitivity Labels for Organizational Access

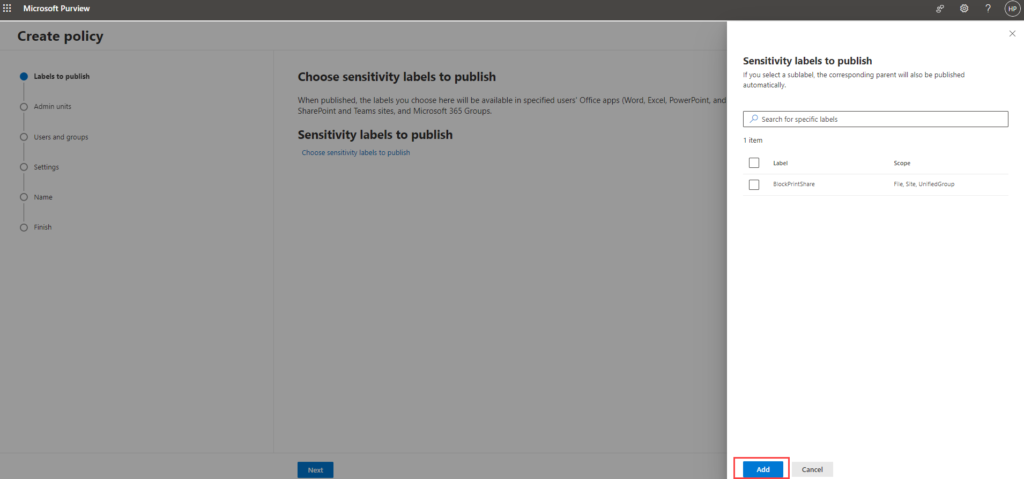
    To commence this procedure, start by returning to the labels tab within the information protection settings housed in the Microsoft Purview Compliance portal. Here, the initial step involves selecting the specific sensitivity label intended for wider accessibility.

    Once the intended label is identified, the subsequent action involves clicking on the conspicuous “publish label” button, conveniently located in the right panel of the interface. This simple act initiates a wizard-like process for creating a sensitivity policy. It’s worth noting that this wizard mirrors the one experienced when generating a policy from the label policy tab, with the distinction that, in this instance, a sensitivity label is pre-selected.

    image

    image

    To advance to the following page, simply click on the “Next” button.

    image

    The selection of admin units plays a pivotal role. These admin units operate as the linchpin in restricting policies to specific user groups, significantly influencing subsequent location options. Understanding the nuances and functionalities of admin units is crucial for optimizing policy management within the Microsoft Entra ID ecosystem.

    image

    The upcoming page provides the option to define the users and groups targeted by the policy.

    By default, it encompasses all users and groups. However, you have the ability to select particular users or groups by clicking the “choose user or group” link.

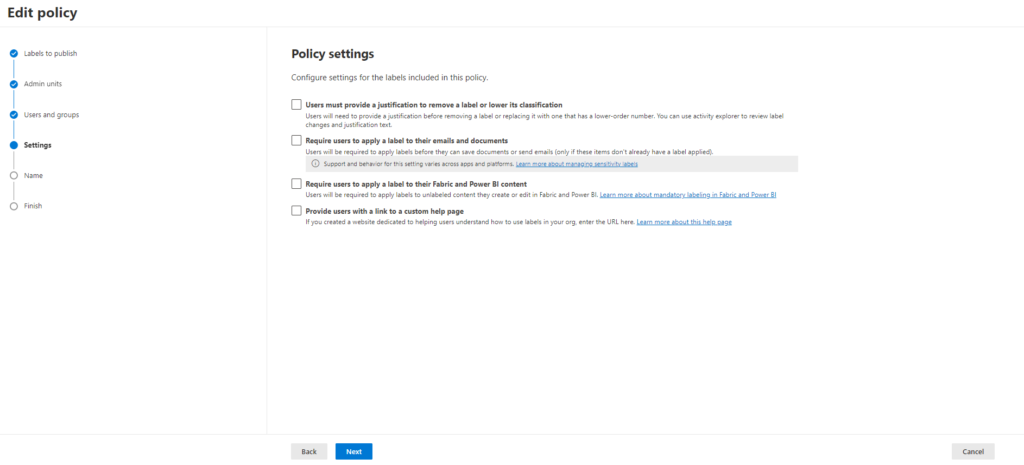
    The Following Section: Policy Settings for Enhanced User Control

    The upcoming policy settings delineate a spectrum of choices, allowing administrators to configure the system to align with organizational data security needs.

    The Power of Choice: Exploring Policy Settings:

    Enabling User Justification for Label Alteration

    Granting users, the ability to provide justifications for label adjustments is a strategic move. By allowing users to articulate reasons for label modification or classification reduction, it fosters accountability while maintaining flexibility. This empowers users to engage responsibly with sensitive data, balancing their needs with organizational security protocols.

    Mandating Sensitivity Labels for Email and Document Handling

    One powerful setting involves enforcing sensitivity labels before sending unmarked emails or saving sensitive documents. This proactive measure ensures that crucial information is appropriately labelled, minimizing inadvertent data exposure. By mandating label application, users become conscious custodians of sensitive data, fortifying organizational data security.

    Extending Sensitivity Labelling to Power BI Content

    Incorporating sensitivity label requirements for unclassified Power BI content amplifies data protection strategies. With this setting, unlabelled Power BI content is no longer overlooked. Users are prompted to apply sensitivity labels, fortifying the integrity and confidentiality of insights gleaned from such data.

    Custom Help Pages: Empowering Users with Guidance

    The provision to showcase a custom help page offers invaluable guidance. Administrators can curate informative resources tailored to assist users in navigating sensitivity label application seamlessly. This fosters user proficiency and understanding, elevating the efficacy of data security practices within the organization.

    image

    Default Label Assignment across Platforms

    The subsequent pages usher administrators into assigning default labels across a diverse spectrum, covering documents, emails, meetings, sites, groups, and Power BI. This pivotal step streamlines the process, ensuring uniformity and adherence to organizational data classification standards.

    image

    Examine and finalize the policy

    Following this step, you’ll be prompted to name your new label policy. You have the option to include a description, although it’s entirely up to you; you can choose to leave it empty. After creating your initial sensitivity label, you’ll have the opportunity to review all aspects of the new policy. Once you’ve confirmed all the settings and particulars, proceed by clicking the submit button to complete the process.

    image

    Overview

    Sensitivity labels are the modern shield for your organization’s data. They fortify your information against threats while nurturing a culture of responsible data handling. With seamless collaboration and robust protection, they ensure sensitive information stays safeguarded. Embrace sensitivity labels to proactively defend your data against evolving risks while fostering a secure, collaborative work environment.

Unlocking hidden insights get started with Microsoft Purview content search

In today’s digital age, businesses generate massive amounts of data daily, stored across emails, documents, chat logs, and more. But finding the specific data you need can feel like searching for a needle in a haystack. Here’s where Microsoft Purview Content Search steps in as your digital detective!

What is Content Search?

This versatile tool helps locate specific information across various applications like Exchange, SharePoint, OneDrive, and Teams. It’s ideal for internal needs such as investigations or audits.

This powerful tool empowers you to effortlessly locate critical information within your Microsoft 365 environment. Whether you’re conducting internal investigations, responding to legal requests, or simply managing day-to-day tasks, Content Search streamlines the process and saves you valuable time.

You can use the Content search eDiscovery tool in the Microsoft Purview compliance portal to search for in-place content such as email, documents, and instant messaging conversations in your organization. Use this tool to search for content in these cloud-based Microsoft 365 data sources:

  • Exchange Online mailboxes
  • SharePoint Online sites and OneDrive for Business accounts
  • Microsoft Teams
  • Microsoft 365 Groups
  • Viva Engage Groups

Running a search is as simple as typing in your keywords. Plus, you get an instant estimate of the number of results and which locations hold the most relevant information. No more wading through mountains of data!

Content Search even lets you preview the results before exporting them for further analysis. This saves you valuable time and ensures you have the right information at your fingertips. Ultimately, Content Search empowers you to make better decisions, faster, and helps your organization stay compliant with regulations.

Here’s how to create and run a content search:

1. Access the Microsoft Purview Compliance Portal:
Go to the Microsoft 365 Admin Center and click on “Compliance”. In the left navigation pane, select “Content search”.

image

image

2. Initiate a New Search:
Click “New search” on the Content search page.

image

3. Give Your Search a Unique Name and Description:
Choose a clear and descriptive name that reflects the purpose of your search. Add a description (optional) to further clarify the search intent.

Image

4. Select Search Locations:
Choose the locations you want to search by toggling them “On.”

  • Exchange Mailboxes: Search all mailboxes by default or select “Choose users, groups, or teams” for specific targets. Use the search bar to find individual mailboxes or distribution groups.
  • SharePoint Sites: Search all sites by default or select “Choose sites” to specify locations. Enter the URL of each SharePoint site, OneDrive site (including those for Teams, Groups, and Viva Engage) you want to search.
  • Exchange Public Folders: There’s no option to choose specific folders. Toggle “On” to search all Exchange public folders or leave it “Off” if not needed.

image

5. Refine Your Search with Keywords and Conditions:
Keyword Query: Enter keywords or phrases relevant to your search.

Conditions: For more precise results, use conditions like:
Sent or received date ranges for emails. File name or last modified date for documents.
Boolean Operators (AND, OR NOT): Combine keywords for complex queries (explained in Microsoft Documentation: https://learn.microsoft.com/en-us/purview/ediscovery-keyword-queries-and-search-conditions).

image

Enable the keyword list checkbox, then add a keyword per row. Keywords in a row are linked by a logical operator (c:s), similar to the OR operator, with a limit of 20 rows to avoid large list issues. Conditions added must align with the keyword query, using a logical operator (c:c) akin to the AND operator, ensuring only items meeting both criteria appear in the results.( You can have up to 20 keywords in the keyword list.)

6. Review and submit to start the search:
Double-check your search settings. Click “Submit” to start the search process.

image

Image

7. Analyze Your Search Results:
After running the search, you’ll see estimated search results and statistics. Download these statistics to a CSV file for further analysis in Excel to view details like:

  • Content locations with matching items.
  • Number of results for each keyword (if using the keyword list).

Microsoft Purview provides valuable insights after you run a content search. Let’s break down the key sections:

1. Search content
This section offers a quick overview of what your search found. You’ll see the total number of items matching your criteria, along with a breakdown by location (mailboxes and sites) and estimated size

Image

Estimated Items by Location: Shows the total count and specifics of items found in mailboxes and on sites.
Estimated Locations with Hits: Details the total and specific numbers of mailbox and site locations containing matching items.
Data Volume by Location (in MB): Reports the total and specific data sizes for mailbox and site items.

2. Condition report
This section dives deeper into how your search terms performed. It shows statistics for each keyword or condition used in your search query. This helps you analyze which terms yielded the most results and potentially refine your search further. You can even download this report as a CSV file for further analysis in Excel.

image

Location Type: Identifies content location—Exchange for mailboxes, SharePoint for sites.
Part: Specifies if stats apply to the entire query (“Primary”) or individual keywords.
Condition: Indicates the keyword or condition generating the stats.
Locations with Hits: Counts content locations with matching items.
Items: Total number of matching items found.
Size (MB): Combined size of matching items in megabytes.

3. Top locations
This section identifies the content locations (mailboxes or SharePoint sites) with the highest number of matching items.
It displays the top 1,000 locations, allowing you to pinpoint where the most relevant information resides.
Similar to the Condition Report, this section offers the option to download a CSV report for further analysis.

image

4. Exporting Reports:
If you want to save your search results for future reference, you can export them. Simply click the “Actions” menu and select “Export report.”

Image

Choose the desired format and generate the report.

Image

Head over to the “Export” tab to locate the exported report.

Image

Click on the report to download it. When generating the report, you’ll see an “Export key”. This key is required to open the downloaded report. You can also change the export key while generating the report for added security.

Image

For exporting data beyond Purview:
While this guide focuses on exporting reports within Purview, if you’re interested in exporting data to your local system in a different context (e.g., PST files), you can refer to our separate blog titled “How to export Office 365 PST file with eDiscovery in Office 365” which provides more information on that specific process.


Exploring Microsoft Purview eDiscovery Solutions

In today’s digital age, the volume of electronic data produced by individuals and organizations has skyrocketed. With this exponential growth comes the necessity for efficient and comprehensive methods to manage, store, and retrieve this data. Enter eDiscovery, a critical process, especially within Microsoft’s purview, providing a robust framework for handling electronic information for legal, compliance, and investigatory purposes.

Understanding eDiscovery in Microsoft Purview

Understanding eDiscovery

Electronic Discovery, commonly referred to as eDiscovery, encompasses the identification, collection, preservation, review, and production of electronically stored information (ESI). In Microsoft’s realm, eDiscovery revolves around leveraging the tech giant’s tools and platforms to streamline this process.

What Can You Discover?

Microsoft Purview’s eDiscovery tools enable the exploration of several repositories, including Exchange Online, SharePoint Online, OneDrive for Business, Microsoft Teams, Microsoft 365 Groups, and even Yammer teams. The versatility of these tools allows for comprehensive searches across mailboxes and sites within a single eDiscovery search.

Leveraging Microsoft Purview eDiscovery (Standard)

For organizations utilizing Office 365 E5 or Microsoft 365 E5 subscriptions (or related E5 add-ons), the capabilities are further amplified with Microsoft Purview eDiscovery (Premium). However, even with the standard version, organizations can identify, hold, and export content discovered within mailboxes and sites.

Why You Need eDiscovery in Microsoft’s Sphere

1. Streamlined Data Management

With the sheer abundance of electronic data, efficient management becomes a cornerstone of operational success. eDiscovery tools in Microsoft’s domain offer streamlined approaches to manage, sort, and retrieve data, enhancing overall productivity.

2. Enhanced Efficiency and Cost Savings

Implementing eDiscovery methodologies within Microsoft’s framework leads to increased efficiency in handling legal matters, thereby reducing the time and costs associated with traditional manual data review processes.

3. Proactive Risk Management

By embracing eDiscovery within the Microsoft ecosystem, organizations proactively manage risks associated with data breaches, ensuring compliance, and safeguarding sensitive information.

Microsoft Purview eDiscovery (Standard) Workflow

Understanding the workflow is crucial to effectively utilize the eDiscovery (Standard) features. The process typically involves:

1. Creation of eDiscovery Holds

Upon initiating a case, the first step is placing an eDiscovery hold on content locations relevant to the investigation. These content locations encompass Exchange mailboxes, SharePoint sites, OneDrive accounts, as well as the mailboxes and sites linked with Microsoft Teams and Microsoft 365 Groups.

2. Association of Searches and Exports with a Case

An integral aspect of the workflow is associating searches and exports with a specific case. This categorization streamlines the process, ensuring a clear linkage between the investigation and the obtained data.

3. Placing eDiscovery Holds

Organizations must initiate eDiscovery holds for individuals of interest, scour relevant content, and subsequently export this data for further scrutiny.

The eDiscovery (Standard) workflow

It is a structured process designed to assist organizations in utilizing eDiscovery tools effectively once a case has been created. Here’s an overview of the key steps involved:

The Ediscovery Workflow

(Standard Workflow for eDiscovery)

Step 1: Create an eDiscovery Hold

After initiating a case, the initial step involves placing an eDiscovery hold on content locations associated with individuals under investigation. These locations encompass Exchange mailboxes, SharePoint sites, OneDrive accounts, as well as mailboxes and sites linked to Microsoft Teams and Microsoft 365 Groups.

The eDiscovery hold serves to preserve potentially relevant content throughout the investigation. Organizations have two options:

Preserve All Content in Specific Locations: This comprehensive approach retains all data within predefined locations.

Create Query-Based Holds: A more targeted strategy, preserving content that aligns with specific queries or criteria.

Beyond content preservation, eDiscovery holds streamline subsequent searches by allowing swift access to held content locations.

Step 2: Search for Content

Post-establishing eDiscovery holds, organizations leverage the in-built search tool to explore held content locations. Additionally, they can extend their search to other content repositories to locate data pertinent to the case.

Organizations have the flexibility to run varied searches associated with the case, utilizing keywords, properties, and conditions to tailor search queries. These queries generate results comprising the most relevant data for the investigation.

Further functionalities within this step include:

Viewing Search Statistics: Utilized to refine search queries and narrow down results for precision.

Previewing Search Results: Allows quick verification of the relevance of retrieved data.

Iterative Query Revision: Enables adjustments to search queries and subsequent reruns for thorough data retrieval.

Step 3: Export and Download Search Results

Upon identifying relevant data through searches, organizations proceed to export these findings out of Microsoft 365 for external review. This process involves two essential steps:

  • Exporting Search Results: Copying the search results to a designated Azure Storage location provided by Microsoft.
  • Downloading the Export Package: Utilizing the eDiscovery Export tool to download the content, including exported data files, export reports, summary reports, and error reports, to a local computer.

The comprehensive export package enables external parties to review the findings beyond the investigation team.

The eDiscovery (Standard) workflow thus encompasses strategic content preservation, meticulous search methodologies, and efficient data exporting, ensuring a comprehensive and structured investigative process.

Process to Start Creating eDiscovery Case in Microsoft Purview

Microsoft Purview simplifies eDiscovery processes by streamlining the steps involved in creating an eDiscovery case. Below is a comprehensive guide detailing each step for initiating an eDiscovery case within Microsoft Purview.

Step 1Accessing eDiscovery in Microsoft Purview

To begin, access eDiscovery by navigating to Microsoft Purview > eDiscovery (Standard).

Ediscovery Standard

(Accessing eDiscovery in Microsoft Purview)

Step 2: Creating a New eDiscovery Case

Once in the eDiscovery section, click on “Create a case” to initiate a new eDiscovery case.

New Ediscovery Case

(Create eDiscovery case)

Step 3: Naming and Describing the eDiscovery Case

Upon clicking “Create a case,” provide an appropriate name and description for the case. Ensure to save the information.

Ediscovery Case

Step 4: Accessing the eDiscovery Case

After creating the eDiscovery case, click on the case name to access it and proceed further.

Ediscovery Case Demo Test

(eDiscovery case has been created)

Step 5: Assigning Permissions

The initial step post-case creation involves assigning permissions to specific groups and users. Navigate to the settings tab and select “Access & permission.” Choose the desired users and groups for accessing the eDiscovery case.

Access Permission

(Accessing Permission Tab)

Accessing Permission Tab

(Assigning eDiscovery case Permission to Users and Groups)

Step 6: Holding Locations

The subsequent step is to hold specific locations within the case. Click on the “Hold” tab, name the hold, provide a description, and save it. Select the locations to apply the hold, including/excluding as necessary.

Holding Locations

(Accessing Hold tab in eDiscovery)

Accessing Hold Tab in Ediscovery

(Creating Hold for eDiscovery case)

Creating Hold for Ediscovery Case

Step 7: Creating Queries

Utilize the Search query builder to create queries that identify desired locations for search and applying holds. Add keywords and conditions using the builder, including multiple keywords and predefined conditions.

Creating Queries

(Enter the Keyword in the Query for search and applying holds)
Multiple Keywords in the Query
(You can enter multiple keywords in the Query)
Add Predefined Conditions
(Add Predefined conditions in the search)

Step 8: Reviewing and Submitting the Hold

Review the settings chosen for the hold and submit the final configuration.

Review Your Hold Settings

(Review your Hold settings)

Step 9: Content Search for eDiscovery Case

Navigate to the “Searches” tab to conduct content searches for the eDiscovery case.

Accessing the Search Tab

(Accessing the Search Tab)

Step 10: Defining Search Conditions

Create a new search case with a name and description. Select the desired locations for content search, defining search conditions, query language, and country/region preferences.

Defining Search Conditions

(Create search for eDiscovery case)
Create Search for Ediscovery Case

(Select the specific location for search case)

Enter the Keyword in the Query

(Enter the Keyword in the Query for search case)

Step 11: Reviewing and Starting the Search

Review the search settings and initiate the search. The status will change from “started” to “complete” upon search completion.

Reviewing and Starting the Search

(Review your search settings before creating it)

Review Your Search Settings

(Search status for content search case)

Step 12: Reviewing Search Results

Post-search completion, a detailed summary showcasing information like item count, location, size, condition reports, and top locations will be available.

Reviewing Search Results

(Search Summary and Status for completed status)

Step 13: Generating Reports

Generate reports through the graphical visualization of search statistics, including CSV format reports for item counts, locations, and conditions.

Image

(Search Statistic results)

Search Statistic Results

(Export Search results)

Export Search Results

Exports Tab

(In Exports tab you can see the exported reports)

Step 14: Closing or Deleting the Case

If necessary, close or delete the eDiscovery case by accessing the settings tab and selecting the desired action from the available options.

Closing or Deleting the Case(Refer Close/Delete case)

Upgrading eDiscovery Case

Consider moving the eDiscovery case from the standard version to the premium version if needed. (If you are dealing with complex data challenges, legal intricacies, and heightened compliance requirements, providing a comprehensive suite of tools to navigate the evolving landscape of data management seamlessly.)

Upgrading Ediscovery Case

(Move case to eDiscovery case from eDiscovery Standard to eDiscovery premium)

Conclusion

Navigating the eDiscovery process within Microsoft Purview involves a systematic approach, starting from case creation to content search and report generation. By following these outlined steps, users can effectively manage eDiscovery cases, ensuring thorough and precise investigations.

How to export Office 365 PST file with eDiscovery in Office 365

In today’s digital landscape, legal and compliance teams are constantly battling the ever-growing tide of electronic data. Complex investigations and tight deadlines demand efficient tools to sift through this information. Microsoft Purview, with its robust eDiscovery and Content Search features, empowers teams to navigate these challenges. However, the true power lies in unlocking the insights within the exported data. This is where the eDiscovery Export Tool used for the streamlining the review process and to access the data in a more usable format.

You cannot actively use a PST file from OneDrive or SharePoint Online. Microsoft is NOT recommending this as a practice. The recommended practice is to convert your PST files to your Office 365 account. (.PST files: These are data files used by older versions of Outlook to store emails, contacts, calendars, etc.)

What is Content Search?

This versatile tool helps locate specific information across various applications like Exchange, SharePoint, OneDrive, and Teams. It’s ideal for internal needs such as investigations or audits.

What is eDiscovery?

Beyond basic search, eDiscovery is a robust solution specifically designed for legal and compliance teams. It allows for efficient identification, preservation, and analysis of electronic content during legal cases or investigations. This ensures adherence to legal requirements and facilitates thorough investigations.

What is the eDiscovery Export Tool?

The eDiscovery Export Tool is a powerful utility integrated within Microsoft Purview, designed specifically for viewing and analysing exported Content Search data. It provides users with a user-friendly interface to navigate through the exported data, and to access the data in a more usable format.

To export a search report, you have to be assigned the Compliance Search management role in compliance portal. This role is assigned by default to the built-in eDiscovery Manager and Organization Management role groups.

Step 1: Access the Microsoft 365 admin centre.

Microsoft 365 Admin

Step 2: Navigate to the “Security & Compliance” Section.

Image

Step 3: In Microsoft purview locate to the ” Roles & Scopes ” area and click on the “Permissions”.

Image

Step 4: In Permission tab Select the roles associated with Microsoft Purview solutions.

Image

Step 5: Next, search for the eDiscovery Manager role in the search box and press “Enter”.

Image

Step 6: Open the eDiscovery Manager role.

Image

Step 7: Click on “Edit”.

Image

Step 8: Add your account to both the “eDiscovery Manager” and “eDiscovery Administrator” roles.

Image

Image

Step 9: Click “Save” to apply the changes.

Image

Downloading Exported Search Results

Downloading exported content from Content Search or eDiscovery requires a separate tool called the eDiscovery Export Tool. While Microsoft Edge is recommended, recent updates might require a different approach.

Here’s what you can do:

Enable ClickOnce support in the newest Microsoft Edge: This might involve some additional steps (Shown Below)

Enabling ClickOnce Support in Microsoft Edge

1. In Microsoft Edge, go to edge://flags/#edge-click-once.

2. For ClickOnce Support Change the setting from “Default” or “Disabled” to “Enabled”.

Image

3. Scroll down to the bottom of the browser window and Restart Microsoft Edge.

Image

Installing and running the eDiscovery Export Tool

1. After exporting your search results in Purview, select “Download results” on the export flyout page. Copy the “export key” to your clipboard for later use.

image

(Important: Downloading directly from a Chrome browser will result in an error. Switch to Microsoft Edge)

2. You’ll be prompted to launch the eDiscovery Export Tool. Select “Open”.

Image

3. If not installed, click “Install” after the security warning.

Image

(Microsoft Office 365 eDiscovery Export Tool Install Pop-up)

Installing Microsoft Office 365 eDiscovery Export Tool

(Installing Microsoft Office 365 eDiscovery Export Tool)

Image

(Application Launching Screen)

4. Upon installation, enter the copied “export key” in the eDiscovery Export Tool window. Specify the download path and file name, then click “Start” to begin downloading the exported data.

Image

5. Following that, you will be able to see the screen for tracking the download progress. Click on Close to finish the download process.

Image

6. Opening the file reveals a folder pane (like the image) displaying details about your content search results.

Image

How to Block External Sharing and Printing Using Sensitivity Labels

What are sensitivity labels in Microsoft 365?

Imagine adding an extra layer of security to your documents and emails. Sensitivity labels are used to classify content and protect content. With Microsoft Purview Sensitivity Labels, you can do just that.

These labels act like tags, classifying information based on its importance (think “confidential” or “public”). Once labelled, policies can be set to control who can access or share this information. This empowers your organization to:

  • Prevent accidental leaks: Stop sensitive information from being shared with the wrong people.
  • Restrict document access: Ensure only authorized users can view critical documents.
  • Add extra safeguards: Block printing or other actions on highly sensitive documents.

Microsoft Purview (previously known as Microsoft 365 compliance) sensitivity labels can be applied to emails, documents, and Microsoft 365 containers, including Teams, SharePoint sites, and Microsoft 365 Groups.

Enhanced Security and Streamlined Compliance with Sensitivity Labels

  • Beyond Permissions: While traditional security and permissions control who sees what, Sensitivity Labels go a step further. They offer a powerful layer of protection by:
  • Encrypting Content: Highly sensitive information can be automatically encrypted, making it unreadable even if accessed by unauthorized users.
  • Restricting Actions: Prevent accidental leaks by limiting actions like copying, printing, or downloading sensitive documents. This goes beyond just who can view the information.
  • Disabling Print Screen: For documents containing the most critical data, you can even block users from capturing screenshots, adding an extra layer of defence.
  • Combined Power: Sensitivity Labels work seamlessly with existing security and permission settings in Microsoft 365. This creates a multi-layered defence, ensuring your organization’s data is protected from both internal and external threats.

Regulatory Compliance:

Simplify Compliance Challenges: Many regulations like GDPR and HIPAA have strict guidelines for handling sensitive data.

Sensitivity Labels streamline compliance by automatically classifying and protecting information based on its sensitivity level.

This reduces the risk of non-compliance and associated penalties.

In this blog, we’ll explore the power of Sensitivity Labels in Microsoft Purview to safeguard your organization’s confidential information.

We’ll delve into how these labels can be configured to prevent two critical security risks: unauthorized external sharing and accidental printing of sensitive documents.

1. Access the Label Creation Portal:

Head over to the Microsoft Purview compliance portal

https://learn.microsoft.com/en-us/purview/purview-compliance-portal

Navigate to Information Protection and select Create label.

img

img

2. Craft a Clear and Informative Label:

  • Name: Choose a descriptive name like “BlockSharingPrinting”. This clearly identifies the label’s purpose.
  • Description: Provide a brief explanation of the restrictions and consequences of applying the label, both for users and adminis.
  • Display Name: This is what users will see in applications (e.g., “Confidential”). Keep it concise.
  • Colour: Select a colour that visually represents the sensitivity level. Click Next to proceed.

img

3. Define the Label Scope:

  • Choose where you want the label to be applicable (e.g., Items-emails, documents, or both, Containers – Groups & Sites). Click Next.

Define The Scope For This Label


4. Enhance Security with Visual Markings (Optional) and Control Access:

Select the Control access option for the protection setting.

You can also consider adding a watermark or header/footer to warn users about the document’s confidentiality. Click Next if you don’t want visual markings.

img

5. Control Access and Printing Permissions:

  • Access Control: Here, you can determine who can view, edit, or copy the labelled content. Different permission levels offer varying access degrees. You can even create custom permissions.
  • Blocking Printing: To restrict printing for specific users, choose the “Viewer” permission level. Higher permission levels allow printing.

Select the Configure access control settings and assign Permission now

img

img

Assigning Permissions:

Click “Assign Permission” to specify who can access the document with the chosen permission level. You can assign access to:

M365 Groups (e.g., Sales Department)
Individual Users or Groups
Specific Email Addresses

img


img

  • Blocking Printing: To restrict printing for specific people, choose the “Viewer” permission level. This allows users to see the document but prevents them from printing it.
  • Allowing Printing: If printing needs to be allowed for some users, select a higher permission level. Options include “Co-owner/Co-author” (full control over the document).
  • Customizing Permissions (Optional): For even more granular control, you can create custom permission levels that define specific access rights.

6. Configure Protection for Groups and Sites

If you selected “Groups and Sites” in step 3, you could define additional settings here.

  • External Sharing: Choose the “Control external sharing from labeled SharePoint sites” and “Only people in your organization” options. This ensures that when this label is applied to a SharePoint site, only members of your organization can access it. Click on next.

img

img

7. Review and Save:

  • Double-check your chosen settings to ensure everything aligns with your security goals. Click Save to create the Sensitivity Label.

img

Making Labels Available to Users: Publishing with Label Policies

Now that you’ve created your powerful Sensitivity Label, it’s time to make it accessible to your users. This is achieved through a process called publishing the label using a label policy.

Here’s a breakdown:

1. Navigate to the Label Policies page in the Information Protection. Click on Publish label to create a new policy.

img

2. Select the Sensitivity Label you want to publish from the available options.

img

img

3. Choose the admin units you’d like to assign this policy to.

img

4. Choose the users or groups to whom you want to assign this policy. This determines which users will see the label available for use in their applications (e.g., emails, documents).

img

5. (Optional) You can customize additional settings within the policy, but for now, we’ll leave them as default.

img

6. Select the label if you want to apply it by default for documents, Emails, Meetings, Sites and groups, and Power BI.

img

7. Provide a clear and descriptive name for the label policy.

img
8. Review the settings then click Submit to publish the policy.

img

  • Important Note: It can take up to 24 hours for the published label to become available in the applications of your selected users.
  • Error Messages: Users may encounter an error message like “FileIRMProtected” when they attempt to print a labelled document. This message indicates that the label’s restrictions are being enforced.

img

The “File Info” menu within applications like Word or Excel might still show “Yes” for printing permissions. This information reflects the base permissions assigned to the document, not the additional restrictions imposed by the Sensitivity Label.

Remember: If “Yes” is displayed for printing permissions, the Sensitivity Label’s settings determine printing is allowed.

img

Step-by-Step Guide to Create a Forms in Power Pages

This tutorial explains advanced techniques for manipulating forms, enabling users to seamlessly integrate, create, modify, and interpret forms within web content. It serves as a foundational resource for improving web development skills.

Steps to Create a Form in Power Pages

There are two ways to create form:

  1. Using PowerApps Portal
  2. Using the “Data” workspace in Power Pages

Method 1: Create a form using the ‘Data’ workspace.

  • Step 1: Go to Power Pages and select the site.
  • Step 2: On the left side of Power Pages, select ‘Data,’ then create a table or choose an available table for the creation of the form.

img

Step 3: After selecting a table, click on “Forms,” then click on “+ New form”

img

Step 4: Fill in the details, such as “Form Name,” and add a description if necessary.


img

Step 5: After creating the form, add fields that need to be required by the creating columns.

img

Step 6: After adding a created column, drag or add it to the form, then click on “Save” and “Publish. Then Click on the back button.

img

User Registration Form

Method 2: Create a form using the Power App Portal

  • Step 1: Go to the Power Apps Portal and click on the table.

img

  • Step 2: Then, either create a form in the existing table or create a new table and add a column to the form.

img

Step 3: After creating a table, you can add a column by clicking on “+ New Column.”

img

Alternatively, you can go to the table and click on the column to create the columns needed.

img

  • Step 4: After creating the columns, click on “Forms” and create a form

img

  • Step 5: To create a form, click on “New form” and then select “Main form.”

img

  • Step 6: To add a column, on the left side, you can see the columns that were created, and you can also create a column. Then Drag or click to add columns it to the form. Then click on Save and Publish from the right side.

img

To add forms to the Power Pages site, follow these steps:

  • Step 1: After creating the form, go to the power page site and create a new page or select an existing page. Then, choose the form from the component section.

img

  • Step 2: Click on the “+ New Form”

img

  • Step 3: Then, choose the table and select the form that was created from the table.

img

  • Step 4: After displaying the form, add permissions to it based on the requirements.

img

img

  • Step 5: After giving permissions, click on “Preview” to see the created form.

img

Conclusion:

Mastering Power Pages empowers users to enhance web development skills through form manipulation.

By outlining two methods – PowerApps Portal and the “Data” workspace – this tutorial provides a seamless approach to form integration, creation, and modification.

Whether following systematic creation processes or integrating forms into Power Pages sites, this guide serves as a foundational resource for navigating form management complexities in web development.

Unlocking the Power BI: A Deep Dive into Power BI Semantic Models

Ever wonder what makes Power BI so effective for data analysis? The secret lies in Semantic Models. These models are the foundation of Power BI, transforming raw data into clear insights for smarter decisions.

This blog post dives into what Semantic Models are and how they work. You’ll learn how they:

Connect your data: Combine information from different sources.
Simplify complex data: Make it easier to understand and analyze.
Empower decision-making: Get the insights you need to take action.

By understanding Semantic Models, you can harness the full power of Power BI and turn data into a driver for success.

What is a Semantic Model?

Imagine Power BI reports and dashboards as the final presentation, but what goes on behind the scenes? That’s where Semantic Models come in.

These models act as a translator, taking your raw data and organizing it for clear understanding. They connect different data sources, define key relationships, and perform calculations – essentially, cleaning up the mess and making it easier to analyze.

Think of it like a map for your data. Semantic Models establish clear connections and hierarchies, allowing users to explore information intuitively. This translates to smoother user experience, consistent data interpretation, and ultimately, more confident decision-making based on accurate insights.

In short, Semantic Models bridge the gap between raw data and clear visualizations, unlocking the full potential of Power BI for data exploration and analysis.

img

Types of Semantic Models

Power BI offers three types of Semantic Models to cater to different data needs and preferences:

1. Import Model:

Best for: Fast performance and offline analysis.

Details: Data is copied and stored within the Power BI file, enabling quick visualizations.

Consideration: Requires regular data refreshes to stay up-to-date.

2. DirectQuery Model:

Best for: Real-time data access and large datasets.

Details: Connects directly to the data source, eliminating storage needs within Power BI.

Consideration: Performance might be slightly slower compared to Import Model.

3. Composite Model:

Best for: Combining speed and real-time updates.

Details: A flexible approach that allows storing frequently used data (Import) and connecting to live data sources (DirectQuery) for specific tables.

Advantage: Optimizes performance based on the type of data being analyzed.

Choosing the Right Model:

For fast analysis and offline use, Import Model is ideal.
For massive datasets requiring constant updates, DirectQuery shines.
When you need both speed and real-time elements, Composite offers the best of both worlds.
Guide to Building Power BI Semantic Models

Here’s a comprehensive guide to building effective Semantic Models:

1. Connect and Import Data:

Establish a connection between Power BI and your data sources.

Import relevant data based on your chosen model (Import or DirectQuery).

2. Transform and Shape Your Data:

Utilize Power Query Editor to clean, transform, and organize your data for optimal analysis.

3. Define Relationships and Measures:

Create clear connections between different data tables within your dataset.

Leverage DAX language to define insightful measures and calculations that reveal hidden trends.

4. Test and Validate Your Model:

Build sample reports and visualizations to ensure your model accurately reflects the desired insights.

5. Save, Publish, and Refresh (for Import Model):

Save your Power BI file for future use.

Publish it to the Power BI service for collaboration.

Schedule data refreshes (Import Model only) to maintain up-to-date information.

img

By following these steps, you can build robust Semantic Models that empower clear data exploration and insightful decision-making in Power BI.

Semantic Model Ownership

Who Can Edit Your Power BI Semantic Model?

Think of your Semantic Model as a shared workspace. Only the owner has permission to make changes. If you access a model through a gateway or cloud connection and see a “read-only” message, it means you’re not the owner.

To edit the model, you can either:

Collaborate with the Owner: Discuss the changes you need and work together.
Become the Owner: If necessary, request ownership from the current owner to make edits directly.
This ensures clear ownership and prevents accidental modifications by unauthorized users.

Conclusion

These models organize your data, making it easier to understand and analyse. They act as a bridge between raw data and clear insights, giving you the power to make data-driven decisions. Think of them as translators for your data, simplifying complex information for better decision-making.

Copilot in Action Create Your Site Through AI Innovation


How to use copilot in power pages

Make use of Copilot’s features when creating websites with Power Pages. AI will help you create your website depending on your description. Use natural language processing to inform the AI about the goals of the website, who the intended audience is, and what content or features it should have. This streamlines the design process by enabling AI to generate a customized website based on your requirements using natural language commands.

With Copilot, we can make sitemaps, homepages, themes, and layouts quickly. Copilot also suggests relevant content, images, and themes based on how users interact. It helps users explore new ideas and make more creative and effective websites.

Create a power pages site using Copilot

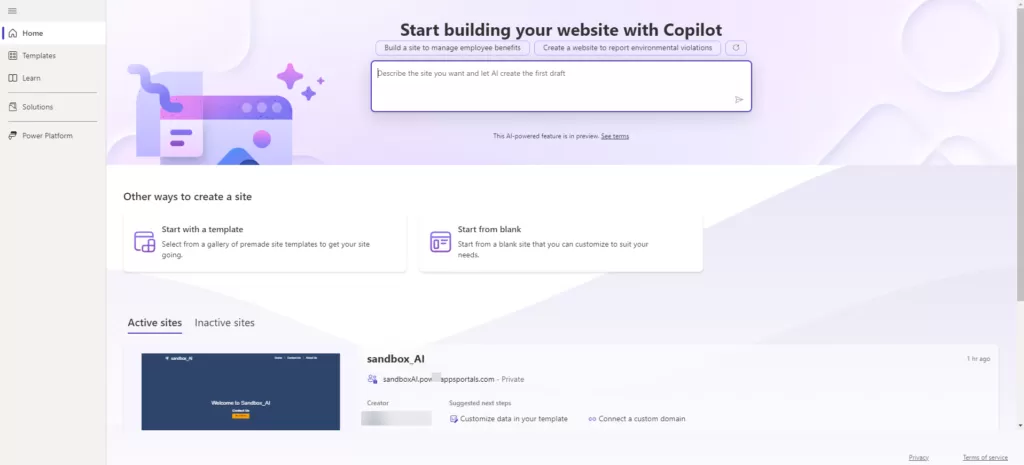
Step 1: Navigate to Power Pages by accessing the following
URL: ‘https://make.powerpages.microsoft.com/’.

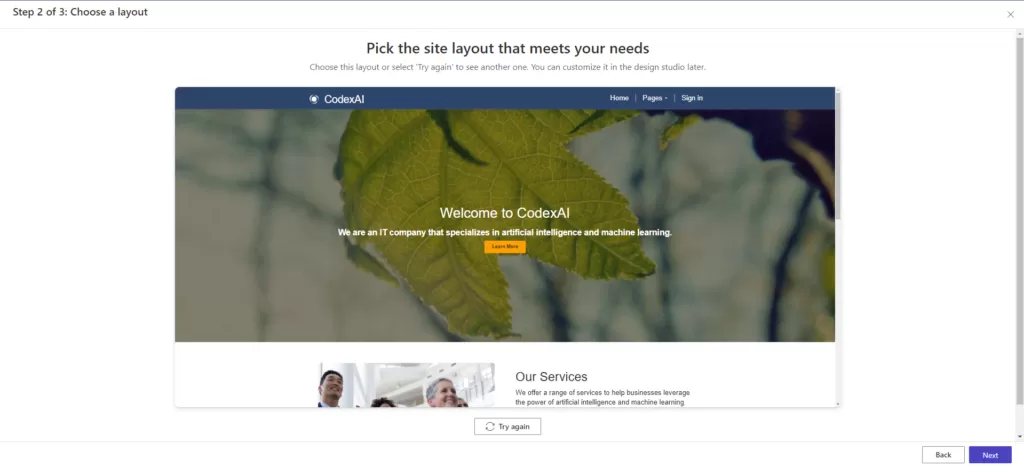
Step 2: Describe the type of website you intend to create. For instance, specify whether it’s an e-commerce platform, a blog, a portfolio site, or any other specific concept.

img

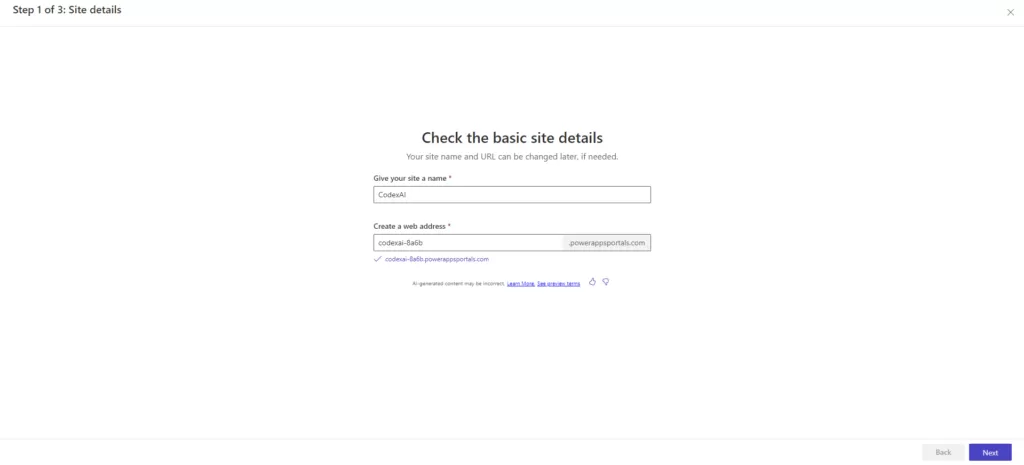
Step 3: After entering the desired site name and web address into the provided fields. Once entered, click on the “Next” button to proceed with the site creation process.

img

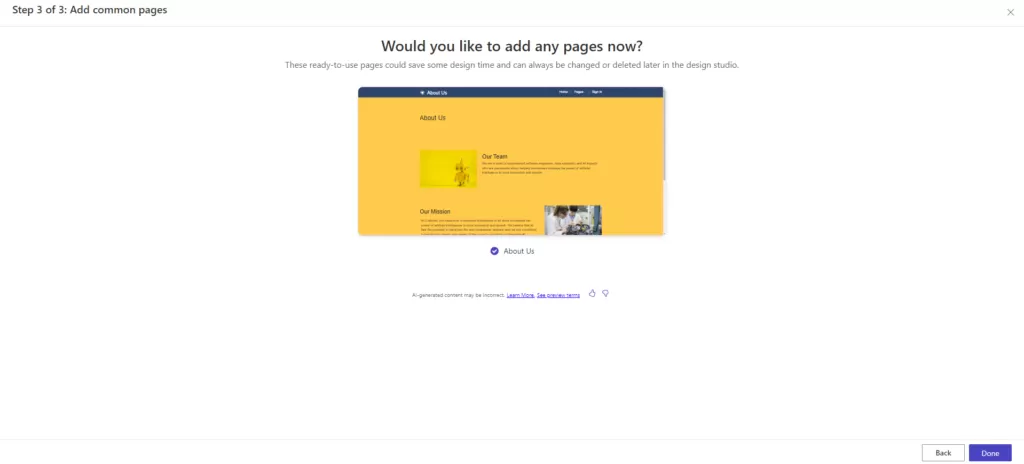
Step 4: The AI Copilot embedded in Power Pages will automatically create the homepage based on the information you’ve provided. Additionally, you have the flexibility to expand your site’s content by adding more pages according to your requirements.

img

img

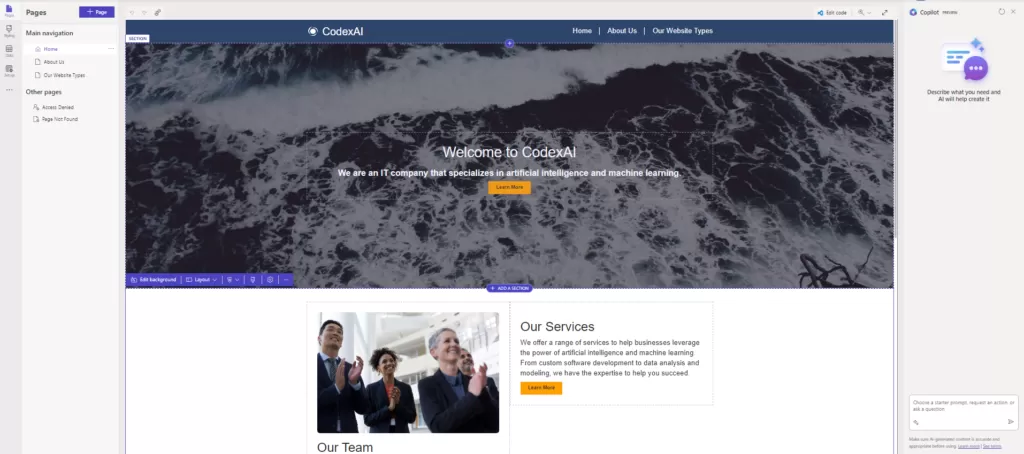
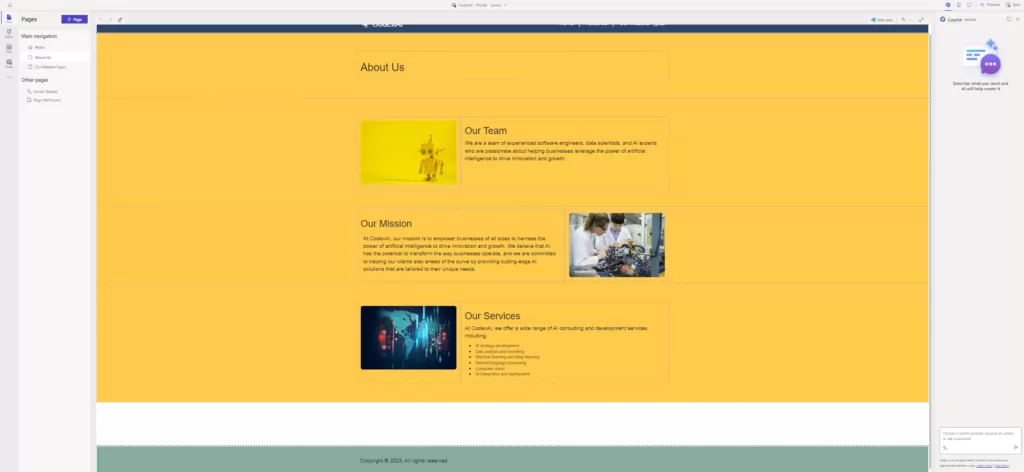
Step 5: After clicking ‘done,’ the site will be automatically created within 5 minutes. We will be able to view the homepage and other added pages, such as ‘About Us.’ Then, we can customize and add things based on our requirements.

img

img

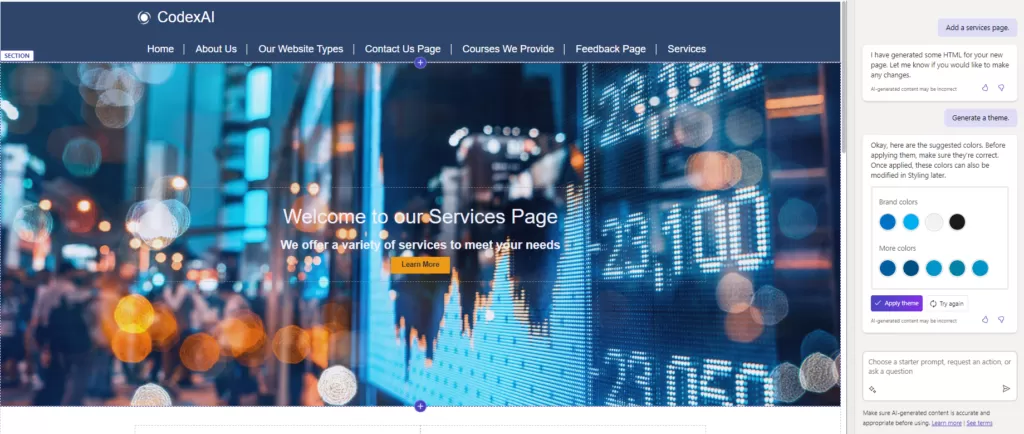
Step 6: If the user wants to create another page using Copilot, they need to enter details about that page. afterward, Copilot will create the page. Also, we can change the site theme using Copilot.

img

Conclusion

Building a Power Pages website using Co-Pilot was a smooth and rewarding experience. Co-Pilot’s AI made things much easier, helping create a lively and attractive website. With Co-Pilot’s assistance, the site has complete information, simple navigation, and a beautiful look. Using this advanced tool has boosted how appealing the website is. By following Co-Pilot’s suggestions, we’ve set the stage for a strong and impactful online presence.

Comprehensive Guide to Error-Handling in Power Automate

Significance of Error-Handling

In automation, mistakes can occur. These errors might happen because the data format changes, there are connection problems, or external services aren’t available. So, it’s important to have good ways to deal with errors in your automated processes. This ensures they keep working well and can be relied upon.

One important part of making strong automated processes in Power Automate is handling errors properly. This blog post will talk about the best practices for dealing with errors in Power Automate.

Error-Handling Standards in Power Automate

1. Incorporating Try-Catch-Finally

Power Automate allows you to incorporate error handling by using certain actions within the flow. Although there isn’t a direct “try-catch-finally” construct, you can effectively handle errors using a combination of actions.

Here’s how you can implement error handling:

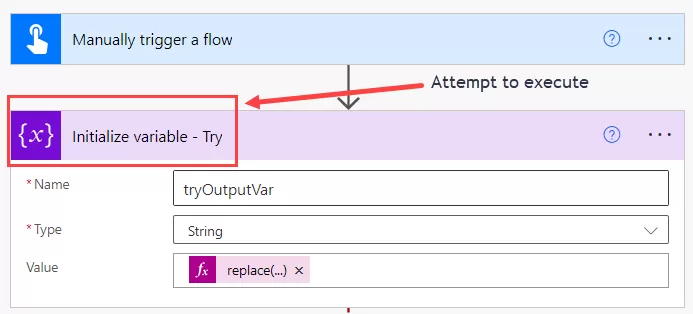
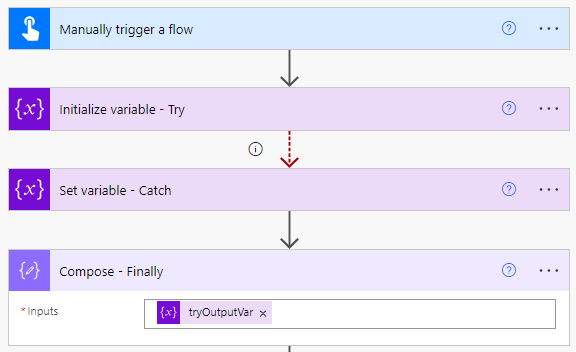
Start by retrieving data from a list and then initialize variable to encapsulate the subsequent actions as a “try” block.


img-01

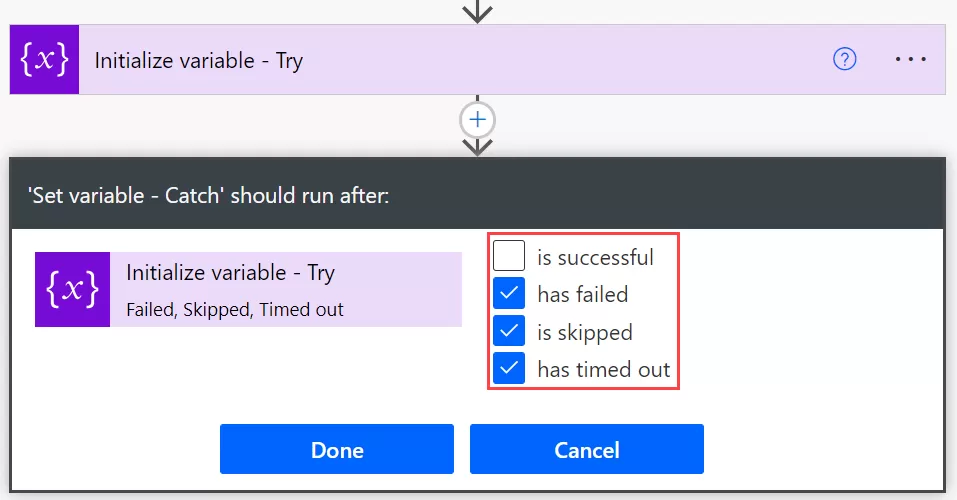
Include an action to set a variable and configure its ‘Run After’ settings by selecting the options ‘has failed,’ ‘is skipped,’ and ‘has timed out.’ This action will function as the ‘catch’ block.

img-02

If an error occurs within the ‘try’ block, causing any of the selected conditions in the ‘Run After’ settings of the set variable to trigger, the flow will then proceed to execute the ‘catch’ block.

img-3

Within the “catch” block, you can handle the error appropriately. Once the “catch” block executes successfully, you can proceed with any final actions needed to complete the flow.

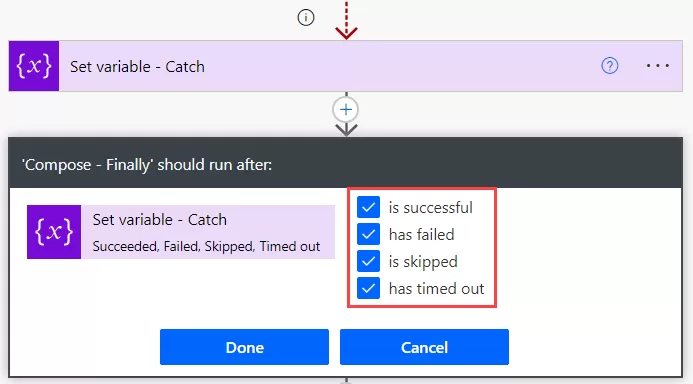
Add a compose action to function as a ‘finally’ block, configuring it with all selections from the ‘configure run after’ settings.

img-4

img-5

By structuring your flow in this manner, you can effectively handle errors that may occur during its execution.

2. Utilizing Try-Catch in scope actions

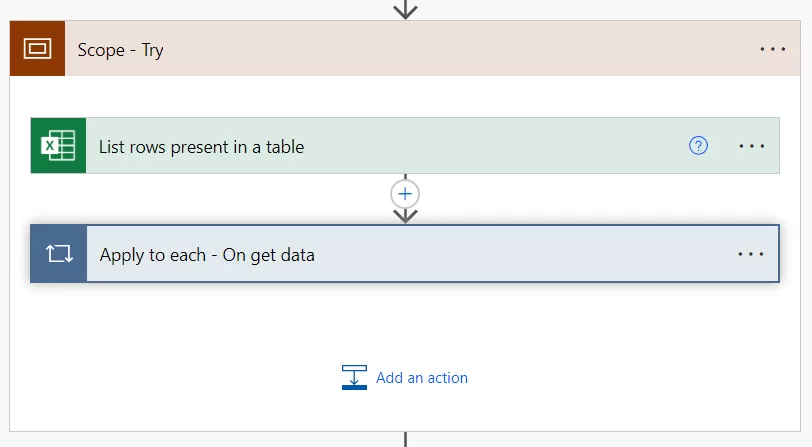
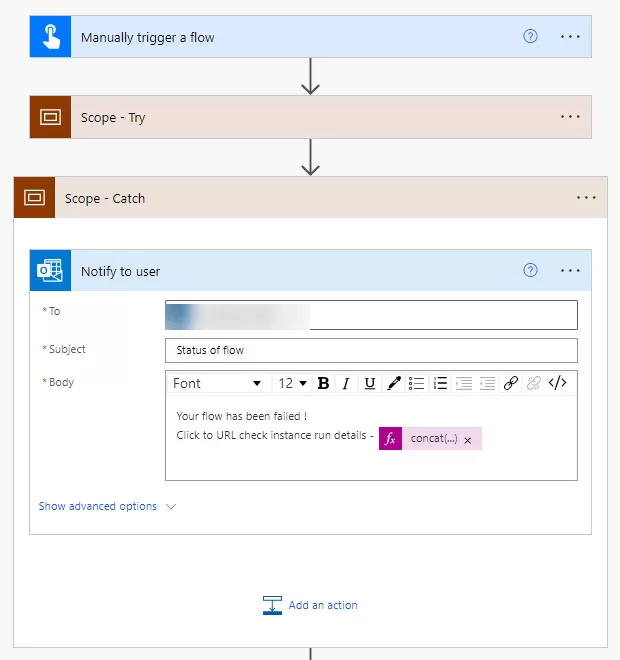
A collection of actions is encapsulated within the “Scope Try” action, serving as a container. Its primary purpose is to execute these actions cohesively while vigilantly monitoring for potential errors. This mechanism allows the flow to seamlessly transition to the “Scope Catch” block if an error arises within the “Try” scope, ensuring a smooth error-handling process.

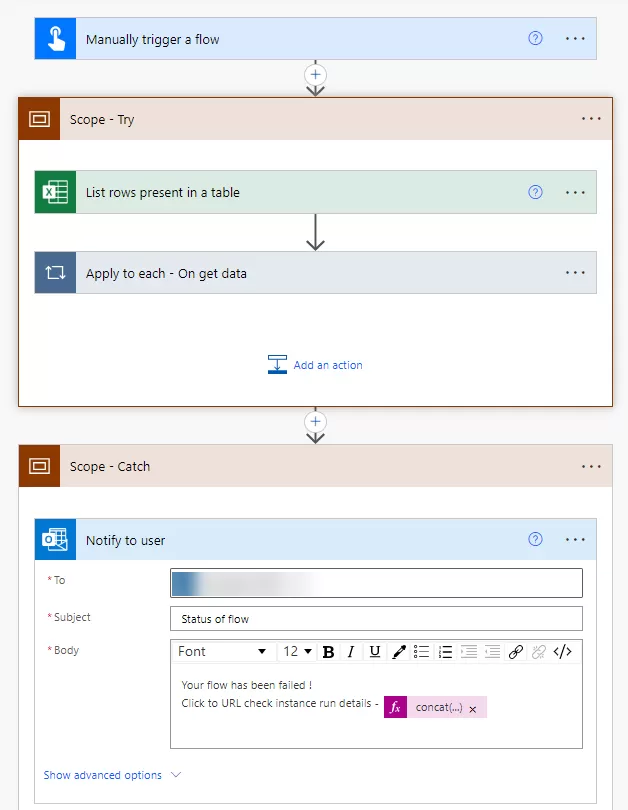
Now, let’s employ an Excel action to retrieve rows from a table and include additional steps within the scope, as illustrated below.

img-6

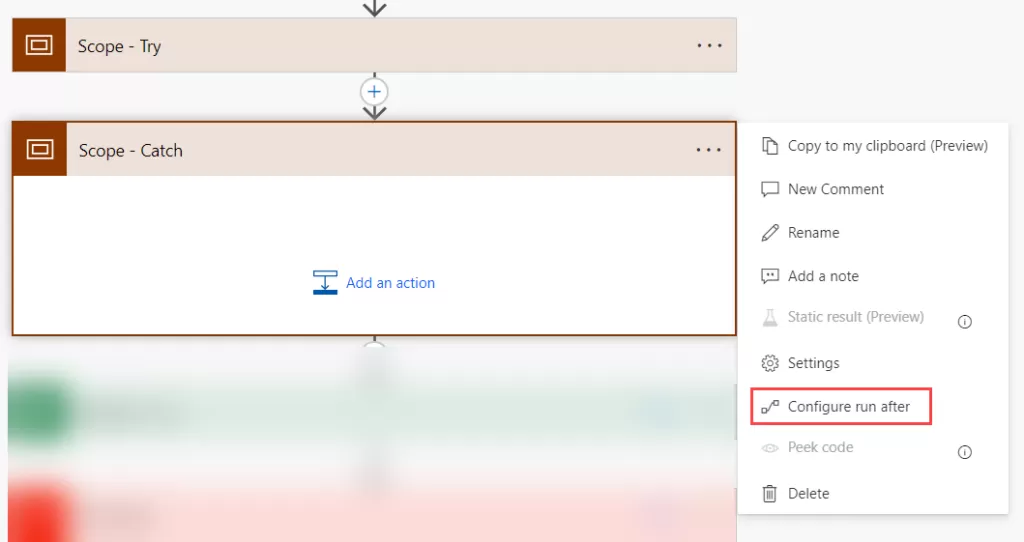
The “Scope Catch” action in Power Automate serves as an error-handling block, seamlessly managing and recovering from errors occurring within the associated “Scope Try” action.

To enhance the error-handling mechanism, add another scope action control and access the “Configure run after” option.

img-7

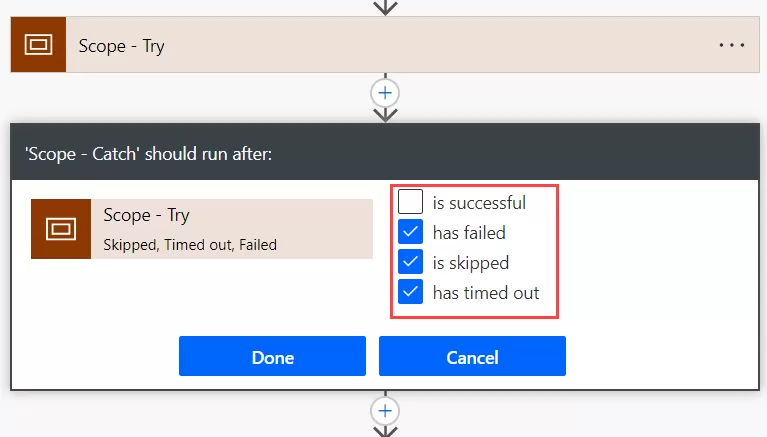
In the “Configure run after” selection, choose “has failed,” “has been skipped,” or “has timed out,” as depicted below.

img-8

Scope Try in Power Automate organizes actions neatly, preventing flow failure from “Try” block errors and enabling integration with Scope Catch for error handling. Scope Catch aids in structured error management, preventing unexpected failures, logging errors, and facilitating action implementation, enhancing overall flow reliability and resilience.

img-9

The “Flow Run History URL” in Power Automate serves as a valuable tool for error handling. It offers a clickable link that leads to detailed information about the specific flow run that experienced an error.


concat('https://us.flow.microsoft.com/manage/environments/',workflow().tags.environmentName,'/flows/',workflow().name,'/runs/',workflow().run.name)

img-10

In summary, it’s crucial to implement proper error-handling techniques when building workflows in Power Automate. Following the guidelines mentioned in this blog post ensures that your workflows can gracefully handle errors and maintain smooth operation.

The key to effective error handling in Power Automate is to anticipate and be prepared for potential failures. Always have a plan in place to address any issues that may arise during the workflow execution.

How to Create the Reusable Header Using Component?

What is component?

Components are reusable building elements for canvas apps in PowerApps that include one or more controls. Complex capabilities can be enabled by components by utilizing sophisticated features like custom attributes.

Scenario

Assume for the moment that our application will have more than two screens and that we must display a header and footer. Therefore, in this scenario, it will be challenging to maintain the header and footer on each screen if we are not utilizing components. If we need to make any changes—for example, to the font size, title, or logo—we will have to travel through all screen windows. We may make this as a component and use it on different screens to avoid these repeating modifications.

Creating Application

Step 1: Open the Browser and pate the URL: https://make.powerapps.com/.

Step 2: Click “Apps” in the left panel.

Step 3: Click on the “New app”.

img-01

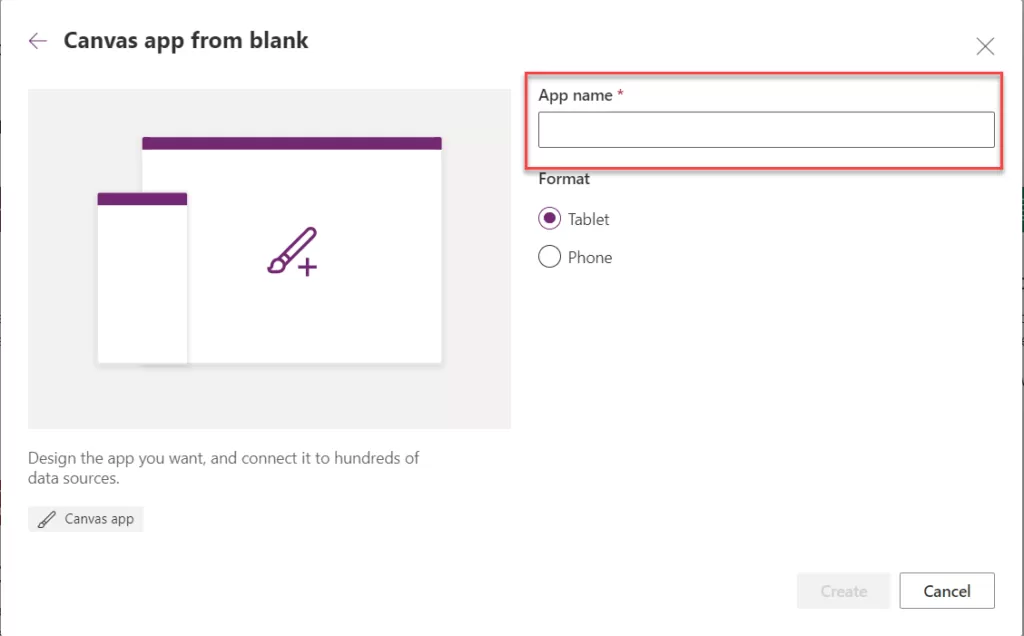
Step 4: Choose the Blank Canvas app and enter the app’s name as it appears in the image below:

img-02


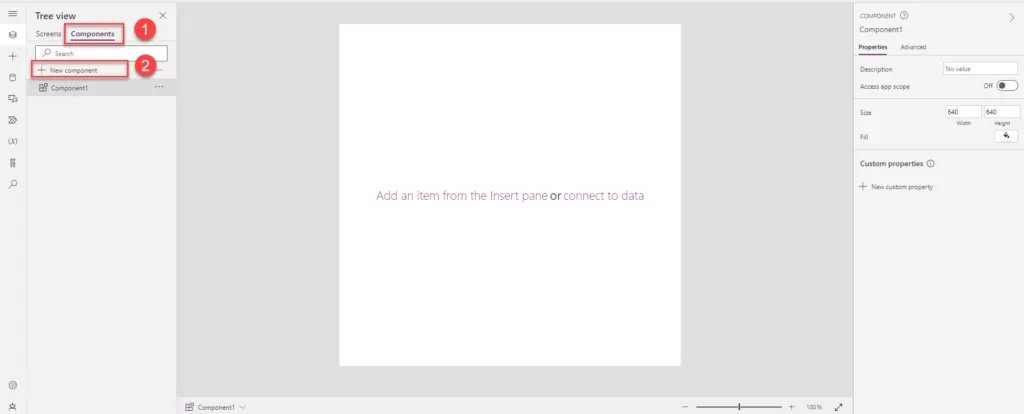
Step 5: Once the app is created, you will notice the component option is visible.

Step 6: Click on the Component tab after the screen as show into the below.

Step 7: Click on the “+ New Component” button and new component will be added to the component screen.

All the above step as show into the below image.


img-03

Step 8: Rename “Component1” to “Header Component” and adjust the “With” property.

Step 9: Currently, the component has a height and width of 640. To decrease the height, set it to 25, and observe the reduced component height as shown below:

img-04

Step 10: To display the screen name, you can insert a text label. If you require a home or back icon or any other elements, you can add and arrange them according to your preferences.

Step 11: For a responsive header, utilize a container control. Incorporate relevant buttons or labels into the header based on your specific requirements.

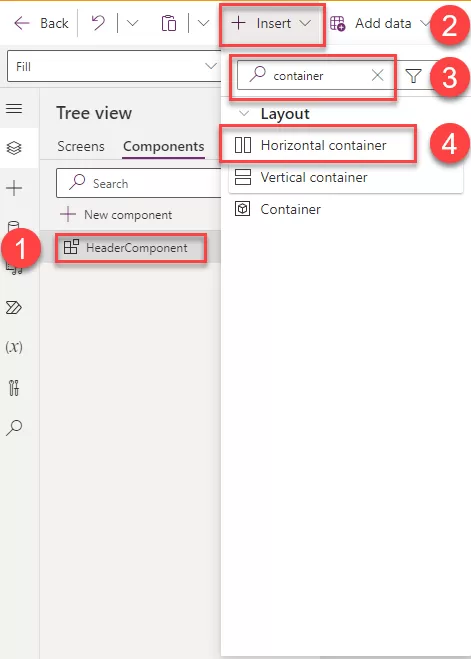
Step 12: Add a Horizontal container to your component by clicking on “Insert,” searching for the container control, and adding it.

img-05

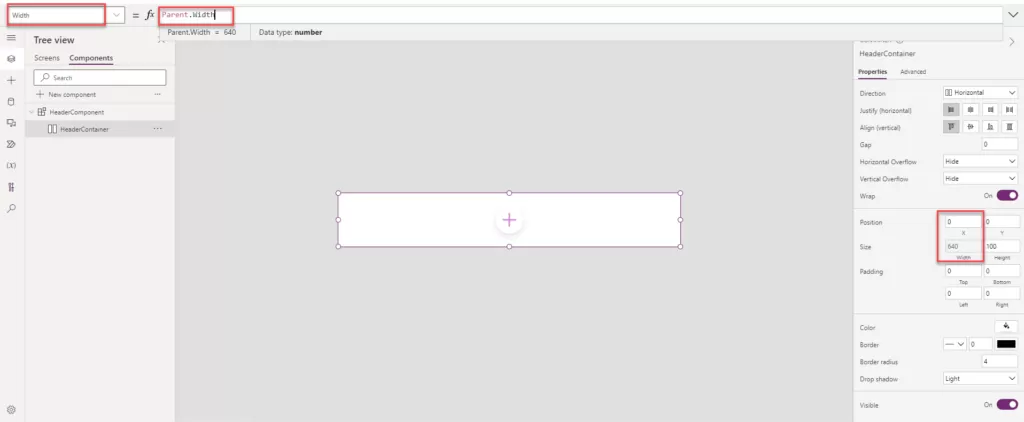
Step 13:  Once you’ve added the Horizontal Container, adjust the width and X property according to your specific requirements.

  • Width: Parent. Width
  • X: 0

img-06

Step 14:  Insert the text label and home icon inside the horizonal container. In the horizontal container all the control which are added into this container is side by side so we can easily rearrange accordingly.

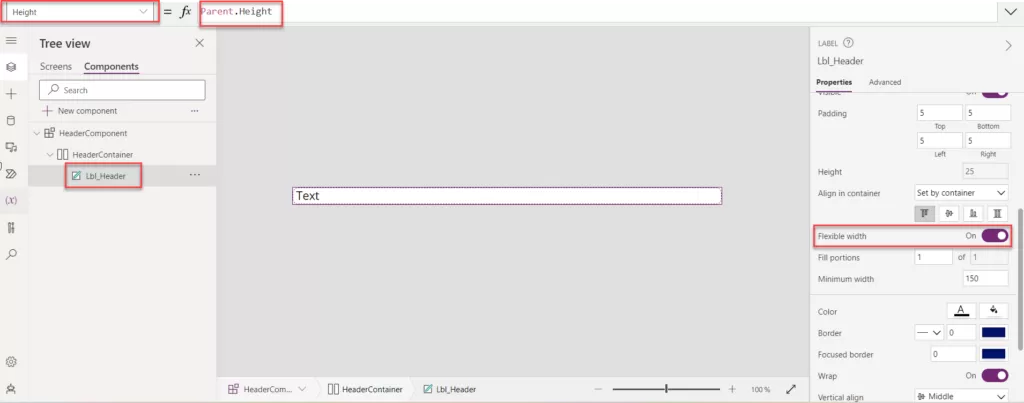
  • Add the text label into the container and change the text label name to “Lbl_Header”.
  • Enable the flexible width option for the Lbl_Header.
  • Also change the height property set as: Parent. Width.

img-07

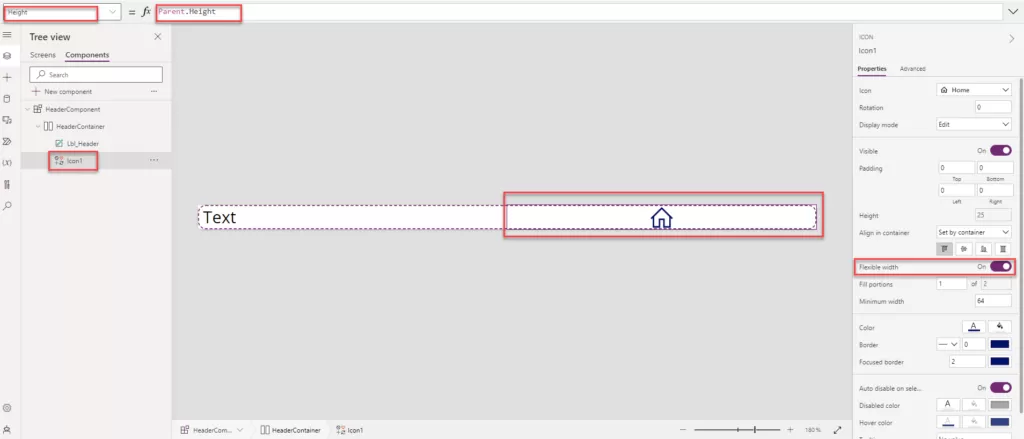
  • Insert the home Icon into horizontal container.
  • Enable the Flexible width to turn on.
  • Ser the height: Parent. Height.

img-08

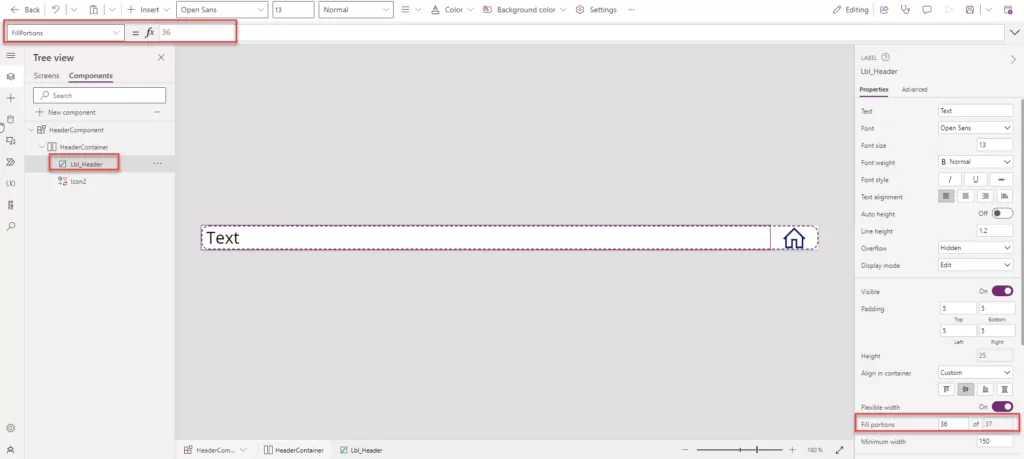
Step 15: You can select the label and adjust the “Fill Portions” based on your specific requirements.

  • Fill Portions is: 36.
  • Fill Portions: Defines how the individual component grows when there is more screen real-estate assigned to its parent. The number represents the portion of the extra space given to the component out of all the available extra space claimed by children of its parent. For example, if child A has Fill portions set to 1 and child B has Fill portions set to 2, child A gets 1/3 of the extra space available while child B gets 2/3 of the extra available space.

img-09

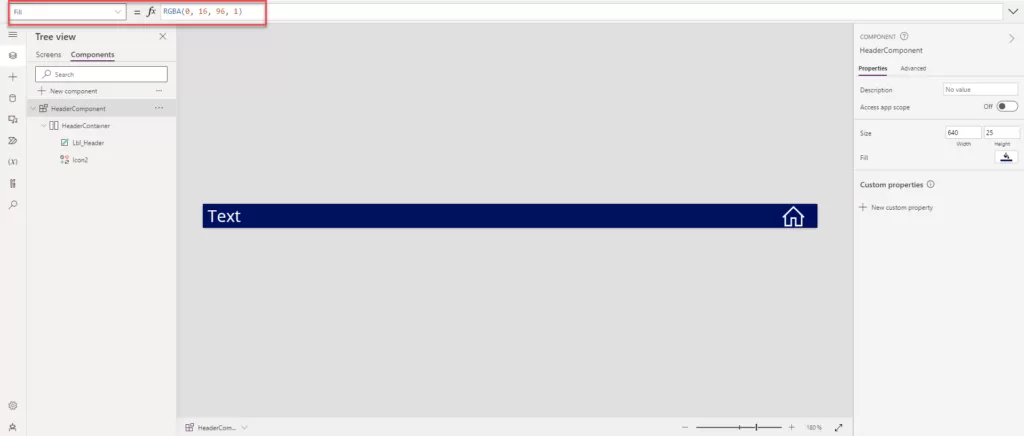
Step 16: Apply the background color to the component to set the header color. Adjust the font color for “Lbl_Header” and “Icon2” based on the background. In our case, we’ve set the text color to white, and the “HeaderComponent” background color is dark blue.

img-10

Step 17: Now that our header component is ready, we can configure the custom properties for Text, Screen, and Fill color, as displayed on the right side.

Step 18:  Custom properties: A component can receive input values and emit data by creating one or more custom properties.

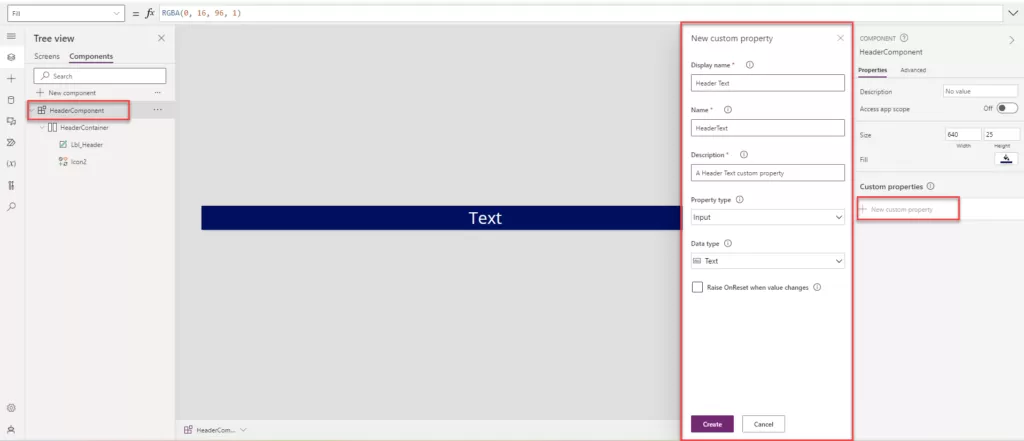
  • In the Display name, Property name, and Description boxes, add information according to your requirements.
  • Display name: Header Text
  • Property name: HeaderText

Note: Ensure that you do not include spaces when providing the Property Name, as this name will be used as a reference.

img-11

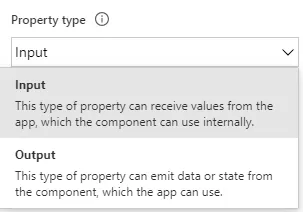
Step 19:  The Property type has two options: one is called input, and the other is called output, as shown in the image below.

img-12

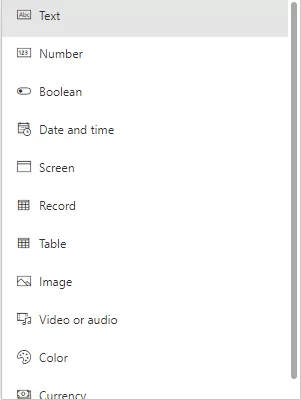
Step 20: Various types of custom properties can be created, including Text, Number, Boolean, Date and Time, Screen, Record, Table, Image, Video or Audio, Color, and Currency.

img-13

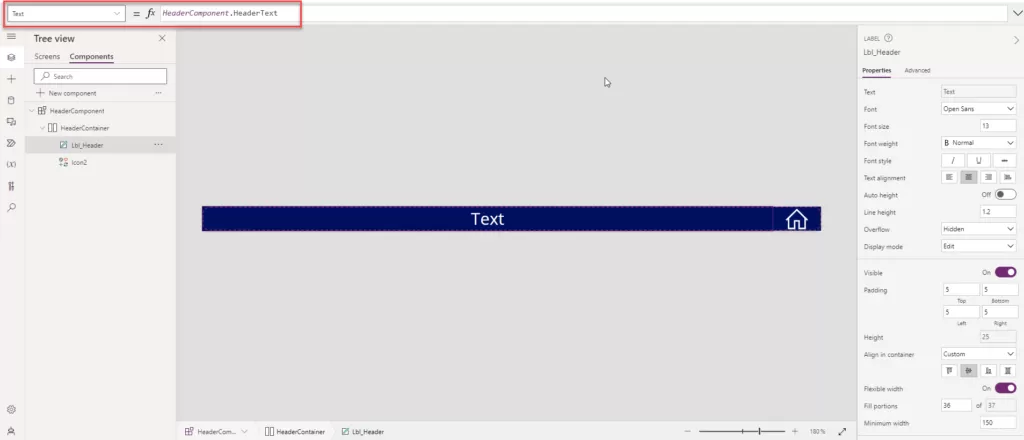
Step 21: In our case, where we need to change the screen header based on requirements, we select “Text” as the data type. Click on “Create” to add the Custom Properties.

Step 22: Add the text property of “Lbl_Header” to “HeaderComponent.HeaderText”

img-14

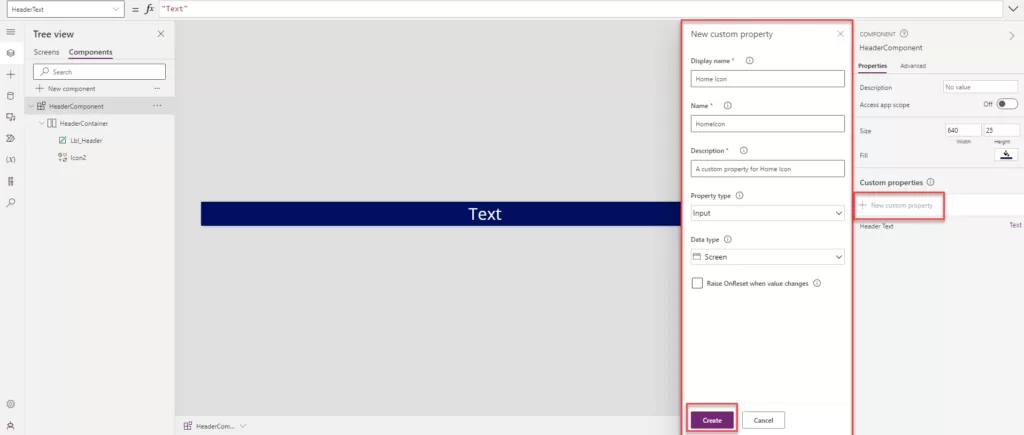
Step 23: Now, create a new property for navigating the screen.

  • Click on “New Custom Property.”
  • Add the Display Name: Home Icon.
  • Name: HomeIcon.
  • Description: A custom property for Home Icon.
  • Data type: Screen.
  • Click on the create button.

img-15

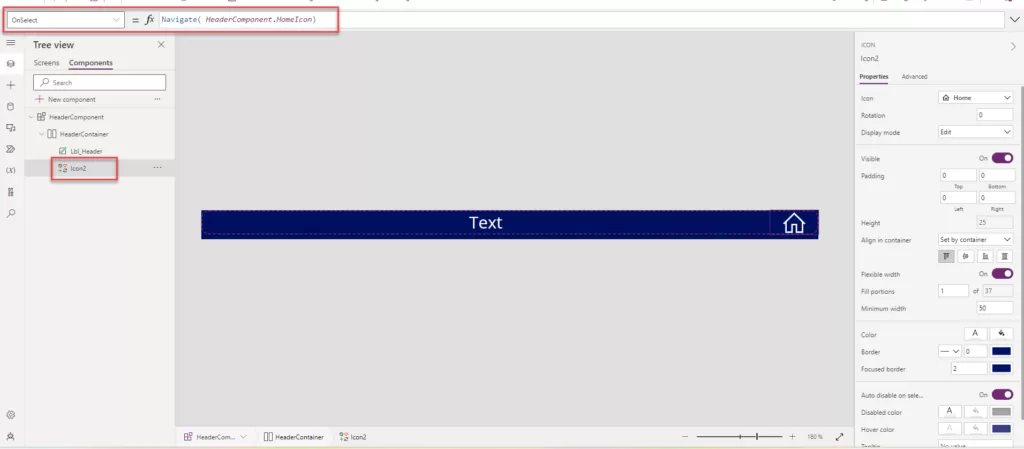
Step 24: Now, add the following formula to the icon’s “On Select” event. In our case, we want to use the Home Icon to navigate to the home screen. Select the icon and add the formula as mentioned below:

  • On Select: Navigate (HeaderComponent.HomeIcon)

img-16

Step 25: Now, our component is ready to be added to the header of the screen in Power Apps. Click on the right side of the “Screen” option.

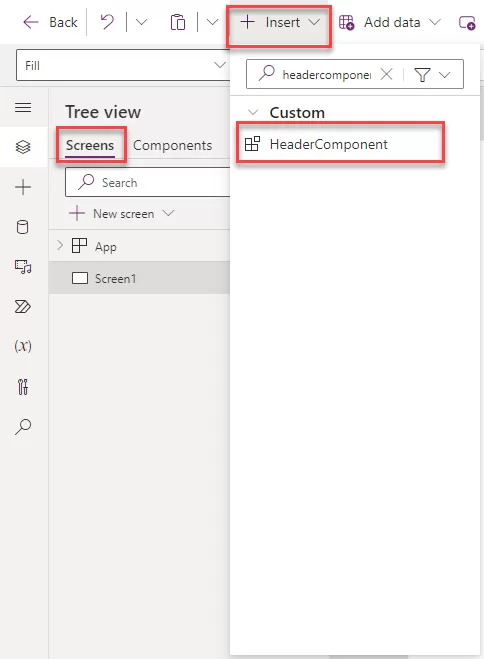
Step 26: Click on “Insert” and search for the component name, then add it to the screen.

img-17

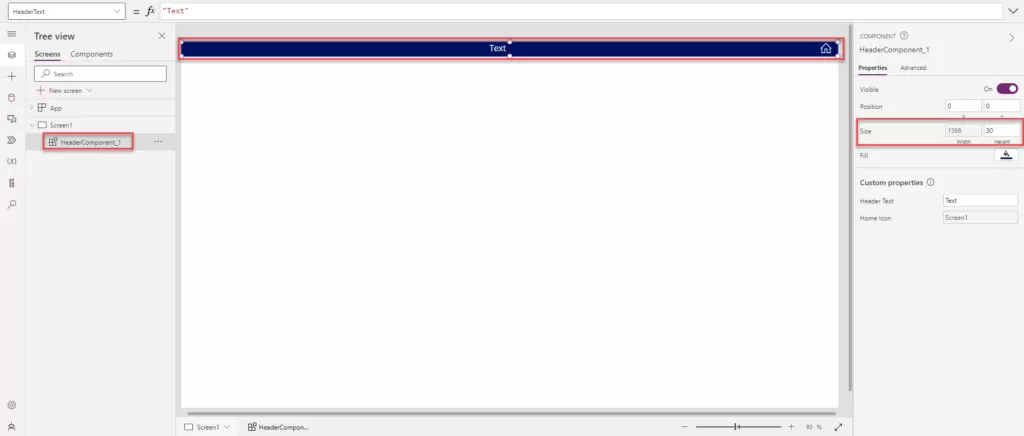
Step 27: Now, set the component width and height according to the requirements on the screen. In our case, the width is set to Parent. Width, and the height is set as 30.

img-18

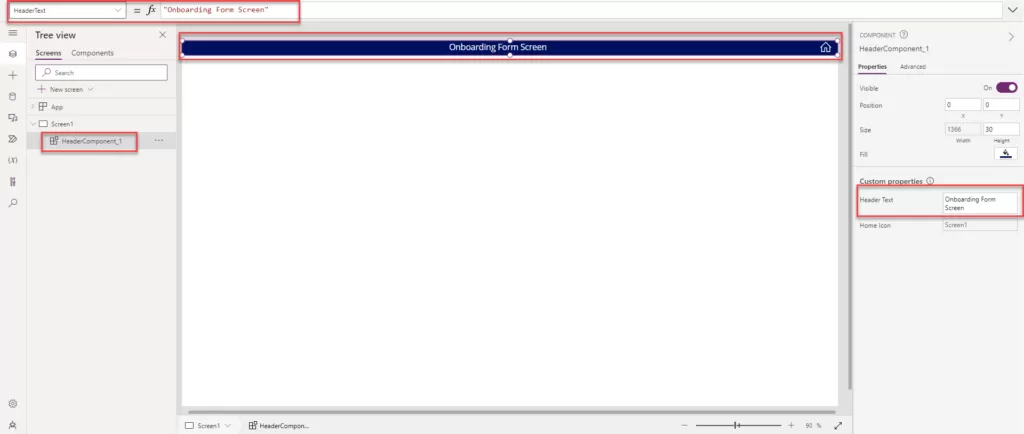
Step 28: Now, to change the header name, select the header control and go to the right side in the component Custom property.

  • Click on “Header Text.”
  • Provide the text you want to display as the screen header. In our case, we have added “Onboarding Form Screen” as the text.

img-19

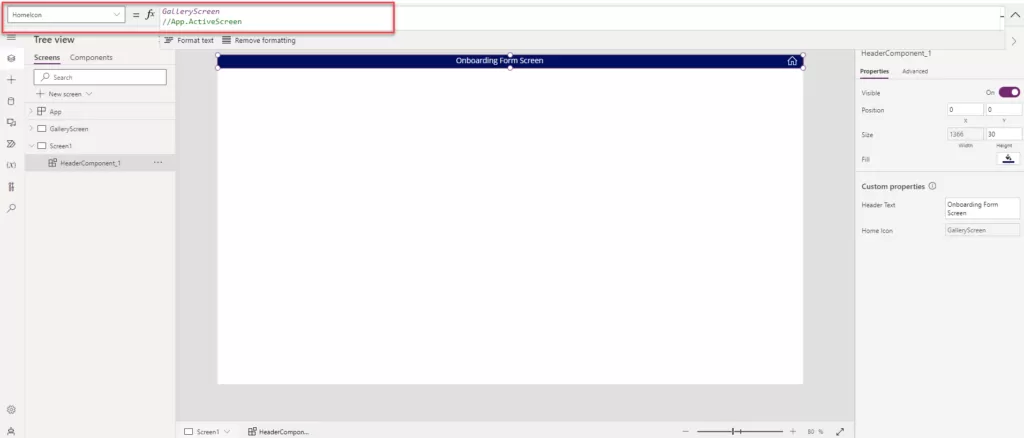
Step 29: To change the functionality of the home icon, follow the same steps as above for changing the header text. Additionally, you can add the screen name that you want to navigate to when the user clicks on the home icon. You can implement the logic in the On Select action to achieve the desired navigation.

img-20

Step 30: All the above process same as you can create the new screen and add the header component.