How to Apply Custom Styles in Power Pages?

Microsoft Power Pages is a user-friendly platform designed for creating and managing websites without the need for coding expertise. It offers a range of pre-designed themes and templates, enabling users to personalize their site’s styling for a unique look. Within Power Pages, the Default Styling Workspace facilitates detailed customization of fonts, colors, and other elements, while the CSS File Upload method ensures consistent design changes across the entire site. Whether you prefer utilizing built-in tools or custom coding, this guide will assist you in achieving a personalized website.

Custom styling can be implemented in Power Pages through two different methods: 

  1. Default Styling Workspace: Within Power Pages, the Styling Workspace empowers you to customize CSS properties for specific elements across your pages. This functionality enables adjustments to fonts, colors, sizes, and various other attributes of individual elements, granting you precise control over the appearance of each element on your webpage.
  2. CSS File Upload: In your preferred code editor, you can craft a CSS file tailored to your design preferences and subsequently upload it onto Power Pages. Upon uploading, this CSS file will be universally applied across all pages on your website, ensuring consistent styling and design elements throughout your entire site.

Method 1: Default Styling Workspace

  1. Upon creating your sites, choose the particular site to which you wish to apply default styling or CSS.
  2. Click on the “Edit” button corresponding to the site you wish to modify.
    Default Styling Workspace
  3. Navigate to the left-hand panel and choose the “Styling” option from the available menu.
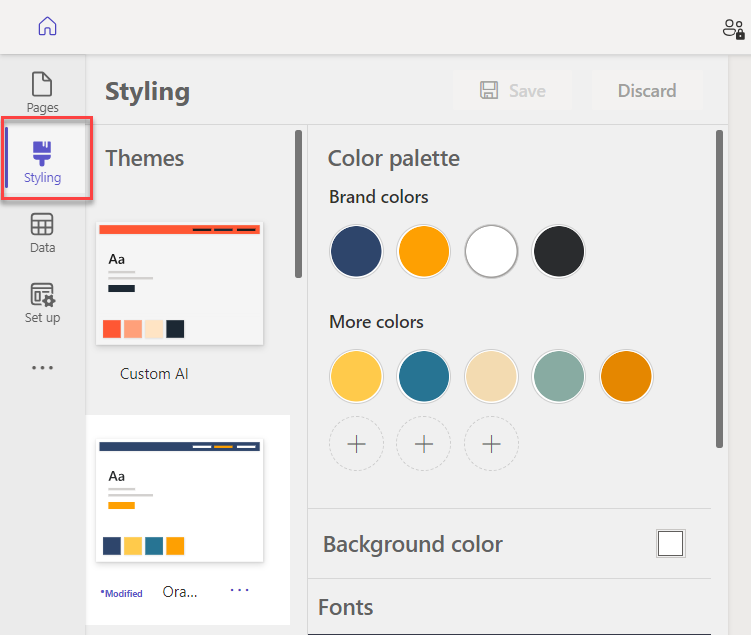
    Styling Option Window
  4. Choose the desired theme that you wish to apply to your site.
  5. Once a theme is selected, various elements can be customized to suit your preferences like:
    • Brand Color and Background Color: Modify the brand color and background color of the page to your preferred choices.
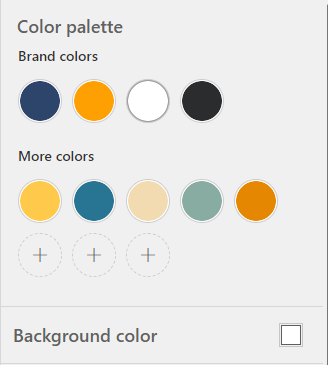
      Brand Color and Background Color Options
    • Fonts: Adjust font-related attributes such as font family, font weight, font size, and font color for various headings to customize the appearance of text on your page.
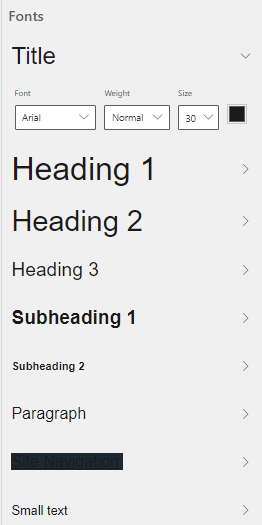
      Font-related Attributes Windows
    • Buttons: Customize button properties like style, button radius, background color, and additional attributes to tailor their appearance on the page.
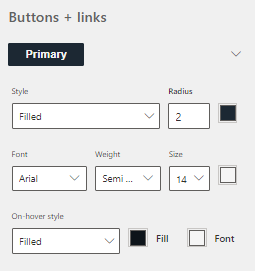
      Button Customization Properties
    • Links: Modify link properties including the presence of underlines, font style, link text color, hover color, and other attributes to customize the appearance and behavior of links on the page.
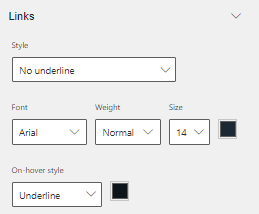
      Link Modifying Properties
  6. Once you’ve made the desired styling adjustments, remember to save the changes to ensure they are applied to your site.
    Styling Save Option
  7. To apply the updated CSS and view the alterations, choose the “Sync” option.
    Sync Option

Method 2: CSS File Upload

  • Choose the particular site to which you wish to apply custom CSS.
  • Click on the “Edit” button corresponding to the site you wish to modify.
  • Navigate to the left-hand panel and choose the “Styling” option from the available menu.
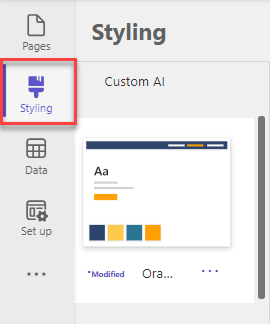
    Styling Option
  • Within the selected theme, locate the “More” option and then proceed to click on “Manage CSS.”
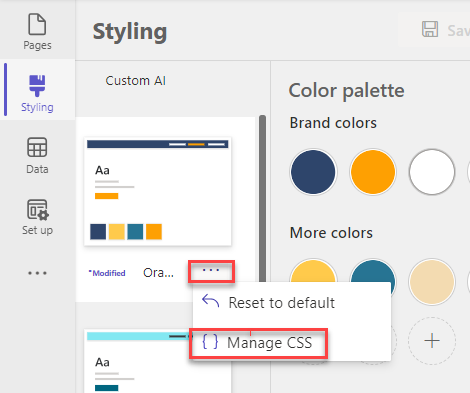
    Manage CSS Option in Styling
  • Within the Custom CSS section, choose “Upload,” and then select the CSS file you wish to upload for the application.
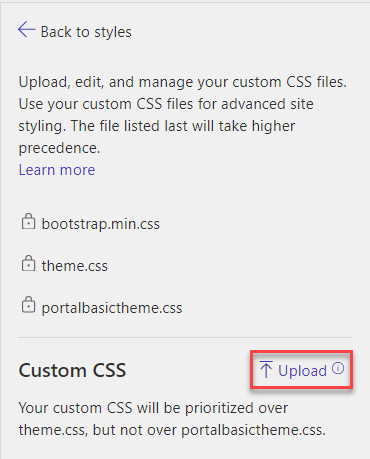
    Custom CSS Upload Option
    Here is an example of how to apply custom styling on Image in Power Pages

    1. Create a page and add an image on that page.
      Component Adding Options
    2. To implement personalized formatting, navigate to the page you’ve generated and click on the Edit option. This action will launch Visual Studio Code for editing purposes.
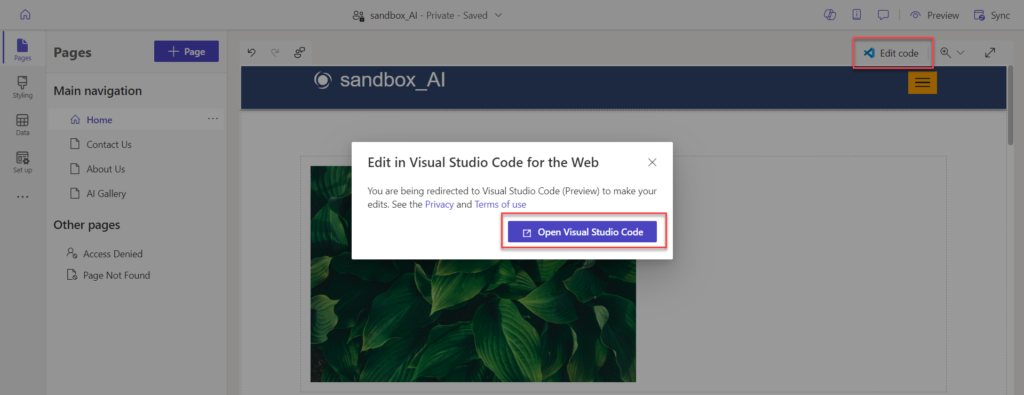
      Visual Studio Code Option
    3. Assign a class name, for instance, cardimage‘, to the image element
      cardimage
    4. Go to the ‘image card’ section and find your ‘CSS’ file.
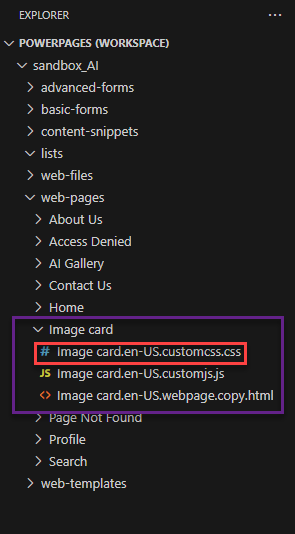
      image card section
    5. Apply your customized CSS styling to the image based on your preferences.
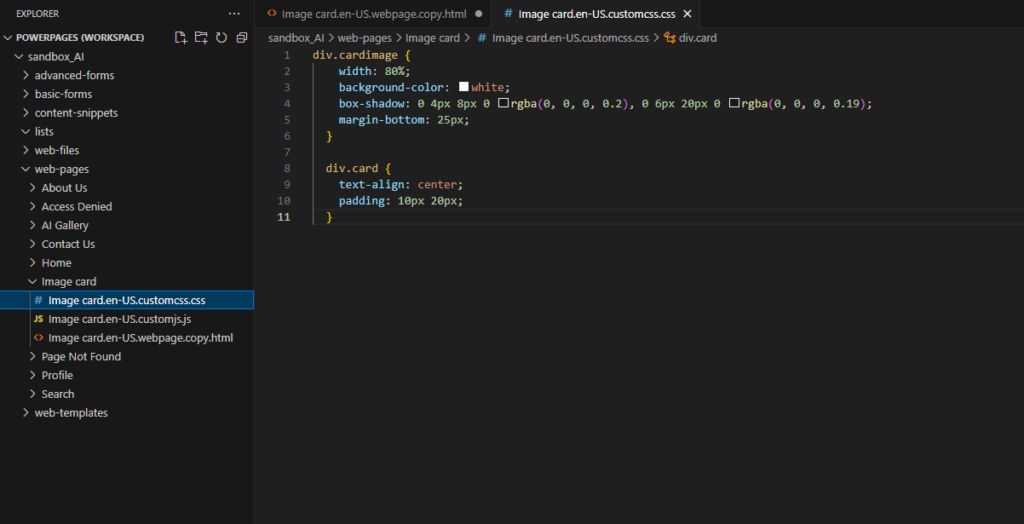
      customized CSS styling
    6. After making your CSS modifications, save the file by using Ctrl+S (or the appropriate shortcut for your system). Next, revisit your Power Pages site and click on ‘Sync.’
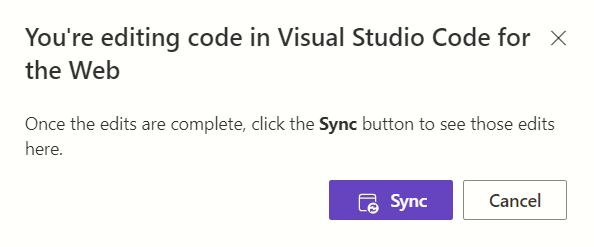
      Sync Option
    7. To preview the alterations on your site, click on ‘Preview’ and choose the ‘Desktop’ option.
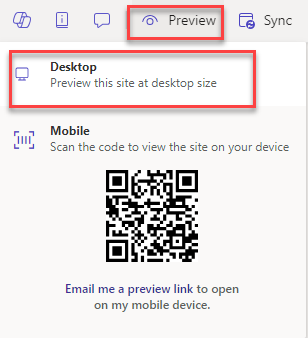
      Mobile and Desktop Preview Option
    8. Once finished, you will observe the image with the personalized style you added.
      Image observe with personalized style

Conclusion

Microsoft Power Pages offers low-code/no-code options for website creation with customizable styling through its Default Styling Workspace and CSS File Upload methods. These features allow for precise control over design elements, enabling users to create a unique website.


Step-by-Step Guide to Creating Edit Forms in Power Pages

This guide provides comprehensive insights into editing forms within the Power Pages environment. Through a structured series of steps, users learn to navigate Power Pages Management, create and sync forms, and effectively manage data on their web pages. This guide equips users with the knowledge and skills necessary to streamline the process of editing forms, ensuring optimal functionality and user experience on their websites.

Step to Edit a Form in Power Pages

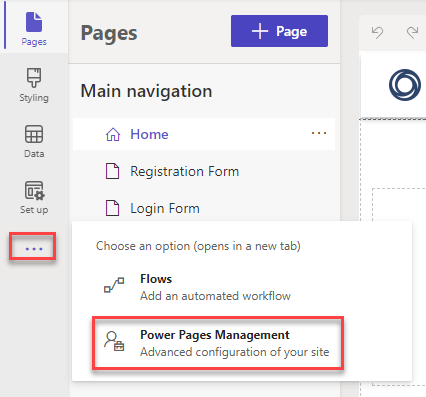
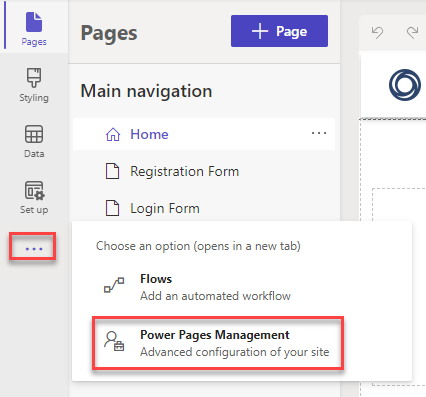
Step 1: Go to the Power Pages Management

Power Pages Management Option

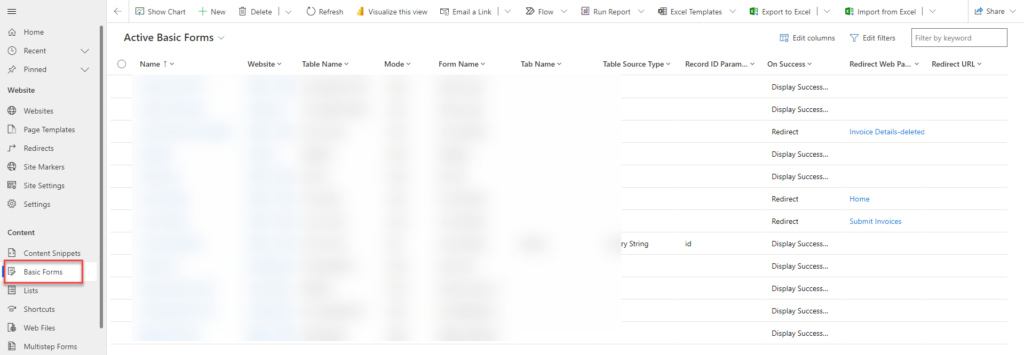
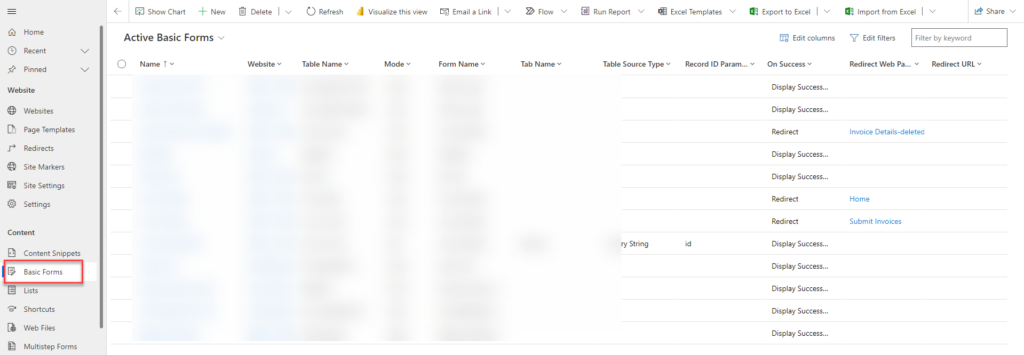
Step 2: Go to Basic Forms and click on the “+ New” button.

"+ New" button

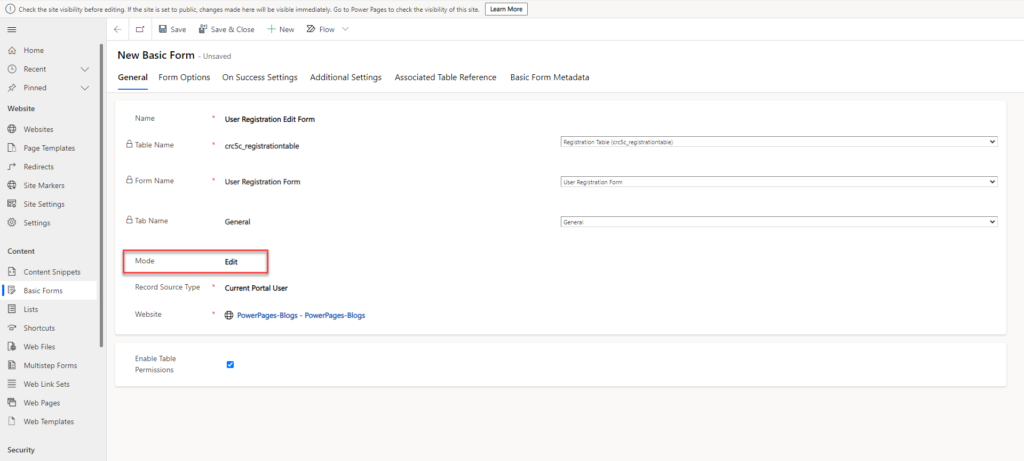
Step 3: Give a name to the form, then select a table. Next, choose the form name and tab name. In the mode selection, choose “Edit,” then select the record source type and website, and finally click on Save.

Edit Option

Step 4: Go to the Power Pages site and “Sync” the site. On the page, in the component section, click on the form and select the edit form that was created.
Sync option

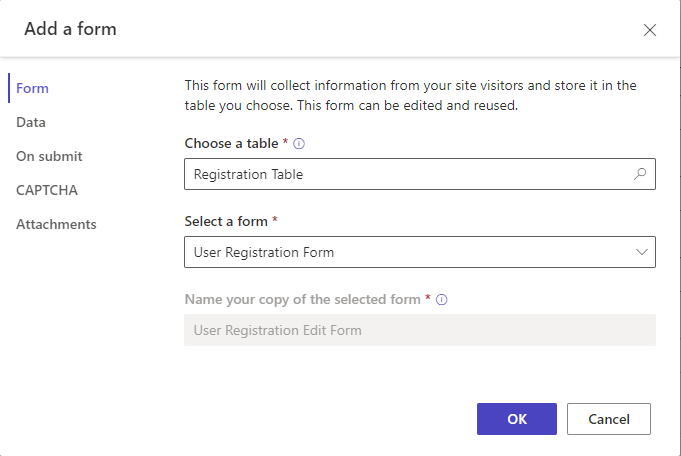
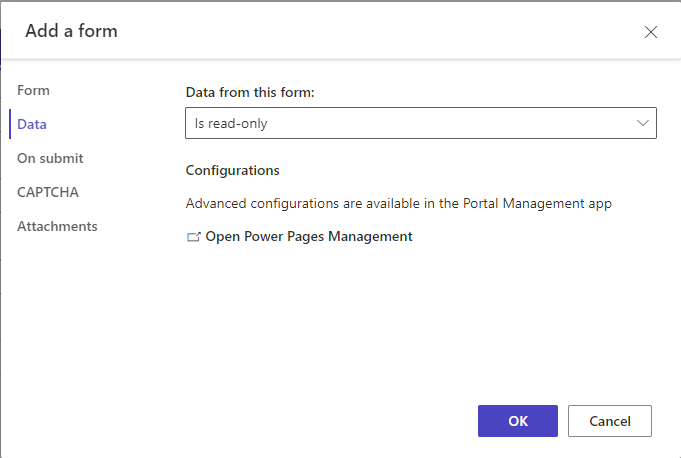
In the data section, you can see that your form is set to update an existing record. Now, you can click on “OK” and add the form to the page.

Data Option in Add a Form

Step 5: To use the edit form, you need to first add some user information to the database, and then you can edit those details.

Form Fields

Conclusion: This guide offers a systematic approach to editing forms within Power Pages, covering navigation, form creation, synchronization, and data management.

With clear instructions and steps provided, users can efficiently enhance their websites’ functionality and user experience. By following these guidelines, users can confidently navigate Power Pages Management and optimize their form editing process.

Step-by-Step Guide to Creating View Forms in Power Pages

This guide helps you understand how to view and read forms in Power Pages. Simply follow these steps: access Power Pages Management, create a new form, sync your site, and add the form to your page.

By doing this, you can easily integrate forms into your website, making it easier to manage data and improve user experiences.

Steps to View/Read a Form in Power Pages

Step 1: Go to the Power Pages Management

Power Pages Management Option

Step 2: Go to Basic Forms and click on the “+ New” button.

New button option

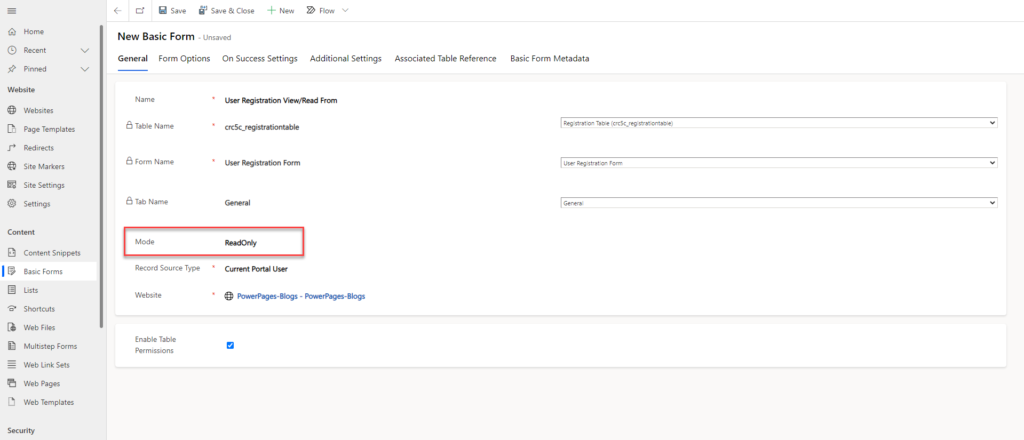
Step 3: Give a name to the form, then select a table. Next, choose the form name and tab name. In the mode selection, choose “ReadOnly” then select the record source type and website, and finally click on Save.

Read Only Option

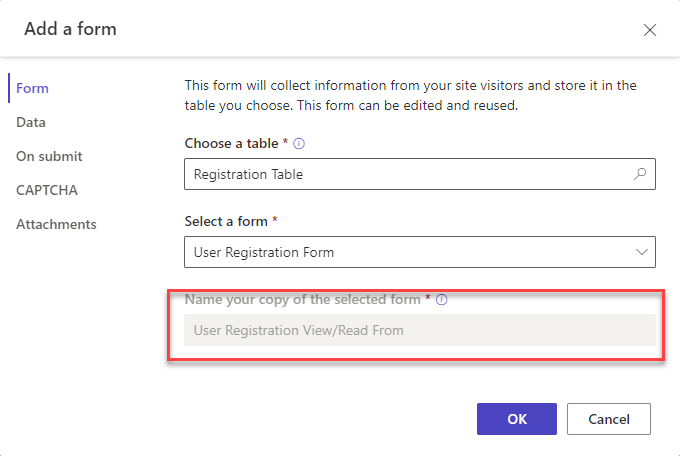
Step 4: Go to the Power Pages site and “Sync” the site. On the page, in the component section, click on the form and select the ReadOnaly form that was created.

Add a Form Pop Up Form

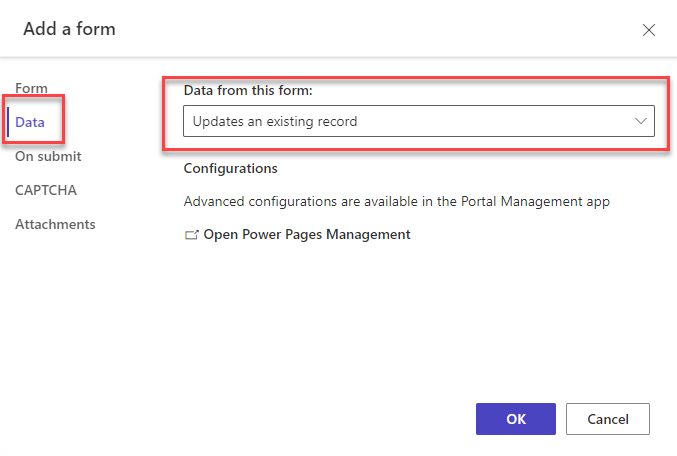
In the data section, you can see that your form is set to is read-only. Now, you can click on “OK” and add the form to the page.

Add a Form Option

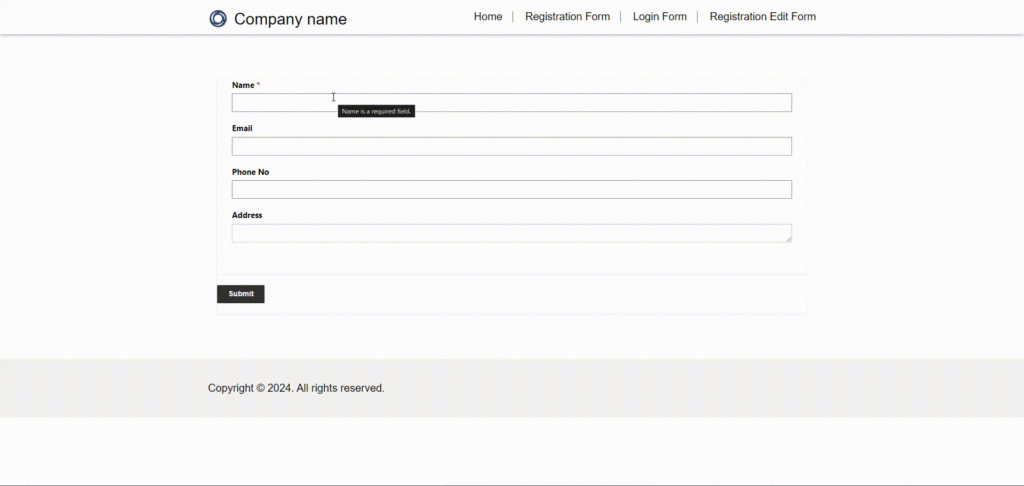
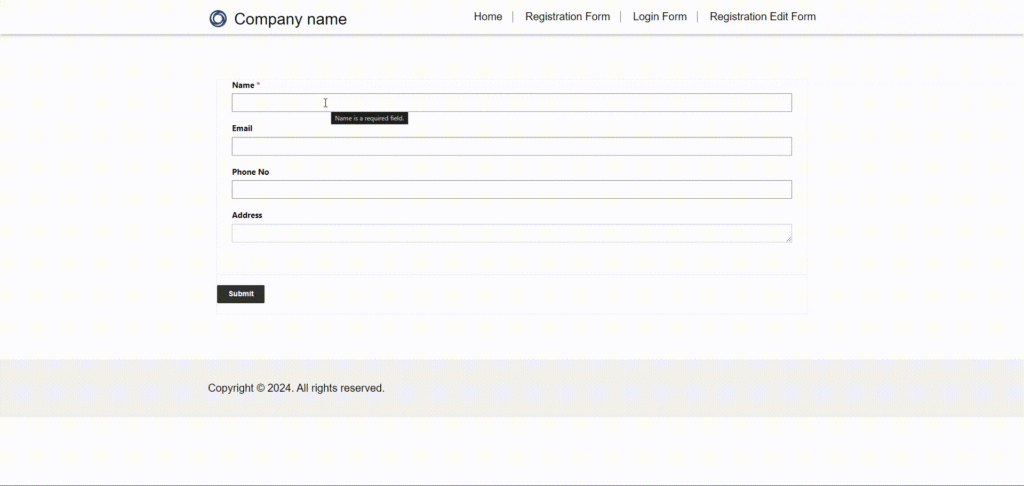
Step 5: To use the read form, you need to first add some user information to the database, and then you can read those details.

Company name option

Conclusion: This guide provides a clear pathway to effectively viewing and reading forms within Power Pages. Following the outlined steps allows for seamless integration of forms into your website, thereby simplifying data management and enhancing user experiences.

By leveraging Power Pages, you can optimize your website’s functionality and ensure a smoother interaction for users.

Using SharePoint Filter Queries in Power Automate: A Guide to Efficient Data Retrieval

The SharePoint Filter Query is a powerful feature that allows users to refine and manipulate data within their Power Automate workflows efficiently. This blog aims to provide an in-depth exploration of how to leverage this functionality effectively, offering insights and tips.

  • The filter query typically follows a syntax that depends on the data source you’re working with. In SharePoint, for example, you can use OData (Open Data Protocol) syntax to construct your filter query. This syntax allows you to specify conditions such as equals, not equals, greater than, less than, contains, starts with, ends with, and more.
  • The Filter Query is a powerful tool to retrieve only the data you need, reducing unnecessary processing and improving efficiency in your workflows.
  1. Single line of text: Starting with the internal name of the single line of text, followed by “equals (eq)” and the corresponding single line of text value.Single line of text
    Column Type Available operator(s) | Functions Usage Example
    Single line of text eq [equals]

    ne [not equals]

    startswith() [column value begins with…]

    substringof() [column value contains…]

    Column eq ‘value’

    Column ne ‘value’ startswith(Column, ‘value’) substringof(‘value’, Column)

    Title eq ‘My Item’

    Title ne ‘My Item’ startswith(Title, ‘My’) substringof(‘Item’, Title)

  2. Choice Column: Input the internal name of the Choice column, followed by “equals” to specify the user’s preference for displaying only pending items. Enclose the desired value in brackets.Choice Column
    Column Type Available operator(s) | Functions Usage Example
    Choice (menu to choose from) eq [equals]

    ne [not equals]

    startswith() [column value begins with…] substringof() [column value contains…]

    Column eq ‘value’

    Column ne ‘value’ startswith(Column, ‘value’) substringof(‘value’, Column)

    Status eq ‘Approved by manager’

    Status ne ‘Not approved’ startswith(Status, ‘Approved by’) substringof(‘by manager’, Status)

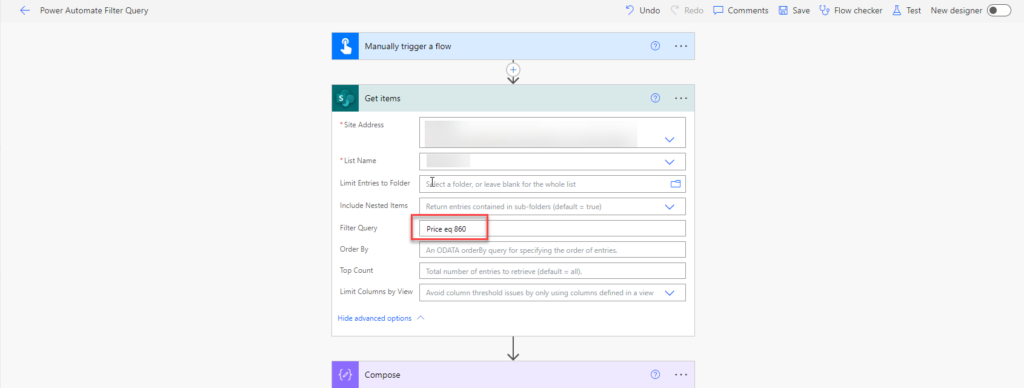
  3. Number Column: Start by entering the internal name of the column, followed by “equals (eq)” and the number you want to specify. Do not include the number value within the single quotes.Number Column
    Column Type Available operator(s) | Functions Usage Example
    Number (1, 1.0, 100) eq [equals]

    ne [not equals]

    lt [less than]

    le [less or equal than]

    gt [greater than]

    ge [greater or equal than]

    Column eq number

    Column ne number

    Column lt number

    Column le number

    Column gt number

    Column ge number

    Value eq 20

    Value ne 100

    Value lt 1000

    Value le 50000

    Value gt 200

    Value ge 50

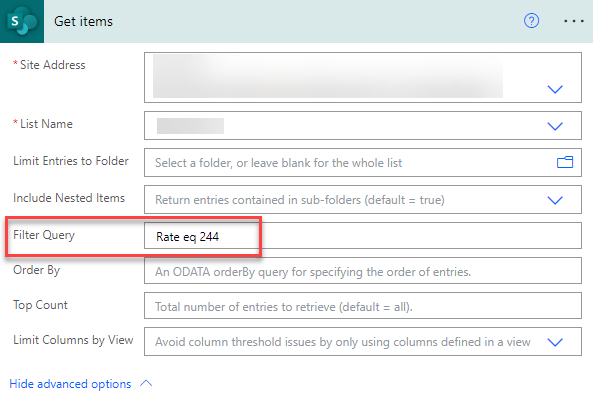
  4. Currency Column: Start by entering the internal name of the Currency column equals(eq) enter the value which user want to filter and run the flow show the output.Currency Column
    Column Type Available operator(s) | Functions Usage Example
    Currency ($, ¥, €)  eq [equals]

    ne [not equals]

    startswith() [column value begins with…]

    substringof() [column value contains…]

    lt [less than]

    le [less or equal than]

    gt [greater than]

    ge [greater or equal than]

    Column eq number

    Column ne number

    startswith(Column, ‘value’) substringof(‘value’, Column)

    Column lt number

    Column le number

    Column gt number

    Column ge number

    Rate eq 20

    Rate ne 100

    startswith(Rate, ‘5’) substringof(‘500’, Rate)

    Rate lt 1000

    Rate le 50000

    Rate gt 200

    Rate ge 50

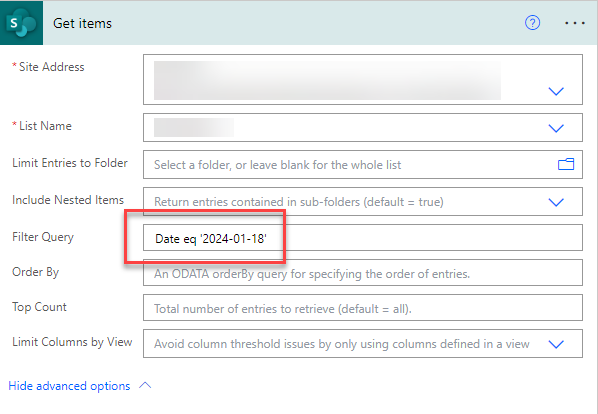
  5. Date and Time: Enter the internal name of the date column, followed by “equals (eq),” and input the desired date for filtering. Ensure that you enclose the date in single quotes and here to the date format as shown: Date Format (yyyy-mm-dd”).Date and Time
    Column Type Available operator(s) | Functions Usage Example
    Date and Time eq [equals]

    ne [not equals]

    lt [less than]

    le [less or equal than]

    gt [greater than]

    ge [greater or equal than]

    Date eq ‘date’

    Date ne ‘date’

    Date lt ‘date’

    Date le ‘date’

    Date gt ‘date’

    Date ge ‘date’

    Date eq ‘2024-01-18’

    Date ne ‘2024-01-18’

    Date lt ‘2024-01-18’

    Date le ‘2024-01-18’

    Date gt ‘2024-01-18’

    Date ge ‘2024-01-18’

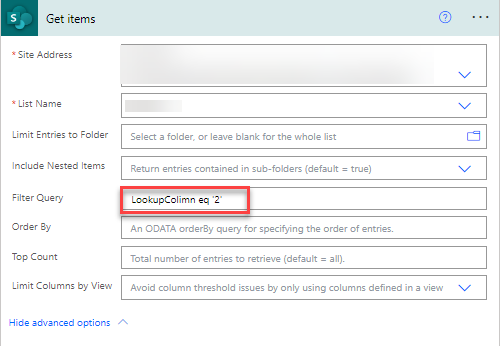
  6. Lookup Column: Begin by including the internal name of the Lookup column, followed by “equals (eq),” to specify the lookup ID.Lookup Column
    Column Type Available operator(s) | Functions Usage Example
    Lookup eq [equals]

    ne [not equals]

    Lookup eq ‘Lookup ID’

    Lookup ne ‘Lookup ID’

    Lookup eq ‘123’

    Lookup ne ‘123’

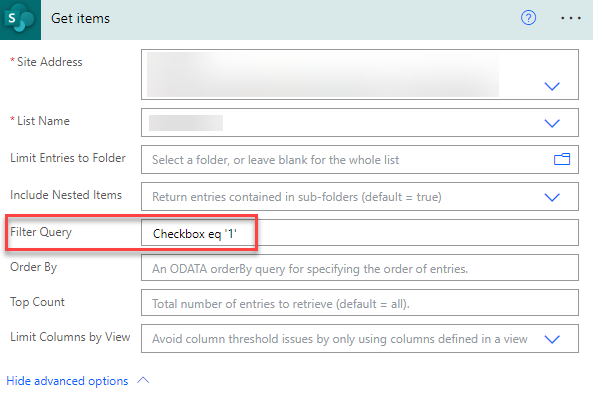
  7. Checkbox: Yes/No Checkbox: Input the internal name of the checkbox, followed by “equals (eq),” and add either ‘0’ or ‘1’.
    ‘0’ corresponds to “No.”
    ‘1’ corresponds to “Yes.”Checkbox

    Column Type Available operator(s) | Functions Usage Example
    Yes eq [equals]

    ne [not equals]

    Checkbox eq 1

    Checkbox ne 1

    Checkbox eq 1

    Checkbox ne 1

    No eq [equals]

    ne [not equals]

    Checkbox eq 0

    Checkbox ne 0

    Checkbox eq 0

    Checkbox ne 0

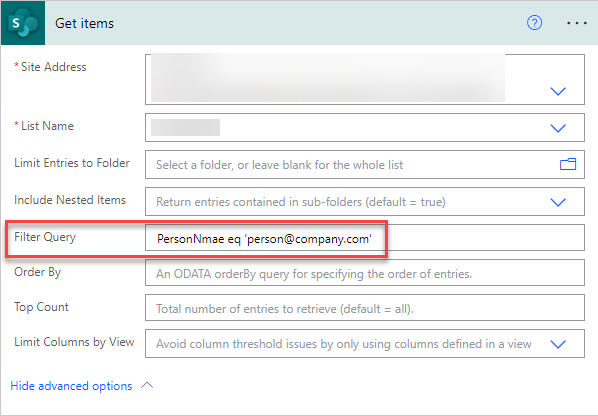
  8. Person or Group: Input the internal name of the person or group, followed by “equals (eq).” Add either the email address or the first name and last name of the person.Person or Group
    Column Type Available operator(s) | Functions Usage Example
    Person or Group eq [equals]

    ne [not equals]

    Person/EMail eq ’email address’

    Person/Title eq ‘user name’

    Person/EMail ne ’email address’

    Person/Title ne ‘user name’ ‘user name’

    Person/EMail eq ‘person@company.com’ 

    Person/Title ne ‘Firstname Lastname’

In conclusion, Power Automate Filter Query emerges as a crucial tool for refining data workflows. By mastering its syntax and leveraging its capabilities, users can efficiently filter and process data, ensuring relevance and accuracy.

This feature enables dynamic automation, allowing for tailored and precise data handling. Embracing Power Automate Filter Query empowers users to optimize workflows, enhancing overall efficiency in their automation endeavours.

Building Powerful Applications: A Guide to Creating Custom Connectors in Power Apps

Microsoft Power Apps has emerged as a significant change in the realm of app development, offering a versatile platform to create powerful applications. One key feature that takes the capabilities of PowerApps to the next level is the ability to create custom connectors. In this blog post, we will guide you through the process of creating a custom connector in PowerApps, allowing you to seamlessly integrate your apps with various data sources and unlock the full potential of this remarkable platform.

Understanding the Power of Custom Connectors in PowerApps 

PowerApps, at its core, empowers users to build applications with minimal coding. However, true magic happens when you leverage custom connectors. These connectors act as bridges, enabling your apps to connect with external data sources, services, and APIs. By creating a custom connector, you open the door to a world of possibilities, extending the functionality of your apps and ensuring they meet the unique requirements of your business or project. 

What is a PowerApps Custom Connector? 

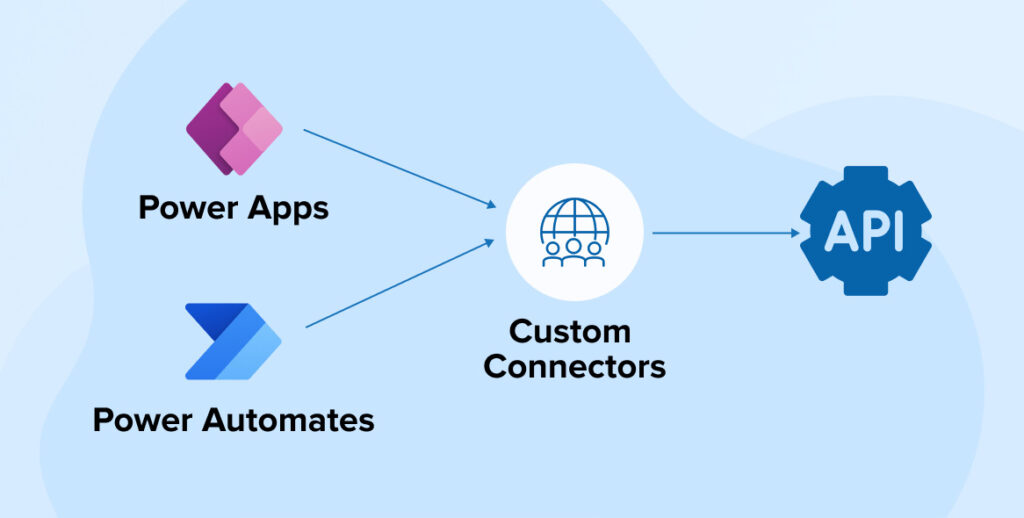
A PowerApps Custom Connector serves as a conduit for integrating your custom APIs with Microsoft Power AppsMicrosoft Power Automate, and Azure Logic Apps. It acts as a wrapper around an API, facilitating communication between different systems. 

Think of a Custom Connector as a vital link that bridges the gap between PowerApps and external services, such as APIs or various data sources. Its primary function is to enable seamless access, retrieval, and manipulation of data. By functioning as this intermediary, Custom Connectors significantly enhance the capabilities of your apps, allowing them to interact with external services effortlessly. 

Image

Creating a New Custom Connector:

Step 1: Sign into Power Apps 

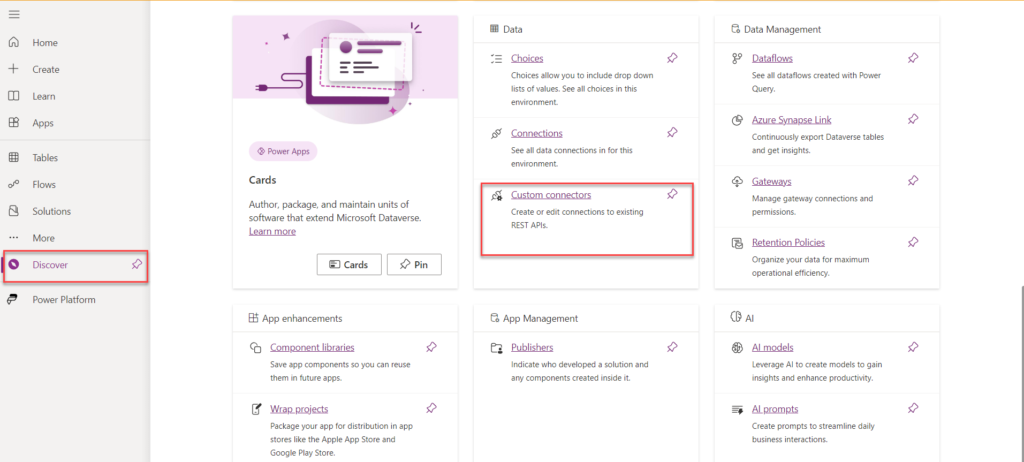
Step 2: Select Custom connectors” in the Navigation pane on the left. 

Image


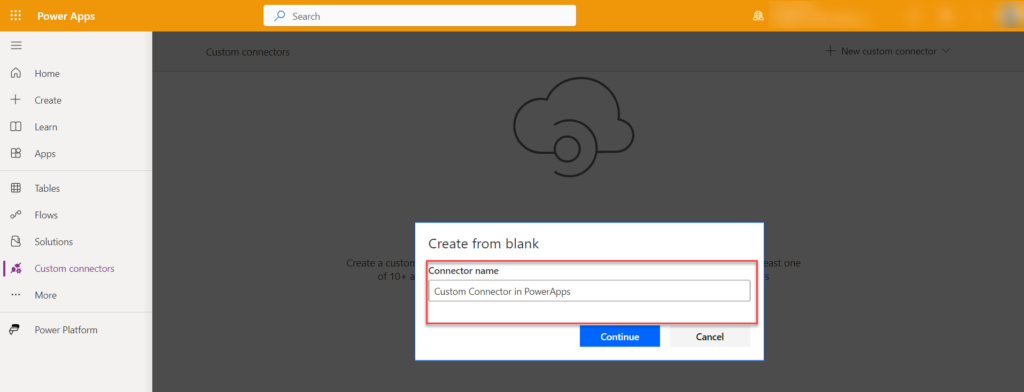
Step 3: Click on “New Custom Connector and choose “Create from blank. 

image

Step 4: Provide a meaningful name for your connector. 

image

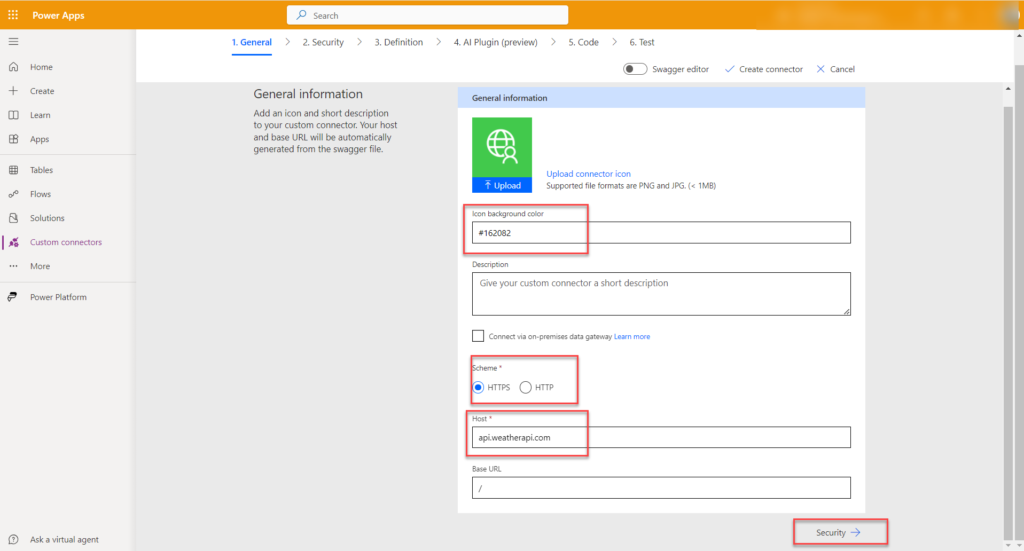
General details of the API and Power Apps Connector: 

  • In the Description field, enter a meaningful value. This description will appear in the custom connector’s details, and it can help others know if the connector could be useful to them. 
  • Schema: HTTP or HTTPS. 
  • Update Host to the address for the API URL. The connector uses the API host and the base URL to determine how to call the API.

Select on Security to continue. 

Image

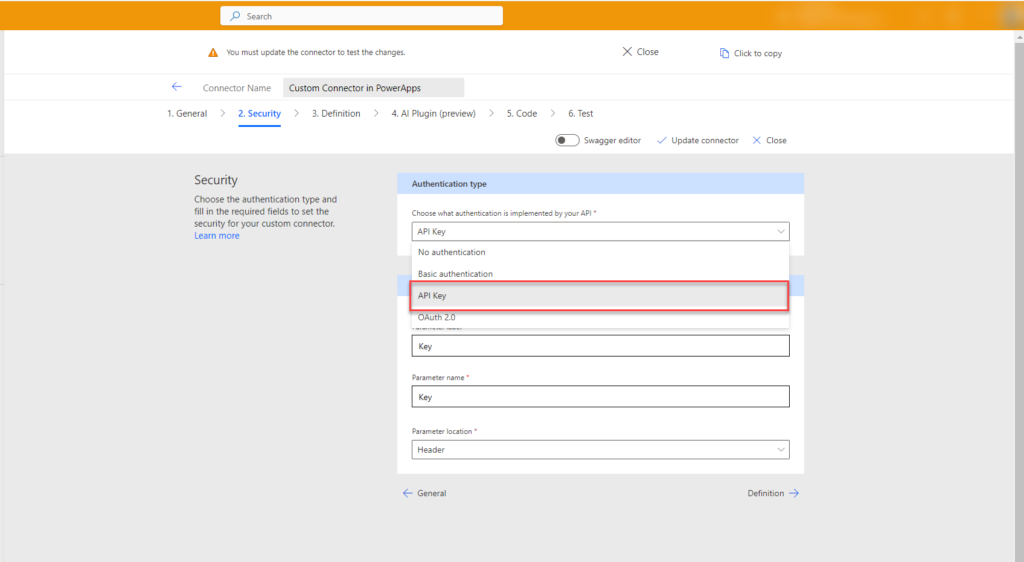
Defining security sections: 

Choose authentication type On the Security tab. 

Image

Select on Definition to continue.

Custom Connector in PowerApps definition: 

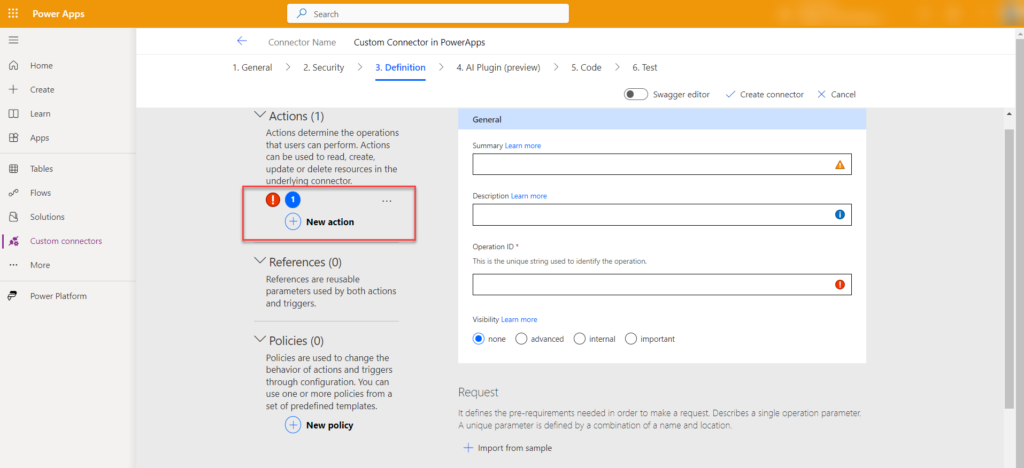
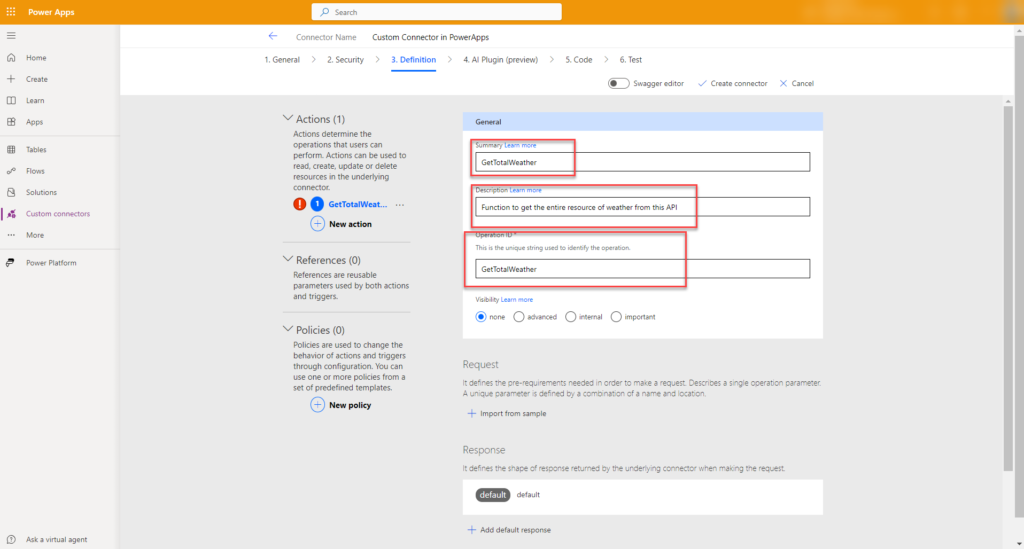
In the definition section, you can define multiple actions for your custom connector. For this blog, we will cover a single action. Click on “New action,” fill in the summary and description, and name the operation ID field for future reference. 

In the operation ID field, name the field which will be easy to remember and meaningful as this field will be required later in the canvas app. 

Create a New Action – Actions > Select New Action 

Image

Complete the SummaryDescription/Operation ID for the new action.

Image

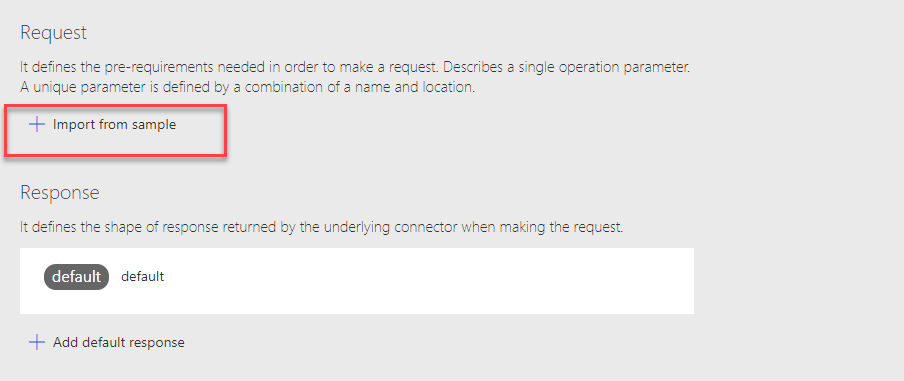
Import from sample: 

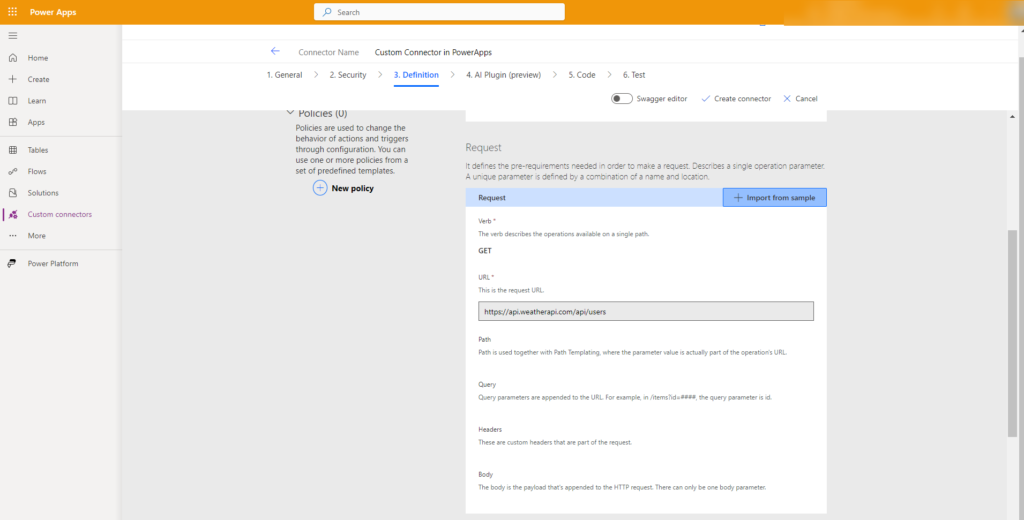
Here, we will define the requirement needed for the request. 

We will use GET as we are getting data from the API. 

In the URL, provide the endpoint which we use earlier to test by city name and click import. 

Image

Image

image

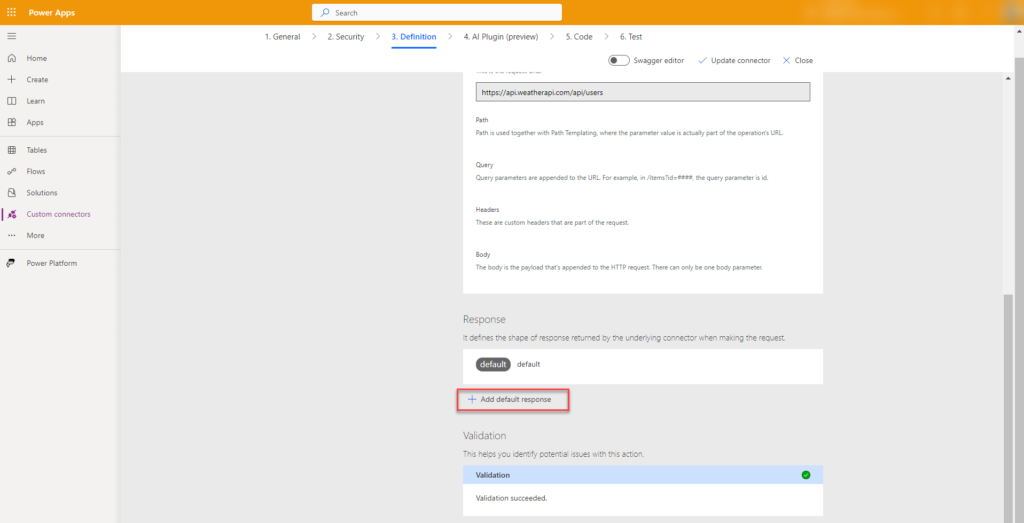
Defining a Response in our custom connector: 

Select Add default response. 

Image

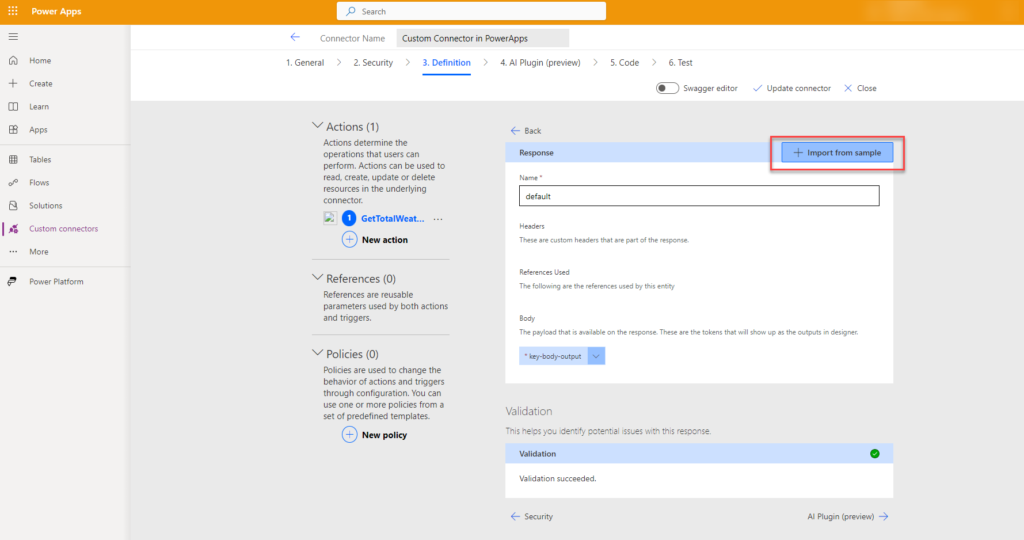
Select Import from sample

Image

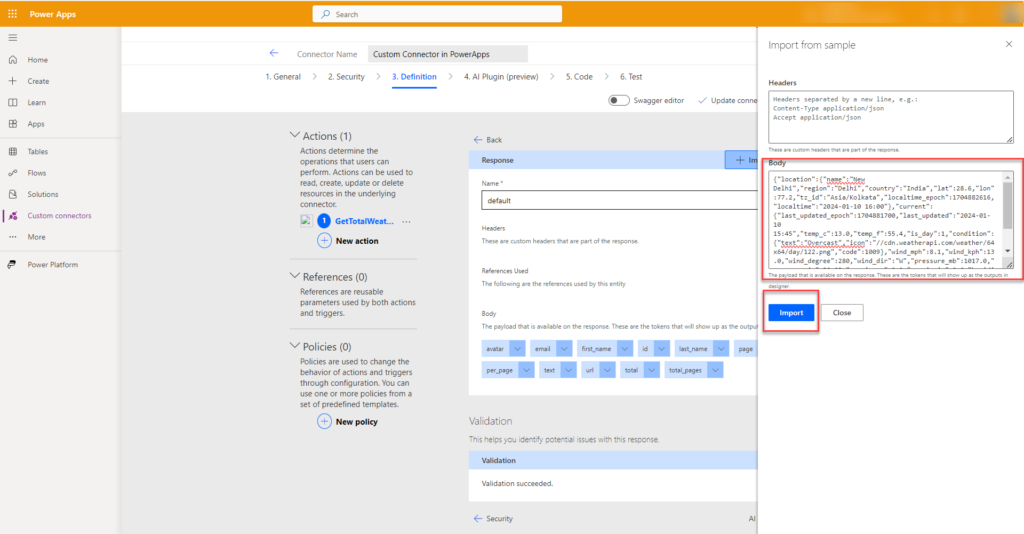
Copy a RAW JSON response from URL. 

In example case from the URL: https://api.weatherapi.com/v1/current.json?key=4c140806280a4b5992c123944230505&q=India&aqi=no 

Image

Paste Body example (as shown below): 

Then, select Import. 

Image

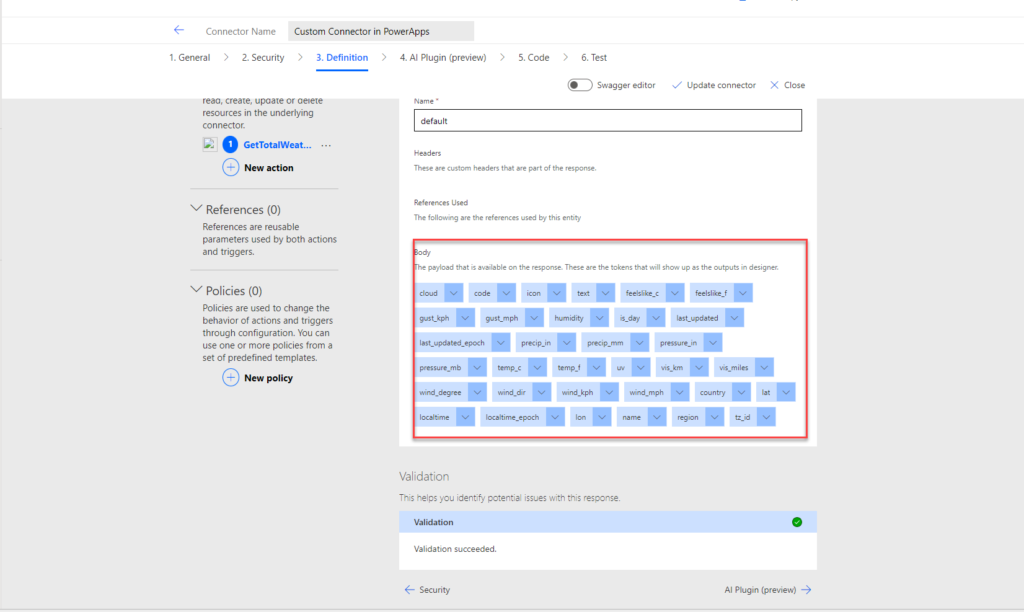
Finally, you will see the properties loaded in the response. 

Select on Code to continue. 

Image

Test the Custom Connector in PowerApps: 

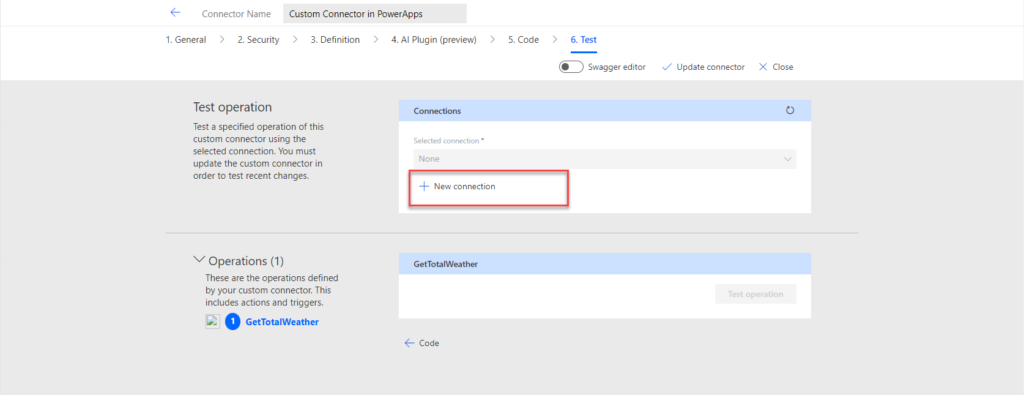
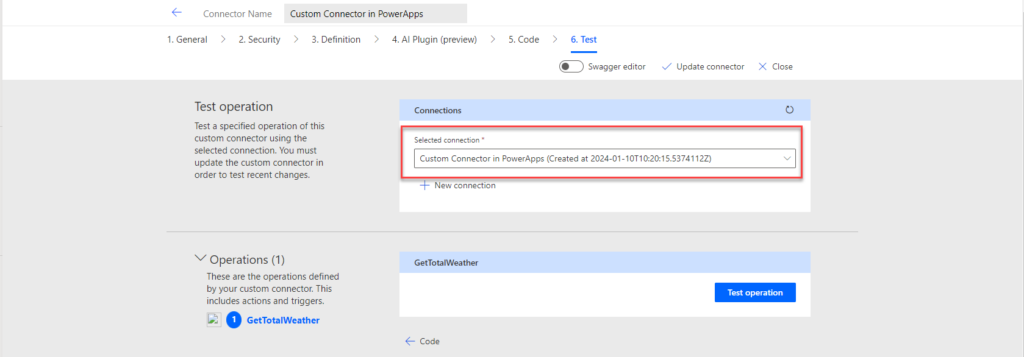
Select Test from Create a new Connection. 

Select New Connection. 

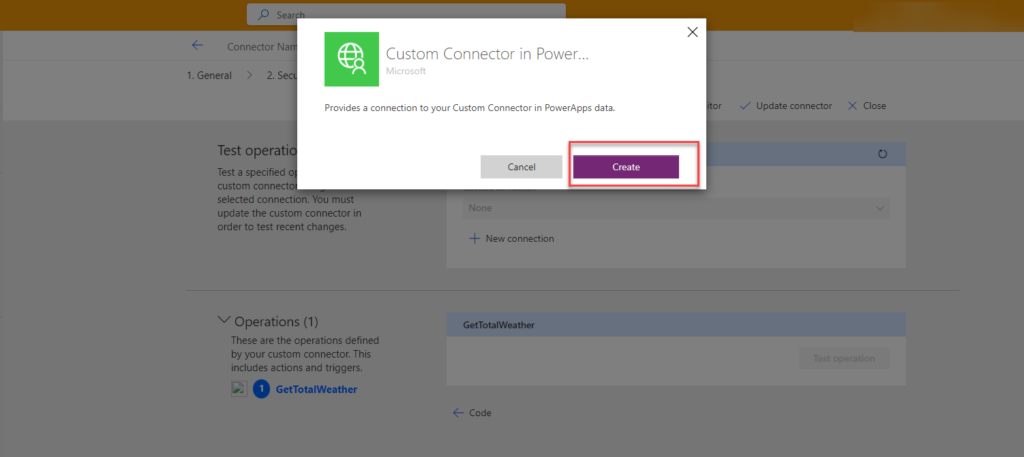
Then, select Create. 
Image

Image

Image

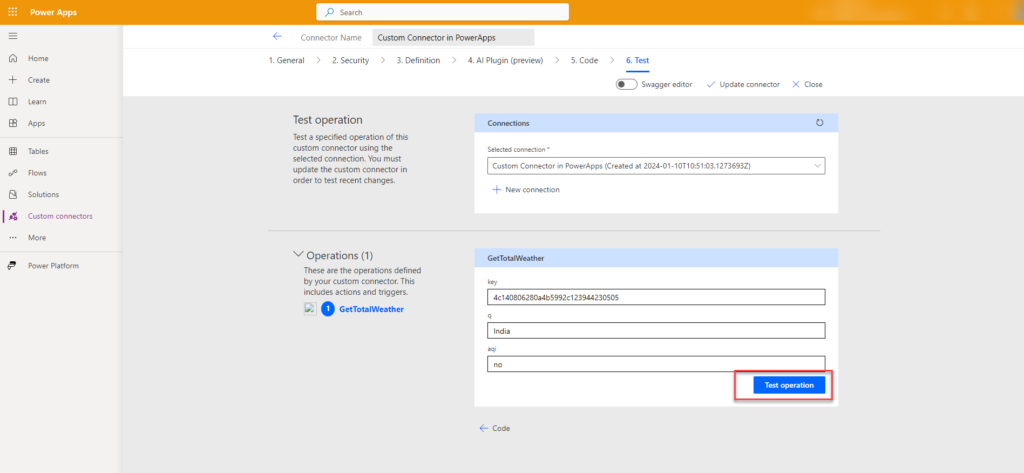
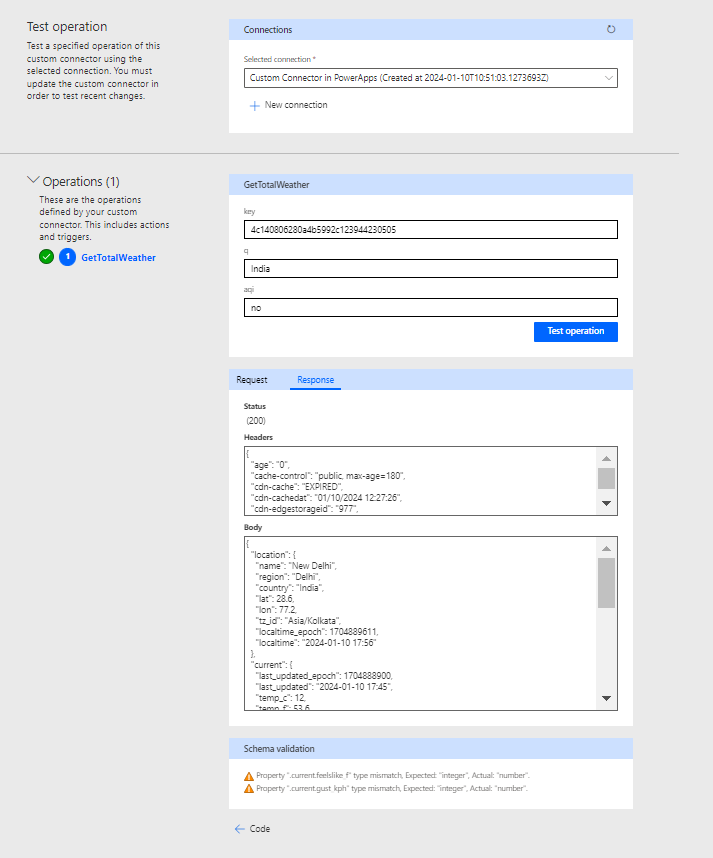
Test Operation: 

Select Test Operation. 

Image

Image

Integrating PowerApps with APIs (Custom Connector):

After creating our custom connector, we will now see how to add our custom connector to our canvas app and use it as a data source. 
Sign in to PowerApps. 
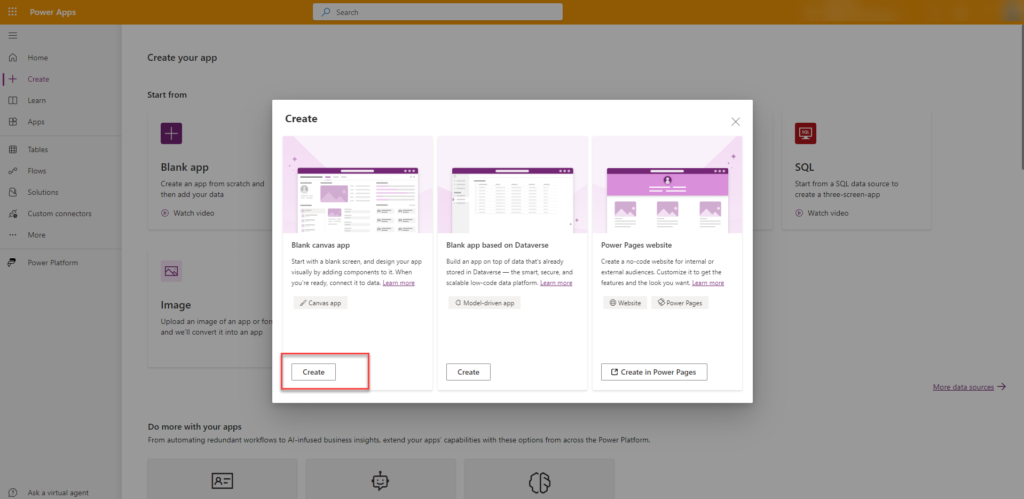
Start a new app or open an existing one. 

Navigate to Home > Blank app.

Image

A blank screen will be displayed. 

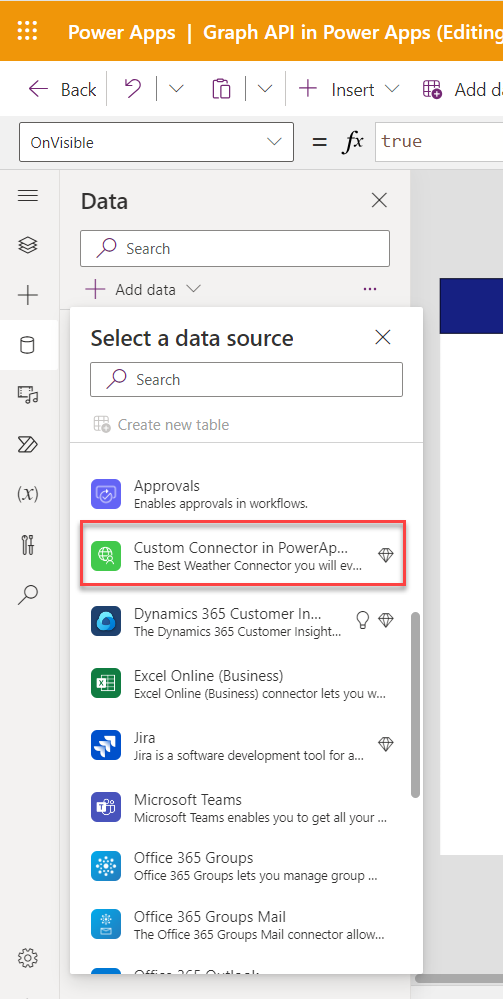
Click on the data icon and select “Add data.” 

Go to the Connectors tab or locate your custom connector in the list. 

Select the custom connector to load and establish a connection.

Image

Now, you just must use a label and see whether it is working or not. 

Use the formula given below to test it. 

The custom connector is the connector name we have given earlier, and the place is the operation ID. 

Note: use your own API Key in the app id.

Add Text Label and Input Boxes: 

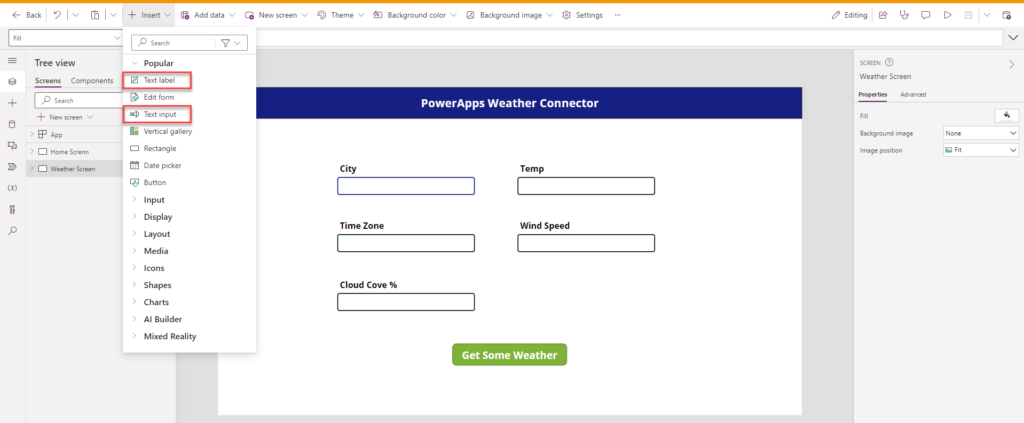
Include Text labels and Text input boxes in your app. 

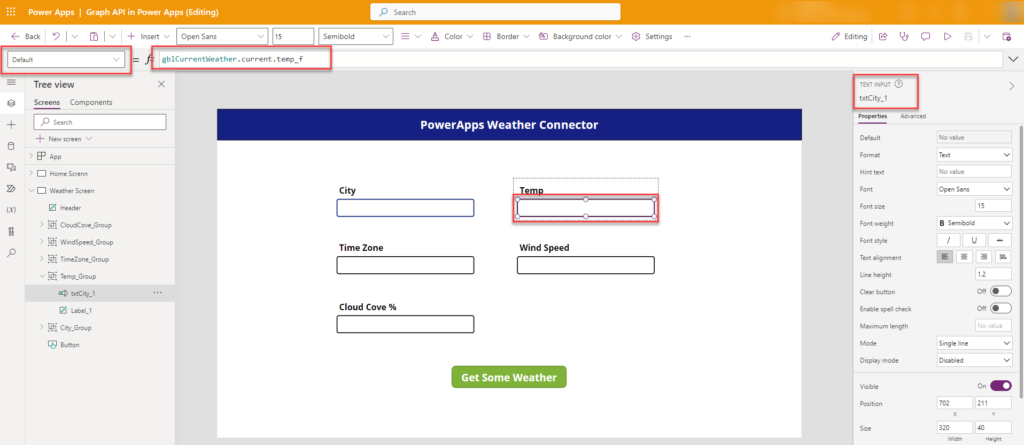
Use the formula below to display real-time data: 

For Temperature: 

Default = gblCurrentWeather.current.temp_f 

For Time Zone 

Default = gblCurrentWeather.location.localtime 

For Wind Speed 

Default = gblCurrentWeather.current.wind_kph 

For Cloud Cove 

Default = gblCurrentWeather.current.cloud 

Image

Image

Configure Button Properties: 

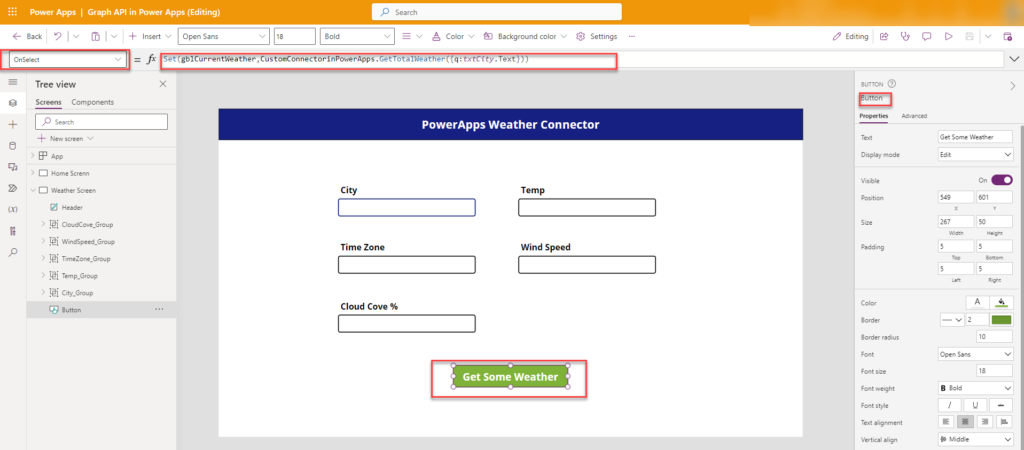
Add a button to trigger data retrieval. 

Set the OnSelect property with the following code: 

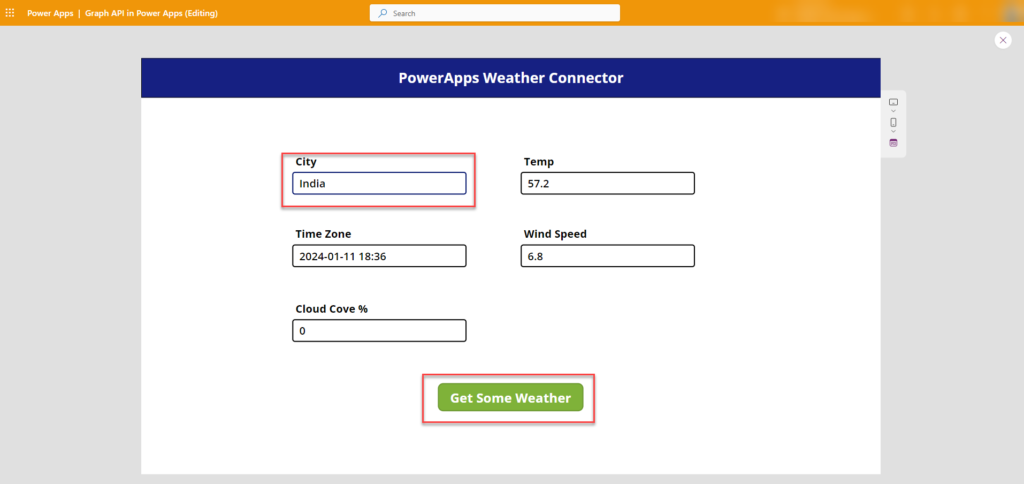
OnSelect = Set(gblCurrentWeather,CustomConnectorinPowerApps.GetTotalWeather({q:txtCity.Text})) 

Image

Run the PowerApps 

Execute the PowerApp. 

Input the city name and click the button to retrieve and display the values.

Image

Conclusion: 

Custom connectors in Power Apps open doors to API integration beyond standard connectors. This guide walked you through creating custom connectors, empowering you to tailor solutions for unique needs. Whether building apps or automating workflows, custom connectors enhance connectivity. If you have questions or feedback, share them in the comments. Best of luck in your Power Apps journey! 

Create a Responsive Container-based Popup Dialog Box in Power Apps

Creating a responsive container-based popup dialog box in Power Apps involves designing a dynamic and adaptable dialog box that adjusts its size and layout based on the content and screen size. This approach typically utilizes container controls to organize and structure the dialog box elements. Containers offer flexibility in terms of layout and control placement compared to traditional popup forms.

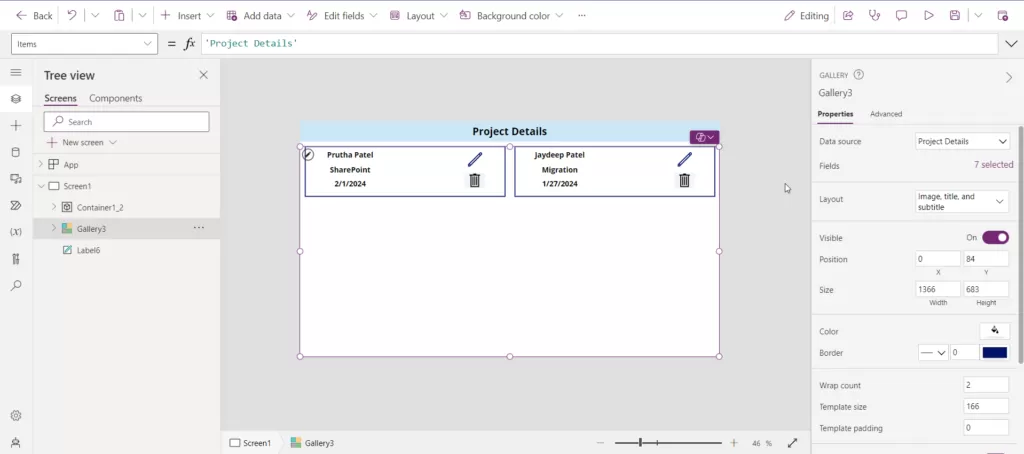
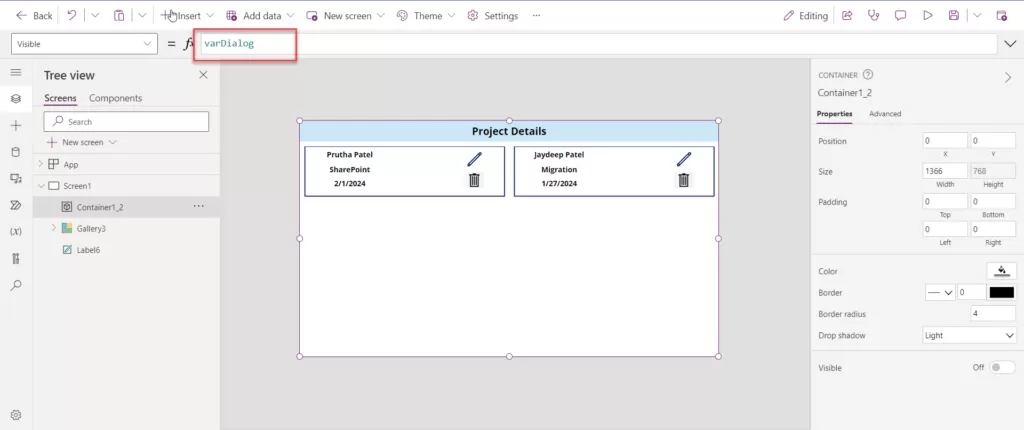
Step 1: Add a new screen in PowerApps and include a vertical gallery connected to your data source. In the screenshot below, display the data with three columns: ‘Project Name,’ ‘Assigned to,’ and ‘Submitting Date.’ Add the edit and delete icon in the gallery1

img

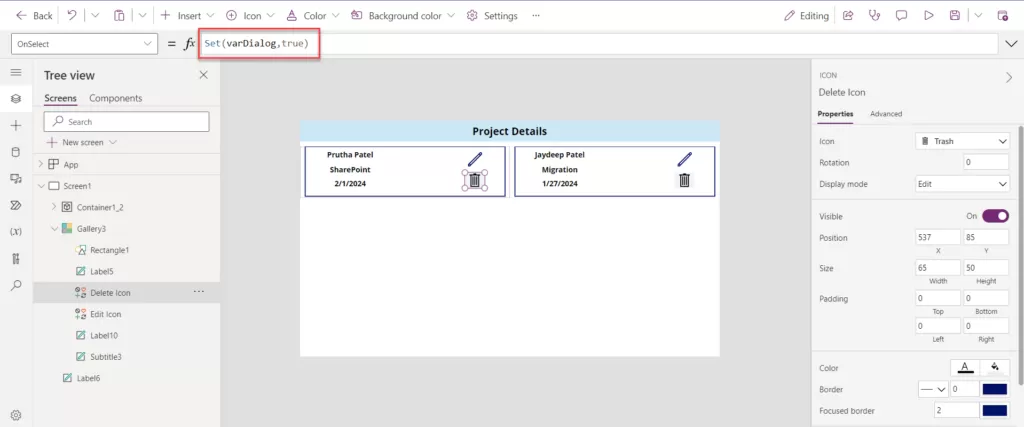
Step 2: Add the Delete and Edit Icon. Add the formula below to the OnSelect property of the Delete icon 

img

Set(varDialog,true)

img

Step 3: Click on Screen1 and insert the Vertical container. Add the variable to the Visible property of the Vertical container. Set the Vertical container’s height and width according to the parent size.

img

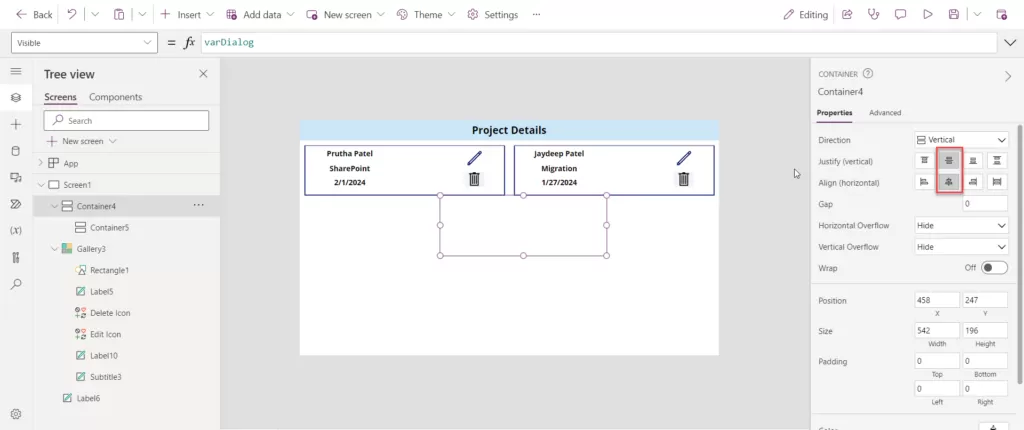
Step 4: Click on Container4 and add a new vertical container. Adjust the height and width according to the screen, then on the right side Justify (vertically) and align (horizontally) it in the centre.

jm

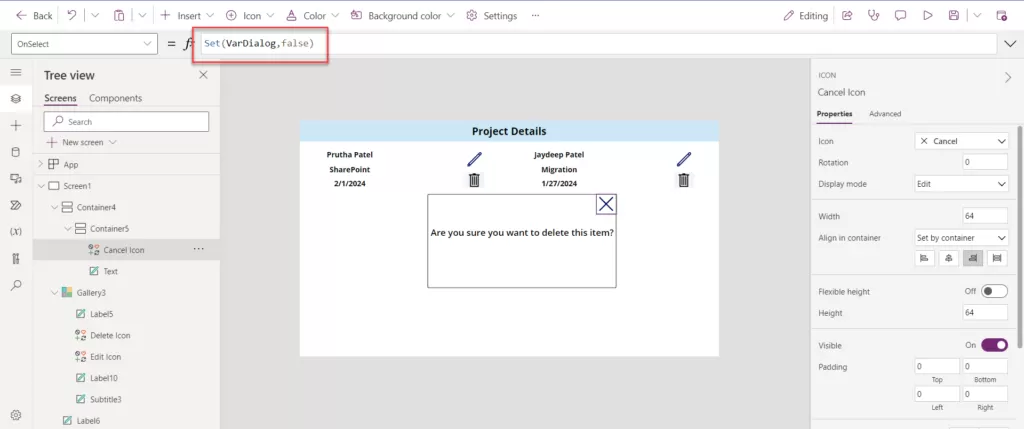
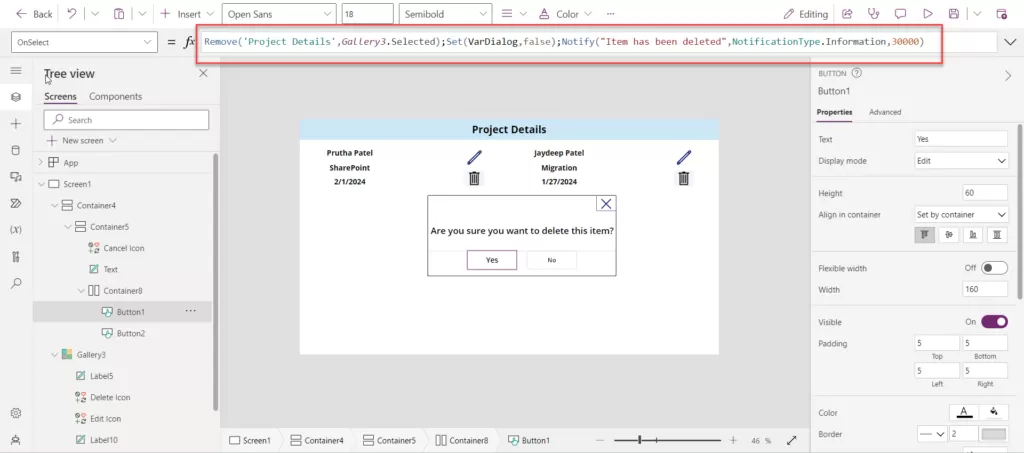
Step 5: Click on Container 5 and add the Cancel icon and Text label. Click on the Cancel button, select the OnSelect property, and enter the formula below. Then, add the text to the Text label. 

ghfc

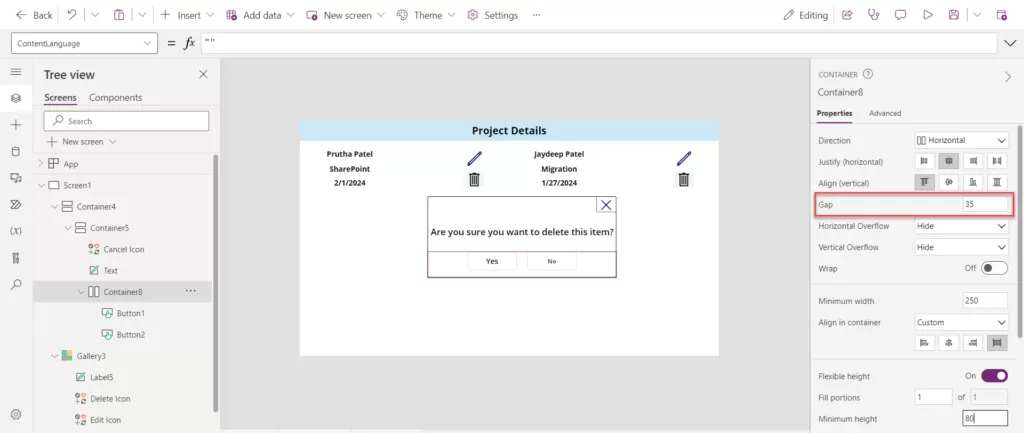
Step 6: Next, click on Container5 and add a horizontal container. Add the 2 buttons in the horizontal container, set their positions to center horizontally, and add a gap between the two buttons.

 
seg fgnf

Step 7: Add the following formula to the OnSelect property of the button “Yes” and “No” buttons respectively. 

On the Yes button add the below formula: 

Remove('Project Details',Gallery3.Selected);Set(VarDialog,false);Notify("Item has been deleted",NotificationType.Information,30000)

Project details replace with your data list.

On the No button add the below formula:

Set(VarDialog,false)
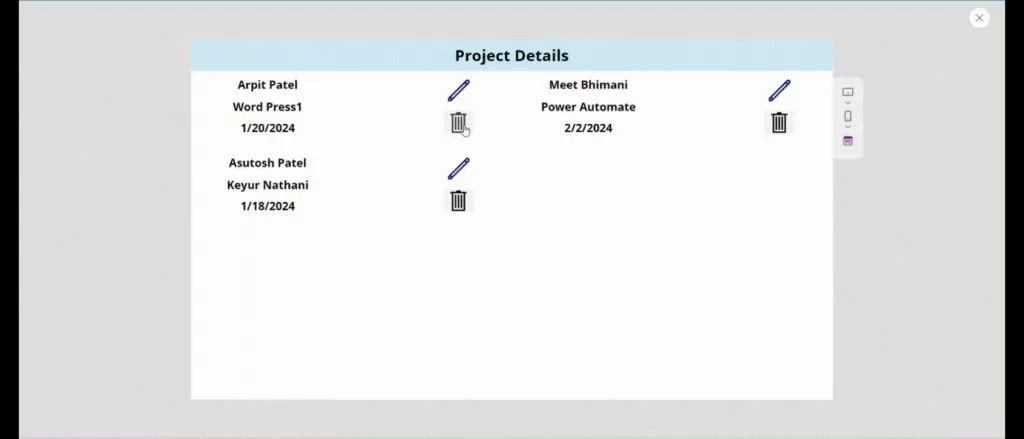
 htrnh Step 8: Click on the delete button to display the popup. If you wish to delete the item, click the ‘Yes’ button, and a notification will appear saying ‘Item has been deleted. 

Step 8: Click on the delete button to display the popup. If you wish to delete the item, click the ‘Yes’ button, and a notification will appear saying ‘Item has been deleted. 

img

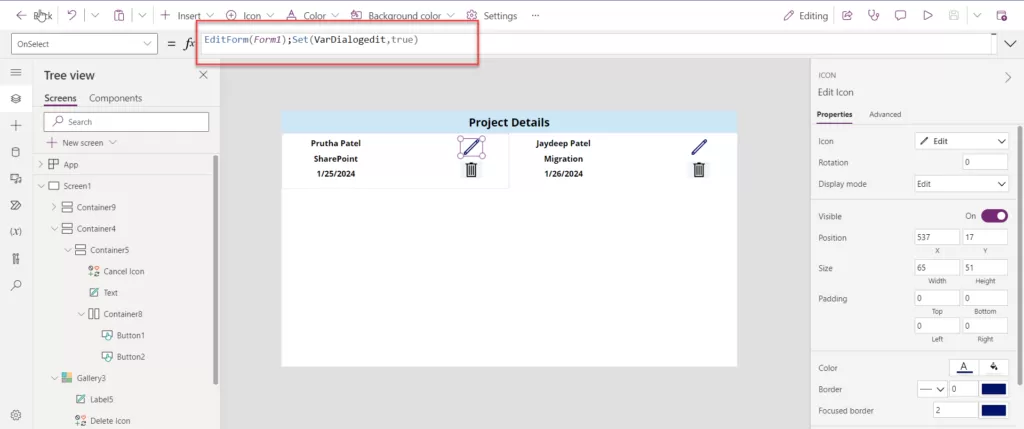
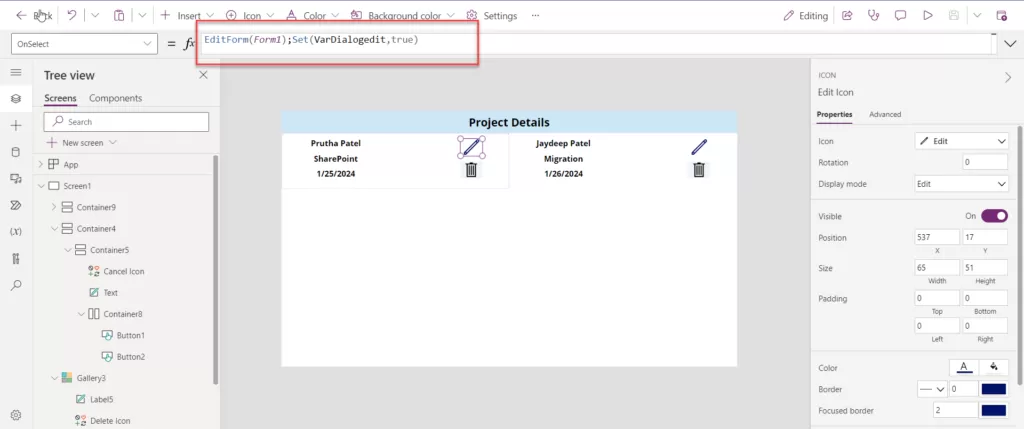
Step 9: Click on the Edit button, create a new variable, and add the formula on Onselect property.

EditForm(Form1);Set(VarDialogedit,true)
 dsv

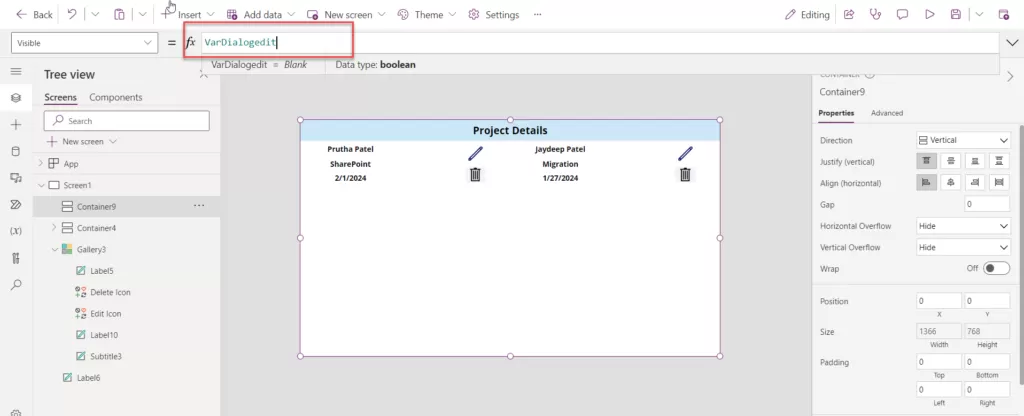
Step 10: Click on Screen1 and add a new vertical container. Set the height and width according to the parent size. Also, set the variable in the Visible property of the vertical container. 

VarDialogedit

 fb

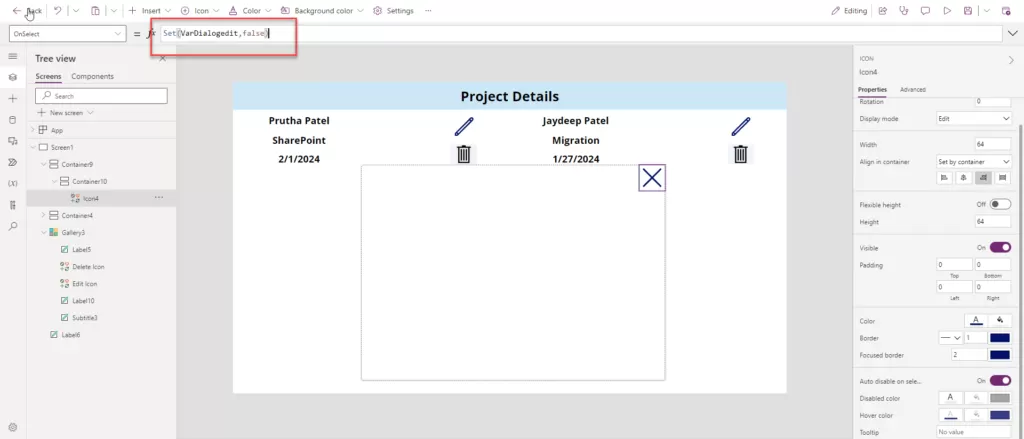
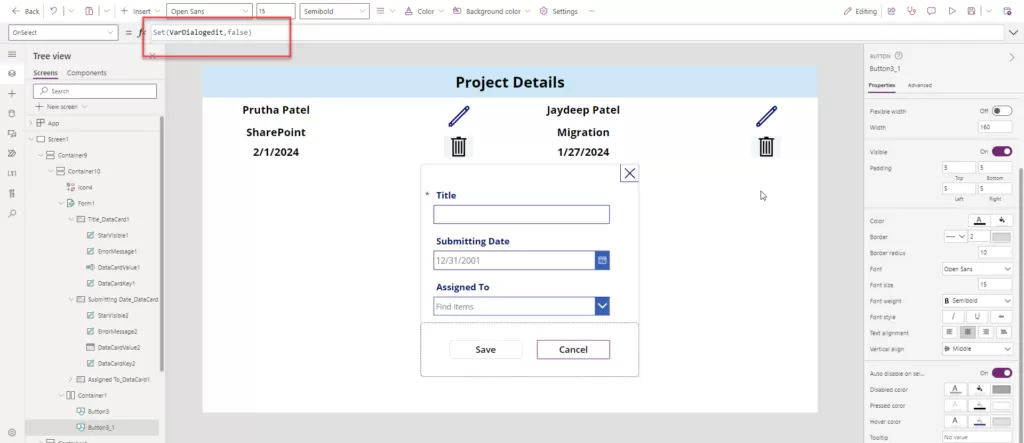
Step 11: Click on the Container and insert a new vertical container. Adjust the justification (vertical) and alignment (horizontal) to centre. Click on Container10, add the cancel icon, select the OnSelect property, and enter the formula below.

Set(VarDialogedit,false)

igg

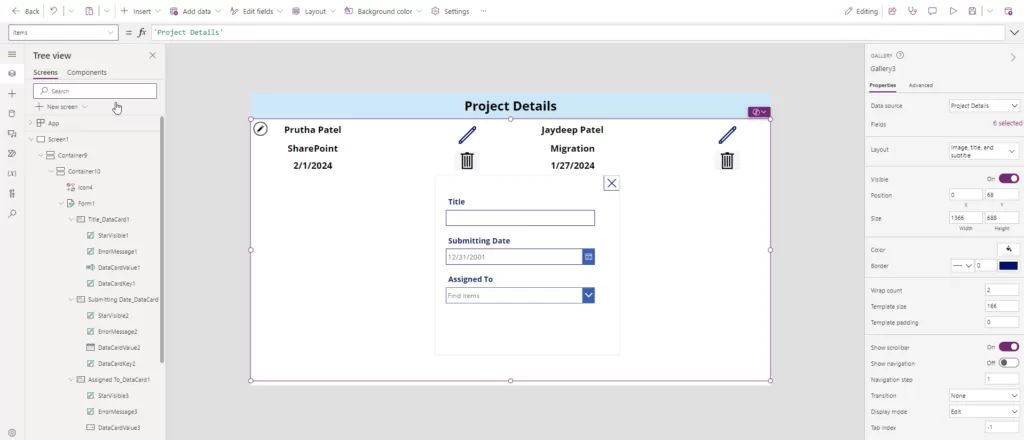
Step 12: Click on Container 10 and add the Edit form, connecting the data with the data list. 

img

Step 13: Click on Container10 and add a horizontal container. Include two new buttons and adjust their sizes according to the form size. Write the formula below for the Cancel button. 

Set(VarDialogedit,false) 
cvf

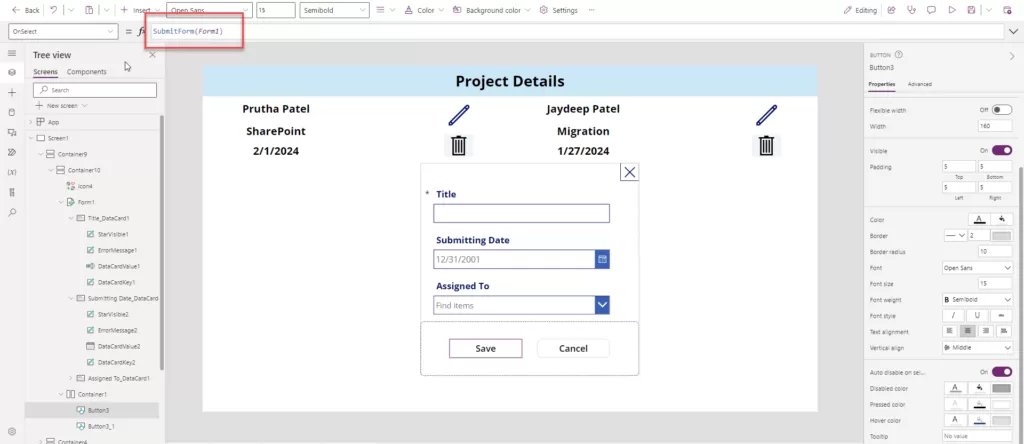
Step 14: Click on the OnSelect property of the Save button and add the formula. 

SubmitForm(Form1)


gm

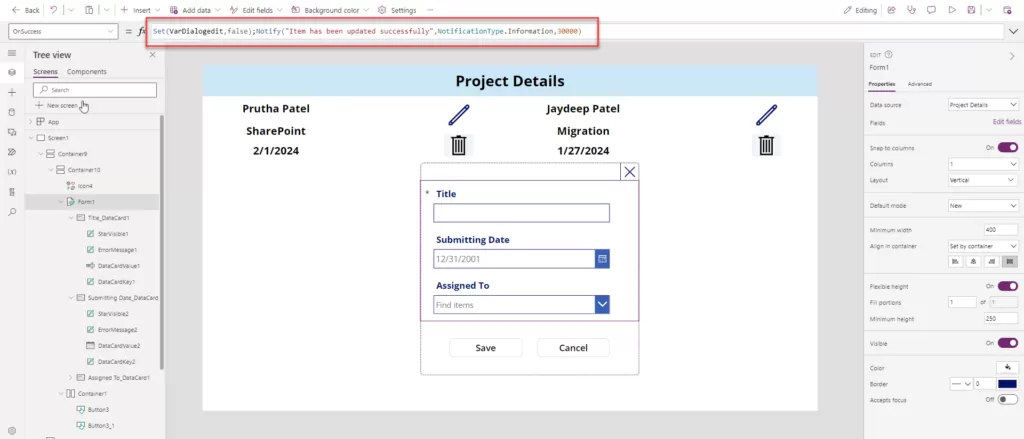
Step 15: Click on Form1, select the OnSuccess property, and write the formula. When the user edits any column and clicks the Save button, display a notification for 3 seconds indicating that the item has been updated successfully.
Set(VarDialogedit,false);Notify("Item has been updated 


fxdbd

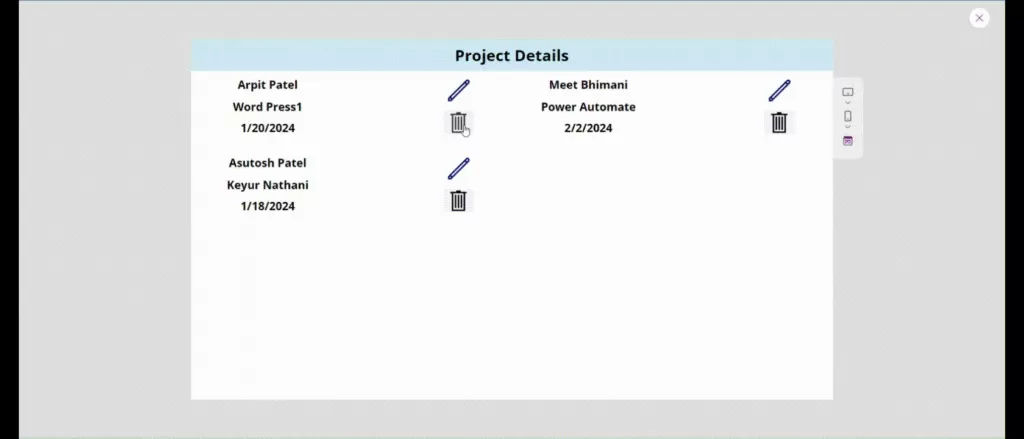
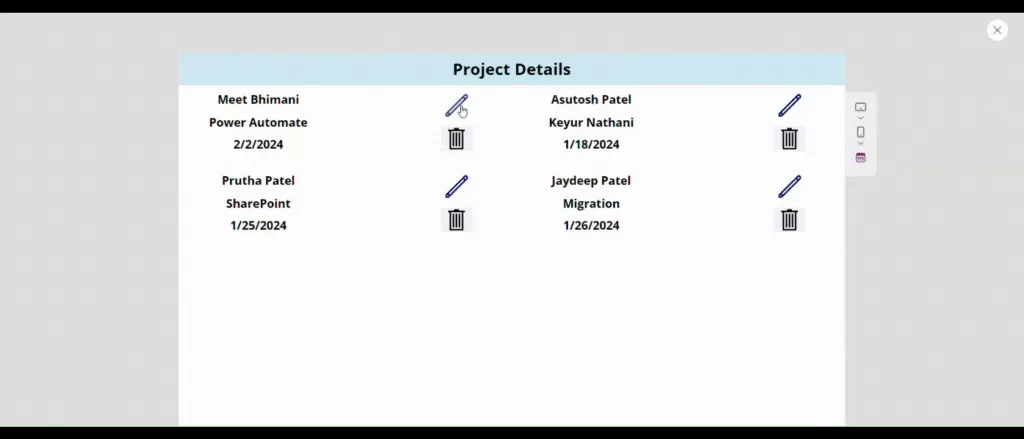
Step 16: Click on the edit button to modify details according to requirements. After making the necessary changes, click on the save button to update the column values.
db
In conclusion, creating a responsive container-based popup dialog box in Power Apps involves designing a dynamic and adaptable dialog box that adjusts its size and layout based on the content and screen size. By utilizing container controls like the Group control, developers can organize and structure the dialog box elements effectively. Key considerations include ensuring responsive design, accommodating dynamic content, implementing show/hide logic, optional use of animations for enhanced user experience, and handling user input if required. This approach allows for a user-friendly experience across various devices and screen sizes in Power Apps.

Microsoft 365 Records Management An In-Depth Guide for Comprehensive Control

A records management system, also known as records and information management, is a solution for organizations to manage regulatory, legal, and business-critical records. Records management for Microsoft Purview helps you achieve your organization’s legal obligations, provides the ability to demonstrate compliance with regulations, and increases efficiency with regular disposition of items that are no longer required to be retained, no longer of value, or no longer required for business purposes.

Understanding Retention Policies and Labels in Microsoft 365

In the world of Microsoft 365, retention policies and labels are more than just mechanisms; they are the guardians of crucial data, ensuring its retention and compliance. These elements, nestled within the Microsoft Compliance Center, serve a paramount role in governing critical information.

Retention Policies and Labels: Guardians of Data 

Retention policies and labels act as a safety net, preventing the irreversible deletion of vital Microsoft 365 data. This encompasses a spectrum of information: from precious Outlook emails and SharePoint documents to the trove of conversations held within Teams messages.

Their significance lies not only in preserving this data but also in enabling organizations to: 

  • Proactively comply with industry regulations and internal policies, mandating the retention of data for stipulated durations. 
  • Mitigate the risks associated with litigation or security breaches by responsibly disposing of outdated content. 
  • Foster an environment of efficient knowledge sharing, ensuring that users engage with pertinent, current information. 

The versatility of retention settings within Microsoft 365 caters to various scenarios, including:

  • Retain-only: Preserving content indefinitely or for a specified period. 
  • Delete-only: Permanently erasing content after a designated timeframe. 
  • Retain and then delete: Maintaining content for a specified period before permanent deletion.

Navigating Retention Settings and Content Interaction

The mechanics of retention settings are designed to safeguard content seamlessly within its original space, irrespective of potential edits or deletions. This mechanism orchestrates an automatic retention of content copies, strategically stored across different platforms:

SharePoint and OneDrive: Copies reside in the Preservation Hold library, ensuring the sanctity of data within these repositories. 

Exchange Mailboxes: Content copies find refuge in the Recoverable Items folder, shielding valuable communication archives. 

Teams and Yammer Messages: Safeguarded within the clandestine confines of the Substrate Holds folder, nestled within the Exchange Recoverable Items folder, lies copies of these conversations. 

Revealing details: Retention Policy vs. Retention Label

Delving deeper into Microsoft 365’s retention strategies reveals two key approaches: retention policies and retention labels. These methods serve distinct functions yet coalesce to fortify data management.

Retention Policies: Container-Level Governance

Retention policies operate at a container level, affording administrators the capability to uniformly assign retention settings across entire sites or mailboxes. They offer a sweeping approach to managing data, ensuring blanket compliance within defined spaces.

Retention Labels: Granular Control at Item Level 

In contrast, retention labels allow administrators to finely calibrate retention settings at an item level, affording granular control. This method excels when nuanced retention needs arise, such as when specific emails necessitate varying retention periods within a single mailbox.

Retention labels offer a portability advantage: they travel with the content across different locations within the Microsoft 365 tenant. In contrast, retention policies are tethered to specific content containers, limiting their purview.

Moreover, retention labels boast distinct capabilities that elevate their functionality beyond retention policies:

  • Initiating the Retention Period: Commencing retention from labeling or event-based triggers, in addition to content age or last modification. 
  • Utilizing Trainable Classifiers: Identifying content for labeling purposes, enhancing precision in retention application. 
  • Default Label Application for SharePoint Documents: Simplifying labeling processes for efficiency. 
  • Disposition Review Support: Allowing scrutiny of content before permanent deletion. 
  • Record Marking: Providing irrefutable proof of disposition upon content deletion at the retention period’s culmination. 

What are the rules of Microsoft 365 retention?

Content can be subject to multiple retention policies and be classified with a retention label. Therefore, Microsoft has defined retention principles to determine what happens to that content. 

gbf

Retention wins over deletion example 

An item is subject to two retention policies 

  • Retention policy 1 deletes content after 1 year. 
  • Retention policy 2 retains content for 2 years. 

In this scenario, the retention rule for policy 2 is the longest so the retention period is 2 years. When the retention period expires content is deleted as per policy 1.

Longest retention wins example 

An item is subject to two retention policies and a retention label 

  • Retention policy 1 retains content for 1 year. 
  • Retention policy 2 retains content for 10 years. 
  • Retention label retains the item for 2 years. 

In this scenario, retention policy 2 has the longest retention so the retention period is 10 years.

Explicit wins over implicit for deletions example 

An item is subject to 

  • Retention policy 1 deletes content after 1 year 
  • Retention label deletes the item after 3 years. 

In this scenario, because a retention label is explicitly applied, the label rules apply. The item is deleted after 3 years.

Shortest deletion wins example 

An item is subject to two retention policies, 

  • Retention policy 1 deletes content after 1 year 
  • Retention policy 2 deletes content after 2 years. 

In this scenario, the shortest deletion period wins, so the item is deleted after 1 year. 

How to Create and Apply Microsoft 365 Retention Labels

When it comes to managing data effectively within Microsoft 365, retention labels play a pivotal role. These labels aid in categorizing and retaining data as per an organization’s policies, ensuring compliance and data governance. Here’s a detailed guide on how to create and apply Microsoft 365 retention labels seamlessly.

Note: To create and configure retention labels, one needs to be a global administrator or a compliance administrator. 

Understanding Retention Labels 

Retention labels are critical for defining how long content needs to be retained, when the retention starts, and what happens at the retention’s conclusion. To create a retention label: 

Step 1: Navigate to the Microsoft 365 Compliance Center 

Access the Microsoft Compliance > Records Management > File plan Here, select “Create a label” to initiate the process. Provide a Label name and description for the label that users and administrators can use. 

fv

Step 2: Define Label Settings 

In the dialog box, specify the label’s name and description. This step is crucial as it lays the foundation for label identification. 

ghm

Step 3: Customize Retention Settings 

Tailor the label’s settings to match your organization’s requirements. Determine the retention duration, start date, and actions post-retention. 

Describe the business details for the label; it’s optional and customizable, allowing you to create descriptors as needed.

File plan descriptors columns 

File plan lets you include more information as part of your retention labels. These file plan descriptors provide more options to improve the manageability and organization of the content you need to label.

By default, starting with Reference ID, the next few columns display these optional file plan descriptors that you can specify when you create a retention label, or edit an existing label.

To get you started, there are some out-of-box values for the following file plan descriptors: 

  • Business function/department 
  • Category 
  • Authority type 
  • Provision/citation 
bd

Define Label setting

  • Retain items forever or for a specific period: Items won’t be retained but when they reach the age you specify, they’ll be deleted from where they are stored. 
  • Enforce actions after a specific period: Labeled items won’t be retained. You can decide whether they should be deleted, or relabeled when the period you specify in the next step ends. 
  • Just label items: Choose this setting if you only want to classify labeled items. The items won’t be retained, and your users won’t be restricted from editing, moving, or deleting them. vgChoose what happens during the retention period 
    • Retain items even if users delete: Users will be able to edit items and change or remove the label. If they delete items,and keep copies in a secure location. 
    • Mark items as a record: Users won’t be able to edit or delete items, and only admins will be able to change or remove the label. For SharePoint or OneDrive files, actions are blocked or allowed based on whether the item’s record status is locked or unlocked. 
    • Mark items as a regulatory record: Users won’t be able to edit or delete items or change or remove the label. In addition, admins won’t be able to modify or delete this label after it’s created. They’ll only be able to increase the retention period or publish it to other locations. fbChoose what happens during the retention period 
      • Retain items even if users delete: Users will be able to edit items and change or remove the label. If they delete items,and keep copies in a secure location. 
      • Mark items as a record: Users won’t be able to edit or delete items, and only admins will be able to change or remove the label. For SharePoint or OneDrive files, actions are blocked or allowed based on whether the item’s record status is locked or unlocked. 
      • Mark items as a regulatory record: Users won’t be able to edit or delete items or change or remove the label. In addition, admins won’t be able to modify or delete this label after it’s created. They’ll only be able to increase the retention period or publish it to other locations. egeDisposition Stages The concept of (multi-stage) disposition allows for a workflow and auditing supported process for content deletion after the retention period has expired. This is mandatory for many regulations and this feature supports this. Disposition review is configured at the label level and here you can set one or more reviewers. By using the permissions on the content, these reviewers only see the content they need to review.drgd

        Step 4: Review and Create

        Ensure all label details are accurate. Then, proceed to create the label.
      xfb

      Once a label is created you will receive this screen to publish the created retention label. 

    • Publishing Retention Labels Creating labels is just the beginning. To leverage these labels effectively, they need to be published across relevant locations. Follow the steps below to establish a retention label policy. Step 1: In Microsoft Purview Navigate to the Records management tab. Select tab Label policies, click on Publish labels. 

      gfnStep 2: In the pop-up dialog box which lists all the labels available for publishing, select the ones you want to publish. 

    • fsvStep 3: The selection of admin units plays a pivotal role. These admin units operate as the linchpin in restricting policies to specific user groups, significantly influencing subsequent location options. Understanding the nuances and functionalities of admin units is crucial for optimizing policy management within the Microsoft Entra ID ecosystem. 
    • fv
    • Step 4: Choose if you want the policy to be static or adaptive. 
    • dfvbStep 5: If you chose Adaptive in Step 4 Click on Add scopes and select one or more adaptive scopes that have been created. Then, select one or more locations. The locations that you can select depend on the scope types added.  If you chose Static in Step 4 Choose the locations where you want to apply the selected retention labels. 
    • cfgbStep 6: Add a name and description to the policy and review the details. wfr

      The selected retention labels will be published. For SharePoint locations(we have selected in the scope), published labels are typically available to apply within one or two days. For Exchange and Microsoft 365 Group locations, it can take up to seven days for the published retention labels to appear for users in Outlook (the mailbox should have at least 10 MB of data). 

      Note:   

      Once a retention label or label policy is created and saved, the following settings cannot be changed: names for retention labels and their policies, the scope type (adaptive or static), the retention settings except the retention period, and the option to mark items as a record. If the retention period is based on when the items were labeled, the retention period cannot be changed either.  

      You can only delete retention labels that are not currently included in any retention label policies, that are not configured for event-based retention, or that do not mark items as regulatory records.

      Understanding the Relationship Between Labels and Policies 

      A retention label can be part of multiple retention label policies, while a single policy can encompass multiple labels, with the exception of auto-apply retention label policies that accommodate only one label. 

      Publishing Labels 

      Once labels are created, they need to be published strategically. The published locations are determined by the label’s function and are specified within retention label policies. These policies dictate where and how the labels are applied to content. 

      Conclusion 

      In conclusion, creating and applying Microsoft 365 retention labels involves a structured process that requires careful consideration of an organization’s data governance needs. By following these steps meticulously, organizations can ensure streamlined data management and compliance within their Microsoft 365 environment. 

Unveiling Auditing Excellence: Microsoft Purview’s Advanced Features

Auditing is the process of investigating security events, conducting forensic investigations, complying with internal regulations, and meeting external compliance obligations. It involves capturing, recording, and retaining a unified audit log. 

In other words, it means keeping a close eye on what happens in the system. It checks actions, changes, and who accesses data to follow rules and keep everything secure. It helps manage risks and ensures that everything meets the required standards.

In Microsoft 365, there are two Auditing options: 

  • Audit Standard: This is the basic option with lots of searchable events stored for 90 days. You can export these records easily. 
  • Audit Premium: This is more advanced. It includes everything in Audit Standard but also keeps records longer, identifies important events, and allows more data access. 

Key Features of Audit New Search 

  • Customizable Query Parameters: The tool offers flexibility in defining search parameters, allowing users to tailor audits based on date ranges, data types, or specific compliance criteria. 
  • Intelligent Insights: Leveraging Microsoft’s robust algorithms, Audit New Search provides insightful data analytics, enabling users to extract actionable insights from the audit results. 
  • Comprehensive Reporting: Generate detailed reports summarizing audit findings, facilitating comprehensive analysis, and aiding in compliance improvement strategies. 
  • User-Friendly Interface: The intuitive interface ensures ease of navigation, allowing both novice and experienced users to navigate the tool effectively.

Benefits of Microsoft Purview’s Audit: 

  • Improved security posture: By understanding what is happening in your Microsoft 365 environment, you can identify and address security threats more quickly. 
  • Reduced compliance risk: Audit logs can help you demonstrate compliance with internal regulations and external compliance requirements. 
  • Improved incident response: Audit logs can provide valuable evidence in the event of a security incident. 
  • Enhanced investigations: Audit logs can help you investigate security incidents and other events more effectively.

How to Audit with Microsoft 365  

Auditing in Microsoft 365 is part of Microsoft Purview. Thousands of actions and operations conducted across Microsoft 365 services and solutions are reported in your organization’s unified audit log. IT admins, risk teams, and compliance and legal operators within an organization can search audit logs using the audit log search tool. 

You must be assigned the Audit Logs role in the Microsoft Purview compliance portal to turn auditing on or off in your Microsoft 365 organization. By default, this role is assigned to the Audit Manager, Organization Management, and Security Administrator role groups on the Permissions page in the compliance portal.

Verify the Auditing status for your organization 

Audit logging is turned on by default for Microsoft 365 organizations. However, when setting up a new Microsoft 365 organization, you should verify the auditing status for your organization.

Use PowerShell to turn on Auditing 

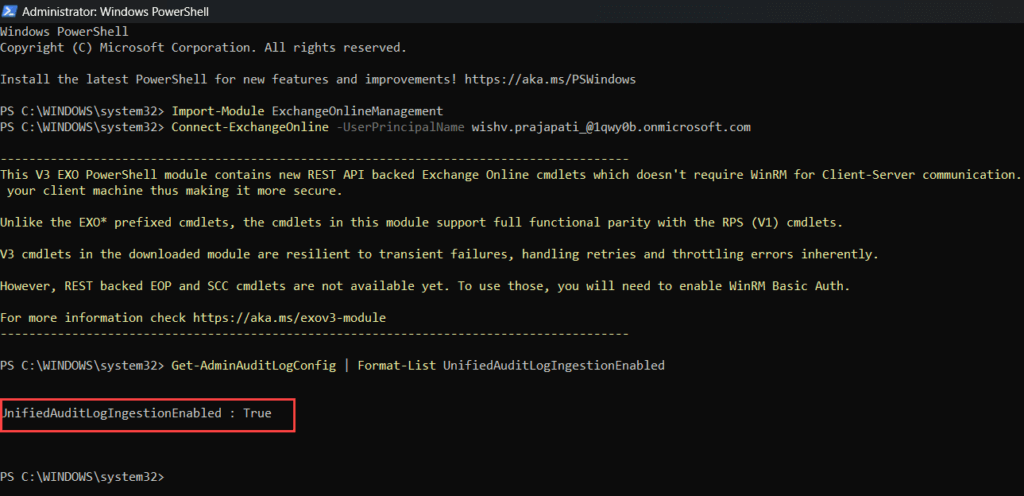
To verify that auditing is turned on for your organization, Execute the subsequent command in PowerShell, following each step.

Step 1:  Import-Module ExchangeOnlineManagement 

Step 2:  Connect-ExchangeOnline -UserPrincipalName <UPN>  

“UPN is your account in user principal name format (for example, xyz@contoso.onmicrosoft.com).” 

In the sign-in window that opens, enter your password, and then click Sign in. 

MFA only: A verification code is generated and delivered based on the response option that’s configured for your account 

Step 3 :  Get-AdminAuditLogConfig | Format-List UnifiedAuditLogIngestionEnabled

image

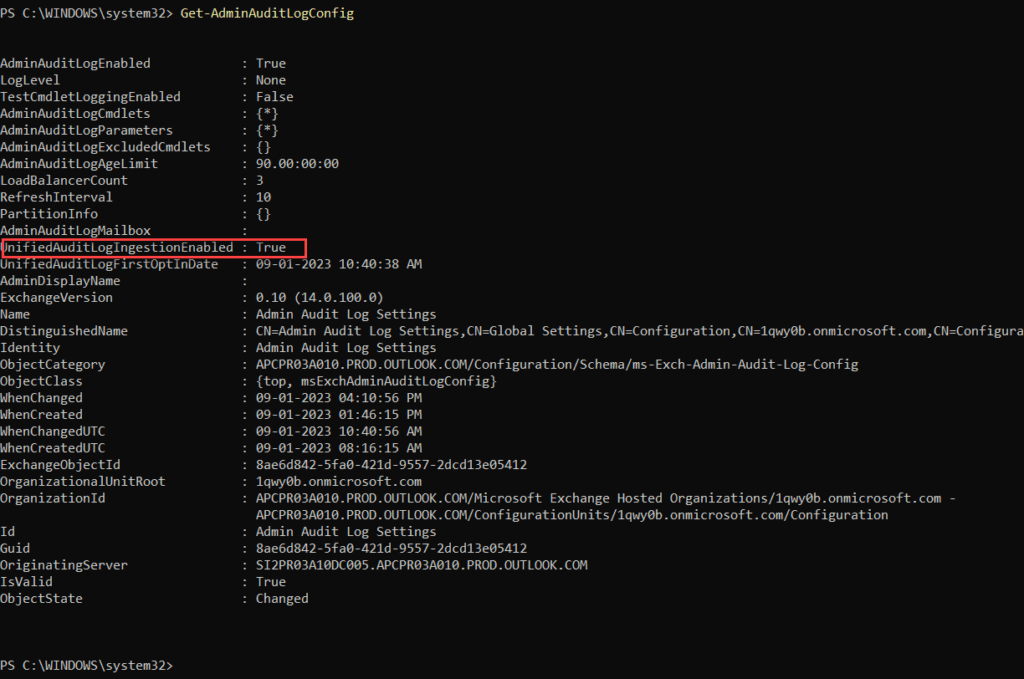
A value of True for the “UnifiedAuditLogIngestionEnabled” property indicates that auditing is turned on. A value of False indicates that auditing isn’t turned on. 

Be sure to run the previous command in Exchange Online PowerShell. Although the Get-AdminAuditLogConfig cmdlet is also available in Security & Compliance PowerShell, the UnifiedAuditLogIngestionEnabled property is always False, even when auditing is turned on

image

Assign permissions from compliance portal to scope Audit logs 
The following screenshot shows the two audit-related role groups in the compliance portal.

image

To search or export the audit log, administrators or members of investigation teams must be assigned to at least one of the following audit-related role groups in the compliance portal 

Audit Manager: A user assigned to the Audit Manager role group can search and export the audit log and manage audit settings for the tenant (like enabling or disabling audit logging). This role group grants the View-Only Audit Logs and Audit Logs roles to the user. 

Audit Reader: A user assigned to the Audit Reader role group can only search and export the audit log. They can’t enable or disable audit logging. This role group grants the View-Only Audit Logs role to the user 

Search the Audit log in Microsoft Purview 

Now you’re ready to search the audit log in the Microsoft Purview compliance portal. 

1. Go to https://compliance.microsoft.com and sign in using an account that has been assigned the appropriate audit permissions. 

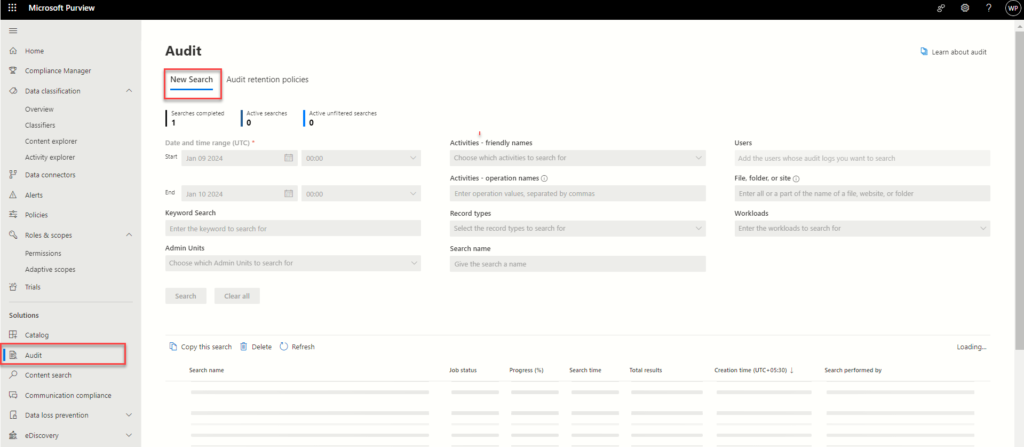
2. Select the Audit tab on the left panel of the homepage to navigate to the Audit tool.

Image

3. Select New Search tab at the top of the Audit page.

image

4. On the New Search tab, configure the following search criteria as applicable: 

  • Date Range: Choose a date range up to 180 days to view events, with the default set to the last seven days in Coordinated Universal Time (UTC). 
  • Keyword Search: Look for specific words or phrases in the audit log, replacing special characters with asterisks for text containing such characters. 
  • Admin Units: Filter audited activities based on specific administrative units within your organization. 
  • Activity Names: Select user or admin activity groups or individual activities to focus your search in the log. 
  • Operation Names: Specify exact operation names to refine search results, enabling flexible data discovery. 
  • Record Types: Filter audited activities based on specific types for more targeted search results. 
  • Search Name: Create a custom name for your search job to distinguish it in the search job history. 
  • Users: Choose specific users to see their related audit log entries or leave blank for all users. 
  • File, Folder, or Site: Search for file or folder activities by entering related keywords or URLs. 

**Select Search to start your search job. A maximum of 10 search jobs can be run in parallel for one user account. ** 

Search Job dashboard

Active and completed search jobs are displayed in the search job dashboard. The dashboard displays the following information for each search job: 

Image

  • Search name: The name of the search job. The full search name for a job can be seen by hovering the cursor over the search job name. 
  • Job status: The status of the search job. The status can be Queued, In Progress, or Completed. 
  • Progress (%): The percentage of the search job that has been completed. 
  • Search time: The total running time that elapsed to complete the search job. 
  • Total results: The total number of results returned by the search job. 
  • Creation time: The date and time the search job was created in UTC. 
  • Search performed by: The user account that created the search job. 

Search Job details dashboard 

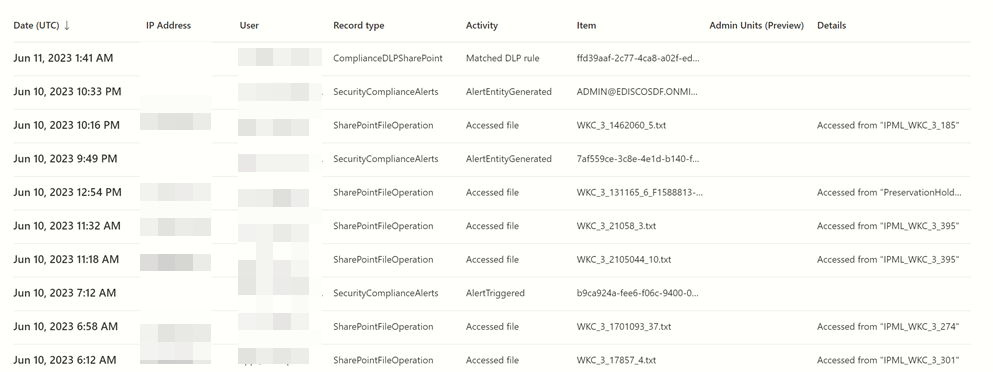
To view details about a search job, select the search job. The total number of items in the job is included at the top of the dashboard. The total result number deducts duplicates, which is why it might be less than the number of items in the search job dashboard. 

Image

The search job details dashboard displays following information about the individual items gathered in the search job results: 

  • Date (UTC): The date and time the activity occurred. 
  • IP Address: The IP address of the device that was used to perform the activity. 
  • User: The user account that performed the activity. 
  • Record type: The record type associated with the activity. 
  • Activity: The friendly name of the activity that was performed. 
  • Item: The name of the file, folder, or site that the activity was acted on. 
  • Admin Units: The admin unit that the user account that performed the activity belongs to. 
  • Details: Additional details about the activity.

Export the Audit report 

This option exports all the audit records from the audit log search you ran, and adds the raw data from the audit log to a CSV file. It takes a while to prepare the download file for a large search. Large files will result when searching for all activities or using a wide date range. 

Format the exported Audit log using the Power Query Editor 

The next step is to use the JSON transform feature in the Power Query Editor in Excel to split each property in the JSON object in the Audit Data column into its own column. Then you filter columns to view records based on the values of specific properties. This can help you quickly locate the specific auditing data you’re looking for. 

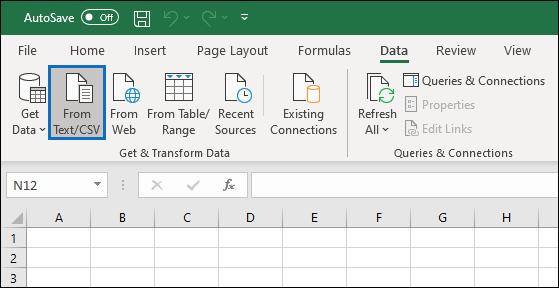
1. Open a blank workbook in Excel for Office 365, Excel 2019, or Excel 2016. 
2. On the Data tab, in the Get & Transform Data ribbon group, select From Text/CSV.

Image

3. Open the CSV file that you downloaded in Step 1. 
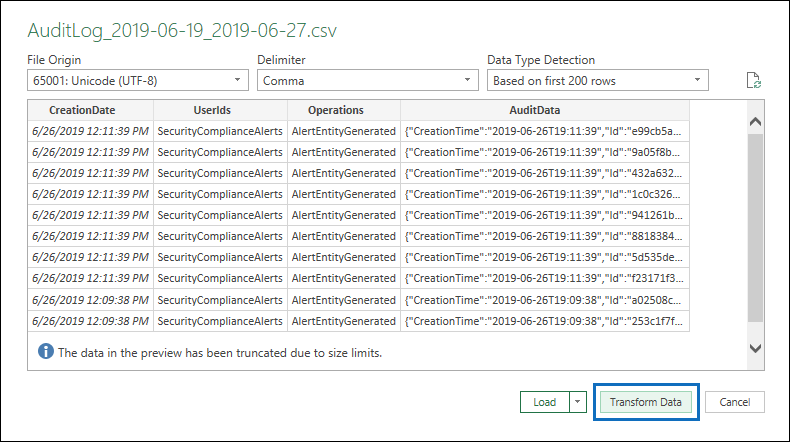
4. In the window that’s displayed, select Transform Data.

image

The CSV file is opened in the Query Editor. There are four columns: Creation Date, User Ids, Operations, and Audit Data. The Audit Data column is a JSON object that contains multiple properties. The next step is to create a column for each property in the JSON object.

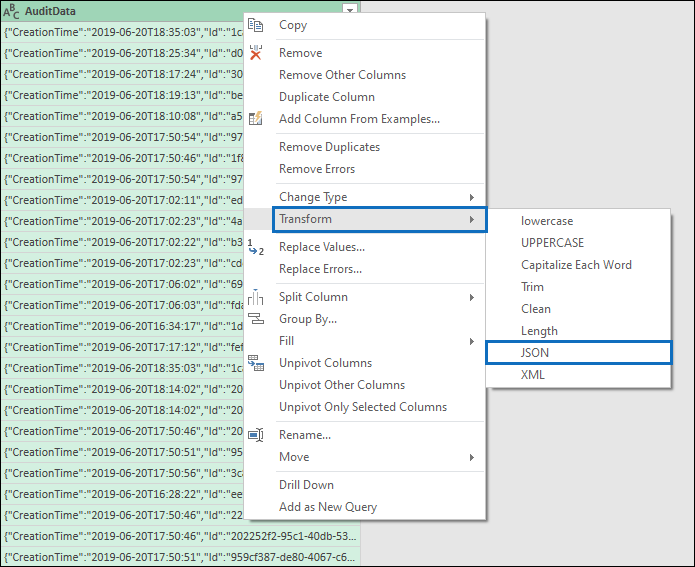
5. Right-click the title in the Audit Data column, select Transform, and then select JSON.

Image

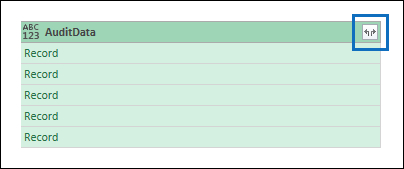
6. In the upper-right corner of the AuditData column, select the expand icon.

Image

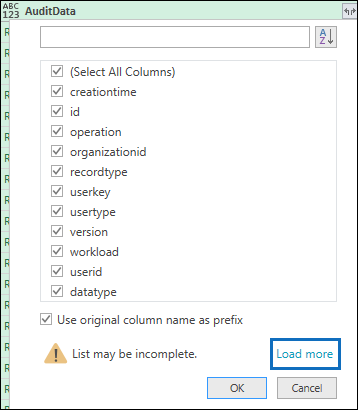
7. Select Load more to display all properties in the JSON objects in the AuditData column.

image

You can unselect the checkbox next to any property that you don’t want to include. Eliminating columns that aren’t useful for your investigation is a good way to reduce the amount of data displayed in the audit log. 

Implementing DLP for secure data sharing in SharePoint and OneDrive

With cyber threats evolving constantly, IT teams face immense pressure to safeguard data from malware, phishing, and insider threats. Microsoft’s Purview platform, equipped with a powerful DLP module, provides a proactive defence. Data Loss Prevention (DLP) is a security solution that helps prevent unsafe sharing and inappropriate transfer of sensitive data. DLP is utilized to protect and monitor sensitive data across both on-premises systems and cloud-based locations within our organizations.

This blog post tackles the critical issue of data security in Microsoft 365. With the ever-growing threat of cyberattacks, protecting sensitive information like social security numbers, credit card data, and “Confidential” documents is paramount.

Microsoft Purview’s DLP module offers a powerful solution to address this challenge. We’ll delve into its importance and provide a step-by-step guide to configure a DLP policy that meets your specific needs.

Scenario:

Block all external sharing of SharePoint and OneDrive items containing sensitive information like Social Security Numbers Credit Card Data etc. and Sensitivity labelled item.

Alerting the Email notification to the security team for every blocked file sharing attempt. User notifications within the interface (if available).
By following our guide, you can gain control over sensitive data sharing and confidently navigate today’s complex cybersecurity landscape.

Step-by-Step Guide to Creating a DLP Policy in Microsoft Purview

This guide walks you through creating a Data Loss Prevention (DLP) policy in Microsoft Purview to prevent accidental or unauthorized sharing of sensitive data in SharePoint and OneDrive.

Step 1: Access the Compliance Portal:
Go to the Microsoft 365 Admin Center and navigate to “Compliance.”In the left-hand pane, find “Data loss prevention” and then “Policies.”

img

Step 2: Create a New Policy:
Click the “Create policy” button.

img

Step 3: Define Policy Details:
Under “Categories,” choose “Custom.” Under “Regulations,” select “Custom policy.”

Click “Next” to proceed. Give a proper policy name and description.

img

img

Step 4: Assign admin units for users or groups:
Similar to the default template approach, assign admin units from Microsoft Entra ID to limit the policy to specific users or groups.

img

Step 5: Enable DLP for SharePoint and OneDrive:
Turn on DLP for “SharePoint sites” and “OneDrive accounts.” Leave other locations disabled. Click “Next.”

img

Step 6: Create and Define DLP Rule:
In “Define policy settings,” ensure “Create or customize advanced DLP rules” is selected. Click “Next” and then “Create rule.”

Give your rule a clear name (e.g., “Block External Sharing of Sensitive Data”). Briefly describe the rule’s purpose.

img img

Step 7: Set Rule Trigger Conditions:
Click “+ Add condition”. Choose “Content is shared from Microsoft 365.” Select “with people outside my organization.” Choose “Content contains” and choose appropriate data types based on your needs. In this case, we’ve selected for sensitive Australian information such as credit card numbers, passport numbers, etc.

img

Step 8: Identify Sensitive Data:
Click “+ Add condition” and set the logic to identify content matching both conditions (AND). Create a new condition group with OR logic (matches at least one condition. Create a new condition group with AND logic (matches at least one condition). Choose “Sensitivity labels” and select the labels based on your needs.

img

Step 9: Block Unauthorized Sharing:
Under “Actions,” choose “Restrict access or encrypt the content.” Select “Block only people outside your organization” to prevent external sharing.

img

Step 10: Notify Users:
Enable “User notifications” to inform users attempting to share sensitive data through a policy tip in Office 365 services. This will notify the user who shared the data.

img

Step 11: Prevent Sharing Overrides:
Ensure “Allow override from M365 services” is not selected to prevent users from bypassing the policy.

Step 12: Set Up Reporting:
Set “Use this severity level in admin alerts and reports” for informational purposes.

Enable “Send an alert to admins when a rule match occurs” to notify admins of potential incidents. Optionally, add email addresses for receiving alerts (e.g., security team). Choose to send alerts for every rule match. You can also enable and add the user to receive incident reports via email when a policy match occurs.

img

Choose the necessary details for incident reports, including the matched information, the location of the match, and the activated rules and policies.

img

Review the DLP Rule After Creation:

img

Step 13: Set Policy mode:
The “State” setting determines when your DLP policy becomes active. It’s recommended to keep the policy off while you’re configuring it and getting approvals. Click Next and then Submit. Click Done.

Here are the available state options:
Run the policy in test mode: You’ll be able to review alerts to assess the policy’s impact. Any restrictions you configured won’t be enforced. Users also receive informative messages to raise awareness about the policy.
Turn the policy on immediately: This enables full enforcement of the policy. After the policy is created, it’ll take up to an hour before any changes are enforced.
Leave the policy turned off: Decide to test or activate the policy later.
Remember: You can change the policy state at any time to adjust your rollout strategy.

img

Step 14: Publish the Policy:
Click “Submit” to finalize and publish the DLP policy.

img

img

Conclusion
By following the outlined steps, organizations can create and implement Data Loss Prevention (DLP) policies in Microsoft SharePoint and OneDrive. These proactive measures significantly enhance data security by preventing accidental or unauthorized sharing of sensitive information. Remember, minimizing the risk of data breaches and ensuring compliance with data privacy regulations require continuous efforts. Regularly monitor policy effectiveness, gather user feedback, and optimize your DLP strategy for a robust security posture in today’s dynamic digital landscape

The Basics of Data Loss Prevention

Microsoft Purview Data Loss Prevention (DLP) helps prevent that by keeping an eye on your organization’s data. It can identify sensitive information like credit card numbers or patient records, and then take action to protect it. DLP policies in Microsoft Purview are a powerful tool for organizations looking to enhance their data security posture and protect sensitive information.

Microsoft offers a range of pre-defined DLP templates tailored to specific countries and regions, such as the US Patriot Act, UK Data Protection Act, or GDPR. These templates come with pre-configured sensitive information types and rules containing conditions and actions. You simply need to assign the template to one or more Microsoft 365 locations. In my experience implementing DLP for organizations, custom policies are frequently utilized.

Data Loss Prevention Apply On:

  • Microsoft 365 services: Like Teams, Exchange Online, SharePoint Online, and OneDrive for Business accounts.
  • Office applications: such as Word, Excel, and PowerPoint.
  • Endpoints: Devices like Windows 10, Windows 11, and macOS computers.
  • Power BI: Detecting sensitive data uploaded to Power BI datasets.
  • Monitoring on-premises file shares and SharePoint.

Benefits of using DLP policies in Microsoft Purview:

  • Minimize data breaches: DLP helps prevent sensitive data from being accidentally or intentionally shared with unauthorized users.
  • Meet compliance requirements: DLP policies can help your organization comply with data privacy regulations like GDPR or HIPAA.
  • Reduce risk of insider threats: DLP can help detect and prevent malicious attempts to steal or leak sensitive data.
  • Increase data security awareness: DLP policies can educate users about the importance of handling sensitive data responsibly.

Here’s a breakdown of how DLP policies work in Microsoft Purview:

  • Identify Sensitive Data: You define what constitutes sensitive data in your organization. This could include things like social security numbers, credit card information, passport numbers, or any sensitive information data classified as “Confidential” based on your internal policies.
  • Set DLP Rules: You create rules that specify what actions to take when sensitive data is detected. These actions can include:
    • Blocking the transfer of the data (e.g., preventing external sharing)
    • Encrypting the data
    • Sending alerts to administrators or users
    • Displaying policy tips to users informing them about the sensitivity of the data
  • Apply DLP Rules: You define where these DLP rules will be enforced. This could include locations like SharePoint sites, OneDrive accounts, emails, or even on user endpoints (laptops).

Features of a DLP Policy:

1. Build Your DLP Policy with templates or custom policies:

In the policy template, there are different templates available to protect different types of information.

image

Financial: Secure financial information by preventing users from sharing details like credit card numbers, bank account numbers, debit card numbers, social security numbers, and more.
Medical and Health: Stop users from sharing confidential and important information.
Privacy: Safeguard information such as license numbers, passport numbers, tax file numbers, national IDs, insurance numbers, and other sensitive details.
Custom: You can create a custom policy from scratch in which you choose the type of content to protect and how you want to protect it.
For more details visit the (https://learn.microsoft.com/en-us/purview/dlp-policy-templates-include?redirectSourcePath=%252farticle%252fc2e588d3-8f4f-4937-a286-8c399f28953a)

2. Define Policy Scope:
A Data Loss Prevention (DLP) policy can identify and safeguard items containing confidential data across various locations. When establishing such a policy, you have the option to designate the specific location(s) where you wish to implement your conditions.

image

3. Define DLP Protection settings
Data loss prevention (DLP) rules act like shields for your sensitive information. You choose what kind of information needs protection by creating these rules.
First, you define the conditions that trigger the rule. This could be finding a Sensitive information in a document.

image

Then, you set the instructions actions that follow. If the rule detects sensitive information, users won’t be able to share the document with anyone outside the company.

image

4. User Notifications
Sharing sensitive information with unauthorized individuals can be a mistake. To help everyone stay informed and protect your organization’s data, you can enable user notifications. When someone tries to share sensitive information externally, they’ll receive a friendly reminder. This includes an email and a clear policy tip explaining why sharing isn’t allowed. You can also customize these notifications! Choose who gets notified (admins or specific teams?), craft a clear email subject and message, and tailor the policy tip text for maximum impact.

image

5. User Overrides
DLP policies offer flexibility In some cases, users might need to share information that triggers a DLP rule. To handle these situations, you can allow users to override the policy.
There are two options for overrides:
Quick Share: Users can proceed without providing a reason.
Explain It Out: Users can provide a business justification for sharing the information.

image

6. Activity Explorer (Reporting Features)

The Activity Explorer tab within DLP lets you monitor all user actions related to sensitive data. You can also filter this activity based on specific criteria, such as policies or sensitivity labels, to focus on what matters most. (Shown below)

image

View Alert Details by Selecting an alert from the “Alert” tab.

image

Click “View Details” to get more information about the alert.

image

This section provides an overview of the triggered alert. You can even assign the alert to a specific user and add comments for further clarification.

img

Click “Events” tab to get a overview of actions taken on the content that triggered the alert.

image