Programatically setting Site Quota Templates

Setting Site Quota Templates using PowerShell

Once sites are created, it can be a challenge to change the quota template. Here’s a way to rip through your site collections and change the quota. In the script below, I grab the Web Application, and go through all the Site Collections, but filter on them using -Match. The trick is to first ensure you are using the Content Service associated with the web application.

   $TemplateName = "MyQuota"
$webAppName = "http://yourWebApp"
$webApplication = Get-SPWebApplication $webAppName
$sFilter = "$($webAppName)/MyPath*"
 
$TemplateName = "MyQuotaTemplate"
$contentService = [Microsoft.SharePoint.Administration.SPWebService]::ContentService
$quotaTemplate = $contentService.QuotaTemplates[$TemplateName]
 
if ($quotaTemplate -ne $null)
{
$ss = $webApplication.Sites 
$sCount = $ss.count
for ($i =0; $i -lt $sCount; $i++)
{
    $site = $ss[$i];
    if ($site.url -match $sfilter)
    {
        try
        {
            $site.set_Quota($quotaTemplate)
            Write-Host "Set Quota for $($site.url)"
        }
        catch
        {
            Write-Host -ForegroundColor DarkRed "Error setting Quota for $($site.url)"
        }
    }
    $site.dispose()
}
}

Automating Creation of Per-Location Views

Automating the Creation of Per-Location Views

SharePoint offers the capability of customizing the Views in Folders.  This can be done manually.  This article will show you how to automate the configuration of views for each folder in a document library.

Configuring Per-Location Views Manually

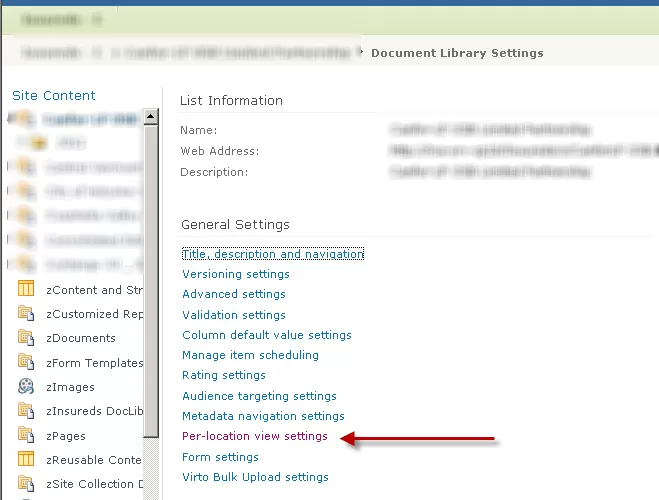
To configure Per-Location Views manually, one must have at least library designer privileges. First, go into Library Settings, then select Per-Location Views:

img

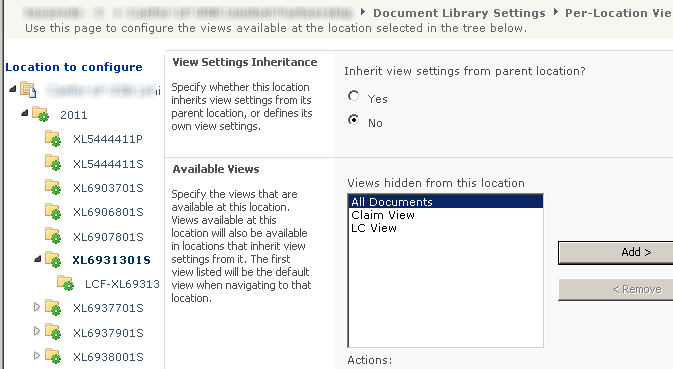
For any View configured for the location, it appears as a folder with a green mark, indicating a custom Per-Location view:

Per-Location View

How SharePoint Stores Per-Location Views

SharePoint stores the per-location view information in XML within a specific property (“client_MOSS_MetadataNavigationSettings”) of the RootFolder object of the list.   Here’s how to extract this XML and save it to a file for examination:

$RF=$List.RootFolder

$RF.Properties["client_MOSS_MetadataNavigationSettings"] > "L:1 before.xml"

Let’s look into the XML and see how Views are stored in this special property.  First note below that Views are referenced by the View GUID, the relative View URL, as well as an Index.  Positive indexes are available Views.  Negative Indexes are hidden Views, and the 0 index is the default View:

img


The approach

The basic approach is to grab the XML described above, clean it up from any previous customization, and add folder nodes; and for each folder, add Views.

Step-by-Step, programmatically adding a Per-Location View

First, let’s grab the List, and Folder objects:


  $web=get-spweb http ://SharePoint/MyWeb $lists=$web.lists
$list=$lists["ListName"]
$Folders=$list.Folders
$ViewSet="All Documents,EMail,Claim View,LC View,UW View"
$ViewArr=$ViewSet.split(",")

We can always save the XML for reference:

 $RF.Properties["client_MOSS_MetadataNavigationSettings"] > "L:1 before.xml"

Now, let’s grab the Views object, the Root Folder object, and the per-location Views cast as XML:

 $Views=$list.Views
$RF=$List.RootFolder
$x=$RF.Properties["client_MOSS_MetadataNavigationSettings"]

Now let’s wipe out any previous per-location Views customizations.  We will simply remove all nodes in the Folder

$x.MetadataNavigationSettings.NavigationHierarchies.FolderHierarchy.removeall()

Anytime we want to examine the XML, we can output it to file, using the InnerXML:

$x.InnerXml > "L:1 after.xml"

Normally, we would grab the  XMLElement using $x.MetadataNavigationSettings.NavigationHierarchies.FolderHierarchy, but this returns a string for a null or initialized node.
So instead, we grab the parent (NavigationHierarchies), then select the underlying single nodes:

$NavHierNode = $x.MetadataNavigationSettings.NavigationHierarchies

$ViewSettingsNode = $NavHierNode.SelectSingleNode(“FolderHierarchy”)

I’ve created Folder Content Types, by inheriting from the Folder Content Type.  This approach allows Folders to hold useful metadata and be selectable by users on creation.  In this case, I use the Folder Content Type to determine the View.  You can make the choice instead on the folder URL or metadata.  I simply loop through all folders, and select the preferred default folder based on the location:

for ($i=0; $i -lt $FolderCount; $i++)
{
 $Folder=$Folders[$i]
 
 switch ($Folder.ContentType.name)
 {
  "Underwriting Folder"  { $DefaultViewName= "UW View"}
  "Claim Folder"   { $DefaultViewName= "Claim View"}
  "Policy Folder"  { $DefaultViewName= "UW View"}
  "Loss Control Folder" { $DefaultViewName= "LC View"}
  default   { $DefaultViewName= "All Documents"}
 }

I grab the actual view, but take care to fall back on All Documents if the View is not found:

 $View=$Views[$DefaultViewName];
 
 if ($View -eq $null)
 {
  Write-Host "View ($($DefaultViewName) not found, falling back to All Documents"
  $DefaultViewName= "All Documents"; # logic assumes this is always there
  $View=$Views[$DefaultViewName];
 }
 
Now, we want to make note of the folder details for use in building the XML.  As you recall there are three aspects to the View of interest: the GUID, ID and relative URL:
[sourcecode language="powershell"]
$FolderGuid=$Folder.UniqueId
 
 $FolderID= $Folder.id
 
 $FolderURL= $Folder.Url;

So let’s start with the folder entry in the XML, by creating a new folder node, and populating it’s attributes, and first element, for the default view:

 $NewFolderNode=$X.CreateElement("ViewSettings");
 $NewFolderNode.SetAttribute("UniqueNodeId",$FolderGuid);
 $NewFolderNode.SetAttribute("FolderId",$FolderID);
 
 $NewViewNode=$X.CreateElement("View");
 $NewViewNode.SetAttribute("ViewId",$View.id);
 $NewViewNode.SetAttribute("CachedName",$View.Title);
 $NewViewNode.SetAttribute("Index","0");  #0 forces view to be default
 $NewViewNode.SetAttribute("CachedUrl",$View.Url);
 $NewFolderNode.AppendChild($NewViewNode);

Finally, we can add all the other Views for the folder. Note we start the index from 1, after the 0 default view. Now’s where the array of Views created earlier comes into use. I always like starting with a comma separated list, converting these into an array for easy use. We make sure not to add the default View a second time:

 $Index=1; # we want in increment index for each view for sequence
 foreach ($ViewName in $ViewArr)
 {
  $View=$Views[$DefaultViewName];
  if ($View -eq $null)
  {
   Write-Host "View ($($DefaultViewName) not found, secondary view, skipping" #never do a continue within foreach!
  }
  elseif ($ViewName -ne $DefaultViewName) #make sure to skip adding the default view as a secondary view
  {
   $View=$Views[$ViewName];
 
   $NewViewNode=$X.CreateElement("View");
   $NewViewNode.SetAttribute("ViewId",$View.id);
   $NewViewNode.SetAttribute("CachedName",$View.Title);
   $NewViewNode.SetAttribute("Index",$Index.tostring());  #0 forces view to be default
   $NewViewNode.SetAttribute("CachedUrl",$View.Url);
   $NewFolderNode.AppendChild($NewViewNode);
   $Index++; #view sequence numbering
  }
 }

$ViewSettingsNode.AppendChild($NewFolderNode)
Finally, we save our XML.  Note both update() are required:

$RF.Properties["client_MOSS_MetadataNavigationSettings"]=$x.InnerXml.ToString();
$RF.Update()
$list.Update() #both property and List update are required

[/sourcecode ]

See: Technet reference
Let’s finally put it all together:
[sourcecode language=”powershell”]
$web=get-spweb href=”http ://SharePoint/MySite”
$lists=$web.lists
$list=$lists[“MyListName”]
$Folders=$list.Folders

$ViewSet=”All Documents,EMail,Claim View,LC View,UW View”
$ViewArr=$ViewSet.split(“,”)

$WipeFolderDefaults=$true; # This is optional

$Views=$list.Views
$RF=$List.RootFolder
#$x.get_Properties()
[xml][/xml] $x=$RF.Properties[“client_MOSS_MetadataNavigationSettings”]

if ($WipeFolderDefaults)
{
try #if it fails, it is because the node just isn’t there, which might mean no folders defined, which is fine.
{
$x.MetadataNavigationSettings.NavigationHierarchies.FolderHierarchy.removeall()
}
catch
{
write-host “nothing to wipe, we are good to go!”
}
}

$FolderCount=$Folders.count;
$NavHierNode = $x.MetadataNavigationSettings.NavigationHierarchies
$ViewSettingsNode = $NavHierNode.SelectSingleNode(“FolderHierarchy”) #grabs it as XMLNode, instead of string, if empty node
for ($i=0; $i -lt $FolderCount; $i++)
{
$Folder=$Folders[$i]
switch ($Folder.ContentType.name)
{
“Underwriting Folder” { $DefaultViewName= “UW View”}
“Claim Folder” { $DefaultViewName= “Claim View”}
“Policy Folder” { $DefaultViewName= “UW View”}
“Loss Control Folder” { $DefaultViewName= “LC View”}
default { $DefaultViewName= “All Documents”}
}

$View=$Views[$DefaultViewName];
if ($View -eq $null)
{
Write-Host “View ($($DefaultViewName) not found, falling back to All Documents”
$DefaultViewName= “All Documents”; # logic assumes this is always there
$View=$Views[$DefaultViewName];
}

$FolderGuid=$Folder.UniqueId
$FolderID= $Folder.id
$FolderURL= $Folder.Url;

$NewFolderNode=$X.CreateElement(“ViewSettings”);
$NewFolderNode.SetAttribute(“UniqueNodeId”,$FolderGuid);
$NewFolderNode.SetAttribute(“FolderId”,$FolderID);

$NewViewNode=$X.CreateElement(“View”);
$NewViewNode.SetAttribute(“ViewId”,$View.id);
$NewViewNode.SetAttribute(“CachedName”,$View.Title);
$NewViewNode.SetAttribute(“Index”,”0″); #0 forces view to be default
$NewViewNode.SetAttribute(“CachedUrl”,$View.Url);
$NewFolderNode.AppendChild($NewViewNode);
$Index=1; # we want in increment index for each view for sequence
foreach ($ViewName in $ViewArr)
{
$View=$Views[$DefaultViewName];
if ($View -eq $null)
{
Write-Host “View ($($DefaultViewName) not found, secondary view, skipping” #never do a continue within foreach!
}
elseif ($ViewName -ne $DefaultViewName) #make sure to skip adding the default view as a secondary view
{
$View=$Views[$ViewName];

$NewViewNode=$X.CreateElement(“View”);
$NewViewNode.SetAttribute(“ViewId”,$View.id);
$NewViewNode.SetAttribute(“CachedName”,$View.Title);
$NewViewNode.SetAttribute(“Index”,$Index.tostring()); #0 forces view to be default
$NewViewNode.SetAttribute(“CachedUrl”,$View.Url);
$NewFolderNode.AppendChild($NewViewNode);
$Index++; #view sequence numbering
}
}

$ViewSettingsNode.AppendChild($NewFolderNode)

}

#$x.InnerXml > “L:PowerShellPer Location Views2a.xml”

$RF.Properties[“client_MOSS_MetadataNavigationSettings”]=$x.InnerXml.ToString();
$RF.Update()
$list.Update() #both property and List update are required

Writing To ULS From Within C#

Writing to ULS From Within C#

Event Receivers and Feature Receivers are notoriously hard to debug.  Here’s a little gem to ease your debugging migraines:

Here’s the function I use, just to simplify subsequent calls:

 private void LogOut(TraceSeverity Level, string OutStr)
        {
            SPDiagnosticsService.Local.WriteTrace(0, new SPDiagnosticsCategory("SuperRouter Updated", Level, EventSeverity.Error), TraceSeverity.Unexpected, OutStr, null);
        }

Here’s  what the call looks like. Note you can set the severity level.  I sprinkle these throughout the code and dump data etc throughout

LogOut(TraceSeverity.High, "Item Updated Event Trapped!");

Here’s the reference to use in the code:

using Microsoft.SharePoint.Utilities;
using Microsoft.SharePoint.Administration;

If you’d like a class to reuse, here it is:

public class MyLogger
   {
       public static void LogOut(TraceSeverity Level, string OutStr)
       {
           SPDiagnosticsService.Local.WriteTrace(0, new SPDiagnosticsCategory("JoelER", Level, EventSeverity.Error), TraceSeverity.Unexpected, OutStr, null);
       }
   }

Taxonomy Internals Deep Dive

The SharePoint Managed Metadata Service centrally manages Taxonomies within SharePoint. More than one service application can exist within a farm. Each uses the traditional service connection proxy to associate with a web application.

Each service application has its own database where terms are stored.

To navigate using the object model, first we grab a session and a termstore:


 TaxonomySession session = new TaxonomySession(site); //site is an SPSite object
TermStore defaultKeywordStore = session.DefaultKeywordsTermStore;

Get the default site collection TermStore associated with the provide site.


 TermStore defaultSiteCollectionStore = session.DefaultSiteCollectionTermStore;
TermStoreCollection termStores = session.TermStores;

To get a term, we have a lot of options:


TermCollection terms = session.GetTerms(prefix, true, StringMatchOption.StartsWith, 4, true);
// parameter 2: Only search in default labels, false does broader scan
// 4: The maximum number of terms returned from each TermStore
// parameter 4: The results should not contain unavailable terms

We can even search by a custom property name:

  TermCollection terms = session.GetTermsWithCustomProperty( customPropertyName, true);
Terms.count() will give you the total terms returned.  If you know you are doing a precise lookup, then the term you are looking for is found in terms[0].
[/sourcecode ]
 
switching to PowerShell, here's how to add a term:
[sourcecode language="powershell"]
 $taxonomySession = Get-SPTaxonomySession <em>-Site</em> $TaxSite
 $termStore = $taxonomySession.TermStores["Managed Metadata Service"]
 $group = $termStore.Groups["Claims"]
 
 $termSet = $group.TermSets | Where-Object { $_.Name -eq $termSetName }
if($termSet -eq $null)
     {
          try
          {
              $termSet = $group.CreateTermSet($termSetName) 
              $termStore.CommitAll()
              Write-Host "Created Successfully $($termSetName) TermSet"
          }
          catch
          {
              Write-Host "Whoops, could not create $($termSetName) TermSet"
          }
 
$Lev1TermObj=$termSet.createterm($Lev1Term,1033)
# make it available for tagging
$Lev1TermObj.set_IsAvailableForTagging($true);
# set a description
$Lev1TermObj.SetDescription($Description,1033)
[/sourcecode ]

Renaming terms

There’s a reason why there’s no rename method in the taxonomy object model. Instead there’s a way to “move” a term. To move from one to another, make sure both are term objects, and do: [sourcecode language=”powershell”] $Lev1TermObj.Move($Lev2TermObj) [/sourcecode ] It’s overloaded to allow you to move it to the top level of a term set. Rather than “rename” a term, instead a new label is applied to the term, and the new label can be made the default value. In this case, I added a new label for the term, then made it the default for our language (1033): [sourcecode language=”powershell”] $Lev1TermObj.CreateLabel(“Joel new Term”,1033,$true)

Note the UI does not let you set a new term as the default. Your only option is to exchange the two values of the labels.

The terms can be seen:

$Lev1TermObj.GetAllLabels(1033)
[/sourcecode ]
There is Timer Job that runs hourly called Taxonomy Update Scheduler

This updates Site Collections with the latest term changes made to the Enterprise Metadata Service. The amazing thing is this Timer Job updates the term, even if a document is checked out. The document remains checked out, but the term value changes.

The wonderful thing about the approach to add a default label rather than rename a term is that the user can find the term searching for any label, yet it is the default label that will appear to the user in the user interface.


Smart Filtering in BCS

Smart Filtering in Business Connectivity Services

Business Connectivity Services allows the rapid creation of reference connections to live legacy data such as tables or views in SQL Server. The wildcard filtering is great, but what if you want to customize it?

Smart MyFilterParm Filtering in BCS

Using a stored procedure requires deviating from the easy out-of-box dynamic SQL and defining the input parameter(s).

Here’s the pseudocode T-SQL for the smart MyFilterParm filtering.

  • Note that first up to 10 MyFilterParms are listed, based on matching on a specific field, then 50 more generic wildcard matches are matched.

This has the advantage of a high-speed response, even if a user enters the letter “a” for search, making long-distance (inter-farm) lookups more responsive.

For the Union, note the fields from each Select need to match precisely in sequence, name and type.

Best is if the exact same fields and names are returned that we are using today.

 CREATE procedure dbo.sp_MySmartSearch
@MyFilterParmSmart nvarchar(255) = null
AS
SELECT 10 FROM [MyDataBase].[dbo].[CompanyView]
WHERE MyFilterParm LIKE @MyFilterParmSmart + '%'
UNION
SELECT 50 FROM [MyDataBase].[dbo].[CompanyView]
WHERE CompanyNM LIKE '%' + @MyFilterParmSmart + '%'

Once this Stored Procedure is written, export the BDCM (using SPD) and edit the XML to provide hard-coded reference to the above Stored procedure, MyFilterParm filter parameter, and fields returned. The BDCM import is not done in SPD, but is instead done in Central Admin in the BCS service app config. Here’s the XML Pseudocode to replace within the Methods XML group in the BDCM (important parts highlighted in larger font):

  &lt;Property Name="BackEndObject" Type="System.String"&gt;sp_MySmartSearch
&lt;Property Name="BackEndObjectType" Type="System.String"&gt;SqlServerRoutine
&lt;Property Name="RdbCommandText" Type="System.String"&gt;[dbo].[sp_MySmartSearch]
&lt;Property Name="RdbCommandType" Type="System.Data.CommandType, System.Data, Version=2.0.0.0, Culture=neutral, PublicKeyToken=b77a5c561934e089"&gt;StoredProcedure
&lt;Property Name="Schema" Type="System.String"&gt;dbo
&lt;Parameter Direction="In" Name="@MyFilterParmSmart"&gt;
  &lt;TypeDescriptor TypeName="System.String" AssociatedFilter="Wildcard" Name="@MyFilterParmSmart"&gt;

You’ll find the XML much easier to edit in Visual Studio (any version) as the nesting is a bit much to handle in Notepad.

MSDN offers a similar example of a stored procedure, in this case, designed to return precisely one row:

https://msdn.microsoft.com/en-us/library/ee558376.aspx


SharePoint Document IDs

SharePoint Document IDs

The SharePoint Document ID Service is a new feature of SharePoint 2010 that offers a number of useful capabilities but carries some limitations.  Let’s dig a bit deeper and see what it does and how it works.

One challenge for SharePoint users is that links tend to easily break. Rename a file or folder, or move the document, and a previously saved or shared link will not work.

By tagging a document with an ID, SharePoint can start referencing documents using this ID, even when the underlying structure beneath it has changed.

SharePoint can accept a link with this ID, by referencing a dedicated page on each site that takes care of finding the the document.

This page is named DocIDRedir.aspx.  Here’s what a URL might look like:

“http: //%3csitecollection%3e/%3cweb%3e/_layouts/DocIdRedir.aspx?ID=XXXX”

There’s also a Document ID web part that’s available for users to enter a Document ID.

This is used most prominently when creating a Records Center site, which is based on an out-of-box website template.

The Document ID Service is enabled at the Site Collection level and assigns Document IDs that are unique only within the site collection.

There is a prefix available for configuration that is most useful when assigned uniquely for each Site Collection to ensure uniqueness across your web application and even farm.

If you have more than one farm, it makes sense to provide an embedded prefix to indicate the farm, to ensure uniqueness globally.

One significant aspect of SharePoint’s architecture is its extensibility through custom development.

Organizations often leverage the expertise of a SharePoint development company like Reality Tech to tailor SharePoint to their specific needs.

These SharePoint development services can include custom workflows, integrations with other systems, and user interface enhancements, all of which can benefit from the stability and reliability provided by SharePoint Document IDs.

Setting Document ID

Once the Document ID Service is enabled, every new or edited document instantly gets a Document ID assigned.

However, historical documents do not get an immediate Document ID assignment.  The assignment of Document IDs to documents that were uploaded prior to this service being enabled are assigned by a Timer Job called the “Document ID assignment job” that exists at the Web Application level.

By default, this job runs nightly.  This is one of two jobs associated with the Document ID Service, the other being the “Document ID enable/disable job “

When the Document ID Service is enabled for a Site Collection, Event Receivers are automatically installed in each Document Library.

Actually, there is a set of Event Receivers installed for each and every Content Type configured within that document library.

The Event Receiver is called “Document ID Generator” and is configured to be fired synchronously. How to add location link in pdf, there is a separate Event Receiver for the following events:

  • ItemAdded
  • ItemUpdated
  • ItemCheckedIn
  • ItemUncheckedOut

Once a Document ID is assigned, it is changeable through the Object Model, although do so at your own risk.

Before the Document  ID Service is enabled, the Document ID field does not exist to be assigned. If you are migrating from a legacy system that has existing Document IDs, you can first migrate the documents, then the Document ID service is enabled.

This adds the internal Document ID field.  Then before the daily Document ID Assignment job runs (better yet, disable it during this process), we can programmatically take the legacy Document IDs and assign their values to the SharePoint Online IDs.

With the Document ID field populated, the Document ID Service will not overwrite the already set Document IDs.

Note that part of the Document ID Service is to redirect URLs referencing the Document ID.

It turns out, if you manually assign duplicate Document IDs (something that in theory should never occur), the daily Document ID Assignment Job detects this situation, and the DocIDRedir.aspx redirects to a site-based search page that passes in the Document ID.

Under the covers there are three internal components to a Document ID:

  • _dlc_DocIdUrl: fully qualified URL for document referencing the DocIDRedir.aspx along with the lookup parameter
  • _dlc_DocId: The Document ID.  This is the internal property you can directly address and assign as $item[“_dlc_DocId”]
  • _dlc_DocIdItemGuid: DocID related GUID

That completes our tour of the Document ID Service.  I look forward to hearing of others’ experiences with it.

Item Level Permissions

Item Level Permissions

SharePoint has a robust object model supporting security at each level of the farm.  Let’s take a quick tour of some relevant methods and properties around item level reporting.

All securable objects have a method named GetUserEffectivePermissionInfo, which is defined in the base class SPSecurableObject.

This method returns back an SPPermissionInfo object which we can use to inspect the role definition bindings and corresponding permission levels.

SPSecurableObject is imple,eented at the SPWeb, SPList, and SPLIstItem class level, hence how we assign permissions if needed at the site level.

We can loop through the SPRoleAssignments objects via the RoleAssignments property. This will give us information about how the user is given access to the resource. This returns the Member (the account or group), the RoleDefinitionBindings (permission level). This is an excellent place to start if you are looping through each item.

Next can look at the RoleDefinitionBindings property which returns back a collection of SPRoleDefinition objects that tell us about the type of access granted.

 Other important properties for reporting security include:

  • HasUniqueRoleAssignments, or the method returing the same thing: get_HasUniqueRoleAssignments()
  • RoleDefinitionBindings: collection of SPRole Definition objects returned.
  • IsSiteAdmin : a property of the user, indicates if a user is a Site Collection Admin ,which includes explicit permissions to everything
  • SPListItem.FirstUniqueAncestorSecurableObject: Retrieves the first unique ancestor if it has unique role assignments otherwise returns the first parent object (folder, list, or Web site) that has unique role assignments.
  • SPItem.AllRolesForCurrentUser

For a more general view of Security permissions in SharePoint, please see this TechNet article.

Consolidation of Application Pools

Automated Consolidation of Application Pools

SharePoint leverages IIS, and runs within Application Pools.  One should recognize up front that there are two distinct categories of Application Pools used in SharePoint; Web Application pools and Service Application Pools.

Overview

Application Pools consume an estimated 80-100MB RAM each, and possibly a lot more, depending on usage.  These appear as w3wp.exe processes in Task Manager.  When you have a number of w3wp processes running, it can be hard to tell them apart; which is for a given web or service application?  Here’s a way to get the PID (Process ID) for each worker process, along with the user-friendly name, so you can correlate each w3wp process:


c: 
cd C:WindowsSystem32inetsrv appcmd.exe list wp
[/sourcecode ]
A nice listing of Web Application Pools is generated by this single command.  It ensures the fields are not truncated, and is extensible to allow display of any properties/columns you wish:
[sourcecode language="powershell"]
get-SPWebApplication | select displayname, url, applicationpool | format-table -autosize | out-string -width 2000
[/sourcecode ]
Note the CmdLet "get-SPWebApplication".  For Service Application Pools, the CmdLet is "Get-SPServiceApplicationPool", as in:
[sourcecode language="powershell"]
Get-SPServiceApplicationPool | select Id, Name, DisplayName, processaccountname
[/sourcecode ]

Within IIS, the Service Application Pools are identified by GUID. Their mapping can be explored individually by examining the application pool binding, but this is a bit laborious.

Removing a Service Application Pool

To remove a Service Application Pool by name, you can use: [sourcecode language=”powershell”] Remove-SPServiceApplicationPool -Identity “Your Orphaned SharePoint Service Application Pool Name”

[/sourcecode ]
My own preference is to first consolidate the application pools, then in IIS quiesce the desired application pools, and only once things are truly running smoothly, they can be removed. It is important to do the removing and adding in PowerShell and not directly in IIS. This will ensure that the correct IIS configuration gets propagated to all current and future WFEs (Web Front Ends).

Consolidating Web Application Pools programmatically

Consolidating Web Application Polls is quite easy. If you do not have security driven segregation of Application Pools, you can consider doing so. Note I have received conflicting advice on doing this. Todd Klindt who I hold in the highest regard recommends considering consolidation. Microsoft does advise quite a low maximum number of Application Pools, yet their support staff have advised segregation.

First let’s grab an existing Application Pool, and simply reassign it to the target Web Application Pool:

[sourcecode language="powershell"]
$sourceWebAppPool = (Get-SPWebApplication &lt; URL of a webapp whose application pool you want to use&gt;).ApplicationPool
$webApp = Get-SPWebApplication &lt; URL of the web application you want to change&gt;
$webApp.ApplicationPool = $sourceWebAppPool
$webApp.ProvisionGlobally()
$webApp.Update()

iisreset

Lather, rinse, and repeat for each of your Web Apps to be consolidated…

Note that there is no SharePoint CmdLet for creating an Application Pool.  You can use the IIS CmdLet, but I am not convinced this is a safe method, as right away I can see the service account is an IIS Service Identity reference, and the application pools have a different type and cannot be assigned to a web application directly.   here’s the CmdLet for reference:

Import-Module WebAdministration
$appPool = New-WebAppPool “My new App Pool”
[/sourcecode ]
If you need to segregate previously consolidated web application application pools, the following round-about procedure is safe and works:

  1. Create a brand new temporary Web Application and associated pool
  2. Reassign your target web app’s pool, as described above
  3. Destroy the temporary Web Application

The sequence is key.  If you destroy the temporary web application, the associated pool is destroyed with it, because there are no other associated applications.  In contrast, once you assign a second web application to this new application pool, the application pool will not be destroyed when the temporary web application is removed.

Consolidating Service Application Pools programmatically

On some farms I’ve inherited, there is a profusion of unnecessary Service Application Pools.  Note there are reasons to isolate distinct service application pools, generally around security and multi-tenancy.

I wanted to consolidate my Service application pools but in a safe and programmatic manner.  While you can change the account associated with a service application, there is the risk that the new service account won’t quite have the necessary access.  When SharePoint does automatically grant access to the new service account, it won’t remove access from the original service account.  Lastly, one needs to make sure the new service account is configured as a managed account.  Lastly, SharePoint doesn’t support managed service accounts for all service applications.  Exceptions do include the User Profile Service ADSync account, unattended user accounts (Excel, Visio, PerformancePoint), search crawl accounts (Foundation, Enterprise, and FAST), and the two Object Cache Portal Accounts (which are configured for each Web Application for performance reasons).

Not every Service Application runs under an Application Pool; some run under the Farm’s pool, and hence can’t be directly reassigned. Farm-wide service applications have one and only one instance in the farm.  So the Security Token Service Application, Web Usage Application (WS_UsageApplication), State Service and Application Registry Service Application don’t run under their own Application Pools, and their CmdLets are simpler.  So while one can create multiple Session State Service Applications and corresponding databases, there’s only one State Service Application.  The script below lists them by name in an array and makes sure not to even try to remap these.  For good measure I include the FAST Content Service Application in this category.  Note yours may be named differently.

Next, I wanted to start with a clean Service Application Pool named clearly denoting the desired service account.


$MyRefAppPool=new-spserviceapplicationpool -name “SPService Service Application Pool” -account “YourDomainspservice”
$SPaps = get-spserviceapplication
for ($i=0;$i -lt $SPaps.Count; $i++)
{
$SPap = $SPaps[$i];     
#Some service applications run at the farm level and don’t have selectable application pools, hence is it wiser to filter these out up front.
if (@(“SecurityTokenServiceApplication”,”Application Registry Service “,”FASTContent”,”State Service”,”WSS_UsageApplication”,””) -notcontains $SPAP.DisplayName)
{
try
{
$testAppPool=$SPAp.get_applicationpool();
#Don’t mix &amp; match the application pools and accounts, best is to consolidate along the lines of existing process accounts, to avoid permissions issues
if ($testAppPool.ProcessAccountname -eq $MyRefAppPool.processaccountname)
{
write-host “Processing  $($SPAp.name) because it has the target process account: $($MyRefAppPool.processaccountname)$SPAp.set_applicationpool($MyRefAppPool)
$SPAp.update()  #update() is actually required.  You will notice a processing delay during the update
}
else
{
write-host “Skipping $($SPAp.name) because it has a different process account: $($SPAp.get_applicationpool().ProcessAccountname)}
}
catch
{
$testAppPool=$null;
write-host “Skipping $($SPAp.name) because it had an error”
}
}
}
[/sourcecode ]

An IISReset at this point is advisable. Lastly, you can go into IIS after running this, view Application pools, and “Stop” the GUID named Application Pools with zero associated Applications. Another IISReset is advisable to ensure you are recovering your RAM.

For a more general overview of Application Pool configuration, please see TechNet.

Gradual Site Collection Deletion

Gradual Site Collection Deletion

I had a mission to achieve overnight; move 28 site collections into a new managed path, as well as rename the 28 associated content databases.   Pretty straightforward to do, and to script in advance to run in stages:

  1. Backup site collections
  2. Delete site collections
  3. Dismount content databases
  4. Rename content databases and shuffle around underlying storage including FILESTREAM RBS location
  5. Create the new managed path; reset of IIS
  6. Remount 28 content DBs
  7. Delete the old managed path
  8. Restore the 27 content databases (this is where tinkling glass is heard, followed by painful silence)

After enough jolt cola to get that turtle to beat the hare fair and square, I got to the bottom of the problem.  First the problem.  The site collections could not be restored into their original database, as the site collection purportedly already existed there.  Even though it was deleted.

By midnight I gave up, and did the 28 Restore-SPSite into any random content databases, tossing organization and structure to the winds (temporarily), knowing I’ve got gads of available storage, knowing once I got to the bottom of the issue, a simple set of move-spsite commands would set things right.  No, I don’t like randomness, but I also like a few winks of sleep and happy users…

Now the cause.  I’m running SharePoint 2010 SP1, which has the ability to recover deleted site collections (not through the UI, but only through PowerShell).  I used the -gradualdelete option, thinking I would be nice and gentle with a production farm.  Here’s a sample of my delete commands, where I also disable prompting:

 Remove-spsite&amp;amp;nbsp; href="http ://SharePoint/div/clm/int/A/" &amp;amp;nbsp;-confirm:$false -gradualdelete

Here’s the kicker.  After the delete, the site collection is indeed still there.   It sticks around actually for the duration of the the Recycle Bin duration (default 30 days).  There’s one good way to see, let’s dive into the forbidden content database, and have a peek:

 SELECT [DeletionTime]
,[Id]
,[SiteId]
,[InDeletion]
,[Restorable]
FROM [Content_mydivision_a].[dbo].[SiteDeletion]
where (Restorable=1)

Restorable=1 indicates this site collection could be restored.

The solution?  Well, it’s not the recycle bin job, that has no effect on this.  There is a gradual delete job at the web application level, but that won’t help us either; at least not just yet.  First you have to use the remove-spsite CmdLet to remove each site permanently.  Here’s the syntax:

remove-spdeletedsite f5f7639d-536f-4f76-8f94-57834d177a99 -confirm:$false

Ah, you don’t know your Site Collection GUIDs by heart? well, me neither, I prefer more useful allocation of brain cells, so here’s the command that will give you the Site Collection GUIDs that have been (partially) deleted:

  get-spdeletedsite -webapplication "http ://SharePoint/"

So, you got your partially deleted GUIDs, you diligently did a remove-spdeletedsite for each, but the Restore-SPSite still will not work.  Now’s the time to run the handy-dandy Gradual Delete timer job for your web application, in Central Admin, Monitoring.  First thing you might notice is the job is taking a bit of time to run.  That’s good, it’s doing something for you, and actually triggering the Content DB Stored Procedure called proc_DeleteSiteCoreAsync.  It actually deletes in batches.

Here’s how to wipe out all these mildly annoying site collections from your recycle bin for a web application:

  get-spdeletedsite -webapplication "http://ma-srv-sp10/" | Remove-SPDeletedSite

At this point your Restore-SPSite will work to your target content database, and if you played SharePoint Roulette like me and restored to a random location, a move-SPSite will make fast work of putting things where they should be.

More information on the Gradual Deletion Timer Job can be found in this Technet Article by Bill Baer

Reporting on “Anonymous” surveys

Reporting on Anonymous surveys

SharePoint enables the creation of anonymous surveys, but how anonymous are they?   If you want a truly anonymous survey, then you will want to create a new web application that allows anonymous access without authentication.  Here’s a TechNet article with some good guidance on doing that.

If you create an anonymous survey in a web application with authentication, the user information is captured, but is hidden to users, and even within the .NET Object model.   SharePoint will gladly create audit logs of access that can expose the survey use.    Note that a site administrator with Full Control can change a survey to non-anonymous and expose the users.

Using PowerShell, we can temporarily expose the users, report on them, then restore the anonymity.  This is useful when needing to chase down non-respondents to a survey, without exposing which survey was completed by whom.  Here’s the PowerShell I wrote to achieve this.  The console output is structure to allow text-to-column conversion or CSV reading in Excel, then easily pivot-table reporting on the results:

 $web=Get-SPWeb href="http ://SharePoint/sites/EXEC
$lists=$web.Lists;
Write-Host "List or Survey,Creator of List or Survey,List Creation Time,List Edit Time,Person completing Survey,Modified Date of list entry"
for ($i=0; $i -lt $lists.count; $i++)
{
$list=$lists[$i]
if (!$list.get_ShowUser())
{
$reversion=$true;
$list.set_ShowUser($true)
$list.update()
}
else
{
$reversion=$false;
}
 
foreach ($item in $list.Items)
{
Write-Host "$($list.title), $($List.get_author()) , $($List.LastItemModifiedDate), $($List.Created), $($item['Author']),$($item['Created'])"
}
if ($reversion)
{
$list.set_ShowUser($false)
$list.Update();
}
 
}

During the running of the script, the survey becomes non-anonymous briefly, so do consider only running this off-hours
[/av_textblock]