Gradually reducing the Change Log for a Web Application

Safely reducing the Change Log for a Web Application

Content Databases by default contain logs of all change events for 60 days. If your Content Databases are under high loads, consider culling these logs.

In general, reducing really large database tables should be done gradually, to prevent Transaction Log failure due to lack of disk space, leading to failures and rollbacks.

There are two related tables that are trimmed through this operation:
dbo.EventCache
dbo.EventLog

I do not recommend reducing these to less than 30 days, or disabling them. That is because they seem to be used for two purposes by SharePoint itself. One is for User Alerts, the other is by the search incremental crawl, for detecting content changes.

In the script below, I reduce the log duration one day at a time, and wait a full 10 minutes after triggering the daily Change Log cleanup Timer Job to run.

the internal name of the timer job is “job-change-log-expiration”. You can get the list of the internal timer job names by using this CmdLet:

Get-SPTimerJob | select name

Or alternatively, pipe the Web Application into it:

get-SPWebApplication http ://SharePoint | Get-SPTimerJob | select name

Once you get the Timer Job, you can execute it:

 $SubTJ = Get-SPTimerJob "job-change-log-expiration" -WebApplication $wa
$SubTJ.RunNow()

Note that the duration of log retention is stored in type “Timespan”. The format in a string is actually “days.hours.minutes.seconds”, so you can change it to suit your needs.

$wa=Get-SPWebApplication http ://SharePoint
[TimeSpan]$OneDay=[timespan]"1.00:00:00"
[TimeSpan]$TargetDuration=[timespan]"30.00:00:00"
while ($wa.ChangeLogRetentionPeriod -gt $TargetDuration)
{
    $wa.ChangeLogRetentionPeriod=$wa.ChangeLogRetentionPeriod-$OneDay
    $wa.Update()
    $SubTJ = Get-SPTimerJob "job-change-log-expiration" -WebApplication $wa
         $SubTJ.RunNow()
    Write-Host -ForegroundColor DarkGreen "Change Log Retention Period reduced by a single day to $($wa.ChangeLogRetentionPeriod.Days)"
    Start-Sleep -s 600
}
 
Write-Host -ForegroundColor DarkRed "Already reduced the Change Log Retention Period to target"

Adding Banding in a CQWP

CQWP Banding using XLST

The Content Query Web Part aggregates SharePoint content. Banding can be added by customizing the associated XSLT in a file called ItemStyle.XSL.

One can optionally customize the XSL in a copy of this file and then customize the CQWP to use the customized file. I wanted to customize the list of Blog posts to be condensed, with a truncated preview.

Here’s how to do it.

Tuning the CQWP

Use the following settings in the CQWP to create a list of just Blog Post Links:

  1. List Type: Posts
  2. Content Types: List Content Types
  3. Show items: Post
  4. Group by: Created By
  5. Sort by: Created
  6. Limit: 25
  7. Group style: Banded
  8. Item Style: Title Only: Important, this determines the XSLT template customized and used later
  9. Fields to display: Title: Title (only)

Optional:

  1. Export Web Part
  2. Open in Notepad
  3. Edit and change the XSLT file ItemStyle.XSL referenced, to point to a different file
  4. Save
  5. Import as a web part

Tuning the XSLT

Locate the XSLT template processing the item, and refine it. If a new XSL file is desired, copy ItemStyle.XSL and edit that one. Here’s the customized commented code for the TitleOnly template:


<!-- Joel's alternating row colorings-->


<!-- Joel's table, created for each row, 300 wide seems a good number -->
<!-- Joel's decision to use the existing 'description' class, to get more vertical compression than 'tem'-->
<!-- Joel's create a table, row and cell around each link, to allow banding -->


Folder Metadata Web Part

Creating a Folder Metadata Web Part

An interesting challenge I faced was programmatically exposing custom folder metadata within a specific Document Library View, for specific Folder Content Types.

As background, I already created Folder Content Types, deriving from the SharePoint Folder Content Type, to which I added appropriate metadata.

These new Content Types were syndicated from a Content Type Hub, and propagated across the enterprise.

I extended the ASP template to include a table that I will build dynamically and a button that I optionally hide:

&lt;/asp:Table&lt;&gt;asp:Button ID="PlaceholderButton" runat="server" Text="Create New Placeholder" onclick="PlaceholderButton_Click" /&gt;

I then add an action for the button:

 protected void PlaceholderButton_Click(object sender, EventArgs e) 
        {
            Response.Redirect("http ://SharePoint/div/myDiv/Lists/MyListTasks/NewForm.aspx?RootFolder="); 
        }

This useful function adds a table row consisting pair of table cells with a property label (in bold) and the property value, but only if the property/value is found, on the current Document. Note Content Type is detected and handled separately:

void push_property(string myLabel, string propertyName)
 {
     try
     {
         string val = null;
         if (propertyName == "ContentType")
             val = folder.Item.ContentType.Name;
         else
             val = folder.Item.Properties[propertyName].ToString();
 
         if (!String.IsNullOrEmpty(val))
         {
             TableRow rw = new TableRow();
             TableCell cel = new TableCell();
             cel.Text = string.Concat("<b>", myLabel, "</b>");
 
             rw.Cells.Add(cel);
             cel = new TableCell();
             cel.Text = val;
             rw.Cells.Add(cel);
             Table1.Rows.Add(rw);
         }
 
     }
     catch { }
 
 }

This is the heart of this little web-part. I derive the actual folder from the user context, by extracting it from the browser URL string using Page.Request.QueryString[“RootFolder”]:

 protected void Page_Load(object sender, EventArgs e)
{
    bool ok = true;
    string ctName = null;
 
    SPWeb web = SPContext.Current.Web;
    string rootFolder = Page.Request.QueryString["RootFolder"];
 
    //Label2.Text = rootFolder;
 
    if (String.IsNullOrEmpty(rootFolder))
        ok = false;
 
 
    if (ok)
    {
        folder = web.GetFolder(rootFolder);
        if (!folder.Exists)
            ok=false;
    }
 
    if (ok)
    {
        ctName = folder.Item.ContentType.Name;
 
        if ((ctName != "Divison Acct Folder") &amp;&amp; (ctName != "Divison Common Folder"))
          ok=false;
    }
 
        PlaceholderButton.Visible = ok;  //reacts dynamically, needs setting in both directions, as it maintains state
 
    if (ok)
    {
        //push_property("Folder Type", "ContentType");  //Handled in special fashion internal to function
        push_property("Claimant", "Claimant");      
        push_property("Account Number", "AccountNumber");
        push_property("Issue Description", "IssueDescription");
 
        /*Only apply this border logic if you want a griddy view
        if (Table1.Rows.Count &gt;  0)
        {
            Table1.GridLines = (GridLines) 3;
        }
        */
    }
 
}

Adding a web part to a List View

Adding a web part to a List View

It’s quite straightforward to add a web part to a specific library view. This can be extended to deploy a web part to every library in every web of a site collection, for example.

I developed this to deploy a web part I wrote that extracts the folder URL from the query string in the URL, and builds a table dynamically of folder metadata, as well as a useful button for user action.

First we get the View URL, and use the LimitedWebPartManager, which works great for customizing ghosted Views. We then loop through the web parts to make sure we are not adding a web part for a second time. I found the Contains() method doesn’t work, as it compares the actual GUID, and as each web part is a new object, it will always have a new GUID.

Below is the PowerShell script to achieve it:

$FullyQualifiedWebPartName= "FolderMetaView.VisualWebPart1.VisualWebPart1" #trick: get from .DWP XML, this is the name of my web part
[Reflection.Assembly]::LoadWithPartialName("FolderMetaView.VisualWebPart1.VisualWebPart1")
 
$JPWeb=get-spweb "SharePoint/Div/TestWeb"
$JPLibs=$JPWeb.lists
$JPLib=$JPLibs["SimpleList"]
 
$Views=$JPLib.Views
$View=$Views["Specific View"]
$WebPartMgr=$JPWeb.GetLimitedWebPartManager($View.Url,[System.Web.UI.WebControls.WebParts.PersonalizationScope]::Shared)
 
$wps=$webpartmgr.get_WebParts() #get web parts
 
$found=$false;  #let's make sure we don't add the web part a second time
for ($wpi=0; $wpi -lt $wps.Count; $wpi++)
{
    if ($WebPartMgr.WebParts[$wpi].webbrowsableobject.tostring() -eq $FullyQualifiedWebPartName)
    {
        $found=$true;
    }
}
 
if (!$found) #if not found, then add it
{
    $webpart=new-object  $FullyQualifiedWebPartName
    $WebPartMgr.AddWebPart($webpart, "Main",0); 
}

Note Views have one web part zone called “Main”. By deploying to ZoneIndex 0, I’m putting the web part on top

InfoPath error when runtime dlls are wiped

InfoPath error for runtime DLLs disappearing

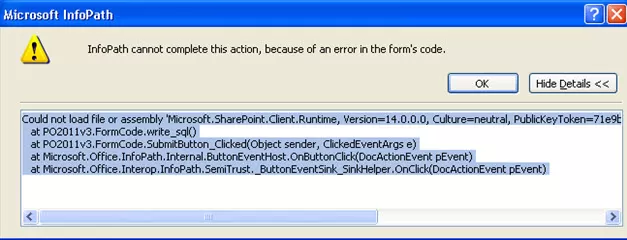
I had an interesting problem the other day. One of the users of an InfoPath solution I had developed suddenly received errors using the InfoPath form on a VMWare instance, but it worked fine on her desktop. The InfoPath form lived in SharePoint, and had Managed Code I had written. Here’s the error.


img


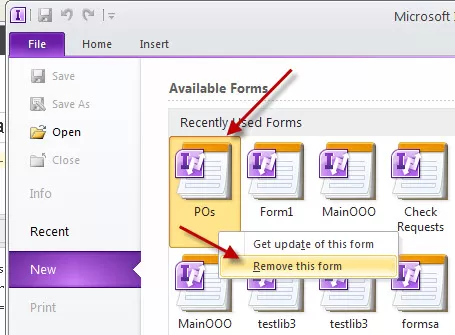
It turns out, some clever admin restored a VMWare image that didn’t include the SharePoint runtime DLLs, yet the user’s profile contained the template. The solution was to go into InfoPath and remove the InfoPath template. On the next visit to the SharePoint site to fill out the InfoPath form, both the InfoPath form (*.xsn), as well as the SharePoint DLLs, were downloaded and all worked.

It turns out the Infopath form template contains all the files needed to activate a solution, in a single file. It can include .html, .xml, .xsd, .xslt, script, and other file types that are necessary to support the functionality of the form.), such as files that define how controls in the form should appear, files for graphics that appear in the form, and programming files that enable custom behaviors in the form.

Here’s how to remove an InfoPath template on a user’s desktop:

img

Metadata Defaults for Folders

Setting Metadata Defaults for Folders

SharePoint Libraries can be configured with metadata defaults for documents added to specific folders.

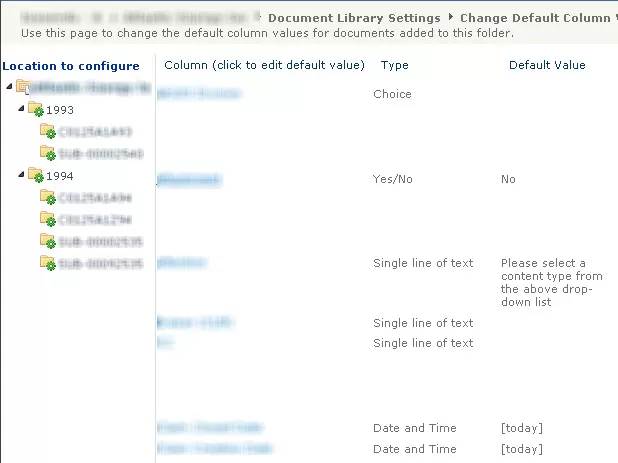
Column Defaults are manually configurable in Library Settings.  For each folder that has metadata defaults, the folder is marked with a green stamp.

Any document added to the folder gets the default metadata by default

img


This configuration can be done using PowerShell.  In this example, I have created Folder Content Types, by defining them as inheriting from the Folder Content Type, then adding metadata to the folder Content Types.  This makes it easy to then assign the metadata defaults.

We can clear away any existing metadata defaults on a folder using these commands to grab a metadata defaults object, then call the RemoveAllFieldDefaults() method:

  [Microsoft.Office.DocumentManagement.MetadataDefaults] $columnDefaults = new-object Microsoft.Office.DocumentManagement.MetadataDefaults($JPLib);
$nuthin=$columnDefaults.RemoveAllFieldDefaults($JPFolder.Folder); 
$columnDefaults.update()

We can assign a metadata default for one field for one folder using these commands:

  [Microsoft.Office.DocumentManagement.MetadataDefaults] $columnDefaults = new-object Microsoft.Office.DocumentManagement.MetadataDefaults($JPLib);
$nuthin=$columnDefaults.SetFieldDefault($JPFolder.Folder, $InternalName, $AssignmentValue);
$columnDefaults.update()

Before we get to the script, it is very important to note that get SPSite and SPWeb object must be acquired using the precise correct case.

It seems the case-sensitive XML underlying these calls is affected by an incorrect case; the folders will get the green stamp, but the metadata defaults won’t be applied unless the case is exactly correct.

To get around this problem, you can grab all SPSites for a Web Application and pipe them to get the SPWebs to process.

The only problem with that approach is the extreme memory inefficiency.

More than that, until the objects are totally released, the changes accrue in the SQL Transaction Log until released, allowing .NET to commit them.

Also note the SPFolder object does not require an update(), as the metadata default methods handle the update.

Here’s the full script:

#already matched to the Claim Folder Fields on 9/4/12 to confirm all necessary fields are included. no changes actually made.
#Added CT filtering on these folder CTs: Claim Acct Folder|Claims Common Folder
 
[system.reflection.assembly]::LoadWithPartialName("Microsoft.SharePoint") 
 
$Action="WipeAndApplyDefaults"
#$Action="ApplyDefaults"
#$Action="WipeDefaults"
 
$FolderFields="Field1,Field2,Field3"
$FolderFieldsArr=$FolderFields.split(",");
 
$baseURL="http ://SharePoint/ManagedPath/"
$SiteURL="http ://SharePoint/ManagedPath/a"
$OutputSuffix="A"
 
$mylogfile=$mylogfile="L:PowerShellLoggingMetadataDefaults$($OutputSuffix).csv"
#$WebAppHeading="http ://SharePoint"
    
Write-Host ("$(get-date) Running script assign metadata defaults to folders")
 
if ($siteurl)
{
    write-host $site.Url
 
    $WebScope=start-SPAssignment
    $TargetWeb=$WebScope | Get-SPWeb $siteURL;
 
    $ListOfLists = @();
 
# Loop through all doc libs
 
    $lists=$TargetWeb.lists;
    $listsCount=$lists.count
 
    for ($ii=0; $ii -lt $listsCount; $ii++)
    {
    $JPlib=$lists[$ii];
 
       if ( ($JPlib.BaseType -ne "DocumentLibrary") -or ($JPlib.hidden) )
        {
          # forget the rest and return to top
          Write-Host -foregroundcolor darkred "fast test skipping Library: $($JPlib)";   
        }
        elseif ($JPLib.Title -Match "Photo|Image|SitesAssets|CustomizedsReports|Templates|Pages|Picture|cache|style")
        {
          # forget the rest and return to top
          Write-Host -foregroundcolor darkred "fast test skipping Library because it mentions $Matches: $($JPlib)";   
        }
    else
    {
        $ListOfLists += $JPlib.title;
    }
    }
    $TargetWeb.dispose();
    $JPlib=$null;
    stop-SPAssignment $WebScope
 
 
    foreach ($CurrentLib in $ListofLists)
    {
    $WebScope=start-SPAssignment
    $TargetWeb=$WebScope | Get-SPWeb $siteURL;
 
    $JPlib=$TargetWeb.lists[$CurrentLib];
    $JPlib.title
    if ($JPlib -eq $null)
    {
        Write-Host "COULD NOT GET LIB $($CurrentLib)"
        continue;
    }
 
    $JPFolders=$JPlib.Folders;
    $JPCount=$JPFolders.get_count();
    for ($i=0; $i -lt $JPCount; $i++)  #Do not use ItemCount, that one includes folders!
    {   
 
        $JPFolder=$JPFolders[$i];
        $CT=$JPFolder.contenttype.name;
 
        if ($CT -notmatch "Folder CT1|Folder CT2")
        {
            Write-Host "+" -NoNewline
 
            if (($Action -eq "WipeDefaults") -or ($Action -eq "WipeAndApplyDefaults"))
            {
                    [Microsoft.Office.DocumentManagement.MetadataDefaults] $columnDefaults = new-object Microsoft.Office.DocumentManagement.MetadataDefaults($JPLib);
                    $nuthin=$columnDefaults.RemoveAllFieldDefaults($JPFolder.Folder); 
                    $columnDefaults.update()
 
            }
 
            if (($Action -eq "ApplyDefaults") -or ($Action -eq "WipeAndApplyDefaults"))
            {
            foreach ($FF in $FolderFieldsArr)
            {
                try
                {
                    if ($JPFolder[$FF] -ne $null)
                    {
 
                        $TargetField=$JPFolder.Fields[$FF];
 
                        $InternalName=$TargetField.InternalName; 
                        if (($TargetField.type -eq "DateTime") -or ($TargetField.type -eq "Date"))
                        {
                            $AssignmentValue=Get-Date $JPFolder[$FF] -Format u; #Z style universal format for assignment
                        }
                        else
                        {
                            $AssignmentValue=$JPFolder[$FF].tostring()
                        } #Leaves open all kinds of field type challenges, such as Managed Metadata
                         
                        if ($AssignmentValue -ne $null)
                        {
                            [Microsoft.Office.DocumentManagement.MetadataDefaults] $columnDefaults = new-object Microsoft.Office.DocumentManagement.MetadataDefaults($JPLib);
                            $nuthin=$columnDefaults.SetFieldDefault($JPFolder.Folder, $InternalName, $AssignmentValue); 
                            $columnDefaults.update()
                        }
                    }
                }
                catch 
                {
                Write-Host "problem with field $($FF)"
                } #must have been a field I shouldn't be poking, no biggie
            }
            } #Action=ApplyDefaults
     
#folder update is not required, columnDefault update propagates immediately
 
}
 
            } # loop for items
        $JPlib.Update();
        $JPlib=$null;       
        $Targetweb.update()
        $TargetWeb.dispose();
        Stop-SPAssignment $WebScope
    } #Only process this lib
     
}# Lib loop
Write-Host "SCRIPT COMPLETE $(get-date)"

Set Portal link for navigating above a Site Collection

Set Portal link for navigating

One of the annoyances in SharePoint is that there is no easy way for end users to navigate to outside the site collection. Creating a Portal Connection is one easy way. However configuration is manual. Here’s a way to automate this connection.

First, we get the Web Application object, then use that to iterate through all the Site Collection objects.  the -Limit All ensures we process all, otherwise it will default to the top 20.  Then we set the Portal name and link.  note that no update() is required if you use the methods below.  If you instead update the properties directly, an object update() is required.

  Add-PSSnapin "Microsoft.SharePoint.PowerShell" -ErrorAction SilentlyContinue
# Script changes the letter heading in each site collection - Joel Plaut
 
$WebApp = Get-SPWebApplication "http ://SharePoint";
 
$SA = $WebApp | Get-SPSite -Limit all
foreach ($MySite in $SA)
{
Write-Host "Fixing Portal for $($MySite.url)" -ForegroundColor darkred
$MySite.set_Portalname("Home")
$MySite.set_PortalURL("http ://SharePoint")
}

Content Type Summary Report

Content Type Summary Report

Sometimes I get challenged with questions as to which fields are used in which Content Types.  All too often I need to know quickly know the internal name of fields used in Content Types.  I wrote a script that generates a report that you can run to generate a CSV that can easily be Pivoted in Excel for answering such questions. I’m a huge fan of using a Content Type Syndication Hub. With all the Content Types in one location, this report becomes very useful.

 $rootwebname="http ://SharePoint"
$rootweb=Get-SPWeb $rootwebname
$MyCTSummaryCSV="L:CTSummary.CSV"
Add-Content  $MyCTSummaryCSV "CT Name,CT Group,Parent CT, CT Read-Only,CT Hidden,Field Internal Name,Field Title,Field Type,ShowInDisplayForm,ShowInEditForm,ShowInNewForm"
 
$CTs=$rootweb.contenttypes
 
for ($i=0; $i -lt $CTs.count; $i++)
{
    $CT=$CTs[$i];
    $CTName=$CT.Name;
    $Fields=$CT.Fields;
    for ($j=0; $j -lt $Fields.count; $j++)
    {
        $Field=$Fields[$j];
 
        $OutStr="$($CTName),$($CT.group),$($CT.Parent.Name),$($CT.ReadOnly),$($CT.Hidden),$($Field.staticname),$($Field.Title),$($Field.type),$($Field.ShowInDisplayForm),$($Field.ShowInEditForm),$($Field.ShowInNewForm)"
        Write-Host "." -NoNewline
        Add-Content  $MyCTSummaryCSV $OutStr
        #write-host "$($outstr)"
    }
}

Report on RBS Configuration by Content Database

RBS Configuration reporting by Content Database

Here’s a simple script that will report on the RBS configuration across all your Content DBs. It’s useful to be able to lower the minimum blob threshold size for your largest DBs. Just remember to do a PowerShell Migrate() to force the movement of documents in or out of RBS, and remember this command can take a while to run.

    Get-SPContentDatabase | foreach {$_;
  try {
      $rbs = $_.RemoteBlobStorageSettings;
      write-host "Provider Name=$($rbs.GetProviderNames())";
      write-host "Enabled=$($rbs.enabled)";
      write-host "Min Blob Size=$($rbs.MinimumBlobStorageSize)"
      } 
  catch {write-host -foregroundcolor red "RBS not installed on this database!`n"}
  finally {write-host "------------------------------------------------------------------`n"}
}

Structure Document IDs to be unique across Site Collections

Configure Document IDs to be unique across the farm

Document IDs are only guaranteed unique within a single site collection. SharePoint tries to ensure uniqueness by putting a random prefix in front of each Docuemnt ID, and setting that at the Site Collection level. However you can easily rationalize these, and make the Document IDs a bit easier to read. The script below assigns a prefix, and sets up SharePoint to reissue Document IDs. Note the actual regeneration of Document IDs will wait until the Document ID Assignment Timer Job runs. This job can take a long time to run, depending on the number of items in your Site Collections.


 [system.reflection.assembly]::LoadWithPartialName("Microsoft.Office.DocumentManagement") 
$siteUrl = "http ://SharePoint/ManagedPath"  #this is the header prefixing my Site Collections
 
$LoopString = "A,B,C,D,E,F,G,H,I,J,K,L,M,N,O,P,Q,R,S,T,U,V,W,X,Y,Z"  #Here are the individual Site Collections
$LoopStringArr = $LoopString.Split(,)
 
foreach ($letter in $LoopStringArr)
{
    $SiteName=$siteurl+$letter
    write-host $SiteName
 
    $Site = New-Object Microsoft.SharePoint.SPSite($SiteName)
    [Microsoft.Office.DocumentManagement.DocumentID]::EnableAssignment($Site,$false)   #First disable, then enable DocID assignment
    [Microsoft.Office.DocumentManagement.DocumentID]::EnableAssignment($Site,$true)
 
 
    $rootweb=$site.rootweb
    $rootweb.properties["docid_msft_hier_siteprefix"]="Ins$letter"  # This is the property holding the Document ID Prefix which we use to ensure uniqueness
    $rootweb.properties.Update()
    $rootweb.Update()
    [Microsoft.Office.DocumentManagement.DocumentID]::EnableAssignment($Site,$true,$true,$true)  # now we can force all Document IDs to be reissued
}