Designing for Document Management Excellence

Designing for Document Management Excellence

There’s a dramatic difference between the Ordinary and the Extraordinary. Here is how to design for effective document management in your enterprise.

Before creating a single site or library, first understand the user and underlying business process.

  • How are documents used?
  • What tasks are users trying to achieve?
  • What are the classes of users?
  • What are their current frustrations?

By understanding deeply how users work, solutions can be configured to address their needs.  Moreover, you can more easily demonstrate a relevant and effective overall solution.

SharePoint has a vast breadth of capabilities. Let the user need drive the selection and configuration of specific capabilities.  Do users need:

  • Advanced and customized search
  • Signoff or approval Workflow
  • Automated document tagging
  • Linking documents
  • Menu customization
  • Ribbon customization
  • MS-Office customization
  • LOB system integration
  • Automation
  • Context dependent views
  • Types of metadata
    numerical, text, rich text, LOB based, lookups, hierarchical taxonomy
  • Version retention
  • Document disposition
  • Security

Take into account the projected rate of content growth, as well as centrally managing metadata

Take into account the need to train users.  Design appropriate training materials, and guides

Document Management is designed with the user and business perspective can be more than just a successful project. It can be a source of efficiency within the enterprise.

How To Migrate Documents Into SharePoint

Getting documents into SharePoint

There are many ways to get documents into SharePoint. This article covers a range of approaches aside from basic file
upload. Let’s first take a quick review of SharePoint’s general file upload limitations:

  • Zero-length files Files such as shortcuts cannot be imported
  • Too large files: Depending on the configured limit, files that are larger than the limit will
    not be uploaded
  • Filetypes Some filetypes are blocked by default. This can be for good reasoning. Executables
    and scripts are dangerous to upload, either easily running on user desks or containing malware.
  • Invalid filename characters Unsupported characters include: ~, #, %, & , *, {, }, \, :,
    <, >, ?, /, |
  • Trailing periods: A filename cannot have a trailing period
  • Leading or trailing spaces: A filename cannot start or end with a blank. Often, the upload will
    work with trailing blanks, but the blank may be truncated
  • Long filenames: The full URL cannot exceed somewhere around 230 characters. Adding in the web
    application, site, library, and any number of folders, it’s not too hard to hit this limit.

img

  Drag and Drop


SharePoint 2013 supports drag-and-drop into SharePoint. Some
limitations to consider

  • Only 100 documents at a time
  • Filenames can only contain valid characters
  • Unless default metadata is configured, this approach does not support tagging.

Explorer Mode Icon

  Explorer Mode


This is also known as WebDav. In the ribbon under the “Library” tab, there should be an “Open with Explorer” option. This supports folders and many documents. Limitations include poor handling for errors on upload.


OneDrive Icon

  Onedrive for Business

If Sync is selected in the library, documents uploaded to OneDrive can be easily synced with a library.

Scripting Icon

  Scripting


Using PowerShell, file migration can be scripted. I’ve created scripts that:

  • Consolidate multiple versions into a single document with versions
  • Preserving of authorship and timestamp
  • Detailed output looking as a CSV
  • Delta migration of only files meeting specific date or other criteria
  • Using custom business logic to map to Sites, libraries, content types, folders, and document sets
  • Fixing of filenames to avoid illegal filename errors

Tool Icon

Migration Tools

A range of document migration tools are available, such as Share-Gate, AvePoint DocAve, Tzunami, and Lightning Tools.


SharePoint 2016 News

Upgrading

Release Candidate is an update to SharePoint Server 2016 Beta 2 and can be installed over Beta 2, so you can upgrade SharePoint Server 2016 Beta 2 to RC.

Timing

SharePoint 2016 is planned for release in spring 2016.

Strategy

SharePoint 2016 is planned for release in spring 2016.

Support for end-of-life services

  • SharePoint Server 2016 will include the ability to support InfoPath Forms Services. InfoPath Forms Services on SharePoint 2016 will be supported for the duration of SharePoint 2016’s support lifecycle.
  • InfoPath Forms Services on Office 365 will continue to be supported.
  • InfoPath 2013 and SharePoint Designer 2013 will be the last versions of those products. SharePoint Designer is not being re-released with SharePoint Server 2016, although it will continue to be supported for custom workflows built with SharePoint Designer and hosted on SharePoint Server 2016 and Office 365.
  • Support for InfoPath 2013 and SharePoint Designer 2013 will match the support lifecycle for SharePoint Server 2016, running until 2026.

Setting a Site Collection to not be read-only

How to set a site collection as not read-only

Is your site collection read-only?

It is critical to be able to set a site collection to not be read-only. This situation can occur if a site backup is interrupted, as an SPSite backup is made read-only temporarily during backups.

 $site=Get-SPSite "http://SharePoint/managedpath/sitename"
$site.set_ReadOnly($false)

To turn it back to read-only:

$site=Get-SPSite "http://SharePoint/managedpath/sitename"
$site.set_ReadOnly($true)

SSRS Deployment Automation

SQL Server reporting comes to life when SSRS (SQL Server Reporting Services) runs in SharePoint integrated mode

Report deployment is a manual process from SQL Server Data Tools within Visual Studio.  If a report has to go to multiple locations, it can be a hassle to track all the locations and ensure proper deployment and updates.

Companies often have a wide range of SSDT (SQL Server Data Tool) Solutions that contain reports. These reports today are deployed to SSRS running in Native Mode.

We have developed a deployment solution to enable a single-stage deployment of reports to SharePoint to the correct and secure location per report.

This tool facilitates report deployments to multiple locations across multiple VS solutions. It utilizes a single database table that contains the full mapping of Visual Studio reports to all the SharePoint locations each report may be published.

The report deployment tool is able to run from any location that can connect to both the destination SharePoint and the SQL Server housing the mapping table.

The tool requires credentials to be able to publish to SharePoint.

The report deployment tool can be used to deploy and manage report publishing from multiple Visual Studio solutions to multiple SharePoint site collections:

  1. Automate SharePoint Location Inventory
  2. Automated inventory of all SSRS Visual Studio reports across solutions
  3. Each SharePoint location can have a description associated, as can each report for publishing
  4. Automatically create libraries and create the views, metadata and add the content types for as many libraries as needed
  5. Each report can be published in more than one location. Reports can be mapped in bulk
  6. Update all reports in SharePoint
  7. Reports in SharePoint need to be rebound to data sources when published. The rebinding can be automatically done for you.
  8. Define the sequence that reports appear in SharePoint
  9. Category and Title fields are published automatically to SharePoint
  10. Creation of libraries and folders fully configured for reports can be done visually within the tool
  11. Retract or delete a report from all associated locations

The tool defaults to not overwriting data sources. This is to avoid overwriting credentials entered for use by the data source. A checkbox is available to force the overwriting of data sources.

Read More

Deploy multiple Office Solutions in a single setup

How to deploy multiple Office Solutions in a single setup

After creation of all your MS-Office solutions, they can be configured to be deployed all at once. The steps below walk through how to configure one setup for all MS-Office solutions using a Click Once installer for the .NET Framework:

Step 1: Create a sample Word Add-In project using VS

(File->New Project->Office/SharePoint;Office Add-ins)

Step 2: Add Projects to the Solution

Add all the projects into this solution where the sample add-in is created.

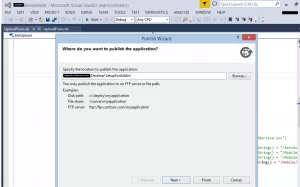
Step 3: Publish project one at a time to the common folder

(For Ex. ‘C:/Publish/’). Publish the sample add-in project last, when you have finished publishing the other projects . (Note: Ensure that publish settings are set correctly. Add the necessary prerequisites to each project, select install prerequisites as the same location as my application. By selecting this one must ensure that all prerequisites are at this location ‘C:\Program Files (x86)\Microsoft SDKs\Windows\v8.1A\Bootstrapper\Packages’) in the appropriate folder.

Screen-Shot: Publishing to common place folder:

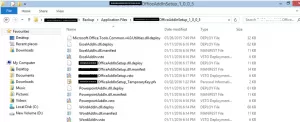
img\

Screen-Shot: Here we have taken ‘SetupForAddin’ folder (as the common location) to publish all add-in projects:

img

Step 4: Modifying the application manifest

  1. From the c:\publish\Application Files folder, move the contents of the {EXCEL_PROJECT}_1_0_0_0 and {WORD_PROJECT}_1_0_0_0 or {PPT_PROJECT}_1_0_0_0 directories to the {SAMPLE_PROJECT}_1_0_0_0 directory.
  2. Open the {SAMPLE_PROJECT}.dll.manifest, {WORD_PROJECT}.dll.manifest, and {EXCEL_PROJECT}.dll.manifest, {PPT_PROJECT}.dll.manifest files in an XML editor.
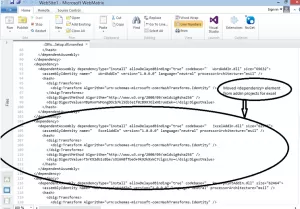
  3. From the {WORD_PROJECT}.dll.manifest file, copy all install and file dependencies including {WORD_PROJECT}.dll. That is, copy all dependencies that start with
  4. In the {SAMPLE_PROJECT}.dll.manifest file, paste the {WORD_PROJECT}.dll install dependency at the end of the dependency section.
  5. Repeat the previous #3 and #4 for {EXCEL_PROJECT} and {PPT_PROJECT}.

Screen-shot: move files from the add-in projects to our last published sampled project directory. (Files to move from each project are ‘.vsto’, ‘dll.deploy’,’dll.manifest’):

img

Screen-Shot: Copied all the element from all word, excel, PowerPoint add-in projects to sample projects {SAMPLE_PROJECT}.dll.manifest file:

img

Step 5: Adding the Entrypoints

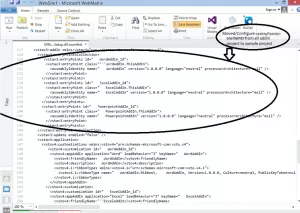
  1. In the {SAMPLE_PROJECT}.dll.manifest file, remove the text between the and elements.
  2. From the {WORD_PROJECT}.dll.manifest file, copy the text between the and elements.
  3. In the {SAMPLE_PROJECT}.dll.manifest file, paste the code after the element.
  4. Add the id attribute to the element to differentiate this entrypoint from others.
  5. Repeat previous points #2, #3 and #4 for {EXCEL_PROJECT} and {PPT_PROJECT}.

Screen-Shot: Copied all the element from all word, excel, PowerPoint add-in projects to sample projects {SAMPLE_PROJECT}.dll.manifest file.

img

Step 6: Adding Assemblies

To add the assemblies to the vstov4 namespace in the application manifest

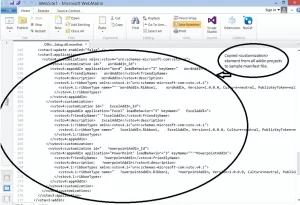
  1. In the {SAMPLE_PROJECT}.dll.manifest file, remove any text between the and elements.
  2. In the {WORD_PROJECT}.dll.manifest file, copy the text between the and elements.
  3. In the {SAMPLE_PROJECT}.dll.manifest file, paste the code after the element.
  4. Add the id attribute to the element to differentiate this customization from others. This id is the same id that was added to the element in the previous step 5.

Screen-Shot: Copied all the element from all word, excel, PowerPoint add-in projects to sample projects {SAMPLE_PROJECT}.dll.manifest file.

img

Step 7: Sign manifests

To re-sign the application and deployment manifests

  1. Copy the {SAMPLE_PROJECT}_TemporaryKey.pfx certificate file from the {SAMPLE_PROJECT} solution directory into the c:\Publish\Application Files\{SAMPLE_PROJECT}_1_0_0_0directory.
  2. Open the Visual Studio command prompt.
  3. Change to the c:\Publish\Application Files\{SAMPLE_PROJECT}_1_0_0_0 directory.
  4. Sign the modified application manifest with the following command:
    mage -sign ContosoInstaller.dll.manifest -certfile ContosoInstaller_TemporaryKey.pfx

The message “{SAMPLE_PROJECT}.dll.manifest successfully signed” appears.

  1. Change to the c:\Publish directory.
  2. Update and sign the deployment manifest with the following command:

mage -update ContosoInstaller.vsto -appmanifest “Application Files\ContosoInstaller_1_0_0_0\ContosoInstaller.dll.manifest” -certfile “Application Files\ContosoInstaller_1_0_0_0\ContosoInstaller_TemporaryKey.pfx”
The message “{SAMPLE_PROJECT}.vsto successfully signed” appears.

Copy the {SAMPLE_PROJECT}.vsto file to the c:\publish\Application Files\{SAMPLE_PROJECT}_1_0_0_0 directory.

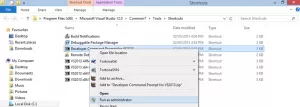
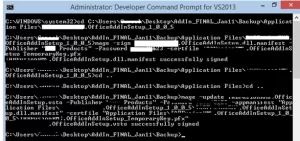
Commands to execute: (Use ‘Developer Command Prompt for VS2013’ command prompt from Visual Studio Tools)

  1. mage -sign XYZOfficeAddIn.OfficeAddInSetup.dll.manifest -Publisher “XYZ Products” -Password xyz@123 -certfile XYZOfficeAddIn.OfficeAddInSetup_TemporaryKey.pfx
  2. mage -update XYZOfficeAddIn.OfficeAddInSetup.vsto -Publisher “XYZ Products” -Password xyz@123 -appmanifest “Application Files\ XYZOfficeAddIn.OfficeAddInSetup_1_0_0_3\ XYZOfficeAddIn.OfficeAddInSetup.dll.manifest” -certfile “Application Files\ XYZOfficeAddIn.OfficeAddInSetup_1_0_0_3\ XYZOfficeAddIn.OfficeAddInSetup_TemporaryKey.pfx”

Screen-Shot: Run the ‘Developer Command Prompt for VS2013’ command prompt from VS tools:

img

Screen-Shot: Re-sign the application and deployment manifests:

img

Now your final setup is ready. You can run to install. You should then see the Add-Ins configured; for Word, Excel and PowerPoint

Creating an MS Office Add-In using Visual Studio IDE

Process for creating MS Office Add-In from Visual Studio IDE

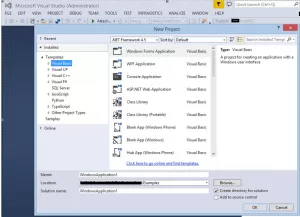
Step 1:

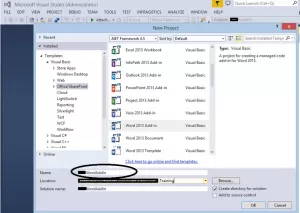
To start constructing an Office add-in, we are going to create a separate project for each Office application i.e. Word, Excel, PowerPoint etc. Let’s start with the MS-Word add-in. Open Visual studio with the IDE option FILE -> New -> Project:

img

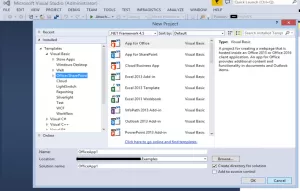
Step 2:

Now select an appropriate template (i.e. Visual Basic, Visual C# etc) to develop an add-in project. We will select Visual Basic for this, Go to Templates -> Visual Basic -> Office/SharePoint.

img

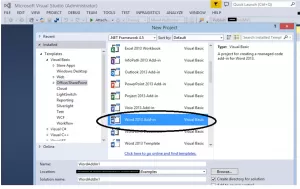
Step 3:

Now select the appropriate add-in project to develop as shown in the screenshot below. Let’s select the MS-Word add-in project, for example.

img

Step 4:

Name the project and select the ‘Location’ folder to save the project work. Click ‘OK’ button to create the project.

img

Step 5:

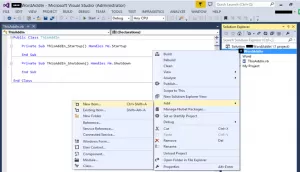
Now we have to add a ribbon to this newly created project which will then be customized further. To add a ribbon, right click on the project, Go to Add -> New Item… Then select ‘Ribbon (Visual Designer)’ component as shown below:

img

Select ‘Ribbon (Visual Designer)’ ->

img

Here’s how it looks after adding the ribbon into the project:

img

Step 6:

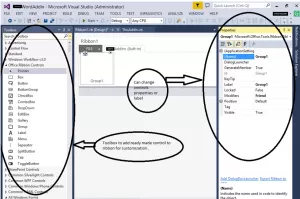
Now that the ribbon add step is done, we will proceed with customizing the ribbon. To design/customize the ribbon, we use the ‘Toolbox’ controls as shown in below screen shot.

img

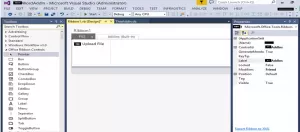
After customization of the ribbon, we have added one button with an image and label ‘Upload File’. We can then trigger the opening of a form on detecting the click of this button.

img

Step 7:

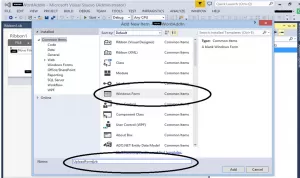
Now we will add a form for processing our logic to upload the file from the user’s machine to the server. To add a windows form, right click on the project, Go to Add -> New Item… Then select ‘Windows Form’ component as shown below screen-shots:

img

Below is the Design form for the move file action using toolbox controls:

img

Step 8:

Write logic to process/move the opened file to the server on the click of the ‘Move Document’ button. Process followed in current Office add-in is as below:

1. User will open his/her document in the MS-Office application
2. After the document is opened, if the user wants this to transfer to a website location, the User can go to the Add-In section and click the ‘Move Document’ button.
3. From step 2, a form will ask for the ‘site URL’. Based on this we can find the service location from the server which is located at ‘http://{siteurl}:{port}/Services/UploadService.svc’
4. After click on the ‘Move Document’ from form –
4.1. Copying current/active file opened in Word (or Office) application into the TEMP location of the user’s machine to read all file contents in bytes. This is because we can’t read in the stream of bytes directly if the file is currently in use.
4.2. Next we read the contents from the file newly located in the TEMP location. Pass this bytes[] to the service method UploadDocument(fileContent, newFileName) in fileContent parameter and the file name us generated to process in the UploadDocument method.
4.3. After bytes[] stream is passed to the service method, it will write to the file in the TEMP location on the server which will be used to process or attach that document to the record based on the selection.

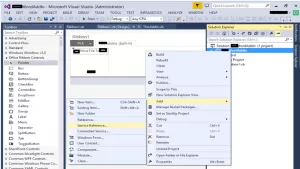
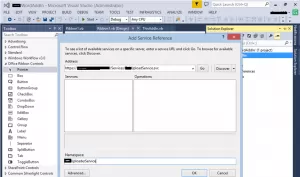
To add the service, right click on the project, Go to Add -> Service Reference…

img

Configuring service reference in the add-in project:

img

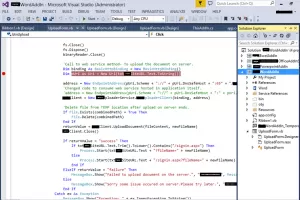
The Code below is added on the click action of the ‘Move Document’ button from our windows form:

img

Office Add-In Installation

To install the MS Office add-in, Go to your setup location folder and click on setup.exe. This setup will install add-ins for Word, Excel, and PowerPoint applications:

img

Screen-Shot: After installation of add-in setup:

img

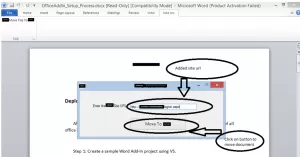
Screen-Shot: Form to move the document to the server:

img

Press the “Move” button and it will open the site associated with the entered URL in the browser. The other upload document process will handle the entered website.

For MS-Excel and MS-PowerPoint we can follow same steps.


Set an Email alert for Document library or List for SharePoint 2013

In this post, I will explain how to add an alert on a document library or list to get notified about item added, updated or deleted events. Below are the steps to follow for adding an alert:

1. First of all Open List or Library.
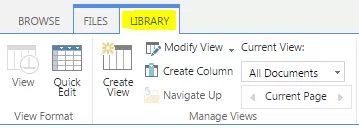
2. If it is a library then open Documents, if it is List then open Lists ribbon tab. In my example I am using a Document Library.

img

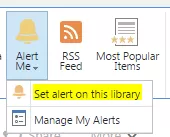
3. No under Share & Track section, search Alert Me option. Click on Set alert on this library

img

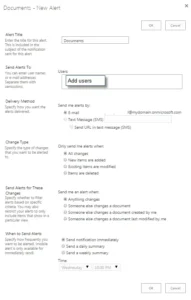
4. A dialog box will appear with available options such as Alert Title, Send Alerts To, Delivery Method, Change Type, Send Alerts for These Changes, When to Send Alerts.

img

5. Apply relevant configuration in the dialog and then click OK. And you are done with setting the alert.

Working with Web Parts in PowerShell

Working with web parts programmatically across pages is awkward but possible in PowerShell. Let’s start by generating a report of the web parts. This iterates through non-admin web apps, site collections, and pages:

$oContentService = [Microsoft.SharePoint.Administration.SPWebService]::ContentService;
[Microsoft.SharePoint.Administration.SPWebApplicationCollection]$waCollection = $oContentService.WebApplications;
$log = ".\results.txt"    # output file name and path
$pagepath = "/default.aspx"    # you can change page name or page path  
"Site URL; WebPart Title ; Webpart ID" | out-file $log
$waCollection1 = $waCollection | where-object {$_.IsAdministrationWebApplication -eq $FALSE}
foreach ($wa in $waCollection1)
{
foreach ($obj in $wa.Sites) 
{
write-host "Processing site: " , $siteURL
$siteURL = $obj.URL
 
$site=new-object Microsoft.SharePoint.SPSite($siteURL)
 
$pageURL = $siteURL + $pagepath 
$web=$site.Openweb()   
$webpartmanager=$web.GetLimitedWebPartManager($pageURL,  [System.Web.UI.WebControls.WebParts.PersonalizationScope]::Shared)   
foreach ($webpart in $webpartmanager.WebParts)
{   
  $siteURL + "; " + $webpart.Title + " ;  " + $webpart.ID | out-file $log -append  
}                           
}
&lt;/pre&gt;
 
As an example, we can remove web parts programmatically, by specifying the site collection and Web Part GUID:
$siteURL = "ht tp://SharePoint/sites/specialsite";  # first constant: site URL
$webpartId = ";   # second argument:  webpart GUID
$pagepath =  "/default.aspx"        # change page name or page path here
$pageURL = $siteURL + $pagepath
write-host "Processing site: ", $siteURL
Write-host "Processing page: " , $pageURL
write-host "Processing webpart ID: " , $webpartID
$site=new-object Microsoft.SharePoint.SPSite($siteURL)
$web=$site.Openweb()
$webpartmanager=$web.GetLimitedWebPartManager($pageURL, [System.Web.UI.WebControls.WebParts.PersonalizationScope]::Shared)
$webpartmanager.DeleteWebPart($webpartmanager.Webparts[$webpartId])
$web.Update()
$web.Dispose()
write-host "Finished."

Changing the page for a SharePoint Library View

Views are easily created by end users, and can be created through automation. I recently had to change the underlying aspx page for an existing view. First I tried using the SPView method SetViewXml(), however that does not work, as many other programmers have discovered to their chagrin.

The approach that works is to clone the view, then rename the title. In this case, I am trying to create AllItems.aspx, so I clone the view to that name then rename it:

$NewView = $SourceView.clone("AllItems",100,$true,$true)
$NewView.title = "All Documents";
$NewView.update();
$Views.delete($SourceView.id);

The script below goes one better. It finds the extra “All Documents” views, and deletes all the ones that are duplicate, preserving the original (latest) View. It iterates through the collection downward deleting as it goes.

Add-PSSnapin "Microsoft.SharePoint.PowerShell" -ErrorAction SilentlyContinue
 
$mylogfile="ongoinglogfile.txt"
 
$envGUID = $(Get-SPFarm).id
if      ($envGUID -eq  "c25ca1f1-6d8f-4c59-86e3-d64821a3bcbb" ) {$env = "Dev"}
elseif  ($envGUID -eq "8e51b3e2-1ed7-4549-ad51-c5c43b065d2c" )  {$env = "Prod"}
else
{
    $env = "Unknown"
    Write-Host -ForegroundColor darkred "UKNOWN FARM in $($MyInvocation.MyCommand.Definition)"
    Add-Content $mylogfile "UKNOWN FARM in $($MyInvocation.MyCommand.Definition)"
    exit
}
elseif ($env -eq "Dev")
{
    #$MatchStr="ht tp://SharePoint dev/Sites/*"  
    $MatchStr="ht tp://SharePoint dev/Sites/2015" 
    $sitesArrNames = "ht tp://SharePoint dev/Sites/2015"
    $sitesArr = $sitesArrNames.split(",");
 
}
elseif ($env -eq "Prod")
{
    $MatchStr="ht tp://SharePoint/Sites/2015" 
    $sitesArrNames = "ht tp://SharePoint/Sites/2015"
    $sitesArr = $sitesArrNames.split(",");
}
else
{
    $waName = $MatchStr = $waName = $null;
}
 
$libsArrStr="Lib1,lib2,Documents,Shared Documents"
$LibsArr=$libsArrStr.split(",")
 
 
write-host  "STARTING: $(get-date) Script: $($MyInvocation.MyCommand.Definition)"
Add-Content $mylogfile "STARTING: $(get-date) Script: $($MyInvocation.MyCommand.Definition)"
 
 
foreach ($SiteName in $sitesArr)
{
    $site = get-spsite $SiteName
    if ($site.url -like $MatchStr)
    {
    $webs=$Site.AllWebs
    $webcount = $Site.AllWebs.Count
 
    for ($i=0; $i -lt $webcount; $i++)
    {
        $TargetWeb=$web=$webs[$i]  #$TargetWeb is used by my standard routines
             
        Write-Host "==&gt;working in $($web.url)"
        Add-Content $mylogfile "==&gt;working in $($web.url)"
 
        $lists=$web.lists;
 
      write-host -f green "The Library $($listName) exists in the site $($web.url), about to tune the view"  #not going to try to config it either
      Add-Content $mylogfile "The Library $($listName) exists in the site $($web.url), about to tune the view" 
 
      for ($k=0; $k -lt $LibsArr.count; $k++)
      {
        $libstr = $LibsArr[$k];
 
        $JPLib = $web.Lists.TryGetList($libStr)  #Extra JPFolder is for the override on routines with lib
        if($JPLib -ne $null)  #optional, can filter to ensure ($JPLib.ContentTypesEnabled)
                            {
                write-host "Analyzing $($JPLib.title) in $($web.url)"
                 Add-Content $mylogfile "Analyzing $($JPLib.title) in $($web.url)"
 
                 $Views = $JPLib.views;
 
                 $foundOne=$false;
                 for ($vi=$views.count-1; $vi -ge 0; $vi--)
                 {
                   $View = $views[$vi];
                   if ($View.title -eq "All Documents")
                   {
                   if ($foundOne -eq $true)  #there was one found earlier
                   {
                     $views.Delete($view.id);
                     write-host "Deleted a view in $($JPLib.title) in $($web.url)"
                     Add-Content $mylogfile "Deleted a view in $($JPLib.title) in $($web.url)"
                    }
                    else
                      {
                      $foundOne=$true;
                      $SourceView = $view;
                      }
                      }
                      }
 
 
                      if ($FoundOne)
                      {
                      if ($SourceView.schemaxml.contains("Documents.aspx"))
                      {
                        $NewView = $SourceView.clone("AllItems",100,$true,$true)
                        $NewView.title = "All Documents";
                        $NewView.update();
                        $Views.delete($SourceView.id);
                        write-host "Cloned and deleted a view in $($JPLib.title) in $($web.url)"
                        Add-Content $mylogfile "Cloned and deleted a view in $($JPLib.title) in $($web.url)"
                        }
 
                        }
      }
      }
 
            $web.Dispose()
            } #SPWeb processing
         
        } #if $true/Siteurl is not null, if environment setup is valid
        $site.Dispose()
} #foreach site