


Customizing SharePoint online forms is typically done using SPFx or Power Apps. However, this blog will demonstrate an alternative approach using JSON to customize out-of-the-box SharePoint list forms. This method eliminates the need for SPFx or Power Apps, as simple JSON can be employed to tailor the header, footer, and body of the form..
Through the use of JSON, users can create distinct sections within the form body and implement validations to dynamically show or hide form fields based on the values of other fields. Notably, the advantage of employing JSON for customization is the inherent responsiveness of the forms. Unlike other methods, there is no additional effort required to make these forms responsive, allowing seamless utilization across both desktop and mobile platforms.
In this blog on SharePoint Online, User will explore the customization and formatting of SharePoint Online list forms through the use of JSON formatting. And column validation in SharePoint online list.
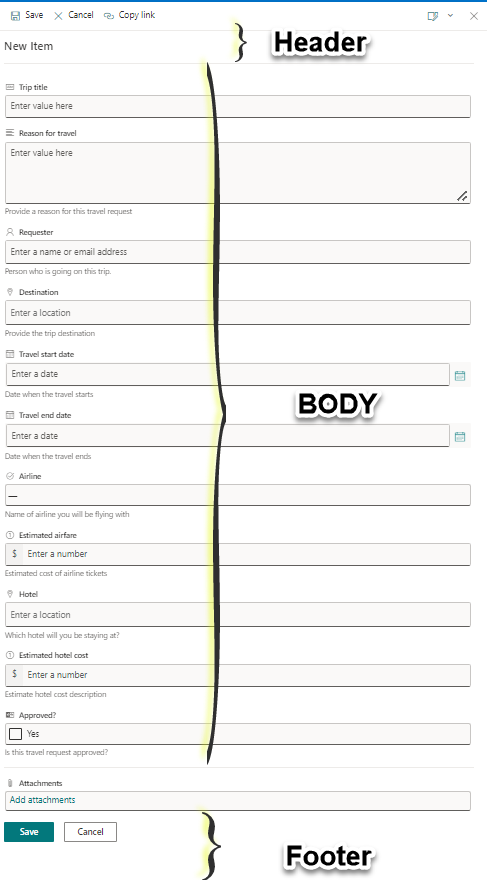
First, familiarize yourself with customizing JSON formatting. Customize the form header, form footer, and form body. Divide the body into different sections.
- Customize the SharePoint Online List Form Header using JSON formatting.
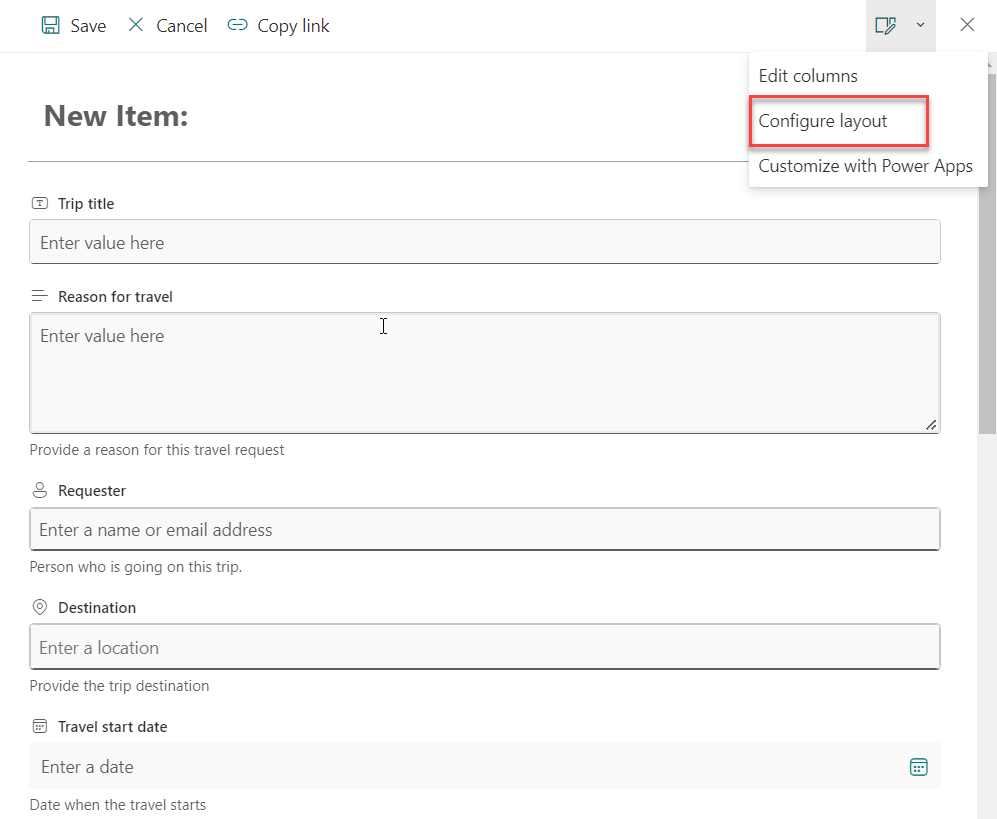
In the Format window, you’ll encounter options such as Header, Body, and Footer. Ensure that you choose Header.
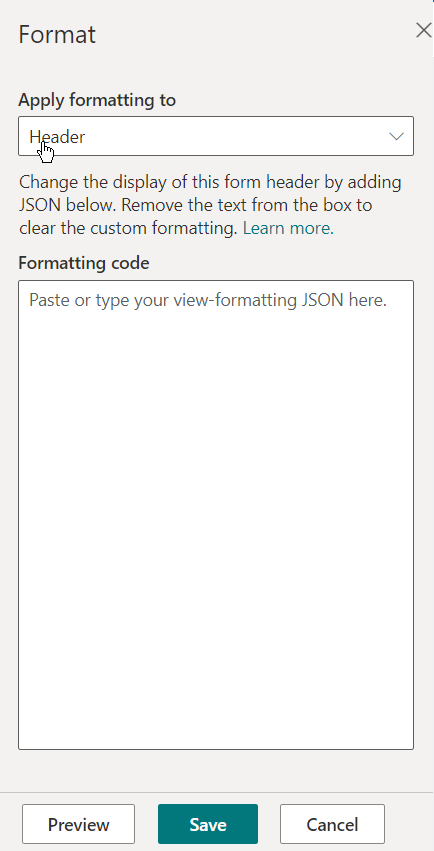
In the “Formatting code” option, apply or paste the JSON formatting code provided below. Alternatively, you can retrieve this code by clicking on “Learn more” within the JSON code section.
{
“elmType”: “div”,
“attributes”: {
“class”: “ms-borderColor-neutralTertiary”
},
“style”: {
“width”: “100%”,
“margin-bottom”: “15px”,
“background-color”: “purple”
},
“children”: [
{
“elmType”: “div”,
“style”: {
“display”: “flex”,
“align-items”: “center”
},
“children”: [
{
“elmType”: “div”,
“style”: {
“flex”: “none”,
“padding”: “0px”,
“padding-left”: “10px”,
“height”: “40px”,
“color”: “white”
}
}
]
},
{
“elmType”: “div”,
“attributes”: {
“class”: “ms-fontColor-themePrimary ms-borderColor-themePrimary ms-fontWeight-bold ms-fontSize-xl ms-fontColor-neutralSecondary–hover ms-bgColor-themeLight–hover”
},
“style”: {
“box-sizing”: “border-box”,
“width”: “100%”,
“text-align”: “center”,
“padding”: “21px 12px”,
“overflow”: “hidden”,
“color”: “white”
},
“children”: [
{
“elmType”: “div”,
“txtContent”: “Task Details”
}
]
}
]
}
You can customize the header by adjusting parameters such as background color, text color, and adding icons. Additionally, you can retrieve dynamic values from the body using this JSON formatting.
2. Customize the SharePoint Online List Form Body using JSON formatting.
Once the “Configure layout” option is chosen, select the “Body” option from the dropdown in the “Apply formatting to” section.
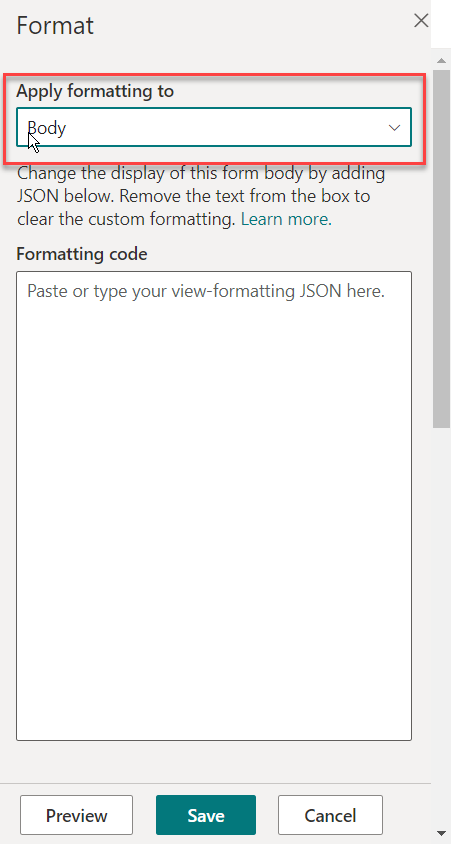
In the “Formatting code” option, apply or paste the JSON formatting code provided below. Alternatively, you can retrieve this code by clicking on “Learn more” within the JSON code section.
{
“sections”: [
{
//give a display name for the section
“displayname”: “✈️”, //Instead of icon, user have the option to use names of sections .
“fields”: [
//reference your fields here using their display name
“Airline”,
“Estimated airfare”
]
},
{
//give a display name for the section
“displayname”: “🏡”, //Instead of icon, user have the option to use names of sections.
“fields”: [
“Hotel”,
“Estimated hotel cost”//reference your fields here using their display name
]
}
]
}
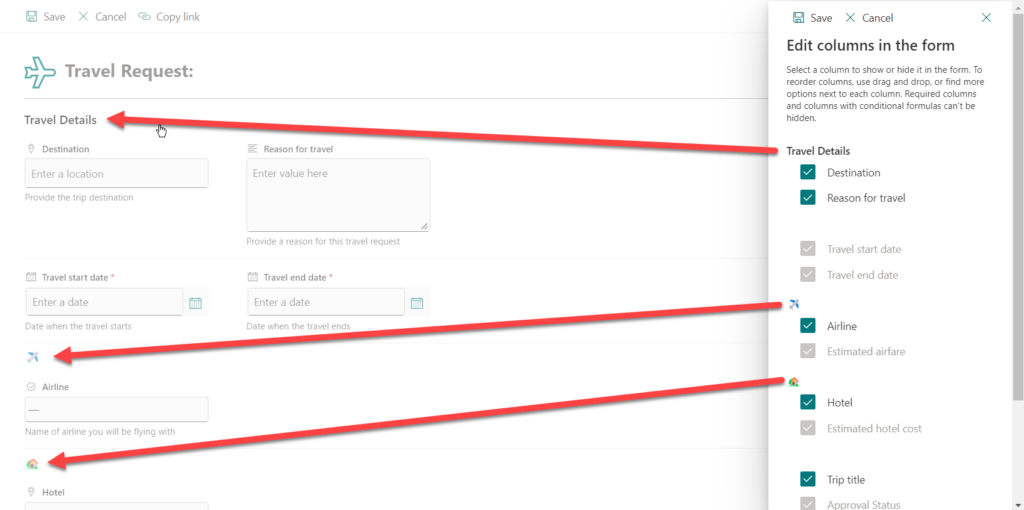
Change the given code to establish distinct sections within the form. Each section allows for the inclusion of an icon alongside its name, mirroring the example depicted below. Additionally, you have the flexibility to add any column to any field within a section.
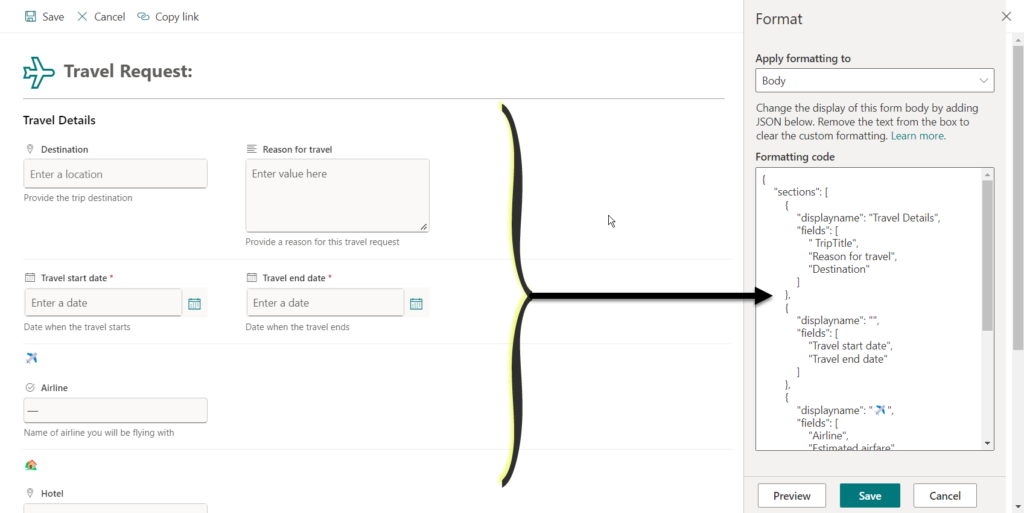
When attempting to edit the columns in the form, it is evident that the fields are presented in a section-wise manner, as demonstrated below:
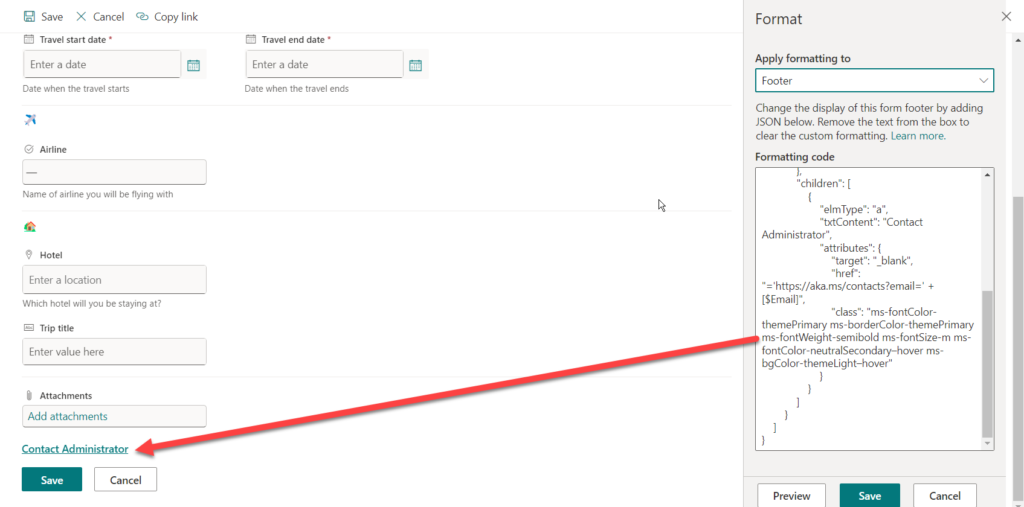
3. Customize the SharePoint Online List Form footer using JSON formatting. After choosing the “Configure layout” option, select the “Footer” option from the dropdown in the “Apply formatting to” section.

In the “Formatting code” option, apply or paste the JSON formatting code provided below. Alternatively, you can retrieve this code by clicking on “Learn more” within the JSON code section.
{
“elmType”: “div”,
“style”: {
“height”: “24px”,
“width”: “100%”,
“color”: “#fff”,
“font-size”: “15px”,
“border-top”: “5px solid #eee”,
“background-color”: “Purple”,
“padding”: “10px”
},
“children”: [
{
“elmType”: “div”,
“style”: {
“width”: “100%”,
“padding-top”: “10px”,
“height”: “24px”
},
“children”: [
{
“elmType”: “a”,
“txtContent”: “=’Task Review for ‘ + [$Title]”,
“attributes”: {
“target”: “_blank”,
“href”: “=’https://aka.ms/task?review=’ + [$Tasks]”
},
“style”: {
“color”: “white”
}
}
]
}
]
}
In the screenshot below, you can observe that the JSON code for the Footer has been included. I have implemented a functionality where clicking on the specified text will navigate the user to the email administrator.
Show/Hide form field based on conditions:
To meet the requirement of displaying the Manager field in the form only when the Priority is set to Critical, follow these steps:
- Click the “New list” button to open the list form.
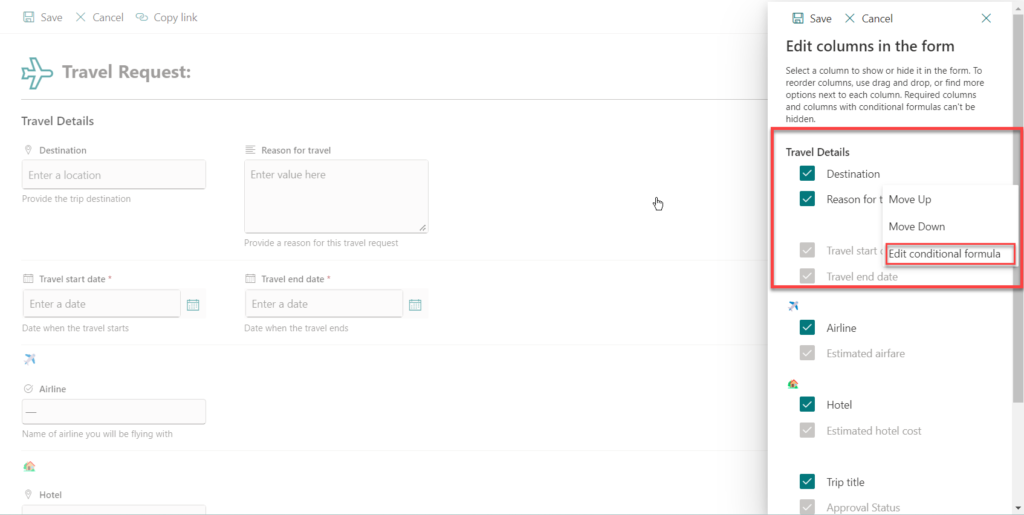
- Choose “Edit columns” from the options available in the top-right corner of the New form.
- Select column which you want to hide/show and click on three dots and select “Edit Conditional Formula”.
Following that, you will encounter the field where you can input your formula. As an example, here is the code for the “Estimated Airface” field: when a specific value is selected in the “Airline” column, the estimated airfare will be displayed; otherwise, it will be hidden.
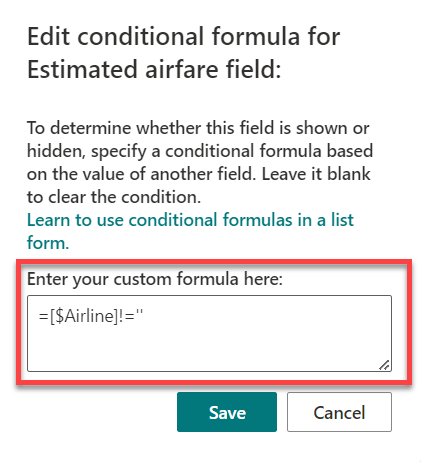
Please note that you can find and obtain a solution by clicking on the line highlighted in green, which reads, “Learn to use conditional formulas in a list form.“
How to do column validation in SharePoint:
- Column validation serves to ensure that the data entered in a specific column is accurate and meets the defined criteria.
- Use Cases/Formulas-
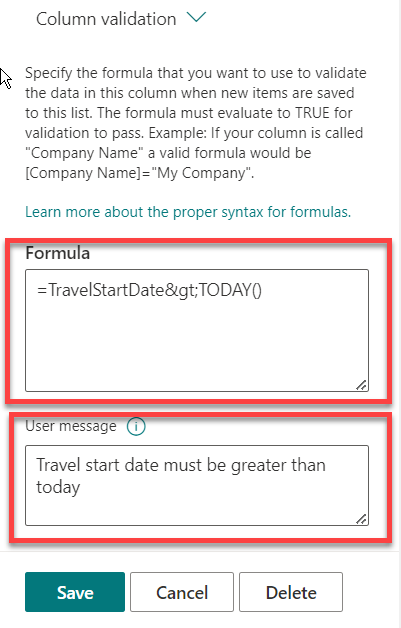
- In my SharePoint list, there is a column named “Travel Start Date,” and I aim to enforce a rule that this date must be greater than or equal to today’s date.: =TravelStartDate>TODAY().
- –First, enter the Edit mode for that column and then click on “More options.” And click on “column validation”
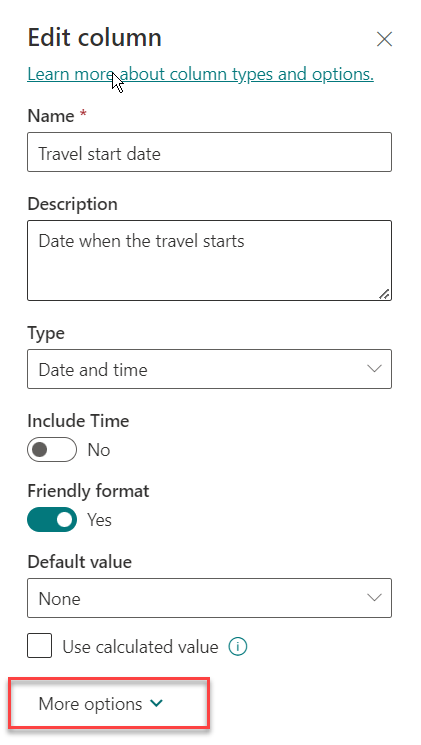
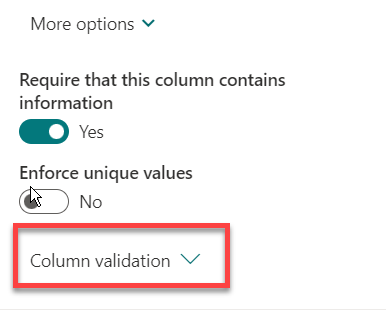
- –First, enter the Edit mode for that column and then click on “More options.” And click on “column validation”
- In my SharePoint list, there is a column named “Travel Start Date,” and I aim to enforce a rule that this date must be greater than or equal to today’s date.: =TravelStartDate>TODAY().
- Subsequently, insert the formula in this section, and ensure to include a User message. If the conditions specified in the formula are not met, this message will be displayed to the user.
Inline column validation in SharePoint will not be effective for this situation since it doesn’t allow retrieving or comparing values from other columns. To address this limitation, it is necessary to utilize list-level validation settings, as illustrated in the image below. This approach enables the use of multiple formulas to compare values from different columns.
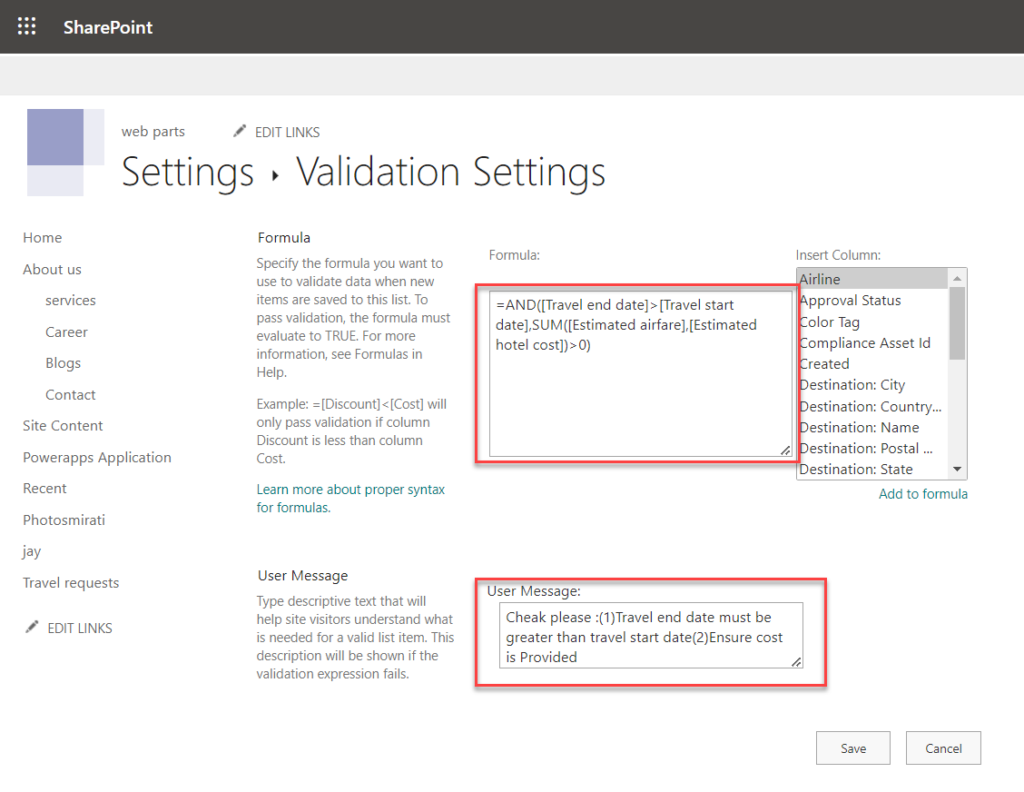
In the image above, the user can specify a formula ensuring that the travel end date is greater than the travel start date. Additionally, the sum of Estimated Airfare and Estimated Hotel Cost must be greater than zero. It’s crucial to understand that Estimated Airfare and Estimated Hotel Cost are individual columns, and their respective formulas won’t work in column validation settings. To overcome this, these formulas must be written in the list setting validation. Moreover, when employing multiple formulas, it’s important to write user messages separately, as demonstrated in the image, as there isn’t a distinct method to display messages within the formula.
Want to talk?
Drop us a line. We are here to answer your questions 24*7.