Records Management with SharePoint – Information Architecture: part 2

There is a good deal of groundwork required to fully implement Records Management in SharePoint.  The foundation is the overall Information Architecture.  SharePoint 2010 provides a range of capabilities and is very flexible.  With this flexibility comes choices.  Some of these decisions affect the manageability and extensibility and usability of SharePoint, so we want to plan carefully.  Below are the primary facets of a SharePoint Information Architecture:

  • Hierarchy
    This includes Web Applications, the breakdown of Site Collections, the Site Hierarchy, and associated Document Libraries.  Separate Site Collections that ride along managed paths allow a logical and granular division between content databases, allowing near endless scalability.
  • Navigation
    A good portion of navigation flows out of the decisions on Hierarchy combined with selection and standardization of navigation elements including tables of contents, left hand navigation, horizontal top level global navigation, breadcrumbs, and optionally additional techniques such as MegaMenus.  Best practice dictates security trimmed navigation, so users are only presented with navigation elements to which they have some level of access.
  • Security
    Best practice guides to the use of permissions inheritance wherever possible.  This will make administration as easy as possible.  If security is granted broadly at the top, and more restrictive as one descends the hierarchy, the user will have the best possible experience. This is because subsites will be reachable naturally via navigation, reducing the incidence of pockets and islands that can only be reached via manual bookmarks and links.  Leveraging AD and/or SharePoint groups further minimizes security overhead.
  • Metadata
    This is the heart of the Information Architecture, and the primary focus of this article.

Metadata can be assigned to individual documents and allocated within individual document libraries, however for a true enterprise-class Information Architecture, this needs to be viewed holistically from top down.  To achieve this, the following should be viewed as best practices:

  • Leverage Content Types
    Content Types are the glue that connects data across the enterprise.  The encapsulate the metadata, the document template, workflow and the policies that apply to documents.  A single centrally managed content type can control documents in libraries within countless sites.
  • Content Syndication Hub
    Before SharePoint 2010, Content Types lived within the Site Collection as a boundary.   This was a significant obstacle to scalability and consistency across the enterprise.  The Content Syndication Hub changes all that.  From a single location, All Content Types can be defined and published across the farm.  That includes the information policies, metadata and document template.
  • Content Type inheritance
    All Content Types must inherit from built-in SharePoint Content Types.  However by structuring your content types to inherit is a logical and hierarchical fashion, management and evolution of your Information Architecture can be an elegant and simple affair.   An example could be a Corporation Content Type, with sub-companies inheriting from it, then divisions, departments, and finally use-oriented content types.  Imagine needing to add a new field (or site column) across an entire company.  Adding it high in your hierarchy will propagate to all subordinate content types.
  • Build out enterprise taxonomies
    For the Information Architecture to be relevant and useful, it needs to map to the organization from a functional perspective.  The vast majority of the naming of data in an organization, as well as the hierarchy and relationships need definition, to enable the SharePoint Farm to enable users to tag, search and utilize the documents and information in the farm.  The larger the organization, the harder this is to achieve.

One challenge is managing all the Content Types and Site Columns.   This is because on publishing, Site Collections actually identify these by name instead of a GUID (Guaranteed Unique Identifier).  If you have an existing Site Column or Content Type locally defined in a Site Collection, this name collision will prevent the propagation of these conflicts into this Site Collection.  The challenge is magnified by the Content Syndication Hub publishing the Content Types and Site Columns to all subscribing Site Collections.  So even if your Site Collection only needs a few, it’s an all or nothing affair.

Given we are limited to planning to avoid naming conflicts, my recommendation is to add identifying information to the trailing end of Site Columns and Content Types, especially when defining a generic content type such as “Reference Document” or a Site Column such as “Completion Date”.  Instead, perhaps add additional text in a consistent manner.  Such as “Reference Document (AR)”  (for Accounts Receivable) or “Completion Date (PMO Task)”.  The reason to add the text at the end is in many situations the end of the text is cut-off in the user interface.  While hovering over the text (such as in a grid column) oftentimes shows the full name, best is to make the title easily identifiable from a user perspective.

The real challenge in setting up the Information Architecture is not the technical configuration.  That’s a walk in the park.  The real hard part is gathering the experts to define the taxonomies and making the appropriate decisions is the hardest part in large organizations.   If you have an existing farm that has grown organically and has not taken advantage of content types, the syndication hub, it is actually possible to wrestle it from chaos to order, but it’s not a cakewalk.  I have created a range of scripts and techniques for publishing the components of the new Information Architecture, and reassigning documents and metadata to it, resulting in the structured farm that works within the defined Information Architecture framework.

SharePoint Administration with PowerShell

I just completed a new book on SharePoint Administration with PowerShell. This one by Yaroslav Pentsarskyy, called Microsoft SharePoint 2010 and Windows PowerShell 2.0: Expert Cookbook (ISBN-13: 978-1849684101).

I found myself bookmarking many gems in this book for future reference. I’ve utilized Yaroslav Pentsarskyy’s tips on the web in the past, so I was really excited to read his book. The book clearly shows the author as both master of SharePoint and the underlying object model. His scripts reflect his deep experience solving the day-to-day business problems that bedevil the SharePoint Administrator and solutions architect. This focus on practical business problems is often absent in books that take an abstract, factual and academic approach that can leave gaps in the practical application of the technology to the business problem at hand. Yaroslav’s recipes are really practical, but they do assume that the reader has an existing strong base of knowledge of SharePoint and PowerShell. I look forward to future books by Yaroslav!

Check it out here.

Records Management with SharePoint – part 1

SharePoint 2010 has some great capabilities for implementing a true Records Management policy.  Let’s explore both the capabilities as well as limitations, and how to extend SharePoint to create a true enterprise-class Records Management system.

The overarching goal in Records Management is to ensure Records are handled in a manner that is consistent with the organization’s Records policy.  So first a policy must be defined across the enterprise, and then all systems including SharePoint must manage documents in a policy-compliant, automated, user-friendly and auditable fashion.  Strategically we want to:

  • Limit demands on the user
    Simplify metadata tagging, and hide records jargon from end-users
  • Policy based disposition
    Automate disposition to eliminate the dependency on end-users to take action on each document.
  • Enhanced reporting
    Enable users to self-satisfy, to explore document expiration and disposition.

First let’s clarify what Records are.  Not all documents are Records.  SharePoint offers a range of capabilities in support of defining and managing records:

  • Records can be managed centrally or in-place
    Central management through sending documents to a “Record Center” offers the ultimate in centralized control, search, storage, security and administration.  However there is a real impact on end-users when Records are moved from their usual home.  SharePoint offers “In-Place Records Management” which is the direction the industry seems to be heading.
  • Records can be blocked from deletion
    End users can be prevented from deleting a Record, which makes sense, as Records Management by definition provides policy for treating Records.
  • Records can be stripped of versions
    This reducing the frequency that multiple versions of a Record are stored.
  • Records can be made read-only
    This can be used to lock down a record so it does not change.
  • Records can and likely do have their own expiration and disposition rules
    SharePoint allows a different policy to be applied to a document if it is a record.
  • Records are quickly identified
    Searching, sorting, filtering are available to identify records.  Documents that are records are also easily identified by a special record mark on the document icon.

Below are the pieces of the puzzle, each of which I will devote an article to addressing:

  1. Define your information architecture
  2. Creating a centrally managed set of Content Types with Information Policies
  3. Wrestling an unstructured set of sites, libraries and documents into a centrally managed information architecture
  4. Document Disposition in SharePoint
  5. Customizing the Expiration Date calculation
  6. Reporting on pending document disposition in SharePoint
  7. Review and approval of document disposition
  8. Control the timing of document disposition

I’m going to delve into how to accomplish the above to define and put in place a Records Management policy and system across an enterprise.

Library and Folder Security Gotchas

When setting up SharePoint security on sites, libraries and folders, there are quite a few options available, however not all approaches work as expected.  This article outlines some pitfalls to avoid, and best practices to keep your documents safe and sound, and lastly ensure an optimal end-user experience.

Top-down security

By far the best approach is to have the top level sites as open as possible, and gradually restrict access as needed on subsites, then libraries and finally if absolutely necessary folders.  If a library has broader access than its parent site, end-users will not be able to navigate to it.   There are two subtle problems to be aware of when violating this principle:

  • Granting broader access to Document Libraries
    When a user who does not have explicit Read access to a site accesses a document library within it, the browser and MS-Office Client will try to access Site-level information (such as the Document Information Panel, Content Types, Site columns etc) generating unnecessary end-user logon prompts.  Entering credentials will not succeed, although users can “escape” past these logons.  The better approach is to grant broader access to the site, and then lock down all other libraries.  A simpler approach I’ve used is to define a site-collection permission-level called “Site Reader” with access to pages but not documents.  This simplifies granting access and enables end users to navigate to their document libraries when fine-grained permissions are truly required.  Once you start customizing security for more than one document library it is worth asking yourself whether dedicated sites with custom permissions might be more appropriate.
  • Granting broader permissions to a folder
    Newbie administrators often try to grant broader permissions to a folder in a document library.  While the configuration seems straightforward, end-users cannot access the folder to which they have been granted read access.  The only approach that will work here is to grant the users broader access to the document library, then lock down specific folders to keep them out.

Avoid breaking inheritance

Everything within a Site Collection inherits security by default.  There are of course times that inheritance needs to be broken in order to lock down security.  Be aware that every time inheritance is broken it creates administrative overhead going forward, and is an opportunity for end-user confusion.

If you really need to give broader access to a folder, here’s how:

  1. Create a new Permission Level (details below)
  2. Assign the broader set of users to this permission level at the site level.
  3. Find the library where the site page(s) are located.  This is often called “Pages”.  Break inheritance, and add everyone as “Read” to this library.  That way users can view the landing page.

Here’s how to create the “Site Reader” permission level:
At the Site Collection level, go into “Permission Levels” under site security, and create a Permission Level called “Site Reader”, with the following permissions:

  • Use Remote Interfaces
    Use SOAP, Web DAV, the Client Object Model or SharePoint Designer interfaces to access the Web site.
  • Use Client Integration Features
    Use features which launch client applications. Without this permission, users will have to work on documents locally and upload their changes.
  • Open
    Allows users to open a Web site, list, or folder in order to access items inside that container.

Set your folder permissions.  Groups can be helpful, where a group is given the broader folder level access, and also Read access to “Pages” and Site Reader access to the site.

Not pretty, but it works…

Customized Taxonomy Creation from a feedfile

Creating a customized Taxonomy from a feed file

There’s an native SharePoint 2013 capability to import termsets using a CSV. However it’s limited in structure, produces no logs, and if it encounters a problem, it fails without indicating where it failed, and it won’t continue the import after the problem entry.

For industrial strength Taxonomy loads, rolling your own is the only way.

Here’s a script that is easily adapted and extended. It detects the first letter of the term, and files the terms by the first letter. Then uses two more levels to create a 3 level hierarchy

When loading terms, terms are committed in batches. The larger the batch, the faster the load. However for most one-off loads, I recommend using a batch size of 1, so any errors are immediately addressable and localized to one term.

Taxonomy basics
First, grab a taxonomy session

1
$taxonomySession = Get-SPTaxonomySession -Site $TaxSite

Now let’s grab the termstore for our target Service Application

1
$termStore = $taxonomySession.TermStores[$ServiceName]

Finally, we can grab our target group

1
$group = $termStore.Groups[$GroupName]

Lastly, we can grab our target termset if it exists

1
$termSet = $group.TermSets | Where-Object { $_.Name -eq $termSetName }

Or create a new termset:

1
2
$termSet = $group.CreateTermSet($termSetName)
$termStore.CommitAll()

Let’s grab one or more matching terms. Setting the value below to $true avoids untaggable terms, like parent company at higher tier, but we want to find unavailable tags here

   [Microsoft.SharePoint.Taxonomy.TermCollection] $TC = $termSet.GetTerms($CurrentLetter,$false)

Let’s see what matching terms we have:

   if ($TC.count -eq 0)
{
  write-host "No Matching Terms Found!"
}
else
{
  write-host "$($TC.Count) Matching Terms Found!"
}

Let’s create a Term2 beneath an existing Term1, then set a description value:

 $Lev2TermObj=$Lev1TermObj.createterm($Lev2Term,1033);
        $Lev2TermObj.SetDescription($Description,1033)

That covers some of the basics. Let’s put it together into a useful script:

 #CREATES  AND POPULATES A FULL HIERARCHICAL TERMSET
#Later we can add details to termset
#term.SetDescription()
#term.CreateLabel
#KNOWN PROBLEM: batch will fail if there are duplicate names in the batch, preventing clean restart unless batch size = 1
 
$snapin = Get-PSSnapin | Where-Object {$_.Name -eq 'Microsoft.SharePoint.Powershell'}
    if ($snapin -eq $null)
    {
      Add-PSSnapin Microsoft.SharePoint.PowerShell
    }
 
$env="Prod"
$termSetName = "YourTermset"
 
$SourceCSV="L:PowerShellTaxTabDelimitedTermsetFeed.txt"
 
#set the batch size; 100+ for speed, reduce to 1 to catch errors
$batchSize=1;
$BatchNum=0;
 
if ($env -eq "Dev")
{
    $TaxSite = "http ://SharePoint Dev"
    $ServiceName="Managed Metadata Service"
    $GroupName="TermGroupName"
}
elseif ($env -eq "Prod")
{
    $ServiceName="Managed Metadata Services"
    $TaxSite = "http ://SharePoint"
    $GroupName="TermGroupName"
}
 
try
{
$StartTime=get-date;
Write-Host -ForegroundColor DarkGreen "Reading CSV...$($StartTime)"
$Terms=Import-Csv $SourceCSV -Delimiter "`t"
$ReadSourceTime=Get-Date;
$Duration=$ReadSourceTime.subtract($StartTime)
Write-Host -ForegroundColor DarkGreen "Read in $($Terms.count) items from $($SourceCSV) in $($duration.TotalSeconds) Seconds"
}
catch
{
Write-Host -ForegroundColor DarkRed "Could not read in $($SourceCSV)"
}
    #first let's grab a taxonomy session
    $taxonomySession = Get-SPTaxonomySession -Site $TaxSite
    #plural Now let's grab the termstore for our target Service Application
    $termStore = $taxonomySession.TermStores[$ServiceName]
    #Finally, we can grab our target group
    $group = $termStore.Groups[$GroupName]
 
    $termSet = $group.TermSets | Where-Object { $_.Name -eq $termSetName }
    if($termSet -eq $null)  # will have to create a new termset
    {
        try
        {
            $termSet = $group.CreateTermSet($termSetName)
            $termStore.CommitAll()
            Write-Host "Created Successfully $($termSetName) TermSet"
        }
        catch
        {
            Write-Host "Whoops, could not create $($termSetName) TermSet"
        }
 
    }
    else #termset already exists
    {
    Write-Host "Nice, termset $($TermSetName) already exists"
    }
 
$CurrentLetter=$LastParentTerm=$null; # track previous parent, to determine whether to create a parent
 
for ($i=0; $i -lt $Terms.count; $i++)
{
$Lev1Term=$Terms[$i]."Level 1 Term"
$Lev2Term=$Terms[$i]."Level 2 Term"
 
if ($LastParentTerm -ne $Lev1Term)
{
    $LastParentTerm=$Lev1Term;
    if ($LastParentTerm[0] -ne $CurrentLetter)  #create a new letter!
    {
        $CurrentLetter=$LastParentTerm[0];
        #setting to $true avoids untaggable terms, like parent company at higher tier, but we want to find unavailable tags here
        [Microsoft.SharePoint.Taxonomy.TermCollection] $TC = $termSet.GetTerms($CurrentLetter,$false)
        if ($TC.count -eq 0)
        {
            $CurrentLetterTerm=$termSet.createterm($CurrentLetter,1033);
            $CurrentLetterTerm.set_IsAvailableForTagging($false);
        }
        else
        {
            $CurrentLetterTerm=$TC[0]
        }
 
    }
 
    #first try to find existing level1 term before trying to create the term.  This is needed for incremental loads
    [Microsoft.SharePoint.Taxonomy.TermCollection] $TC = $termSet.GetTerms($Lev1Term,$false)
    if ($TC.count -ge 1)  #Term found.  So use it
    {   #assume only one hit possible, if more than one found, just use first, as precise parent is less important in this case
        $Lev1TermObj=$TC[0];
    }
    else # no term found, so create it
    {   #in this case, all parent terms are not available, this logic is for extensibility only
        $Lev1TermObj=$CurrentLetterTerm.createterm($Lev1Term,1033);
        if ($Terms[$i]."available" -eq "FALSE")  #careful, if term2 has a new term1, the term1 will be created as available for tagging
        {
            $Lev1TermObj.set_IsAvailableForTagging($false);
        }
        else
        {  #we choose not to tag this level as available, so force level1 to always unavailable.
        $Lev1TermObj.set_IsAvailableForTagging($false);
        }
    }
} #term1 unchanged, so this above was handling new terms or finding terms, below is just term2 handling. Note hole, in case term is being loaded that exists already
    try
    {
    if ($Lev2Term.get_length() -ne 0)  #bypasses my habit of new parent terms with empty level 2, can be zero length and not null
        {
        $Lev2TermObj=$Lev1TermObj.createterm($Lev2Term,1033);
 
        $Description=$Terms[$i]."Description"
        if ($Description.get_Length() -ne 0)
        {
            try
            {
                $Lev2TermObj.SetDescription($Description,1033)
            }
            catch
            {
            Write-Host -ForegroundColor DarkRed "Failed to set description on $($i)"
            }
        }
 
        }
    }
    catch
    {
    Write-Host -ForegroundColor DarkRed "Could not create $($terms[$i])"
    }
    if (($i % $batchSize) -eq ($batchSize-1))   #some quick modulus math
    {
    $BatchNum++;
        try
        {
        $termStore.CommitAll();
        Write-Host -ForegroundColor darkgreen "Committed terms in batch: $($BatchNum)"
        }
        catch
        {
        Write-Host -ForegroundColor darkred "FAILED commiting terms in batch: $($BatchNum), Index: $($i)"
        }
    }
}
 
$termStore.CommitAll();  #in subsequent ophase, try to commit a batch at a time

Observations

1. CSV loads fast, and is cached, so subsequent loads are extremely fast
2. Batching speeds things, but not as much as one might imagine
3. Once a batch fails due to a duplicate name, the whole process is messed up and the script needs re-running

Tips and tricks

1. Sort source CSV by Term1 () then by Available
2. Eliminate leading blanks for terms using Trim()
3. Ensure no dups in advance
4. Sort so all term levels are grouped together, otherwise an attempt to create the second set of Term1 will fail

Enjoy!

Tuning Your Crawl

Want to tune your Search crawling? There’s plenty of benefit to be had refining how Search crawls in SharePoint. Eliminate useless page hits, or documents that will fail crawl processing.

It’s another way to exclude sensitive documents as well, if you can find a suitable search crawl exclusion rule.

I found out the hard way that SharePoint URLs defined in a Content Source MUST be a Web Application.

If you only want to crawl a subsite your recourse is to pare out all other sites using Crawl Rules.

The Crawl Rules come in two basic flavors; simple wildcard which is quite intuitive, and Regular Expressions. You can find the Crawl Rules in Central Admin, General Application Settings, Search, (your Content SSA if in FAST), Crawl Rules ( visible on left).

Surprisingly, there is scant documentation on the Regular Expression implementation in SharePoint.Through a bit of digging and trial and error I’ve summarized the Regular Expression operators supported in SharePoint:

? Conditional matching; matches optionally “http ://SharePoint/List_%5ba-z%5d?.aspx”
the char a-z is optional
* Matches on zero or more “http ://SharePoint/List_M*”
no M or M or MM…at the end.
+ Matches on one or more “http ://SharePoint/List_M”
One or more Ms at the end
. Match one character “htt p://SharePoint/List_”
One character expected after _
[abc] Any characters; I use abc as example. Ranges a-c work too “http ://SharePoint/List_%5ba-z]”
Matches on any List_ with any letter a-z
| Exclusive OR
If both sides are true, this evaluates to false.
() Parentheses group characters for an operation
{x,y} Range of counts
{x} Exact count
{x,} X or more counts

For FAST, note the Crawl Rules are under your Content SSA, not the Query SSA.

To create an Exclusion Rule with Powershell, Type 0=include, 1=exclude:

New-SPEnterpriseSearchCrawlRule -SearchApplication FASTSearchApp  -Path “http ://SharePoint/Sites/Secret/*”  -Type 1

To output all your Crawl Rules, use this line of PowerShell:

get-SPEnterpriseSearchServiceApplication | get-SPEnterpriseSearchCrawlRule | ft

The CmdLet “get-SPEnterpriseSearchCrawlRule” requires a Service Application object, so we simply pipe one in using the “get-SPEnterpriseSearchServiceApplication” CmdLet.

You can then pipe it to whatever you want.  “ft” is an alias for Format-Table, which is the default output, but you can just as easily pipe it to a file for automatic documentation.

This is especially useful when playing with your crawl rules.

Changing Mysite Links

When the User Profile Service is configured, settings are configured for the default location for all MySites, as well as the associated search location.

These two URLs are managed for all MySites; both current and MySites are yet to be created.

If you try to change these values, you may find that the changes do not “stick”.

I was faced with a farm that had Web Applications originally created that referred explicitly to the Web Front End (WFE) server using a port number.

Moving to all friendly URLs instead of server names has the following advantages:

  • Disaster Recovery (DR)
    You can route a DNS based URL to a different server, if need be
  • Easier load balancing
    The DNS can route to a Virtual IP (VIP) supported by Microsoft Server 2008, or via a dedicated hardware solution (such as a F5 BigIP or Kemp)
  • Shorter URLs
    Long URLs create problems a bit quicker, due to length restrictions.  This most often occurs through deeply nested folder names in SharePoint.
  • User Friendly URLs
    Enabling users to type “SharePoint”, “Search”, “MySite” or “Intranet” into the browser makes the user experience that much easier.

Adding a friendly DNS name is easily done through Alternate Access Method (AAM), but getting the friendly Web Application name into the User Profile Service took a bit of research.

To change these settings:

  1. Go into Central Admin
  2. Click “Manage Service Applications”
  3. Click “User Profile Service” (yours could have a different name, depending on what was chosen during installation)
  4. Click “Setup My Sites”
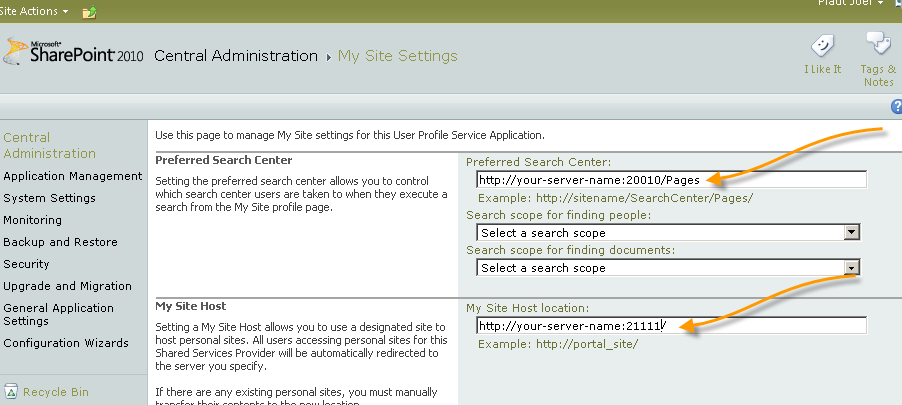
  5. Update the URLs for Search and MySite Location

mysites1

However, if your new URLs are not in the default zone, you are in for a surprise. It turns out, that the User Profile Service actually pokes into the URLs you enter, and changes them back to the Default Zone for the URL.

How to fix?

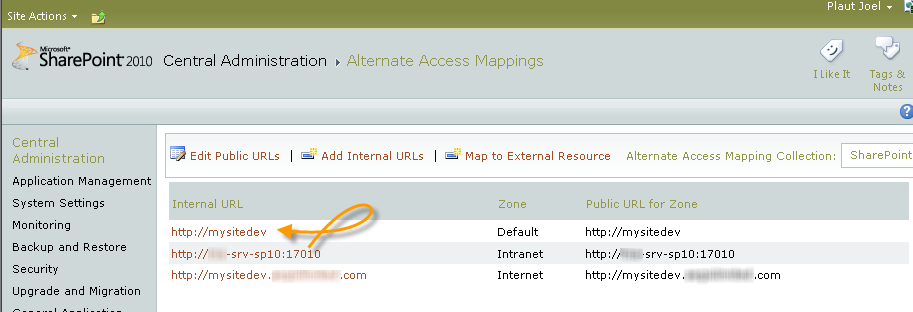
Let’s change the Default Zone, by going into AAM:

  1. Go into Central Admin
  2. Click “Application Management”
  3. Click “Alternate Access Methods”
  4. Select your Web Application from the drop-down on the right
  5. Edit Public URLs

mysites2

There are a total of five zones available. The “Default” zone is where you want your new friendly name to reside. Note above that the “MySiteDev” is entered twice.  The second time as a Fully Qualified Domain Name (FQDN).

That’s best practice as fall-back for non-standard access to your sites; the FQDN is often a default trusted site in browsers in companies.

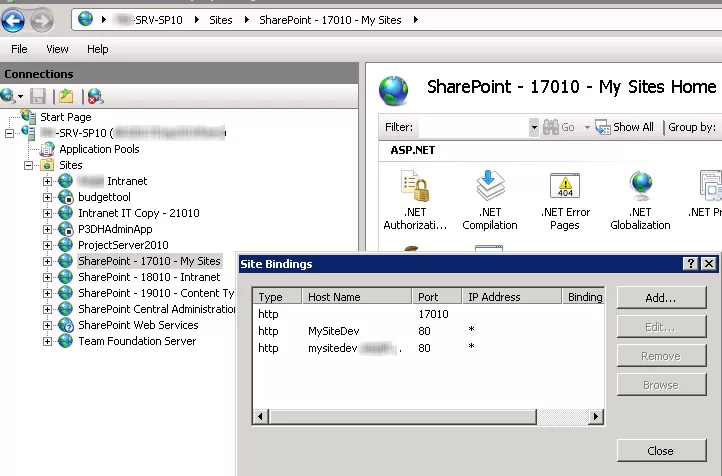
Now let’s make sure IIS is configured to handle your URLs:

  1. Logon to your SharePoint server
  2. Open IIS
  3. Open the Web Application
  4. Click “Edit Bindings”

mysites3

Before you start:

  1. For multiple WFEs, you will need to make the change to each WFE
  2. Make sure the new friendly DNS names are created
    A Records are best for several reasons, including they will be required if you use or will migrate to Kerberos
  3. An IISReset is required
    At the very least the Web Application/Application Pools will need recycling.  A reboot is always best.
  4. Have your backup/restore strategy in place
    At the very least, keep your notes of all changes.  Note a server snapshot and a farm config DB backup is highly recommended.
  5. Test first in Development
    Do it all in Development first. I heard a very wise MVP once say “If you say you don’t have a Development Environment, what you really mean is that you don’t have a Production Environment!”

Limiting Search Crawling to a subsite

I had an interesting challenge.  I was asked to limit Search Crawling to a single subsite.  The underlying issue was that a great deal of security in this farm was implemented via Audiences which is not a secure method of locking down content. Audiences expose documents and items to users, but don’t prevent the user from actually accessing the documents or items.  Search Content Sources expect to have nice and simple Web Application URLs to crawl.  So how best to restrict crawling to a subsite?

The simple answer is set up the Content Source to crawl the whole Web Application, but set up Crawl Rules to exclude everything else.  Only two rules are needed:

  1. Include: List the site to include, such as “http ://SharePoint/sites/site1/site2”
    Note the * at the end to ensure all sub-content is crawled.  Being the first crawl rule, this takes precedence over the next. Don’t forget the *.*
    It seems the testing of the crawl rule with just a * will appear to capture all content, but at crawl time, only a *.* will capture content with a file extension.
  2. Exclude: List everything else: http://*.*
    This will exclude anything not captured in the first rule.
  3. If you have a content source that includes people (sps3://SharePoint) be sure to use a wildcard on the protocol as well.

Voila!

Memory Management in PowerShell

For limited work in SharePoint PowerShell, memory is freed when the PowerShell session is closed. If your script ignores memory management, everything usually just works fine. But what happens when you alter metadata for hundreds of thousands of documents within thousands of document libraries in one PowerShell script?

Doing a simple $web.update() is not enough. In fact the implications are more significant than just memory. The SharePoint Object Model doesn’t just hold onto the memory. It also keeps the Content DB transaction open on SQL Server. The result is a growing Transaction log, until the transaction is completed. The transaction log is not flushed until the memory is explicitly released. I know, because my script started consuming tens of GBs, until I ran out of Transaction Log space.

Additional Read

Send email from PowerShell


In addition to the normal $var.update() and $var.dispose(), you want to use Start-Assignment/Stop-Assignment both locally through a named Assignment Object, and also Globally at the start/end of the script. If you monitor SQL Transaction Logs, as well as memory utilization, the results are remarkable. Note that you will not be able to access any of the script objects (of course) after the script run, so consider adding these as the final touch after debugging.

Here’s what to add to your scripts to keep both memory management and SQL transaction management lean and mean:


 # avoid problems, try to add in SharePoint snap-in, but don't complain if it's already loaded 
Add-PSSnapin "Microsoft.SharePoint.PowerShell"-ErrorAction SilentlyContinue
 # this frees up all assignments if you end it at end of script 
Start-SPAssignment –Global
#sample function, that cleans up after itself
function Reset-SPstuff ($WebUrl)
{
 $FuncAssign =Start-SPAssignment #start of a named assignment object
  #Here's how to allocate an object using an assignment:
$web=$FuncAssign | Get-SPWeb$WebUrl
 #your function... 
$web.Dispose()
$FuncAssign | Stop-SPAssignment    #release the named assignment object
 }
 
 # here's the main part of script, 
$site =... 
 #for any variable you do use without a named assignment, try to dispose of it after use:
try {$site.Dispose();} catch {Write-Host"can't dispose Site $($site.title) object"}
 # very important to end the assignment of anything from within this script between Start/Stop assignment: 
Stop-SPAssignment –Global

Direct filtered access to SharePoint Timer Job History

Have you ever needed to scroll through the Timer Job History in Central Administration?  Wow, do a lot of jobs run!  Nice that you can view 2,000 at a time, but even that’s not enough to scroll to a previous day’s Timer Job History.   You can just jump into SQL Studio and use this query to extract the timeframe you want.  I needed a two minute window almost three days ago, here’s the simple query, enjoy!

  SELECT * 
FROM [SharePoint].[dbo].[TimerJobHistory] 
WHERE starttime >'1/1/12 4:59:00'and EndTime <'1/1/12 5:01:00'