Real-Time Data Updates in Power BI

Introduction

Imagine this: you’re in a pivotal meeting, ready to make a key decision for your company. Excitement fills the room as you prepare to review the Power BI report, but suddenly, the dashboard lags—displaying outdated data.

Two common methods exist for updating Power BI data:

  1. Manual Refresh: Data updates occur via backend processes requiring manual intervention.
  2. Real-Time Integration: Data flows automatically into reports as soon as it is updated.

With Power Apps integration, the second method becomes a reality. By linking Power Apps with Power BI, you can ensure reports update dynamically, enabling real-time insights for smarter decision-making without delays.

This blog explores how to achieve seamless real-time updates in Power BI by leveraging Power Apps.

Real-Time Data Updates: A Practical Example

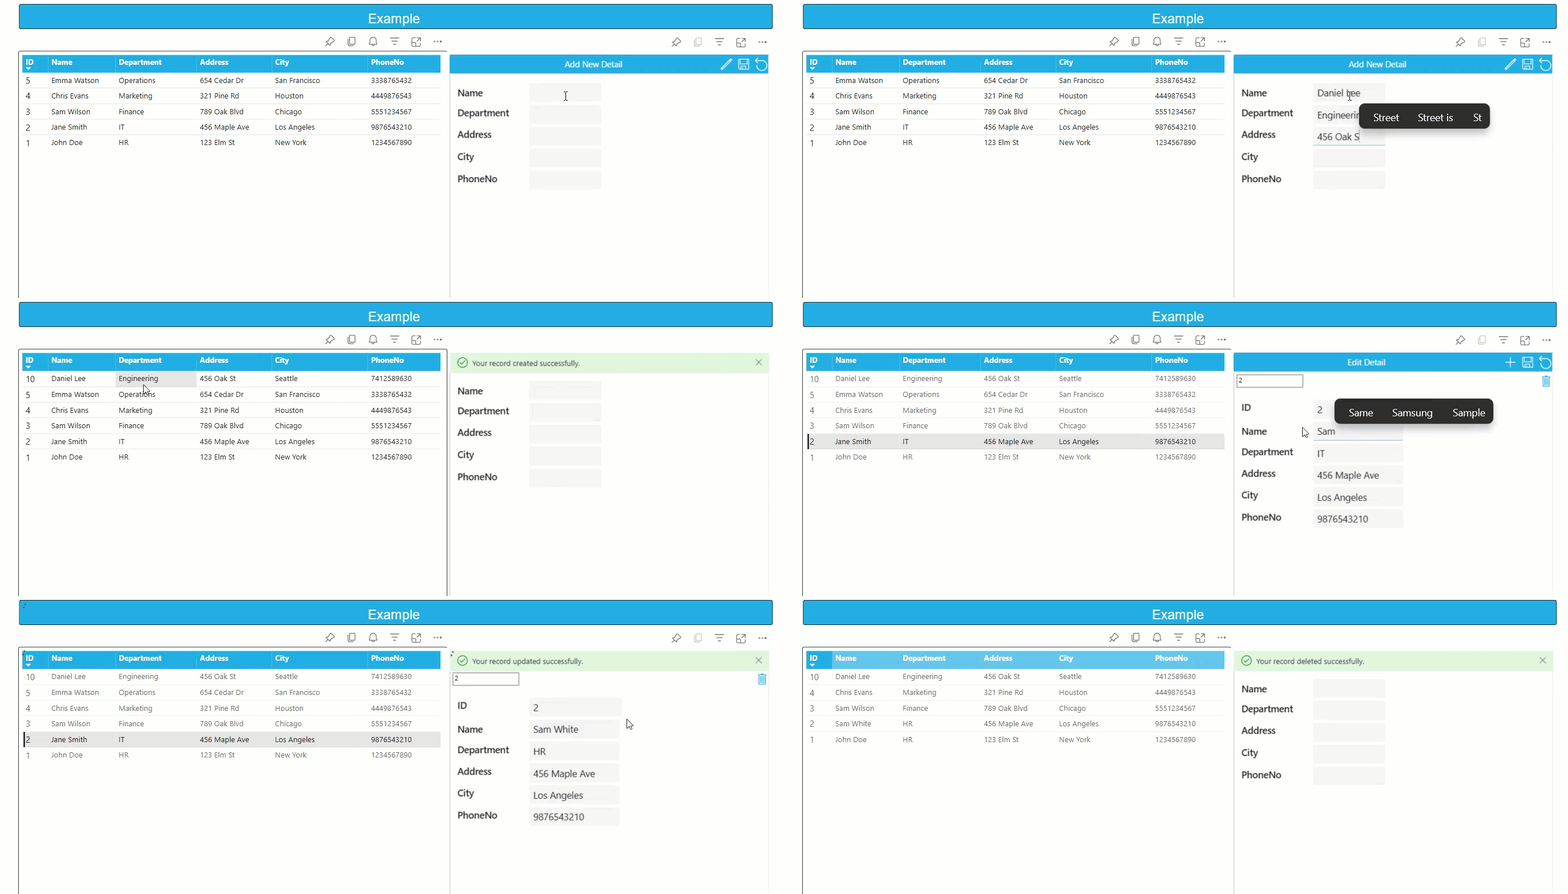
Picture this: as sales figures or inventory data updates in Power Apps, the corresponding Power BI reports instantly refresh—keeping decision-makers informed with the most current insights.

Here is the visual representation of Power BI and Power Apps integration:
IMG 01 GIF


Summary

In this blog, we will dive deep into how you can leverage Power Apps to push data updates directly to Power BI, ensuring that your report is always showing the most current and accurate information available. Let’s get started with a step-by-step guide to setting up real-time data updates between Power Apps and Power BI.

Steps to Integrate Power Apps Visual with Power BI

Prepare Data Source

Power BI and Power Apps support multiple data sources such as SharePoint, Dataverse, and SQL databases.

Ensure that your data sources support Direct Query. For example:

  • For SQL databases, enable the correct table and configure permissions.

IMG 02


Create a Power BI Report

  • Go to Power BI Desktop, click on the blank report, and create a new report.
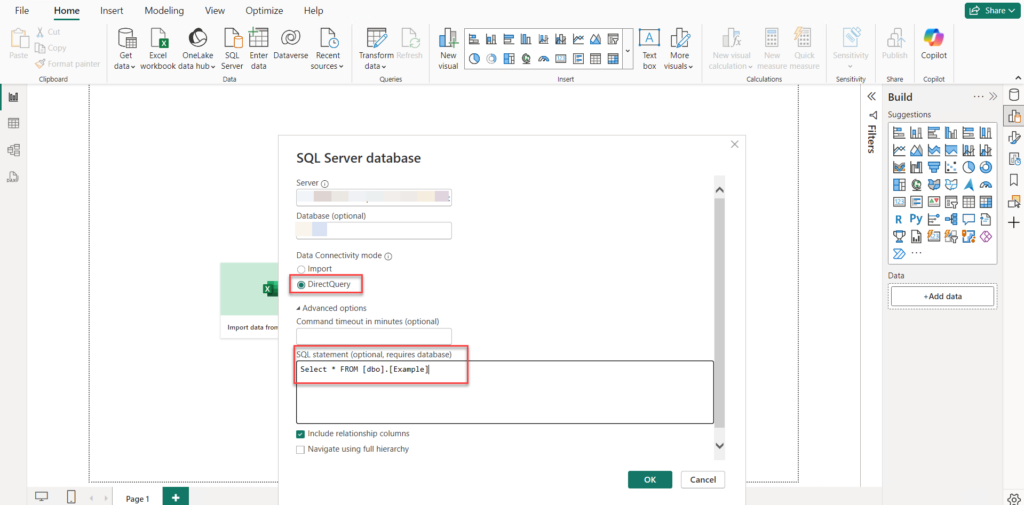
  • Choose SQL as the data source, connect to your server, and select “Direct Query” as the connectivity mode. Add your table to the report.

Why Use Direct Query?

Direct Query ensures real-time updates by querying the data source directly. This keeps your report constantly up to date, without the need for manual refreshes. Unlike the Import method, which requires scheduled refreshes, Direct Query eliminates data duplication and always reflects the latest information.
IMG 03


Add Visual to Power BI Report

After setting up Direct Query, select the visual (e.g., matrix visual) where you want to display the data. Add the relevant columns and publish your report to the workspace.
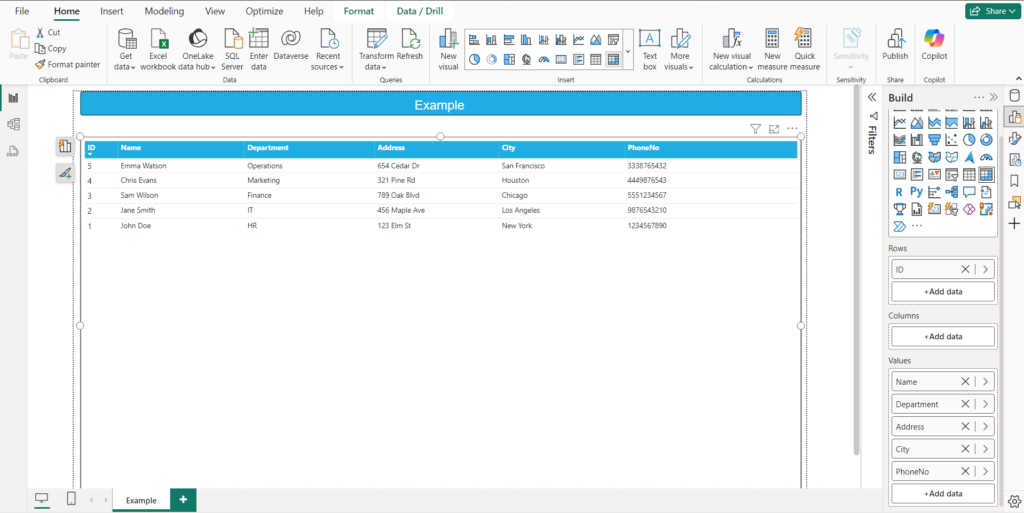
IMG 04


Power Apps Integration

To integrate with Power Apps, use the web version of Power BI, as the desktop version has limitations in this area. You can test the integration locally in the desktop version, but to fully interact with Power Apps, you need the Power BI Service.

  • Go to Power BI Web (“ https://app.powerbi.com/”) and navigate to your workspace.
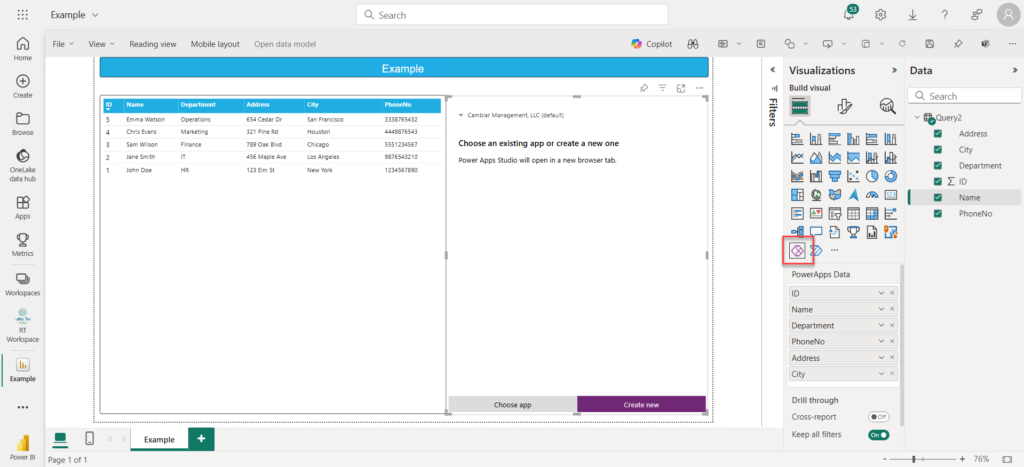
  • Open the report, click on “Edit,” and add the Power Apps visual. Select the columns you want to display and click “Create New.”IMG 05
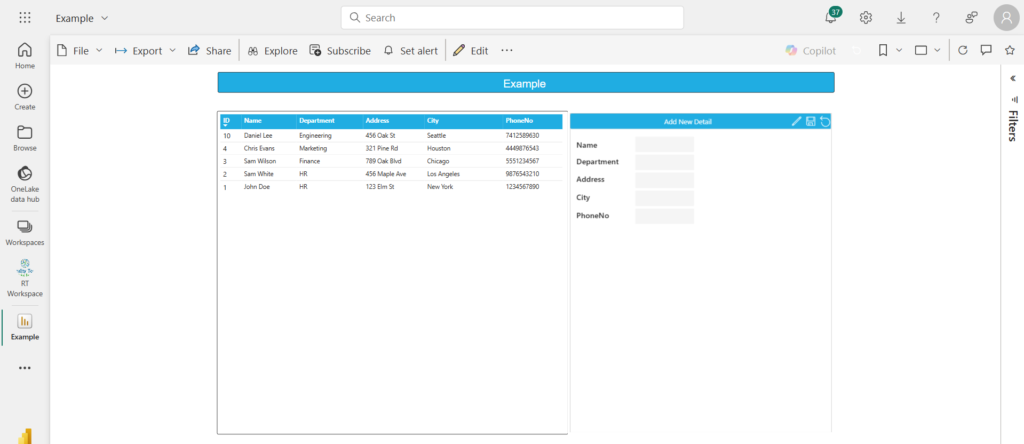
  • After creating the Power Apps, you can see both the Power Apps visual and the Power BI report visual like this.IMG 06

Add PowerBIIntegration.Refresh() Formula

In the newly created Power App:

  • Design the app to allow data submission, updates, or deletions.
  • In your new Power App, where the data submission, update, or deletion occurs, add the following formula: Refresh()
  • e.g. Use the PowerBIIntegration.Refresh() formula in the submit button’s OnSelect property to trigger real-time updates.IMG 08
    IMG 07

Note: This formula only works with newly created apps it will not work with existing ones.This formula ensures that after any data is entered, updated, or deleted in Power Apps, the Power BI visual will refresh automatically to display the most current data.

How It Works:
When data is submitted, updated, or deleted in Power Apps visual, the PowerBIIntegration.Refresh() formula triggers a refresh in Power BI. This ensures that the Power BI report instantly reflects the latest data, removing the need for manual refresh.

Conclusion:
Real-time data integration between Power Apps and Power BI transforms the way businesses operate, enabling dynamic and informed decision-making. By leveraging this seamless connection, you can eliminate delays, enhance accuracy, and gain immediate insights whenever new data becomes available. This integration not only saves time but also empowers teams to stay ahead in fast-paced environments. Implementing this solution opens up opportunities to make smarter, data-driven decisions with confidence, ensuring that your business remains agile and competitive in a world where every moment counts.


Row-Level Security in Power BI

Introduction to Row-Level Security (RLS)

Knock, knock! Who’s there? Data security!

In today’s data-driven landscape, safeguarding access to sensitive information is not just important—it’s essential. As organizations increasingly rely on tools like Power BI for data analysis and decision-making, ensuring data confidentiality and compliance becomes paramount. Enter Row-Level Security (RLS)—a feature designed to restrict data visibility based on user roles.

With RLS, you can centralize reporting while ensuring that each user only sees the data relevant to their responsibilities. This improves data privacy, supports compliance, and simplifies management, all while delivering tailored insights to users.

Why Use Row-Level Security?

The primary benefits of RLS in Power BI include:

  • Enhanced Data Privacy: Protect sensitive information by ensuring users access only authorized data.
  • Compliance: Meet regulatory requirements for data segregation and confidentiality.
  • Improved Decision-Making: Allow users to make decisions based on relevant and role-specific data.

Configuring Row-Level Security in Power BI

Importing and Preparing Data:

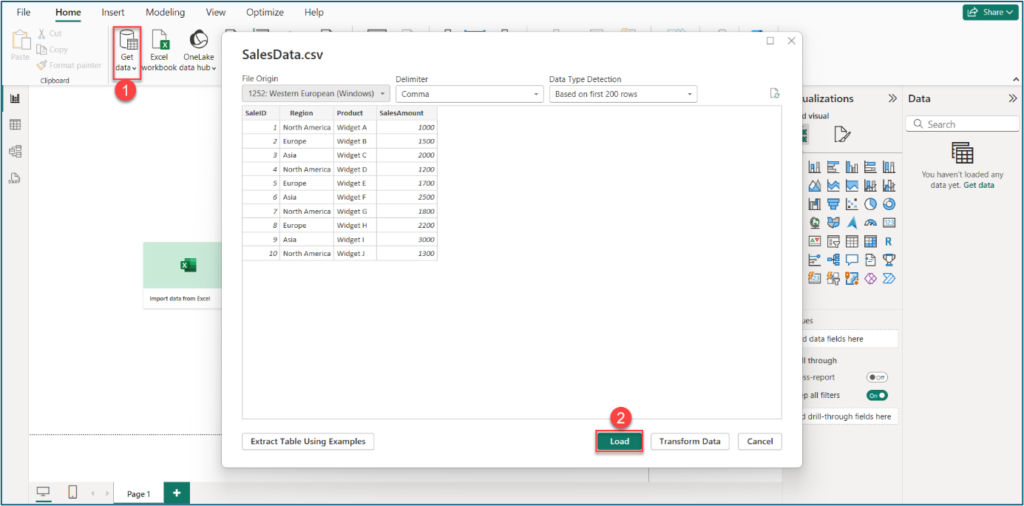
  • Open Power BI Desktop.
  • Select Get Data to import your dataset and load it into the report.

01 1

Managing Roles:

Navigate to the Modelling section and select Manage roles.

Creating a New Role:

  • Select New to create a role
  • Choose the table for which you want to set up restrictions.
  • Define your filtering logic:
    • Use basic conditions to filter rows (e.g., Region = “Europe”).
    • Switch to the DAX Editor for advanced, dynamic filtering.

02 2 1

Example:

  • Europe Role: Filter data where the region equals “Europe”.04 2
  • North America Role: Filter data where the region equals “North America”.

    05 2

Testing Your Role:

  • Use the View as option to simulate the report for specific roles.
  • Select a role and click OK to see the restricted view.
  • To revert, click Stop Viewing to return to the unrestricted view.

07 1

Result: The view will appear as configured with Row-Level Security (RLS), showing only the data the user is permitted to access based on their role.

Note: After clicking on “Stop Viewing” the data should revert to the normal view, displaying all accessible data without the role-based restrictions.

08 1 1

Saving and Publishing:

Save your report and publish it to your Power BI workspace.

09 1

Applying Security Settings in Power BI Service:

  1. Open Power BI Workspace at app.powerbi.com and select your workspace.

    10

  2. Navigate to your dataset and click on three dots. Go to security option.

    11

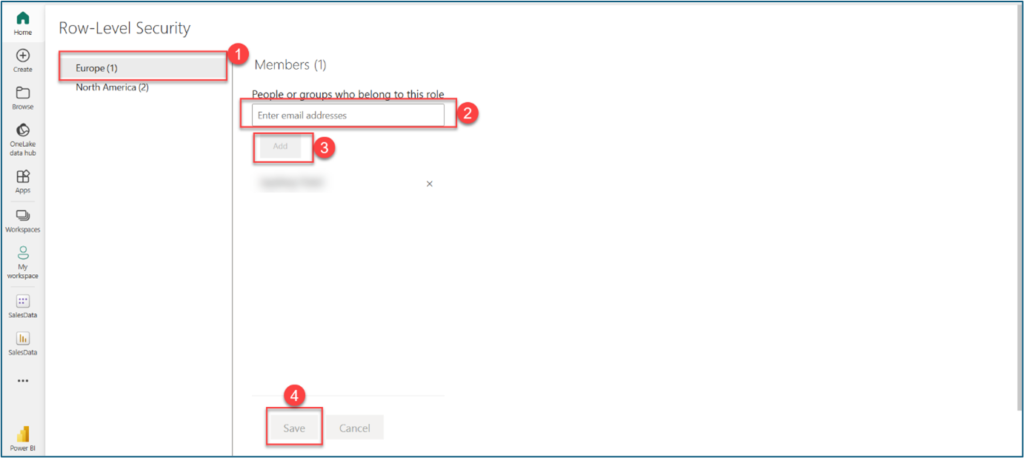
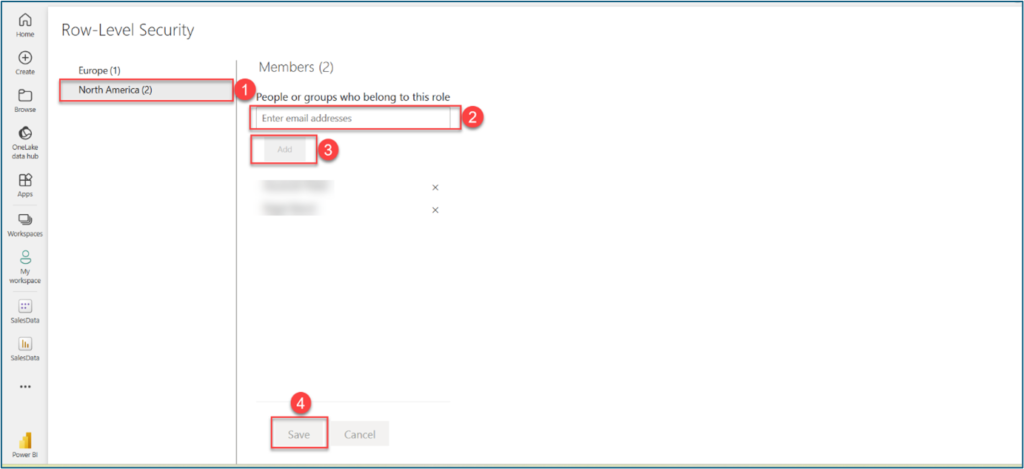
  3. Select Role-Level Security role, Enter the user’s email address, click the Add button, and save the changes. Now, the user will only see the rows that you want them to see.

Example Role Assignments:

  • Europe Role: Assign specific user permissions so that only the designated user can see data filtered for Europe. This role has permission assigned to one user, as shown in the image.

    12

  • North America Role: Similarly, assign specific user permissions for a designated user to view only data filtered for North America. This role has permission assigned to two users, as shown in the image.

    13

Note
For Power BI, if a user has either member or admin permissions, they can see all data. Therefore, manage permissions accordingly, especially when using Row-Level Security (RLS).

Conclusion
Row-Level Security (RLS) in Power BI is crucial for protecting sensitive data by ensuring users access only the information relevant to their roles. Using the Security Editor in Power BI Desktop, you can define and manage RLS roles to enhance data privacy and compliance. This guide will help you implement RLS in your reports, providing secure and tailored data access for all users.

How to implement Cascading Drop Downs in Model-Driven Apps

Introduction:

When dealing with applications that manage large amounts of data, filling out forms with numerous fields and options can often be overwhelming for users. Cascading dropdowns in Model-Driven Apps offer an effective way to simplify this process. They allow users to select options in a specific order, with each choice narrowing down the available options for the next step. This not only makes data entry more efficient but also reduces the likelihood of errors by showing only the most relevant choices. By leveraging relationships between Dataverse tables, users are presented with options tailored to their previous selections. In this guide, we will walk you through the steps to set up cascading dropdowns in Model-Driven Apps.

Scenario:

Consider a scenario where you are building a student registration form, and users need to select their country, state, and city. When a user picks a country, only the states for that country should be shown. Then, once a state is chosen, the city dropdown should only display cities within that state. This approach reduces confusion and ensures users only see options that are relevant to their previous choices, making the process more streamlined and easier to follow.


01 2


To begin, you need to create the necessary Dataverse tables. Start by creating a Country table with a Country Name column of the Single Line of Text type. Populate this table with country names, such as the USA, Canada, and the UK.


03 1


Afterward, create another table called State, which should include two columns: a Country column (a lookup column pointing to the Country table) and a State Name column (a single line of text that contains the name of the state based on the selected country). Once you have set up the State table, input state data corresponding to each country (e.g., California for the USA, Ontario for Canada).


04 1


Next, create a City table. This table will have three columns: Country (lookup to the Country table), State (lookup to the State table), and City Name (a single line of text that contains the name of the city based on the selected state). Populate this table with cities associated with their respective states and countries (e.g., Los Angeles for California, Toronto for Ontario). Now, you have a structure in place where the relationships between Country, State, and City are ready for cascading functionality.


05 1


With the foundational tables set, it’s time to create the Main Table, where users will input their details. In this table, include fields for First Name, Last Name, Address, and Phone Number as Single Line of Text columns. Then, add lookup columns for Country, State, and City, each referencing their corresponding Dataverse tables.


06 1


To enable the cascading effect, you need to establish relationships between the Main Table and the Country, State, and City tables. To do this, navigate to the Main Table, select the Relationships section, and create Many-to-One relationships with the Country, State, and City tables. This will link the Main Table to the Country, State, and City tables, forming the basis for the dynamic filtering.


07


08


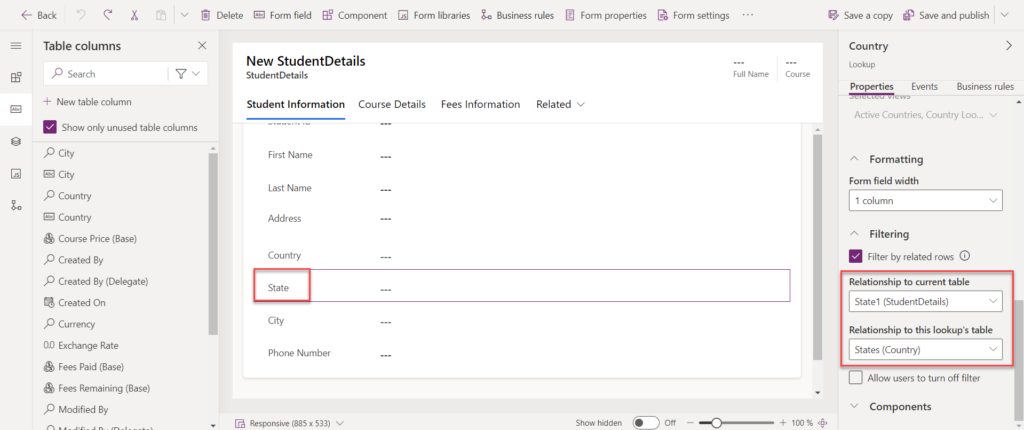
Once the relationships are set, go to the Main Form where users will input data. Select the State field, and in the properties pane on the right, configure the Filtering option. Set the State field to be filtered based on the selected Country and relationship. Repeat this process for the city field, ensuring that it filters based on the selected State. After configuring the filtering for the fields, save your changes and publish the app.


09


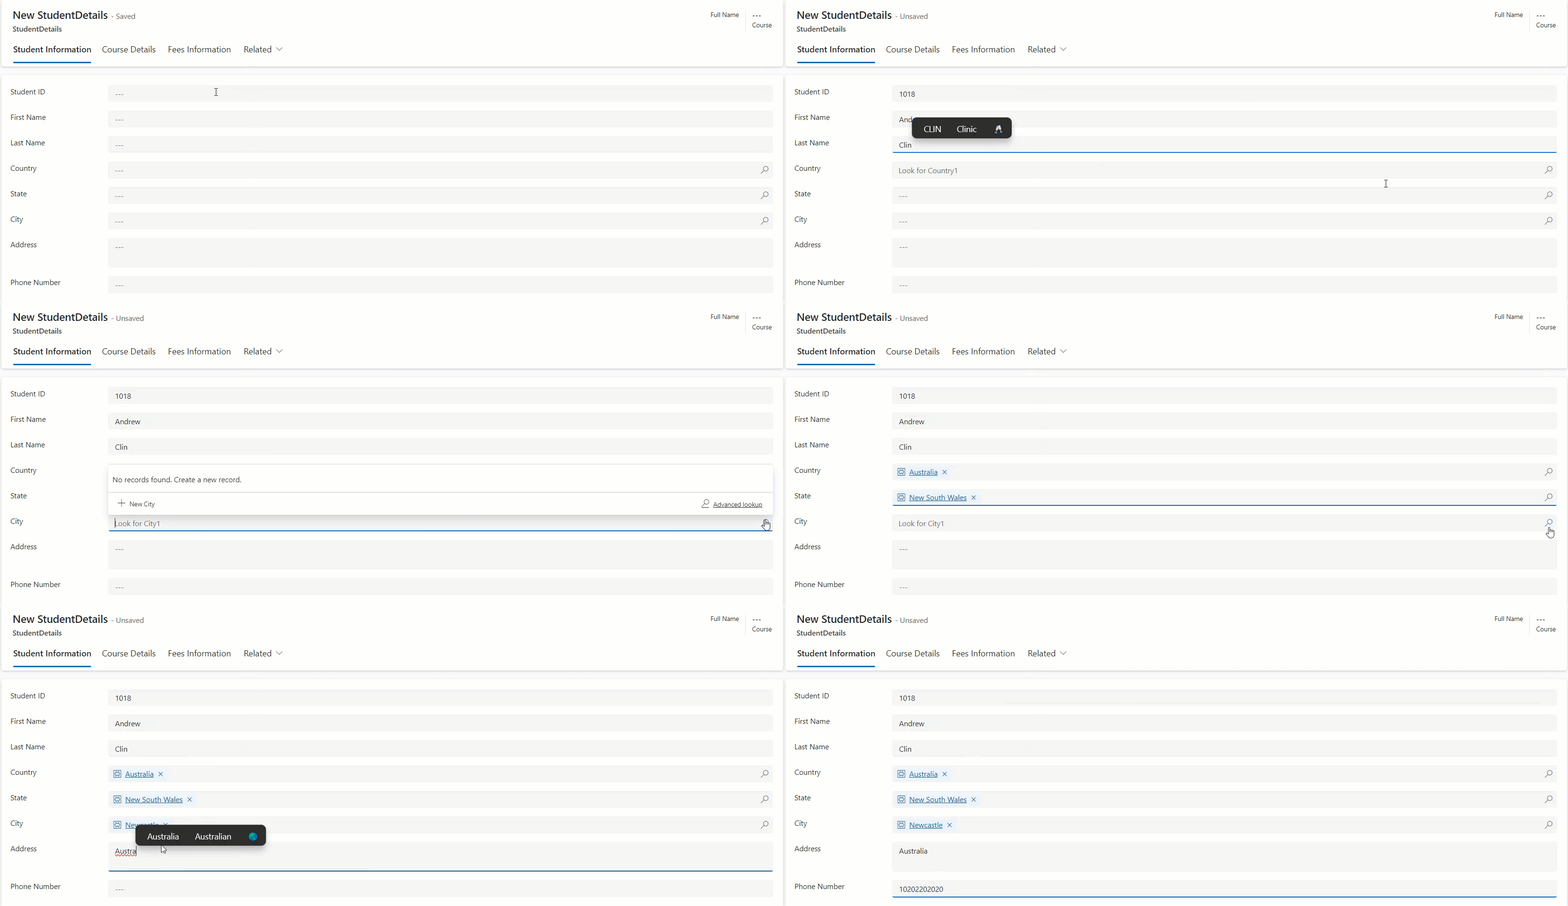
Now, when users fill out the form, selecting a country will automatically filter the options available for states, and selecting a state will filter the cities accordingly. This cascading functionality creates a seamless user experience by ensuring that each field displays only the relevant options based on prior selections.


FinalGIF 4


Conclusion:

Cascading dropdowns in Model-Driven Apps make data entry easier by presenting relevant options based on previous choices, minimizing errors. This leads to more accurate data and smoother processes. Using Dataverse relationships improves the overall user experience and efficiency.


Concatenation multiple columns using formula type column in Microsoft Dataverse

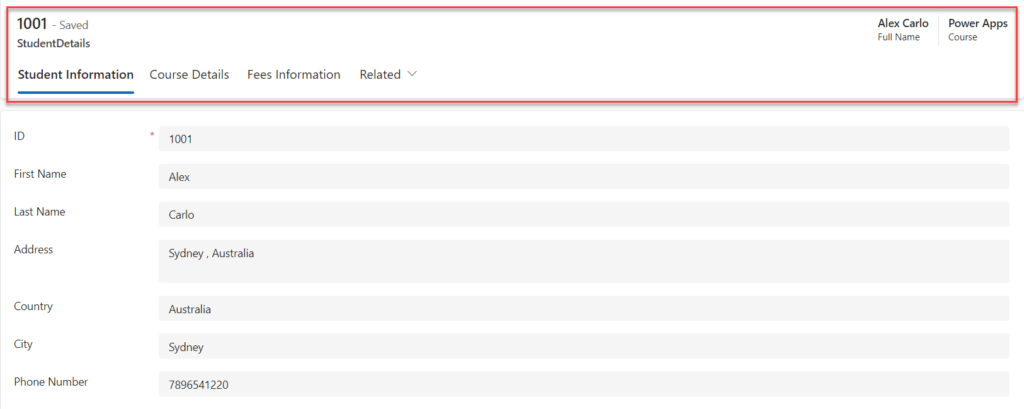
Information: A dynamic header allows important information to be displayed at the top, making it easier for users to view key details without navigating through different sections of the form.

Scenario: Let’s say you’re working on a Student Details form with multiple tabs. Each tab contains information such as Personal Details, Enrollment, Courses, and Grades. Instead of making users click through different tabs to access basic information, you can create a dynamic header that displays the student’s full name and course, visible at all times, enhancing the user experience.


01


Here are the steps to create a dynamic header for the modern-driven app:

Step 1: Go to Power Apps and navigate to the table used in the application. Create the columns you want to display in the application header in the column section.

Step 2: To display the student’s full name (combining the first and last names) in the header, a new column named “Full Name” was created, with the data type set to Formula. The Concatenate function was used in the formula to combine the first and last names: Concatenate (‘First Name’, ” “, ‘Last Name’).


02


Step 3: After creating the ‘Full Name’ column, drag and drop it into the header section of the app, then save and publish the form.


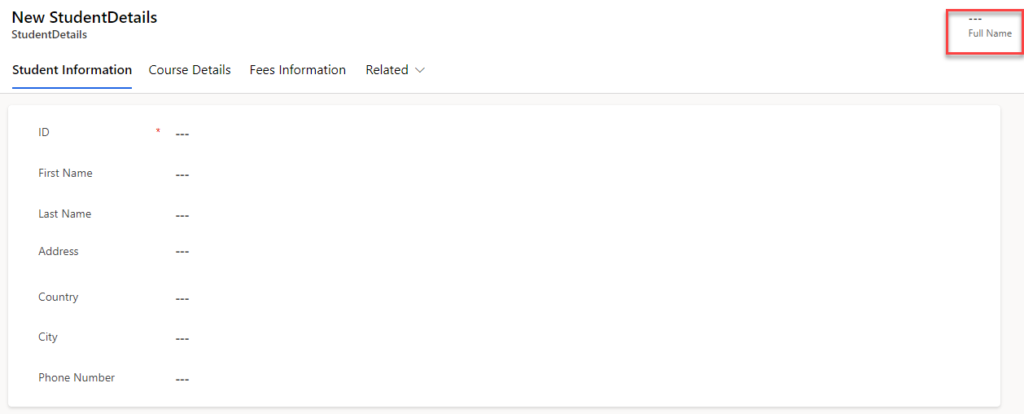
03


Step 4: Once the details are submitted, the full name will be displayed in the header section.


04


Step 5: To display another field in the header section, create a new column with the data type set to “Calculated.” In the formula, simply add the column name of the data you want to display in the header.


05


Step 6: After adding the details to that column, the data will be displayed in the header.


06


Conclusion: By leveraging formula columns and dynamic headers, users can access important information at a glance, enhancing both navigation and usability. This approach is particularly effective in forms with multiple sections or tabs, ensuring that key details remain visible without the need to switch between different parts of the form.


Break Down Language Barriers: Translate Documents in SharePoint using SharePoint Premium

How might content translation be useful for your organization? If you work across regions, being able to quickly translate content enables better multilingual collaboration and communication. If your business has a global reach, localizing business content for your customers optimizes user experiences. Finally, if you are in a regulated industry or need to comply with local or national laws, automated translation at high scale helps ensure documentation is available in required languages.

With business transactions and collaboration increasingly global, SharePoint Premium now enables documents to be translated directly from a document library into another language. The original file is duplicated, and all formatting and structure are preserved during the translation. This feature will be incredibly useful for organisations that receive content in multiple languages. Eliminating the need for external translation services or copying/pasting content into an online translator.

This is currently only available in your organisation if SharePoint Premium (Syntax) pay as you go is configured in your tenant & linked to an Azure subscription. In the M365 Syntex admin centre ensure your Azure subscription is setup.

Enabling Document Translation in your Tenant

Before we begin, ensure you have a Syntex Pay As You Go subscription set up and linked to an Azure subscription. You can manage this in the M365 Admin Center through the Syntex Admin Center

Here’s how to enable Document Translation:

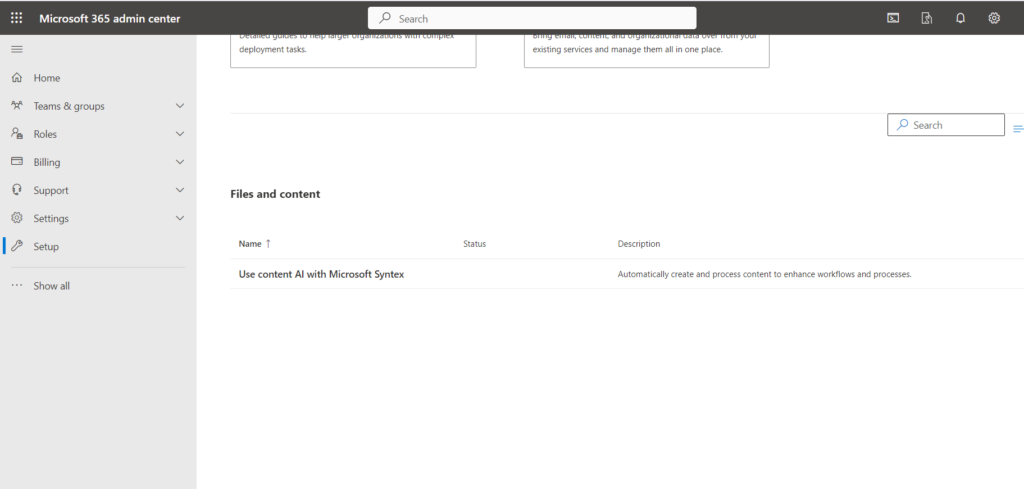
Access the M365 Syntex Admin Center:  Navigate to the M365 Admin Center and locate the Syntex Admin Center. (The specific location may vary depending on your interface).


IMG 1


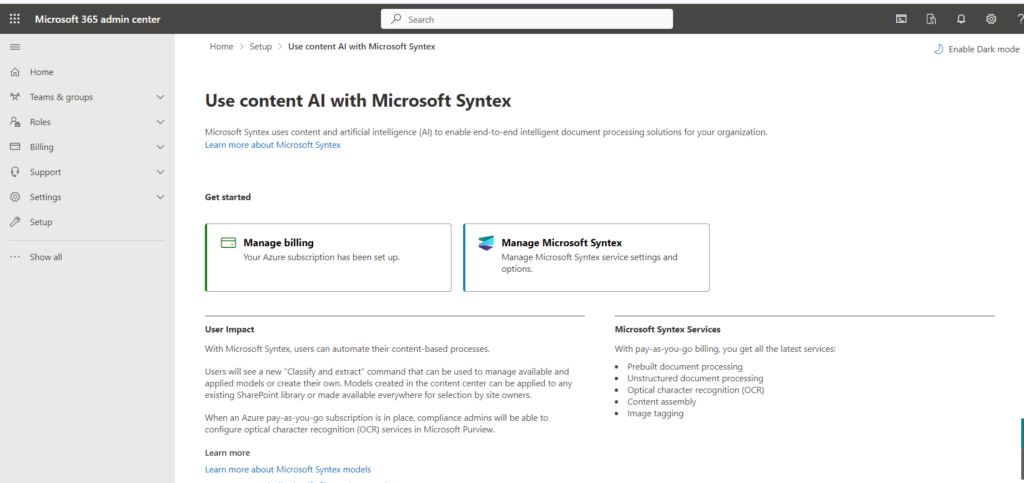
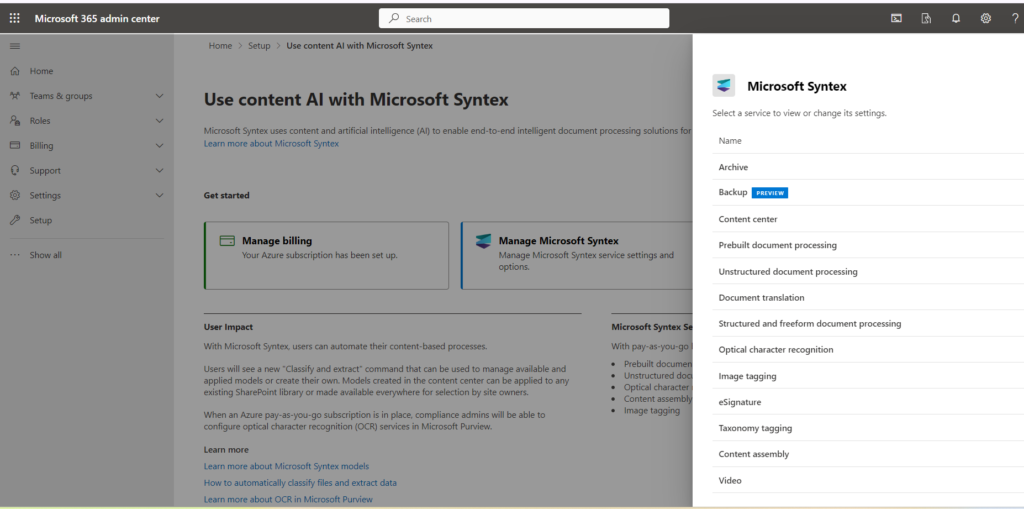
Verify Azure Subscription:  Within the Syntex Admin Center, make sure your Azure subscription is properly set up. Select the “Manage Microsoft Syntex” and then after select the “Use content AI with Microsoft Syntex.”


IMG 2


IMG 3


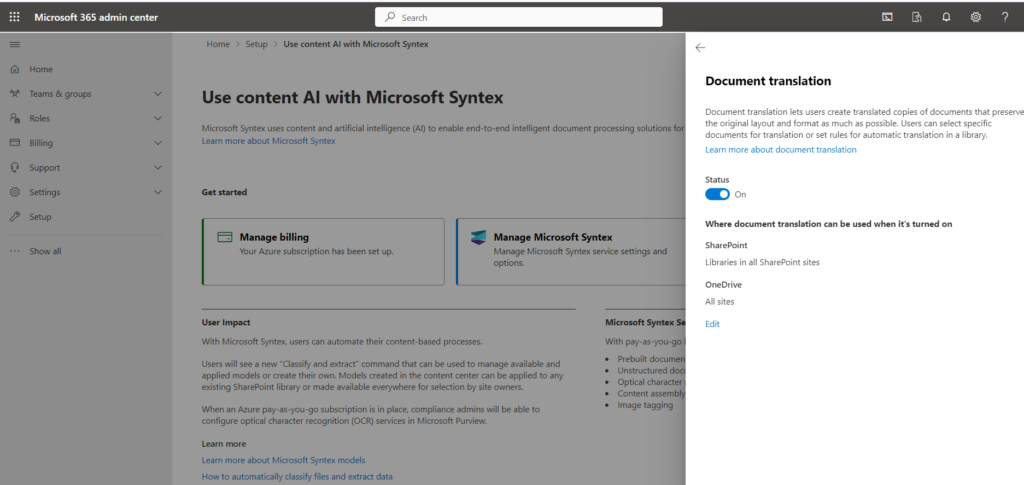
Enable Document Translation:  Select “Document Translation” service and turn on the status. Choose Specific SharePoint site to where you want to enable the “Document Translation” service.


IMG 4


IMG 5


SharePoint Premium Document Translation – On-Demand Translation

Go to a SharePoint Document library in one of the sites enabled for Document Translation. As mentioned previously there is no additional configuration required in the library to enable it for Document Translation other than the site being enabled for Document Translation

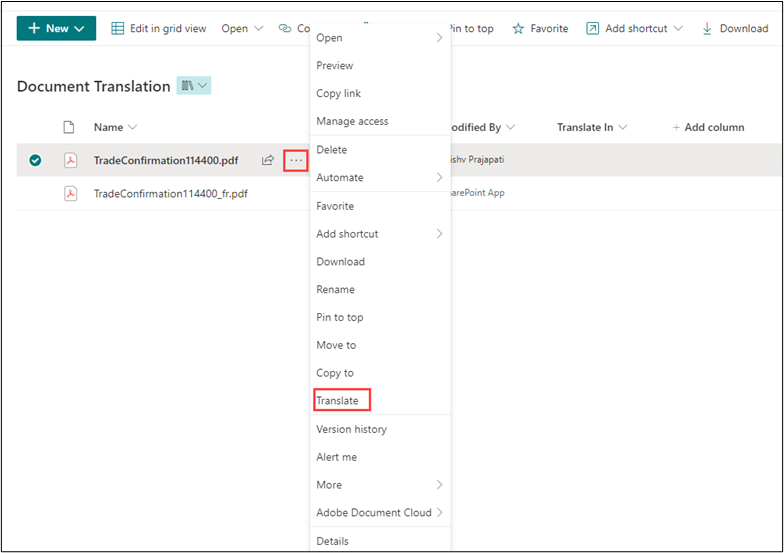
Now select the document or documents (multiple) in the document library. Then select from either the document library menu or the file menu (see two options below)


IMG 6


IMG 7.1


Select the “Translate” option.


IMG 8


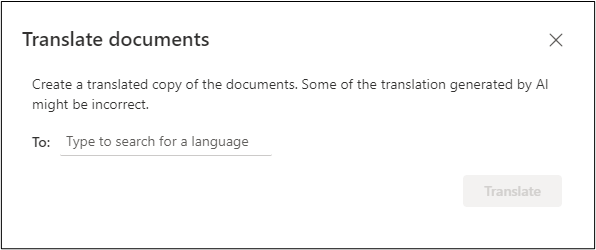
A Translate documents pop out then occurs, asking you to enter a language to translate the document into. Click on the text box to enter a language.


IMG 9


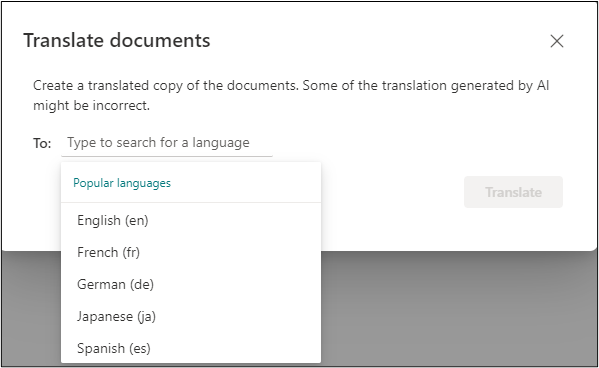
Five popular languages will appear (English, French, German, Japanese and Spanish) in a drop down.


IMG 10


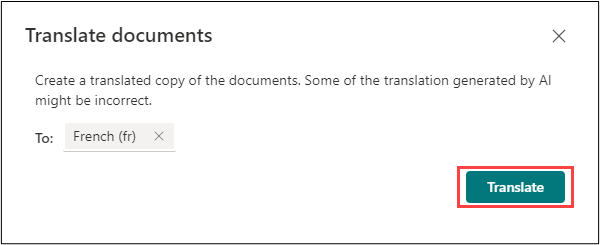
Document Translation supported 133 languages, which is the same as the Azure Translation Service. You can type in the language short code i.e. fr to translate documents into French. My document is in English, so I want to translate it to French (fr).

Once selected or typed in the language will be displayed in the text box – then press the Translate button.


IMG 11


A confirmation appears to show the document has then been submitted successfully for translation.


IMG 12


After some time, copied and translated documents were added into the library. It has the same title as the original document, but the country code of the language used to translate i.e. fr for French has been appended to the filename I.e. TradeConfirmation114400_fr.docx


SharePoint Premium Document Translation – Document Library Rules

Documents when added to a document library can also be auto translated either when column in a document library change using SharePoint Document Library rules.

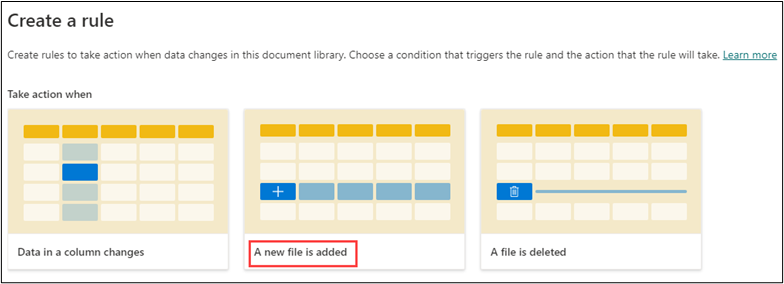
Here we will show how the Document Library rules can be configured. Browse to the Document Library then click on the Automate menu on the Document Library top bar then click on Rules, then Create a rule.


IMG 13


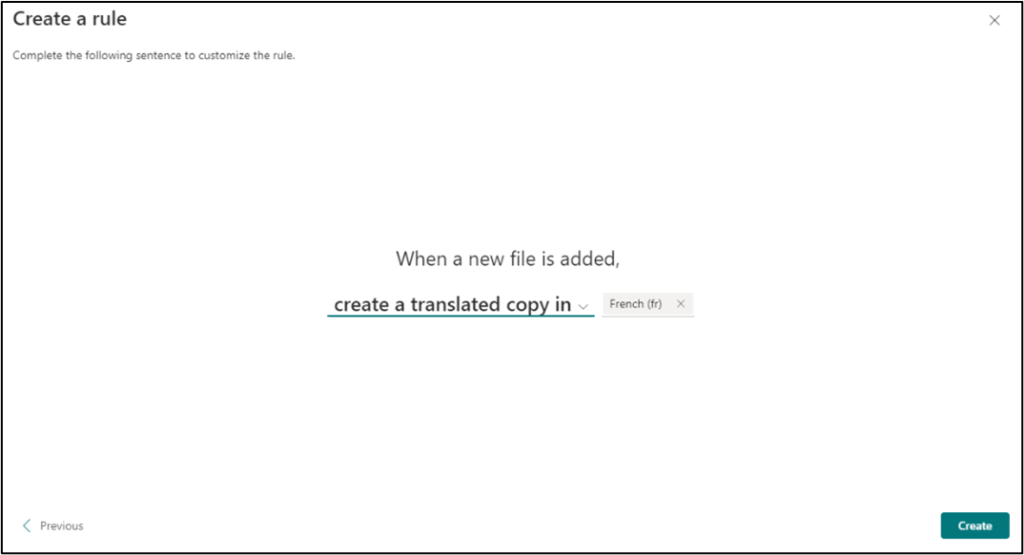
Configure a rule to trigger when “A new file is added.”. Within this rule, select the action “Create a translated copy in.”. Specify the language you want the file translated into. Click “Create Rule” to activate the automation.

There are two rule options that will work with translating documents “When a new file is added” & “Data in a column changes”. We are going to focus on when “A new file is added”.


IMG 14


IMG 15


The Manage rules page is then displayed confirming the created rule.


IMG 16


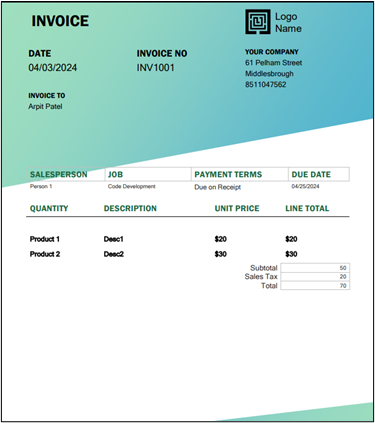
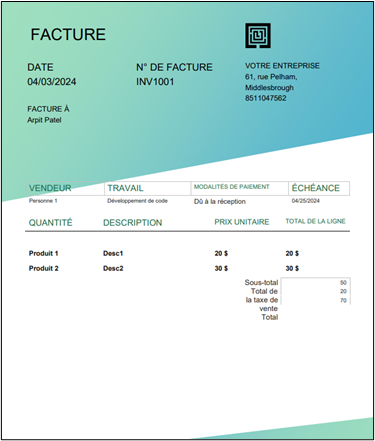
I will now upload the document “Invoices1” into the library. Shortly after the translation rule is automatically triggered and the document is auto translated into French “Invoices1_fr.”


IMG 17


Here’s the original English document and its French translation.


IMG 18


IMG 19


Summary

Document Translation is an excellent addition to the SharePoint Premium suite, particularly for multi-geo companies and those that produce or receive documents in foreign languages.

This feature allows users with the permission to create documents in a library to translate documents directly from a SharePoint document library. Eliminating the need for copying and pasting content into online translation sites, sending content to external organisations, or relying on custom development.

How to Load 2000+ Records in Canvas PowerApps from SharePoint List using collection

Summary:

Loading large datasets into Canvas PowerApps from a SharePoint List can be challenging due to PowerApps’ delegation limits and performance constraints. In this blog post, we explore effective techniques to efficiently handle and load over 2000 records. We’ll discuss the importance of optimizing your SharePoint list and using collections to manage data. Our approach focuses on loading data using collections to enhance performance and ensure a smoother user experience.
Step1:

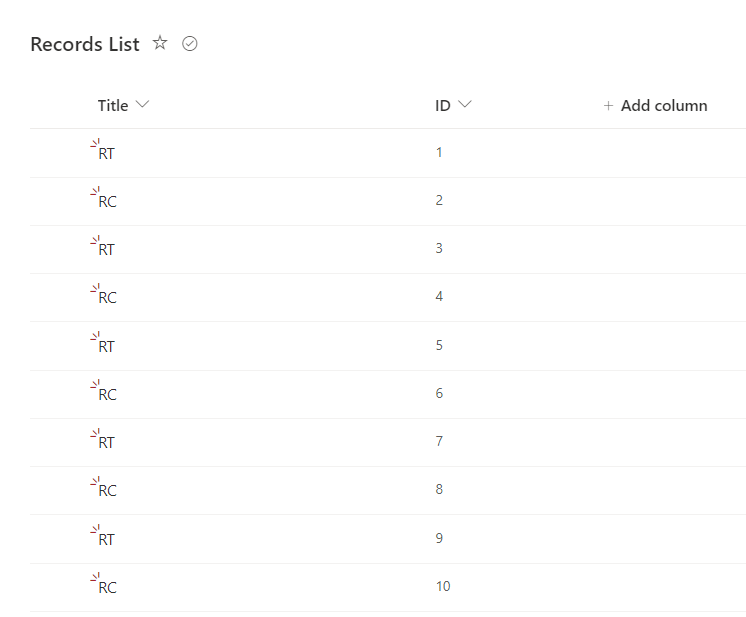
Create a SharePoint list and use the default ‘Title’ column to add data. Populate the list with approximately 5,000 records.


IMG00


Step2:

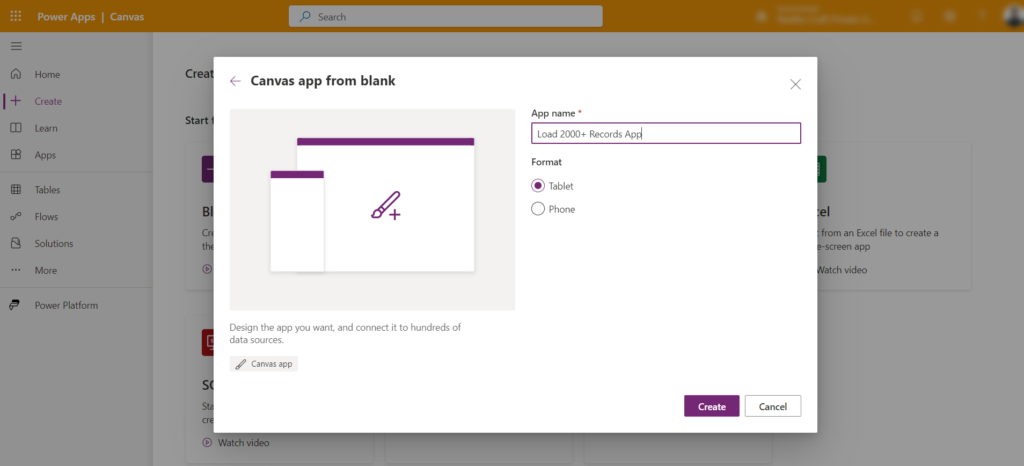
Create canvas PowerApps from app.powerapps.com.


IMG01 1


Step3:

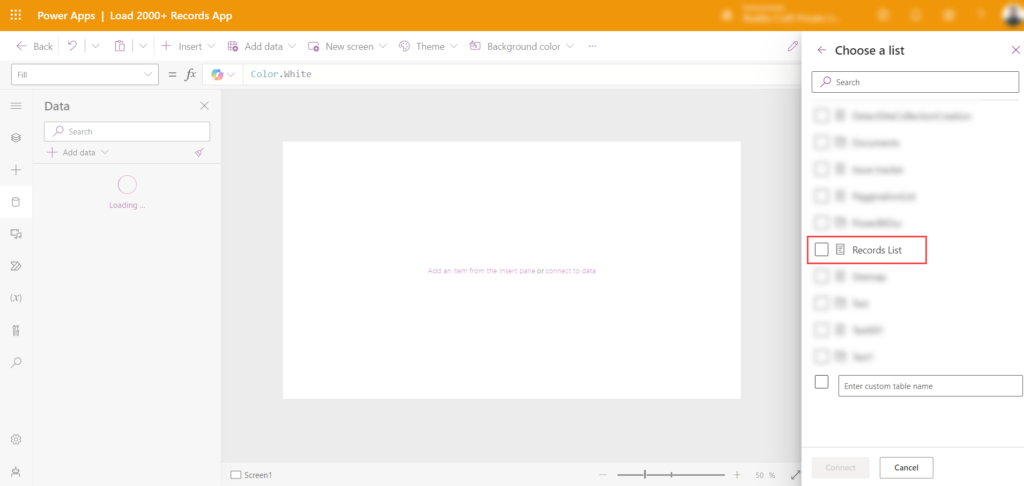
Add the SharePoint List as data source ‘Records List’.


IMG02 2


Step4:

Add a ‘Vertical Gallery’ and insert two labels. Set the data source to SharePoint List. Set the values to ThisItem.Title and ThisItem.ID. Rename the headers in the gallery to ‘Title’ and ‘Index’.


IMG03 2


Step5:

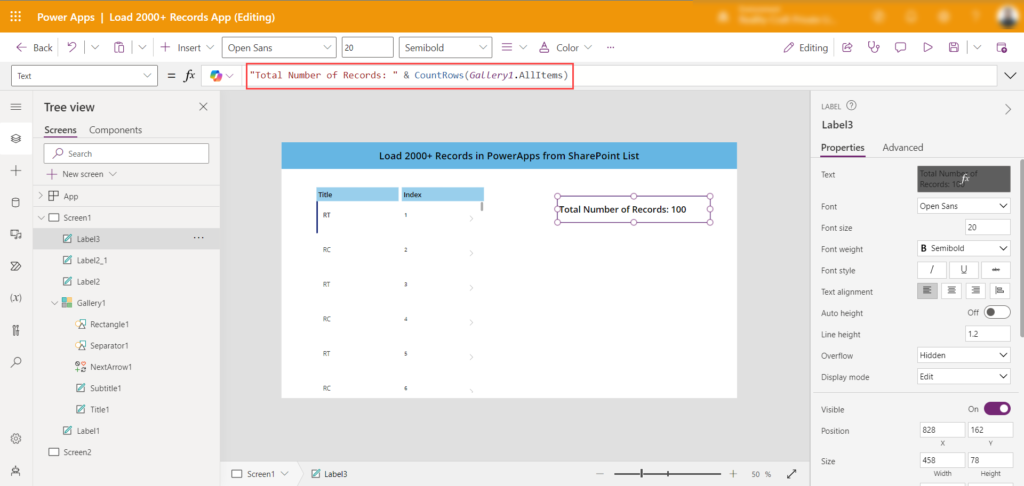
Add a label to display the number of records loaded in the app.

Code:

“Total Number of Records: ” & CountRows(Gallery1.AllItems)


IMG04 1


Step6:

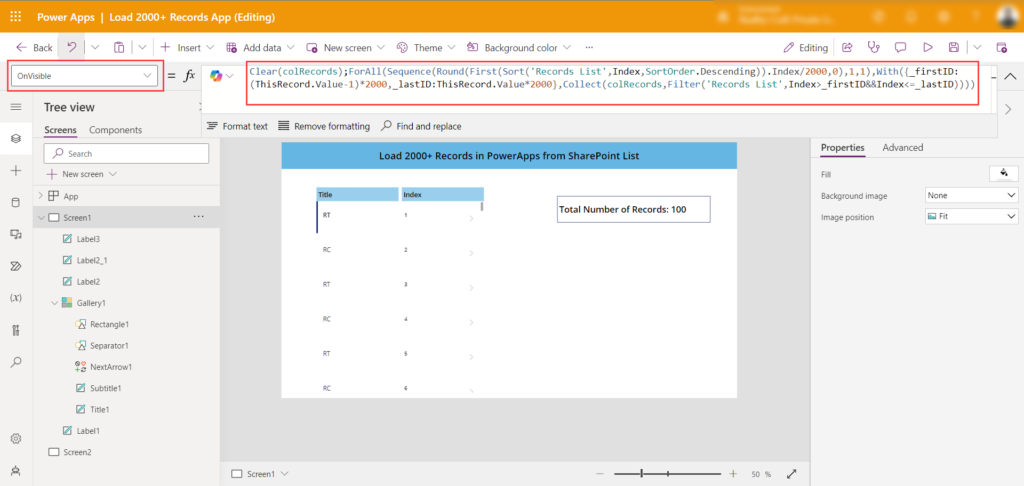
Create an additional screen to handle redirection, set the collection, and load data into it. This logic can be implemented in various places within the app, such as the App.OnStart event, a Button click event, or the Screen Visible property. In this case, we will write the logic in the Screen Visible property so that it executes automatically during screen transitions.

  • Currently, we have approximately 5000 records in our SharePoint list, and the PowerApps “Data row limit” is set to 2000 records. Therefore, the total number of records in the SharePoint list (5000) divided by the data row limit (2000) equals approximately 2.5, which rounds up to 3. Based on this, our logic involves looping through 3 iterations to insert records into the “colRecords” collection.

Code: Clear(colRecords);ForAll(Sequence(Round(First(Sort(‘Records List’,Index,SortOrder.Descending)).Index/2000,0),1,1),With({_firstID:(ThisRecord.Value-1)*2000,_lastID:ThisRecord.Value*2000},Collect(colRecords,Filter(‘Records List’,Index>_firstID&&Index<=_lastID))))


IMG05 1


Step7:

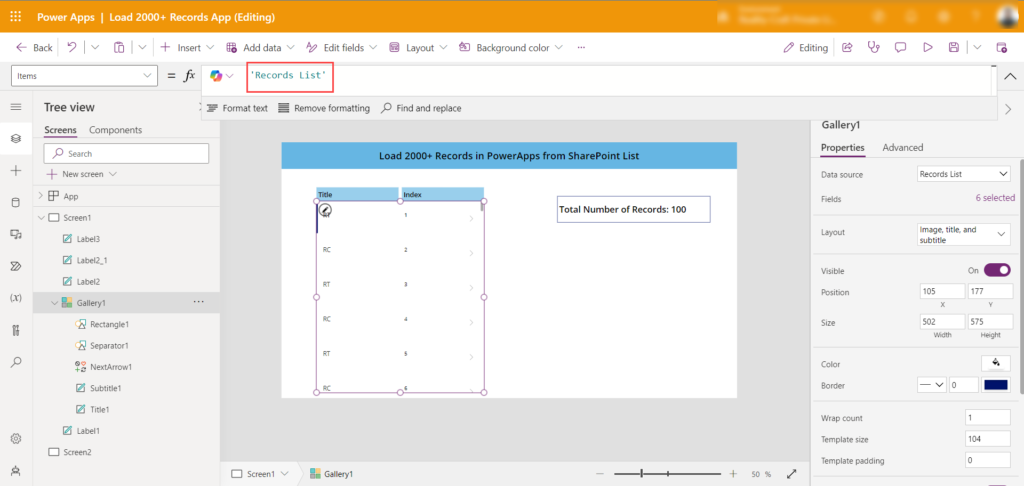
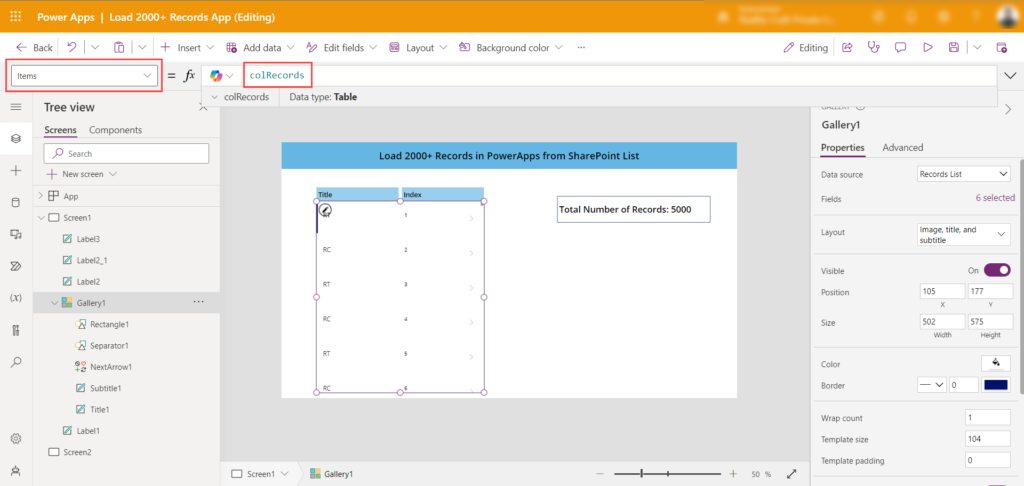
Change the data source name in the Gallery “Items” property to the collection name “colRecords”.


IMG06 1


Step8:

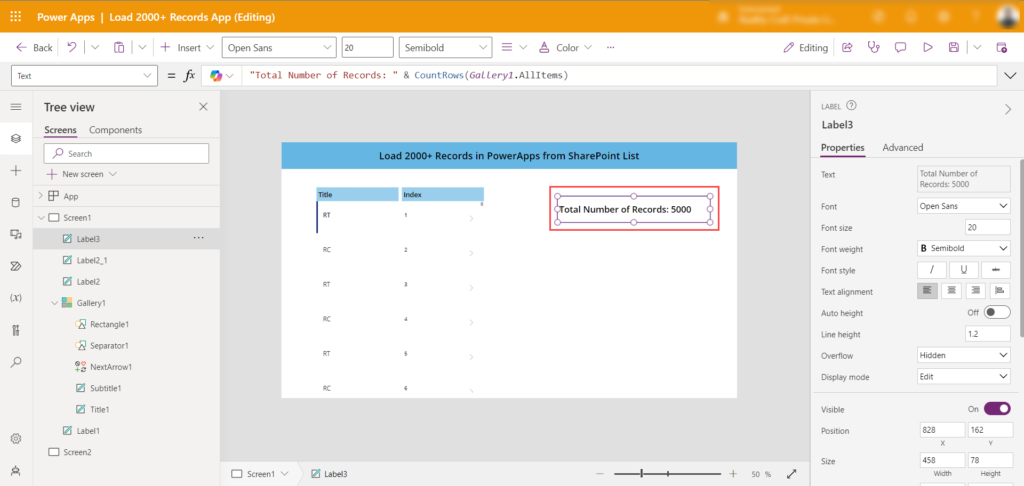
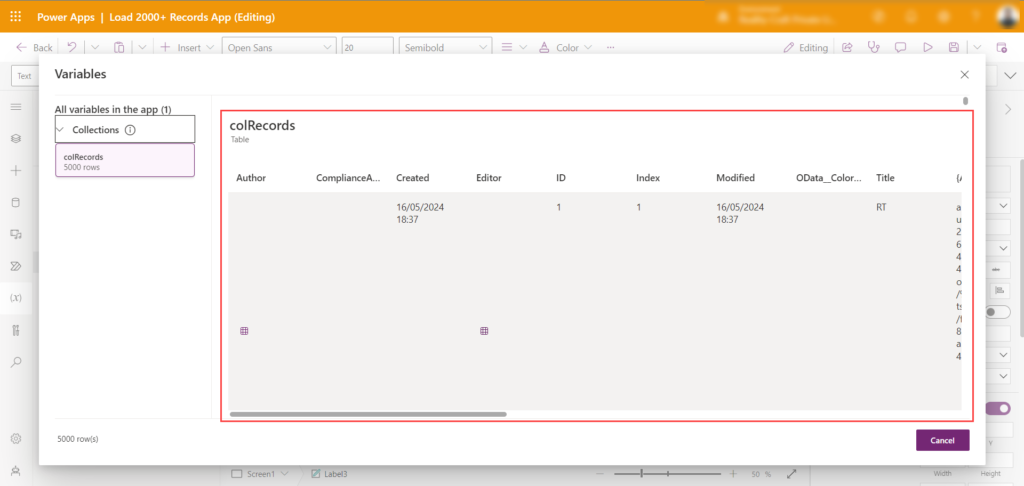
Now, switch from Screen1 to Screen2 and check the “Total Number of Records” display; it should show a total of 5000 records.


IMG07 1


Step9:

Now you can use the items from this collection throughout the application.


IMG08 1


Conclusion:

In conclusion, efficiently loading over 2000 records in Canvas PowerApps from a SharePoint List requires a strategic approach. By optimizing the SharePoint list and leveraging collections, you can work within PowerApps’ delegation limits while ensuring a smoother user experience. The outlined steps, from setting up the canvas and gallery to implementing mathematical logic for data retrieval, enable you to manage large datasets effectively. By breaking down the data into manageable chunks and utilizing collections, you enhance performance and responsiveness, ultimately delivering a more efficient application for users.

Offline capability in Canvas PowerApps

Summary:

  • In today’s digital landscape, the demand for offline-capable applications is skyrocketing. With the prevalence of mobile devices and the need for seamless user experiences, mastering the art of developing offline-capable Canvas PowerApps for both Windows and mobile platforms is crucial for staying ahead in the game.

Leveraging Canvas PowerApps for Offline Functionality

  • Canvas PowerApps, with their flexibility and versatility, provide the perfect platform for building offline-capable applications. By leveraging features like local data storage and offline data synchronization, developers can create robust solutions that deliver a seamless user experience regardless of network availability.

Creating Application

  1. Open the Browser and pate the URL: https://make.powerapps.com/.
  2. Click “Apps” in the left panel.
  3. Click on the “New app”.

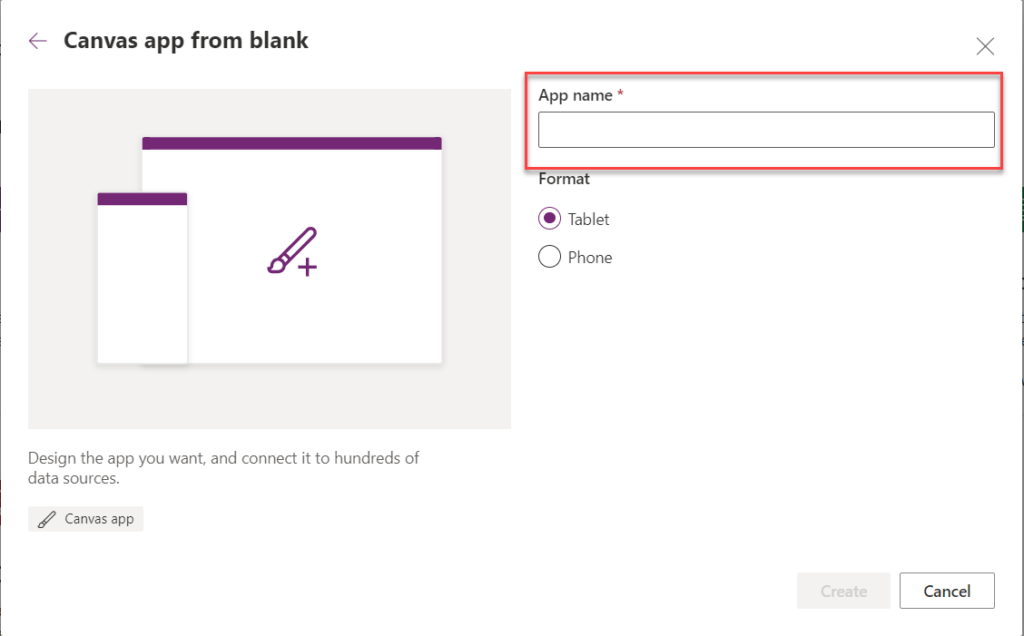
    Img 01 2

  4. Choose the Blank Canvas app and enter the app’s name as it appears in the image below:

    Img 02 2

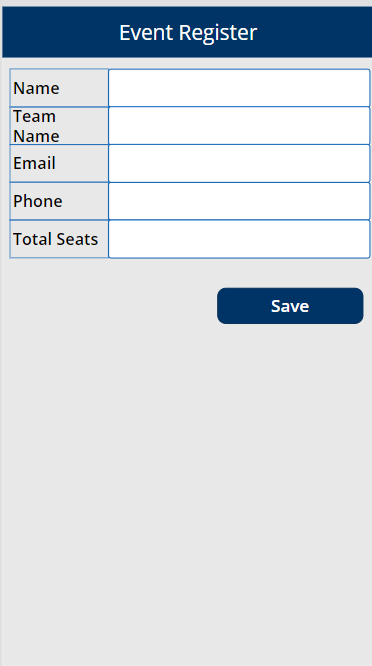
  5. Once the app is created. Connect to the SharePoint list as data source as we will store the data in SharePoint list. In this example we will utilize the Events list with columns mentioned in below Power Apps UI. Now, create the similar UI in Power Apps.

    Img 03 2

  6. If data submission without form control is required, utilize the Patch function to update records effectively.
  7. Prior to integrating the Patch function, establish a connection to the SharePoint list as the data source, ensuring it is properly configured.
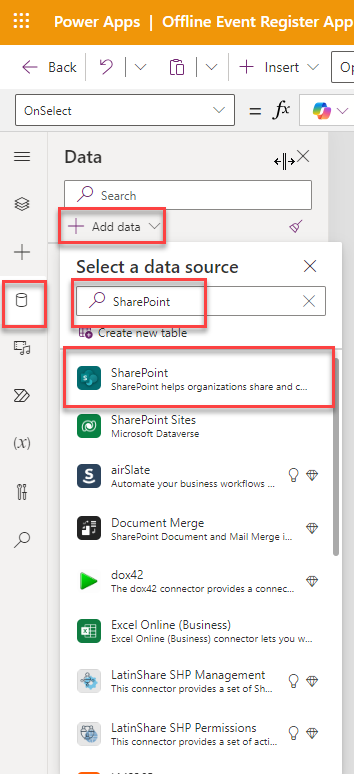
  8. Navigate to the data Source icon, search for the SharePoint connector, and designate the site where your list is configured.

    Img 04 2

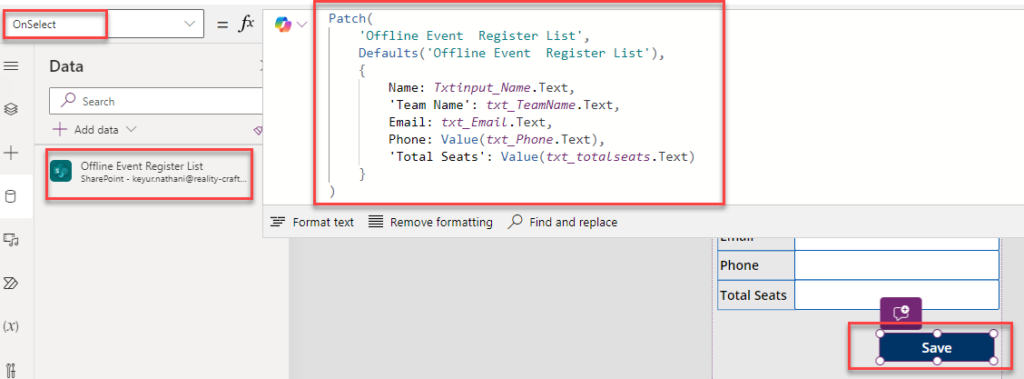
  9. After successfully establishing the connection to the data source, it will appear on the left side of the interface. Next, incorporate the Patch function into the button’s “on Select” event, as illustrated in the image below.

    Img 05 2

  10. Since the Patch function may have limitations, it works only when the network connection is available, consider utilizing Power Apps Collection functionality to store data temporarily. This enables efficient management and manipulation of data within the application.
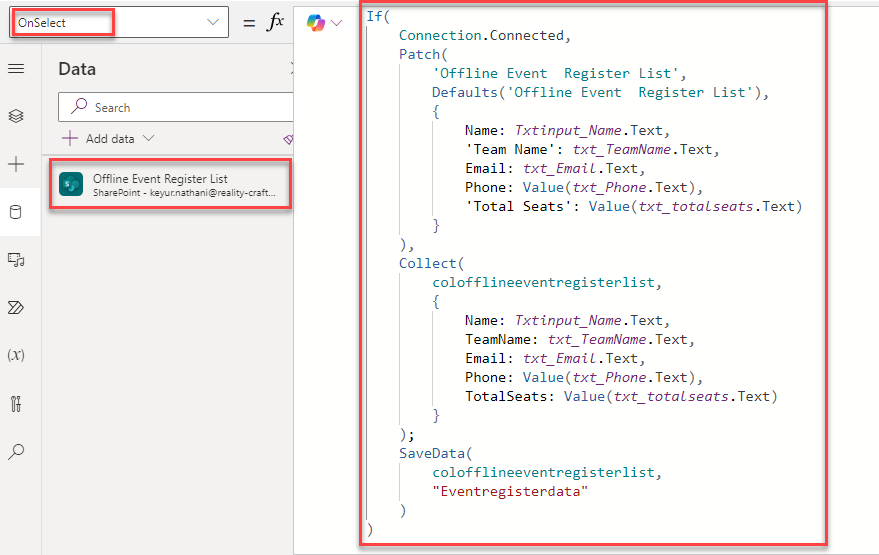
  11. Power Apps offers a useful function called Connection. Leveraging this function, we have implemented logic: if the connection is available, we utilize the Patch function; otherwise, we store the data in a collection and save the file locally on the device.
  12. In Power Apps, to verify the availability of the connection, incorporate an if condition to check if the connection is accessible, as demonstrated in the image below.

    Img 06 2

    Code:

    If (

    Connection.Connected,

    Patch (

    ‘Offline Event  Register List’,

    Defaults(‘Offline Event  Register List’),

    {

    Name: Txtinput_Name.Text,

    ‘Team Name’: txt_TeamName.Text,

    Email: txt_Email.Text,

    Phone: Value(txt_Phone.Text),

    ‘Total Seats’: Value(txt_totalseats.Text)

    }

    );

    Notify (“The Event has been Submitted successfully…”);

    Navigate (

    SuccessScreen,

    ScreenTransition.Cover

    ),

    Collect (

    colofflineeventregisterlist,

    {

    Name: Txtinput_Name.Text,

    ‘Team Name’: txt_TeamName.Text,

    Email: txt_Email.Text,

    Phone: Value(txt_Phone.Text),

    ‘Total Seats’: Value(txt_totalseats.Text)

    }

    );

    SaveData (

    colofflineeventregisterlist,

    “Eventregisterdata”

    );

    Notify (“The Event has been Submitted successfully.”),

    Navigate (

    SuccessScreen,

    ScreenTransition.Cover

    )

    )

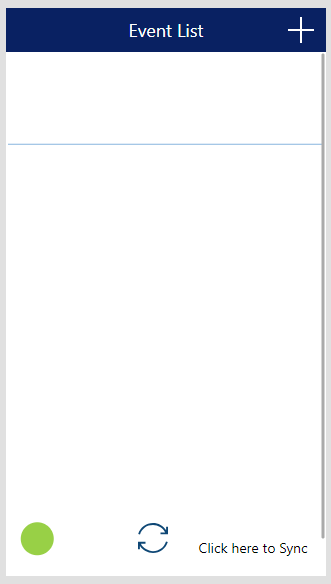
  13. Now, let us incorporate a new Scrollable Screen and integrate a Gallery into the DataCard, as shown in the image below.

    Img 07 2

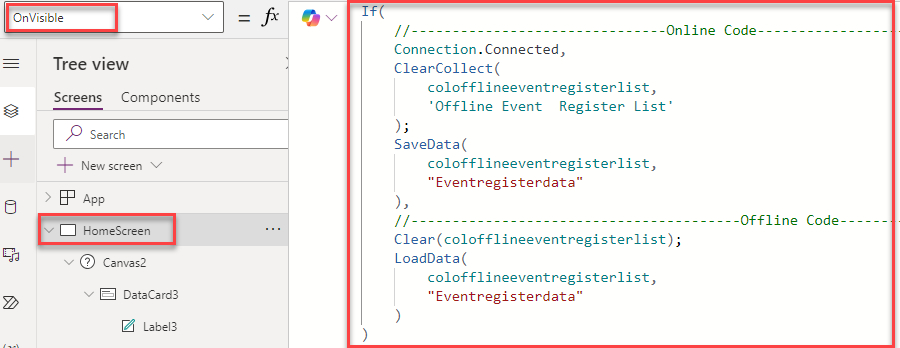
  14. Certainly! You can integrate the same code into the “OnVisible” property of the home screen to check the network connectivity status and adjust the functionality accordingly. Here is how you can do it:

    Img 08 2

    Code:

    If (

    //——————————-Online Code————–

    Connection.Connected,

    ClearCollect ( colofflineeventregisterlist,

    ‘Offline Event  Register List’

    );

    SaveData (

    colofflineeventregisterlist,

    “Eventregisterdata”

    ),

    //——————————Offline Code———–

    Clear(colofflineeventregisterlist);

    LoadData (

    colofflineeventregisterlist,

    “Eventregisterdata”

    )

    )

  15. It sounds like you are encountering an error message stating, “There was a problem saving your data. Data cannot be saved when running in a web browser.” This message typically occurs when attempting to save data locally in a web browser environment, which is restricted due to security reasons.
  16. However, if your app is functioning correctly despite this message, you can safely ignore it. Power Apps sometimes display this message even when data saving is not the main concern or when it is working as intended. Just ensure that your app’s functionality is not affected, and users can continue using it without any issues. If needed, you can provide a brief explanation to users about this message to alleviate any concerns.
  17. When the app detects that it is in offline mode, users can be informed that their data is being saved locally. When the app goes online, users can click on the Sync icon to synchronize all locally saved items with the SharePoint list. Here is a general approach:

    Img 09 2

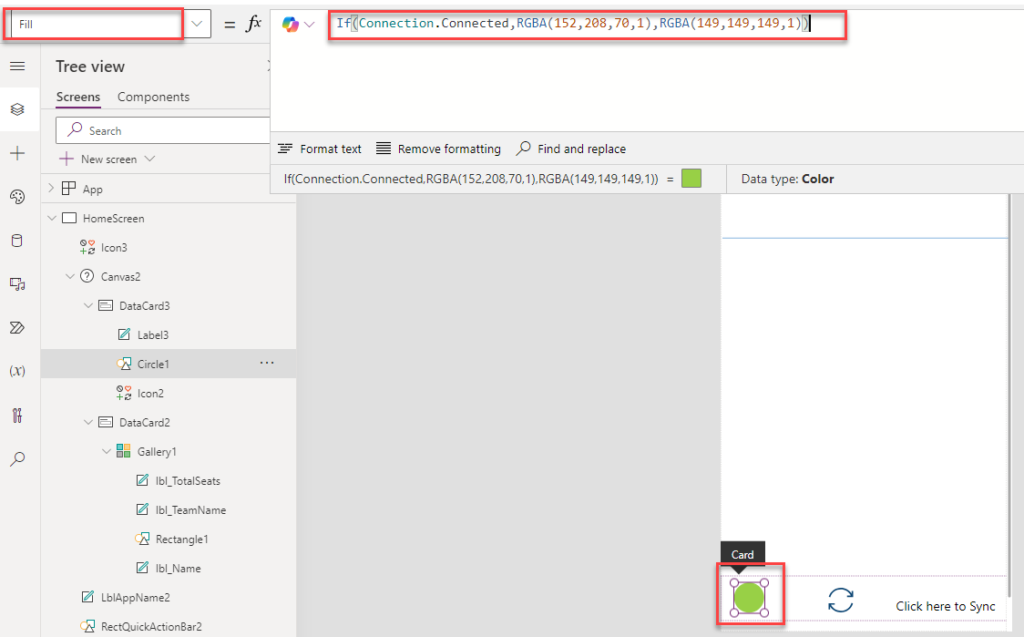
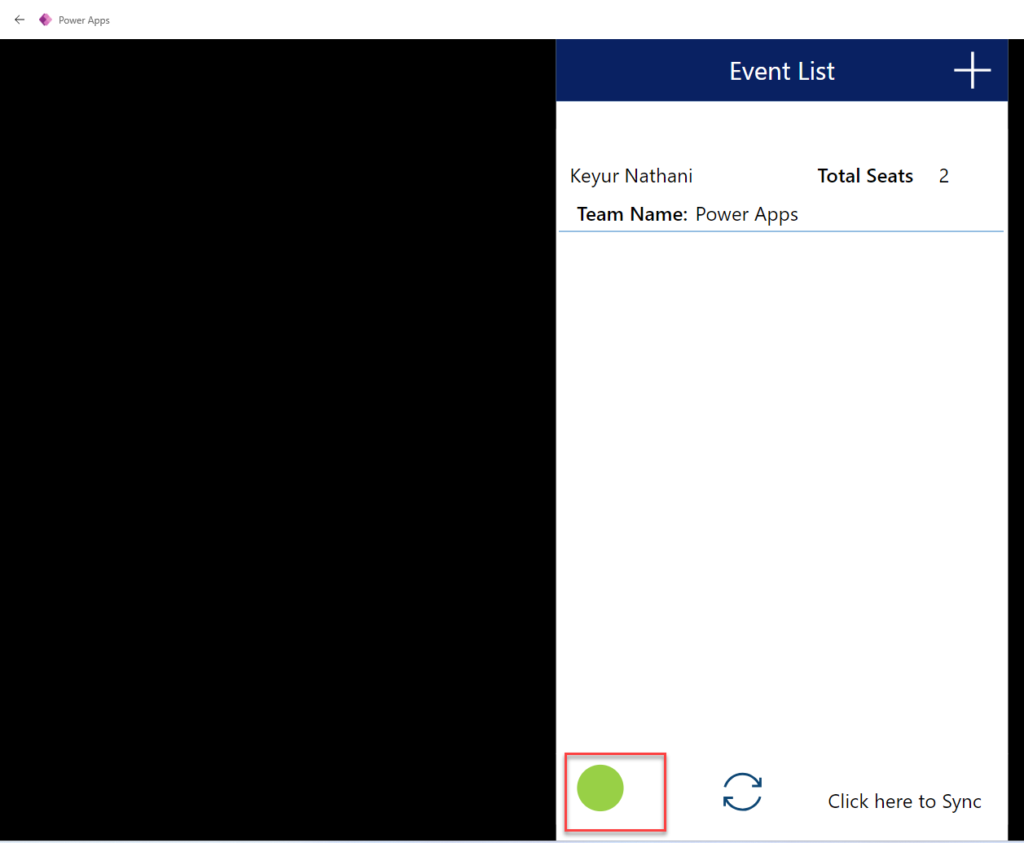
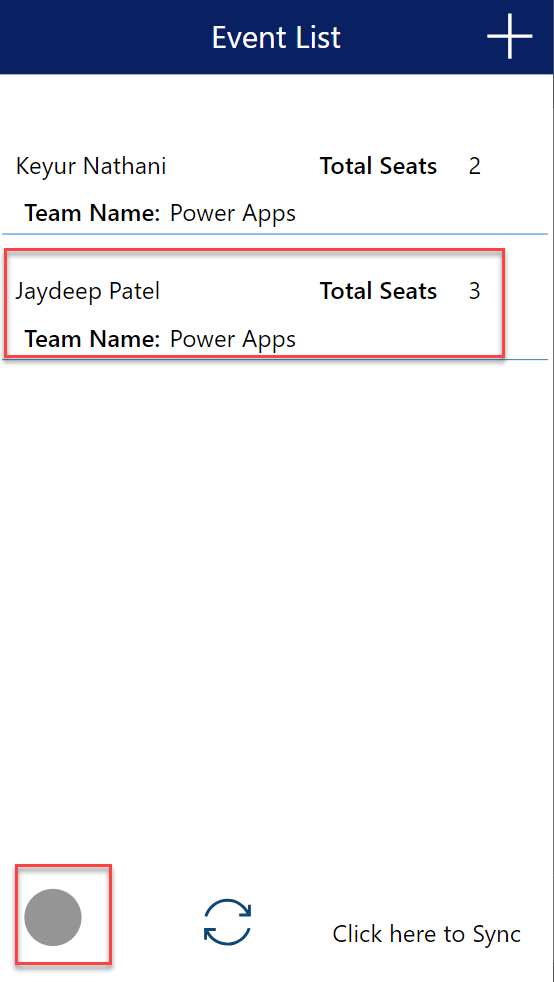
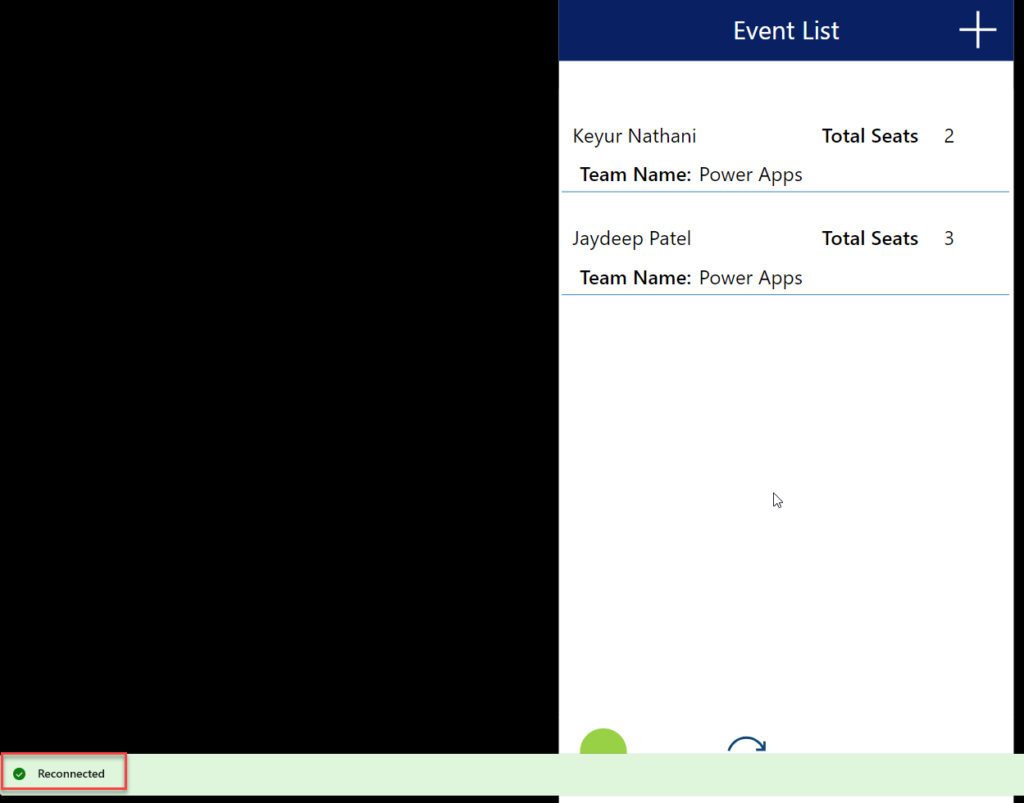
  18. To change the color of the Circle icon based on the network status (online or offline), you can adjust its fill property dynamically in Power Apps. Here is how you can implement this:
    • Define Online and Offline Colors: Define the colors you want to use for representing online (green) and offline (gray) statuses.
    • Update Circle Icon Fill Property: Update the fill property of the Circle icon based on the network status. You can use the If function to conditionally set the fill color.

      Here is a sample code snippet:
      Fill: If (Connection.Connected,RGBA(152,208,70,1),RGBA(149,149,149,1))

      Img 10 1

      Img 11 1

  19. Now that the app is configured to function offline, you can proceed to install the Power App on your preferred device, whether it is a mobile device or a Windows device.
  20. After installing the Power Apps application, ensure that you use the correct email address with which the app was shared. This ensures seamless access to the app and its functionalities tailored to your account.
  21. If you have added new entries to the app while offline, those entries will be stored locally but will not be immediately added to the SharePoint list since the app is offline. However, once the app reconnects to the network, you can implement a synchronization mechanism to upload the locally stored entries to the SharePoint list.

    Here is a general approach to achieve this:

    • Local Storage: When the app is offline and new entries are added, they should be stored locally using mechanisms like Power Apps Collections or SaveData function.
    • Sync Functionality: Implement a Sync button or mechanism that checks for network connectivity. When the app comes online, this mechanism should synchronize the locally stored entries with the SharePoint list using functions like Patch or Collect.

      Img 12 1

    • Here is a SharePoint List snapshot as shown in the below image.

      Img 13 1

  22. Now We are Connected the app with Network then it is shown the screen as show into the below image.

    Img 14

  23. Now the We click on the Sync Button and check the again the data is insert into our SharePoint list or not.
  24. After clicking on the Sync button, you will want to verify whether the data has been successfully inserted into your SharePoint list. Here is how you can do it:
    • Sync Button Functionality: Ensure that the Sync button triggers the synchronization process, where locally stored data is uploaded to the SharePoint list.
    • Notification or Confirmation: Provide a notification or confirmation message to indicate that the synchronization process has been initiated.
    • Check SharePoint List: After the synchronization process is complete, manually check your SharePoint list to confirm whether the new data entries have been inserted successfully.

      Img 15

Simplifying & Mastering Complex ECM System Migrations with Reality Tech’s Strategy and Tzunami Deployer’s Precision

In the rapidly evolving digital landscape, businesses must ensure their content management systems are modern, efficient, and future-proof. Migrating from legacy Enterprise Content Management (ECM) systems to modern platforms can be daunting. However, Reality Tech and Tzunami Deployer provide a comprehensive solution to simplify and master this complex process. This blog delves into the detailed migration process, highlights the benefits of using Tzunami Deployer, and showcases Reality Tech’s strategic approach to handling complex migrations.

Understanding the Migration Process

Migrating ECM systems involves several stages, each requiring meticulous planning and execution to ensure a seamless transition. Here’s a breakdown of the process:

  • Assessment and Planning
    • Initial Assessment: Reality Tech begins with a thorough assessment of the existing ECM system. This includes understanding the data structure, content volume, user roles, and permissions.
    • Planning: Based on the assessment, a detailed migration plan is developed. This plan outlines the timeline, resources required, potential challenges, and mitigation strategies.
  • Preparation
    • Data Cleanup: Before migration, it’s crucial to clean up the data. This involves identifying and removing redundant, obsolete, and trivial (ROT) data to streamline the migration process.
    • Mapping: Reality Tech maps the content from the source ECM system to the target platform. This ensures that metadata, permissions, and structures are accurately transferred.
  • Execution
    • Tzunami Deployer Utilization: Tzunami Deployer is pivotal in the execution phase. Its precision and efficiency ensure a seamless migration. Here’s how:
    • Automated Migration: Tzunami Deployer automates the migration process, significantly reducing manual intervention and the risk of errors.
    • Real-time Monitoring: It provides real-time monitoring and reporting, allowing for immediate identification and resolution of issues.
    • Preservation of Metadata and Permissions: One of the standout features of Tzunami Deployer is its ability to preserve metadata and permissions, ensuring that the content remains intact and secure post-migration.
  • Validation and Testing
    • Post-migration Validation: Reality Tech conducts thorough validation to ensure that all content has been accurately migrated. This includes checking for data integrity, completeness, and security.
    • User Acceptance Testing (UAT): Users are involved in the testing phase to ensure the migrated system meets their needs and expectations. Feedback is collected and any necessary adjustments are made.
  • Go-live and Support
    • Go-live Preparation: A detailed go-live plan is executed, including final data synchronization, system configuration, and user training.
    • Ongoing Support: Post-migration, Reality Tech provides continuous support to address any issues, ensure smooth operation, and help users adapt to the new system.

Benefits of Using Tzunami Deployer

Tzunami Deployer offers several advantages that make it the ideal tool for ECM system migrations:

  • Efficiency
    • Tzunami Deployer’s automation capabilities significantly reduce the time and effort required for migration. It handles large volumes of data efficiently, ensuring minimal downtime and disruption to business operations.
  • Precision
    • The tool’s precision ensures that all content, metadata, and permissions are accurately migrated. This minimizes the risk of data loss or corruption, providing peace of mind during the migration process.
  • Flexibility
    • Tzunami Deployer supports various ECM systems and target platforms, offering flexibility to businesses regardless of their current setup or future needs. It can handle complex migration scenarios, making it suitable for organizations of all sizes and industries.

Reality Tech’s Strategic Approach

Reality Tech’s strategic approach is crucial to the success of complex ECM system migrations. Here’s how their strategy complements the capabilities of Tzunami Deployer:

  • Comprehensive Assessment

Reality Tech’s detailed assessment ensures a deep understanding of the existing ECM system and the specific needs of the business. This forms the foundation for a customized migration plan that addresses all potential challenges.

  • Customized Solutions

No two migrations are the same. Reality Tech develops customized solutions tailored to the unique requirements of each business. This includes creating specific workflows, mapping strategies, and data transformation processes.

  • Expertise and Experience

With years of experience in ECM system migrations, Reality Tech brings a wealth of knowledge and expertise to the table. Their team of experts ensures that the migration is handled professionally and efficiently, minimizing risks and maximizing success.

  • Continuous Support

Post-migration support is critical to ensuring the new system’s success. Reality Tech provides continuous support to help businesses adapt to the new platform, address any issues, and optimize their operations.

Conclusion

Migrating from legacy ECM systems to modern platforms can be complex and challenging. However, with Reality Tech’s strategic approach and the precision of Tzunami Deployer, businesses can simplify and master the migration process. The detailed process, efficiency, and flexibility offered by these solutions ensure a seamless transition, allowing businesses to future-proof their content management systems and stay ahead in the digital age.

Embrace the future of content management with Reality Tech and Tzunami Deployer – the perfect partners for a successful ECM system migration.

Achieving Data Accuracy and Compliance in Migrations with Insights from Reality Tech and Tzunami Deployer

Ensuring data accuracy and compliance during content migrations is paramount. As organizations move from legacy systems to modern platforms, maintaining the integrity of their data and adhering to regulatory requirements become critical challenges. This is where the synergy between Reality Tech and Tzunami Deployer proves invaluable. By leveraging advanced techniques and robust methodologies, this partnership guarantees seamless, accurate, and compliant data migrations.

The Importance of Data Accuracy and Compliance

Data accuracy ensures that the information being migrated remains consistent, complete, and correct, preserving its usability and value. Compliance, on the other hand, involves adhering to legal, regulatory, and organizational standards throughout the migration process. Non-compliance can lead to legal repercussions, financial penalties, and a loss of trust from stakeholders.

Techniques Used by Tzunami Deployer to Maintain Data Integrity

Tzunami Deployer employs a suite of advanced techniques to maintain data integrity during migrations:

  • Metadata Preservation: Tzunami Deployer ensures that all metadata associated with content, such as author information, timestamps, and custom attributes, is accurately transferred. This is crucial for maintaining the context and traceability of data.
  • Content Validation: Before, during, and after migration, Tzunami Deployer performs rigorous content validation checks to ensure that the data remains unchanged and intact. Any discrepancies are flagged and rectified promptly.
  • Delta Migration: To minimize disruptions and ensure that the most recent data is migrated, Tzunami Deployer uses delta migration techniques. This involves migrating only the changes made since the last migration, ensuring data accuracy and consistency.
  • Audit Trails: Tzunami Deployer maintains detailed audit trails of the migration process. This not only helps in tracking the progress but also in verifying that the data integrity is upheld throughout.

Reality Tech’s Methodologies for Monitoring and Execution

Reality Tech brings a wealth of experience and robust methodologies to the table, ensuring the smooth execution and monitoring of migration projects:

  • Comprehensive Planning: Reality Tech begins with a thorough assessment of the existing environment and migration requirements. This includes understanding the data structure, compliance needs, and potential risks
  • Project Management Excellence: With a focus on clear communication and meticulous project management, Reality Tech ensures that all stakeholders are aligned and that the migration progresses as planned. Regular updates and checkpoints are integral to their approach.
  • Dedicated Migration Expert Team: Instead of relying on advanced monitoring tools, Reality Tech’s dedicated migration expert team continuously monitors the migration process. This hands-on approach ensures uninterrupted migration service and immediate resolution of any issues that may arise.
  • Post-Migration Support: The commitment of Reality Tech extends beyond the migration process. Post-migration support includes validating the success of the migration, addressing any residual issues, and ensuring that the new system operates optimally.

Conclusion

The partnership between Reality Tech and Tzunami Deployer exemplifies excellence in achieving data accuracy and compliance during content migrations. By leveraging Tzunami Deployer’s advanced techniques for maintaining data integrity and comprehensive compliance strategies, alongside Reality Tech’s meticulous methodologies for monitoring and execution, organizations can confidently transition to modern platforms. This synergy not only ensures a seamless migration process but also fortifies the organization’s data governance and regulatory adherence, paving the way for a future-proof digital transformation.

How to integrate Microsoft 365 Users with the Power Apps Modern Control People Picker

The out-of-the-box people picker in Modern Power Apps Form currently doesn’t work properly with Power Apps modern controls. Therefore, the workaround is to use Microsoft 365 users with the Modern Control form.

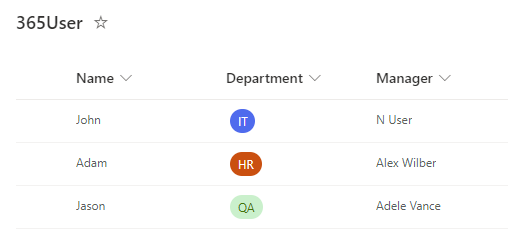
First need to create a SharePoint list with the following types of columns:

  • Name: Single line of text
  • Department: Choice
  • Manager: People picker


IMG 01


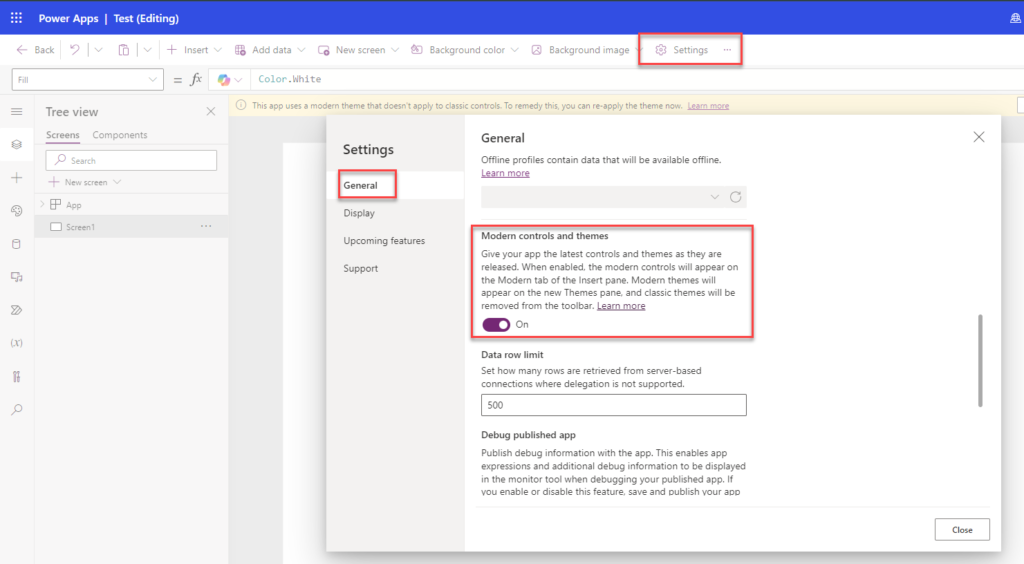
Step 1: Go to Power Apps and create an app. In the app, add a modern form to the screen. Ensure modern controls are enabled from the Power Apps settings. To enable them, navigate to Settings, then General, and enable ‘Modern Controls and Themes’.


IMG 02


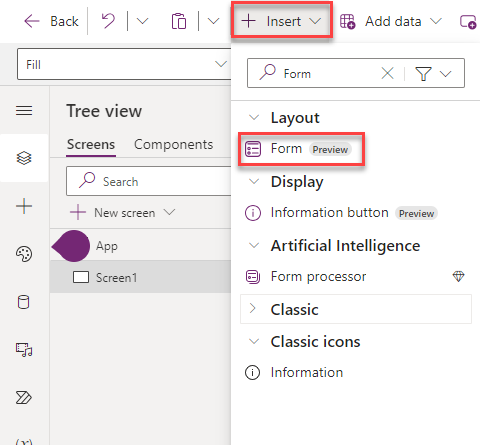
Step 2: After enabling it, click on ‘Insert’ and add a modern view form.


IMG 03


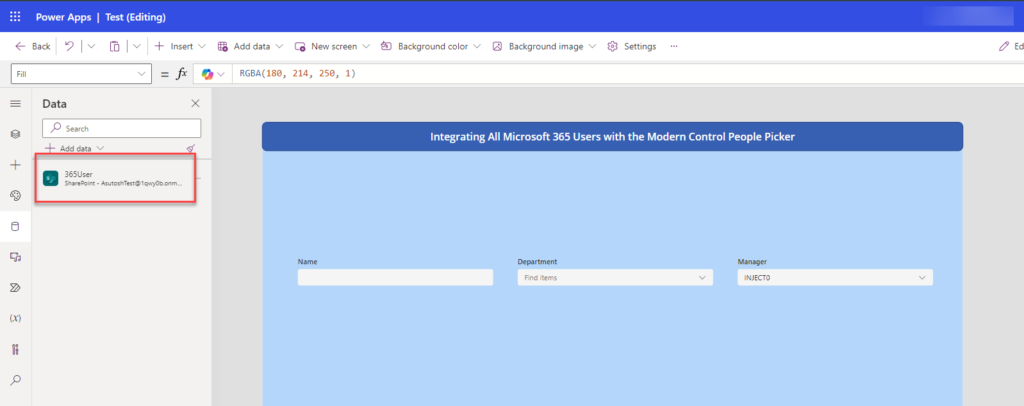
Step 3: After adding the form, select the data source. Choose the site, and then select the list. Once the list is selected, the columns will appear in the form.


IMG 04


Step 4: In the Manager column, first select the data card where you want to display the information. Then, click on the fields edit button.


IMG 05


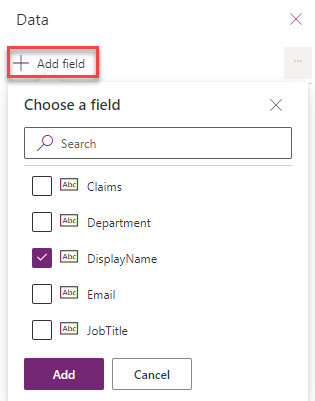
Step 5: Click on ‘Add Field’ and select which property you need to show in the dropdown.


IMG 06


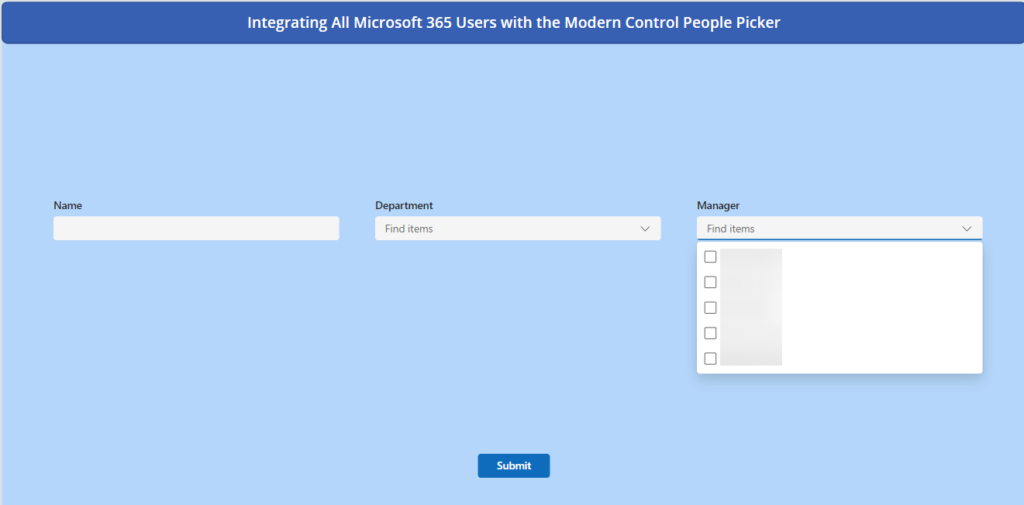
Step 6: Now, run the app. In the column, you will see a limited list of users that you can select, not all from the tenant users.


IMG 07


Step 7: To get all the users from the tenant, you need to add the Office 365 User data source in Power Apps.


IMG 08


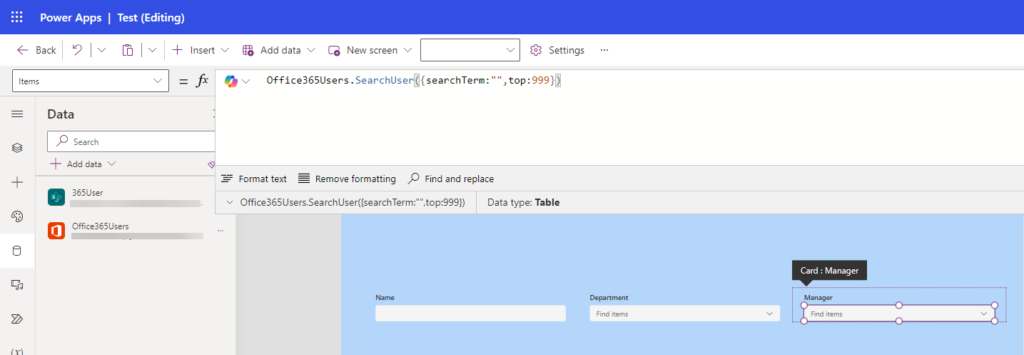
Step 8: After that, go to the data card, click on the item property, and add

Office365Users.SearchUser({searchTerm:””,top:999})


IMG 09


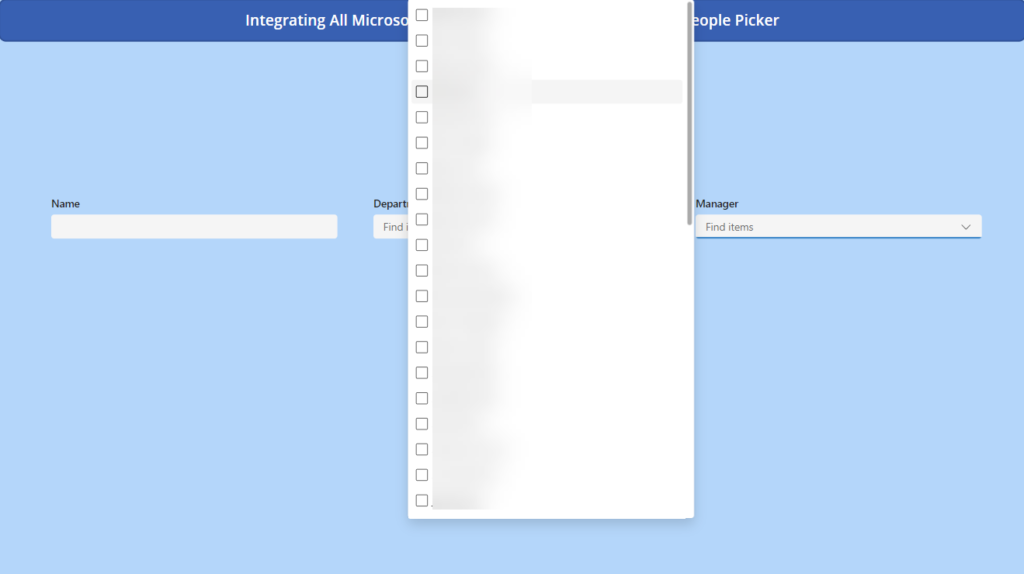
Step 9: After adding that, you should now see all users from the tenant.


IMG 010


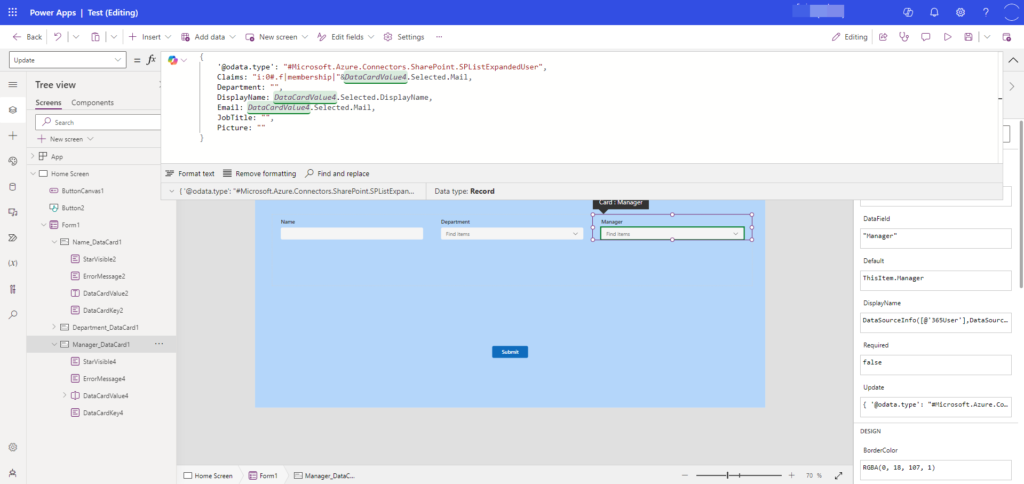
Step 10: To get the people picker value in the list, add this code to the data card’s Update property.

{

‘@odata.type’: “#Microsoft.Azure.Connectors.SharePoint.SPListExpandedUser”,

Claims: “i:0#.f|membership|”&DataCardValue4.Selected.Mail,

Department: “”,

DisplayName: DataCardValue4.Selected.DisplayName,

Email: DataCardValue4.Selected.Mail,

JobTitle: “”,

Picture: “”

}


IMG 011


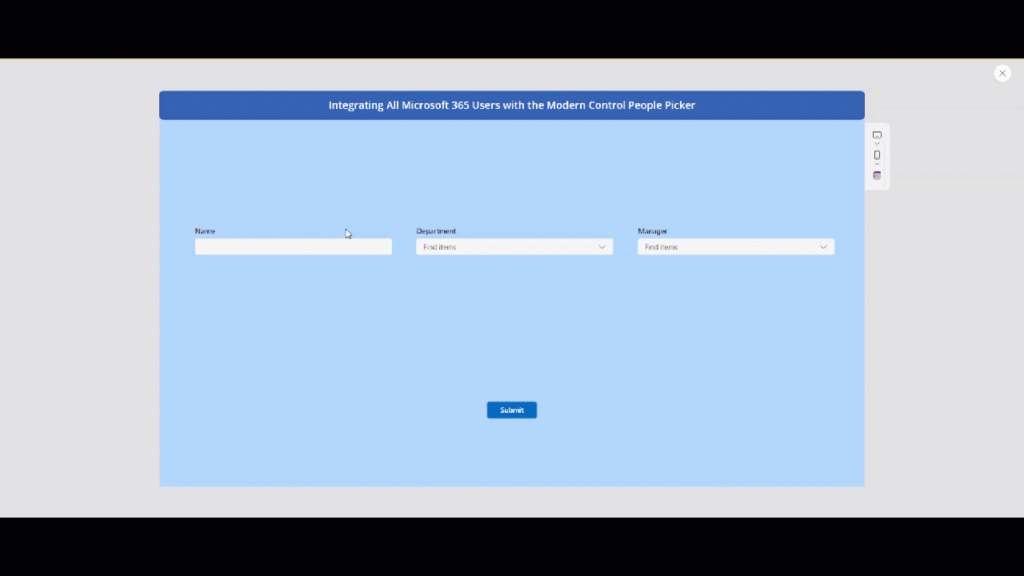
Step 11: After completing all the steps, run the app and submit the data.


IMG 011 GIF


Conclusion:

Integrating all Microsoft 365 users with the modern people picker in Power Apps simplifies how data is managed in SharePoint lists. Users can easily select and submit data by setting up modern forms, adjusting settings, and adding the Office 365 User data source, ensuring smooth operations across the platform.