10 Power Automate Workflows Every Small Business Needs in 2025

If you’re running a small business, you’re probably wearing multiple hats, handling sales, managing customer support, following up with leads, and juggling invoices. It’s rewarding, but also exhausting.

The good news?

You don’t have to do everything manually anymore. Power Automate workflows can take a load off your shoulders, giving you more time to focus on what really matters.

What is Power Automate?

Let’s be honest, most small business workflows are repetitive and time-consuming. From sending email reminders to updating spreadsheets, these tasks drain your time. Microsoft Power Automate offers a powerful, user-friendly way to automate small business processes without the need for complex coding or IT expertise.

Whether you’re managing a startup or running an established local business, Microsoft Power Automate workflows can streamline your operations, reduce errors, and improve efficiency. You’ll not only save time and money but also boost customer satisfaction by responding faster and working smarter.

Now, let’s dive into the top 10 Power Automate workflows every small business should consider in 2025.

Top 10 Power Automate Workflows for Small Businesses in 2025

Automated Invoice Processing

Tired of manually creating and sending invoices?

Use Power Automate to connect tools like Excel, SharePoint, and Outlook. Automatically generate and email invoices when a deal is closed in your CRM. You can also set up reminders for overdue payments.

Which will save time, improve cash flow, and reduce human error.

Contract and Document Approval Workflow

Route contracts or internal documents for review and approval without manual follow-ups. Automate reminders, track status, and ensure key stakeholders sign off on time, great for legal, HR, or vendor processes.

Collaborating on internal reports or policy updates? Automate the review process, send documents to reviewers, collect feedback, and track versions all in one flow.

This workflow reduces bottlenecks and improves document quality.

Employee Onboarding Workflow

When a new hire joins, trigger a flow that sends welcome emails, sets up accounts, assigns equipment, and shares required documents. Ensures a consistent and professional onboarding experience for every employee or contractor.

Project Status Summary Roll-Up 

Managing multiple projects or departments? Use Power Automate to gather weekly updates from different team members and compile them into a single summary report or dashboard.

Perfect for keeping leadership informed without the back-and-forth emails.

Customer Support Ticket Routing

Connect your support inbox or web form to a ticketing system. Based on keyword triggers or categories, route issues to the right person and send an acknowledgment to the customer automatically.

Power Automate for small businesses makes it easier to stay on top of support without needing a large team.

Employee or Contractor Offboarding

When someone leaves your business, Power Automate can help you stay organized, trigger account deactivation, schedule exit interviews, notify IT, and track equipment returns.

This protects your business and ensures nothing is overlooked.

Customer Follow-up Automation

If someone contacts your business or requests a service, you can automatically send a personalized email thanking them and offering next steps or support links.

This small business workflow keeps communication timely and professional, without adding to your to-do list.

Automated Reports and Dashboards

Need to keep tabs on performance? Pull data from Excel, SharePoint, or your CRM and have reports sent to your inbox on a set schedule.

Pair this with Microsoft BI Consulting Services to get meaningful insights without spending hours in spreadsheets.

Lead Capture and Nurturing

Using Microsoft Forms or your website contact form, you can trigger workflows that capture leads, add them to your CRM, and send an introductory email automatically. You can also route high-value leads to your sales team instantly.

You never miss a lead again and engage potential customers while your business is still top-of-mind.

Task Management Integration

Integrate Microsoft To Do, Planner, or Trello with email and calendar systems. Automatically create tasks from flagged emails or calendar events so your action items don’t get lost.

Small business workflow automation like this keeps your team aligned and deadlines on track.

Customer Support Ticket Routing

Connect your support inbox or chatbot to a ticketing system. Based on keyword triggers, route issues to the right department automatically and send confirmation emails to customers.

Power Automate for small businesses makes it easier to manage support queries without needing a full helpdesk team.

Document Approval Process

Need to get contracts or proposals reviewed? Automate the approval process by routing documents to the right team members. Set reminders and track responses to avoid delays.

This will improve accountability and get important documents signed faster.

Automated Reports and Dashboards

Pull data from Excel, SharePoint, or your CRM and send automated reports to your inbox weekly or monthly. Pair this with Microsoft BI Consulting Services to visualize trends and make data-backed decisions.

This is a must-have for business owners who want insights without spending hours on spreadsheets.

How to Get Started with Power Automate Workflows

Now that you’ve seen what’s possible, let’s talk about how to start implementing Power Platform Solutions in your business.

Step 1: Identify Repetitive Tasks

List out tasks you and your team do daily or weekly. Focus on those that are time-consuming, require little decision-making, and happen in multiple apps.

Step 2: Use Power Automate Templates

Power Automate offers hundreds of ready-to-use templates that cover a wide range of use cases, from email automation to file syncing. You don’t have to start from scratch.

Step 3: Connect Your Tools

Power Automate integrates with 500+ apps, including Outlook, Excel, SharePoint, Dropbox, Slack, and Google Drive. Connect the tools you already use to begin automation.

Step 4: Test and Iterate

Run your flows in test mode and adjust based on performance. Start with simple flows and build complexity over time.

Step 5: Get Expert Help If Needed

Sometimes, the best automation ideas get stuck because of technical hurdles. That’s where a Power Automate Consulting Services partner can help.

At Reality Tech, we specialize in helping small and medium-sized businesses harness the full power of Microsoft’s ecosystem. Whether you’re just starting out or want to overhaul outdated systems, we bring years of hands-on experience in Power Platform Solutions, including Power Automate Consulting Services. 

We help you build, test, and launch automation flows tailored to your business. Microsoft BI Consulting Services: We turn your business data into visual dashboards that tell stories and uncover trends. End-to-End Workflow Automation: From finance to HR to marketing, we create scalable automation systems that simplify your operations.

Why Now Is the Right Time to Automate

Your competitors are automating, your customers expect faster service, and your team needs more time to focus on meaningful work. Investing in small business workflow automation is no longer a luxury; it’s a necessity.

Whether you’re looking to automate small business processes, improve team productivity, or build smarter systems, Microsoft Power Automate is a tool worth exploring. It’s flexible, scalable, and accessible even if you don’t have a full-time IT department.

By leveraging smart Power Automate workflows, you’re not just saving time, you’re building a more resilient and future-ready business.

Final Thoughts

Small businesses drive innovation, and automation helps you do more with less. With Microsoft Power Automate, you don’t need a big budget or tech team, just the right workflows and mindset.

Start small with one or two simple automations. Watch the impact. Then build from there. And if you need support, expert help is always within reach.

Make 2025 the year you stop working harder and start working smarter.

Keep Your Data Safe: SharePoint Security Best Practices

If your team depends on Microsoft SharePoint to store, manage, or share documents, something that should always be at the top of your list is security. SharePoint is an incredibly powerful platform, but without proper settings and protocols in place, it’s just as susceptible as any cloud system.

This is full of actionable SharePoint security best practices, practical examples, and an explicit distinction between SMEs and enterprises on how to handle it. Whether you’re on SharePoint Online, Office 365, or on-premises SharePoint, it’s not a choice to secure it, it’s a business imperative.

Understanding SharePoint Security

Let’s dissect what Microsoft SharePoint security actually entails before we get into best practices:

  • User access control
  • Permission levels
  • Data encryption
  • Audit logs and monitoring
  • Governance policies

These factors collaborate to ensure that only the appropriate individuals are able to access your documents and that your company is in compliance with data protection regulations such as GDPR or HIPAA.

Top SharePoint Security Best Practices

If you want to secure your SharePoint environment, here are the best practices that actually move the needle.

1. Set Up Role-Based Access Controls (RBAC)

Not everyone needs admin privileges. With SharePoint security settings, start by assigning roles based on job functions. Limit access to sensitive documents using granular permission levels.

Why it matters: One of the biggest mistakes companies make is giving too much access to too many people. A well-structured RBAC system is your first line of defense.

2. Enable Multi-Factor Authentication (MFA)

This should be table stakes. Enabling MFA for all users, especially those accessing from outside your corporate network, adds a critical layer of protection.

Tip: Use Microsoft 365 Conditional Access policies to fine-tune who gets prompted for MFA based on location or device.

3. Monitor Activity with Audit Logs

Microsoft SharePoint Support Services often include tools to help you monitor user activity. Use these logs to detect abnormal access patterns and potential threats.

Bonus: Set up alerts for sensitive folders using Microsoft Purview or third-party monitoring tools like Lepide.

4. Implement Data Loss Prevention (DLP) Policies

Prevent accidental or malicious data leaks by configuring DLP policies. SharePoint Online integrates easily with Office 365 DLP tools.

Example: Automatically block the sharing of documents that contain credit card numbers or personally identifiable information.

5. Secure External Sharing

If your team shares content with vendors or clients, make sure you restrict it. Disable anonymous sharing and allow sharing only with authenticated users.

Best practice: Always use time-limited access and audit every shared link.

6. Keep Permissions Clean and Organized

Don’t let permissions grow wild. Review and audit them quarterly. Use groups instead of assigning permissions to individuals. This reduces human error.

7. Protect Admin Accounts

Admin accounts should never be used for day-to-day operations. Create dedicated admin accounts with enhanced monitoring and minimal sign-in privileges.

SharePoint Security Tips for SMEs vs. Enterprises 

Not all SharePoint environments are built the same. The size of your organization directly impacts how you should approach security, both from a risk standpoint and a resource perspective. While SharePoint best practices apply across the board, the implementation will look very different for a startup with 20 users versus a multinational enterprise with 20,000.

Here’s a breakdown of how SMEs and enterprises can tailor their SharePoint security strategies for maximum effectiveness.

SharePoint Security Tips For SMEs (Small and Medium Enterprises)

Small doesn’t mean safe. SMEs are often targeted by attackers precisely because they’re perceived to have weaker defenses. At the same time, budget and technical capacity are limited, so security has to be simple, scalable, and smart.

SharePoint Security Tips For SMEs


1. Start with Microsoft SharePoint Support Services

Don’t try to “DIY” SharePoint security unless you have certified in-house expertise. Working with trusted SharePoint services providers ensures that your system is configured securely from day one. They can help:

  • Set up user roles and permissions correctly.
  • Ensure secure default settings.
  • Implement quick wins like MFA and basic DLP.

Tip: Look for vendors who provide ongoing support, not just setup, so your security posture evolves as your business grows.

2. Standardize Permissions

The temptation to create unique permissions for each team or project is real. But for SMEs, it’s a trap. Customized permissions create confusion, audit headaches, and misconfigurations that can expose sensitive data.

Instead:

  • Use a consistent access model across departments.
  • Define user groups by function (e.g., Sales, HR, Finance).
  • Limit the use of unique permission inheritance unless absolutely necessary.

3. Don’t Rely on Internal IT Alone

Even if you have an IT person (or a small team), SharePoint security requires specialized knowledge. Most internal teams are stretched thin and may not be up to date on evolving threats.

That’s why it’s crucial to:

  • Schedule an external SharePoint security audit annually.
  • Validate your settings against industry benchmarks.
  • Review any policy changes introduced by Microsoft that might impact your setup.

4. Use Services with Built-In Security Features

Leverage Microsoft 365 services like:

  • Microsoft Defender for Business for endpoint and threat protection.
  • Secure Score to benchmark your security posture.
  • Compliance Center to monitor and enforce policies.

These tools offer excellent value, especially when bundled with your Microsoft 365 license. For SMEs, built-in protection is the smartest way to cover your bases without blowing the budget.

SharePoint Security Tips For Enterprises

When it comes to enterprise SharePoint environments, scale becomes your biggest risk factor. More users, more content, more integrations—and more chances for something to go wrong. Enterprises need to go far beyond default settings and embrace a multi-layered, policy-driven approach.

1. Develop a Full SharePoint Security Playbook

Enterprise security should never be ad hoc. Develop a formal SharePoint security guide that includes:

  • Role-specific access policies.
  • Data classification guidelines.
  • Audit and review schedules.
  • Incident response procedures.

Pro tip: This playbook should align with your broader IT governance and compliance policies (e.g., ISO, NIST, HIPAA).

2. Invest in Real-Time Monitoring and Incident Response

SharePoint audit logs are good, but you need real-time visibility to catch insider threats, external breaches, or policy violations.

Use tools like:

  • Microsoft Purview for governance and risk insights.
  • Lepide for user behavior analytics and alerting.
  • Custom dashboards that track unusual access patterns and sharing behavior.

Make sure your incident response workflows include SharePoint-specific triggers and clearly defined next steps.

3. Integrate with Your SIEM System

A Security Information and Event Management (SIEM) system becomes essential at scale. Integrating SharePoint with your SIEM allows you to:

  • Correlate SharePoint events with activity across the entire IT ecosystem.
  • Detects cross-platform threats (e.g., a user accessing SharePoint after a failed login on another system).
  • Improve regulatory compliance through centralized logging.

Whether you use Microsoft Sentinel or a third-party SIEM like Splunk or QRadar, SharePoint should be a key data source.

4. Segment Data and Apply Unique Policies Per Site Collection

Don’t treat your entire SharePoint as one monolithic environment. Segment data based on sensitivity and function by:

  • Creating dedicated site collections for departments like Legal, Finance, and HR.
  • Applying tailored sensitivity labels and DLP policies to each.
  • Restricting access to highly confidential content to select user groups only.

This allows you to:

  • Reduce risk exposure.
  • Simplify audits.
  • Enforce the principle of least privilege at scale.

Example: Legal documents may need higher retention requirements and encryption, while marketing materials can be more freely shared.

Regardless of your size, SharePoint security isn’t just about the platform. It’s about your people, your policies, and your priorities. And if you’re unsure where to start or how to scale, partnering with experts through Microsoft SharePoint Support Services or SharePoint Premium Consultants is always a wise move.

Common SharePoint Security Mistakes

Even if you’ve taken the best SharePoint security measures, your configuration may still have gaps. Why? Because some blunders are not apparent, they don’t appear until something breaks. Let’s examine three of the most prevalent missteps, why they’re dangerous, and how to correct them before they cause an issue.

1. “Set-and-Forget” Permissions

SharePoint’s permission system is powerful. You can get really specific about who can view, edit, or manage content. But with great power comes. a mess, if you’re not careful.

Why it’s risky:

Outdated Access: Employees leave or switch teams but still have access to sensitive folders.

Project Bloat: Archived projects or inactive sites remain accessible to large groups.

Unclear Visibility: No one is aware of what access people have, making audits difficult and errors simple.

Real-world example:

A medium-sized financial company experienced a data breach when an old contractor, who still retained access to internal reports, inadvertently shared a confidential file on a public file-sharing platform. The contractor did not do it on purpose, but the access should have been cut off a long time ago.

How to fix it

Check permissions every quarter: Remind yourself to review who is accessing high-risk locations and document libraries.

Create expiration dates: Implement access expiration policies on temporary users (particularly vendors or contractors). 

Role-based access: Delegate permissions on the basis of job roles with Active Directory groups this reduces administrative effort and errors.

Apply SharePoint reporting facilities: Run reports on access and permission summaries and detect anomalies frequently.

Pro Tip: Integrate Microsoft Purview’s access reviews with automated alerts for a tidy and safe access setup.

2. Ignoring Third-Party App Integrations

SharePoint gets along with other equipment, CRMs, document scanners, analytics suites, you name it. But each new integration is a possible weak link if not managed carefully.

Why it’s risky:

Over-permissioned apps: Most apps request sweeping access, such as “Read all files on all sites,” when they actually require access to a single folder.

Vulnerabilities due to poor coding: Not every third-party application is coded with security in mind. A poorly coded application can leave your data open to breaches.

Collateral damage due to breaches: Even secure apps can be hacked. If they have access to your SharePoint environment, so do the attackers.

Example scenario:

One firm integrated a marketing automation application that requested worldwide file access during installation. Months later, that application was breached, and confidential client proposals in SharePoint were part of the leaked information.

How to solve it:

Vet every app: Prior to approval, inspect the permissions it’s asking for. Ask: Is this degree of access actually required?

Verify security policies: Research the vendor’s security stance, breach history, and privacy certifications.

Stick to vetted apps: Search for trusted integrations using Microsoft AppSource.

Long-term strategies:

Enable Conditional Access: Deny access from untrusted networks or devices.

Regularly monitor connected apps: Navigate to the Microsoft 365 Admin Center and review app connections.

Keep a third-party risk register: Record each app connected to SharePoint and determine its level of risk.

Pro Tip: Employ Microsoft Defender for Cloud Apps to define alerts for suspicious third-party behavior.

3. Using Only Microsoft’s Default Settings

Microsoft offers good default security settings, but they’re not a blanket approach. Each company has unique risks, users, and compliance requirements. Having everything on default is like purchasing a safe and putting the key under the mat.

Why it’s risky:

External sharing rules: External sharing may be turned on by default for all sites.

Basic retention policies: Your audit logs may not have the timeframe you require for compliance.

No custom sensitivity: Sensitive documents may be floating around with no encryption or tagging.

Example scenario:

A healthcare organization found that SharePoint enabled external sharing on a research site. A team member mistakenly sent a link containing patient information to a third-party vendor. This resulted in an expensive compliance investigation.

How to fix it:

Turn off external sharing at the global level: Then turn it on site-by-site on a business-justification basis.

Create custom Sensitivity Labels: Utilize Microsoft Purview to label content by sensitivity 

Apply Data Loss Prevention (DLP): Block files containing sensitive information (such as credit card numbers or patient information) from being shared.

Configure retention policies: Keep logs and files for the duration required to satisfy your legal or regulatory requirements.

SharePoint Security Settings You Should Know

For those who want to get into the weeds, here are some SharePoint security settings worth checking out:

  • IRM (Information Rights Management): Prevent the download or print of sensitive documents.
  • Retention Policies: Automatically archive or delete content after a specific time.
  • Sensitivity Labels: Classify documents and apply encryption.
  • Safe Attachments and Safe Links (via Defender): Scan incoming files for threats.

These features are especially critical if you’re using Office 365 SharePoint Security or SharePoint Online Security Best Practices as part of a cloud-first strategy.

If configuring all this seems overwhelming, you’re not alone. Companies like Reality Tech specialize in security-first SharePoint deployments. They bring deep knowledge, consistent execution, and hands-on experience with real enterprise environments.

So if you’re looking for SharePoint Premium Consultants, this is the kind of help that pays off long-term through peace of mind and zero headaches.

Final Thoughts

Whether you’re an SME just getting started or a Fortune 500 company managing terabytes of content, SharePoint security should be an ongoing effort, not a one-time task.

By implementing the best practices covered here, avoiding common mistakes, and considering professional SharePoint services, you can protect your data, your brand, and your business’s future.

Looking for guidance tailored to your organization?

Reach out to a trusted partner offering Microsoft SharePoint Support Services and get expert help that aligns with your goals.

Low-Code Power Apps: Transform Business Processes Without a Big IT Team

Let’s get this out of the way first: “Low-code” does not mean “lightweight”. In fact, when used right, it’s the most direct way to fix inefficient business processes, eliminate manual tasks, and empower the people closest to the problems to build the solutions.

If you’ve been juggling between bloated software, endless IT requests, and manual Excel sheets just to keep the business running, Microsoft Power Apps development services are the way out. And no, this isn’t a platform you “experiment” with. It’s a serious productivity engine, used by enterprises, mid-size businesses, and even scrappy startups who want results without the overhead. 

What Is Power Apps & How It Works

Microsoft’s low-code development with Power Apps is a platform that lets businesses build custom apps fast without relying heavily on traditional development resources. Think drag-and-drop components, ready-to-integrate data sources, and the ability to publish across web and mobile instantly.

What makes Power Apps different from other low-code application platforms?

  • It’s part of the Power Platform ecosystem, which includes Power Automate (for workflows), Power BI (for reporting), and Dataverse (a no-fuss database).
  • It plays really well with Microsoft 365 and Dynamics 365. If your business already lives in Outlook, Teams, or SharePoint, it fits like a glove. Although Power Apps integrates with Dynamics 365, some advanced customizations may still require traditional development. 
  • It supports real-world scaling, meaning you can start small but grow into enterprise-grade applications when the need arises.

In short, Power Apps for business process automation helps you build tools for the business problems no one has solved yet.

How Low-Code with Power Apps Transforms Business Processes

Now we’re getting into the good stuff.

Every business has a bunch of internal processes that live in spreadsheets, paper, or the minds of a few people who just “know how it works.” That’s not scalable. That’s not safe. And most importantly, it’s wasting your team’s time.

Here’s how a Power Automate consultant changes that:

1. It cuts through the IT backlog

You don’t have to wait six months and three approval cycles to digitize a basic form or automate a workflow. Power Apps lets business users or a small internal dev team get it done in days, not quarters.

2. It standardizes processes you never had time to fix

Do you really want your sales reps manually emailing PDFs for approvals? Or your HR team chasing documents over WhatsApp? With Power Apps, you can build polished, secure workflows that follow real rules and leave audit trails.

3. It lets your team do more with the tools they already use

Because it integrates seamlessly with Excel, SharePoint, Teams, and Dynamics, your team doesn’t have to “learn a new system.” They just work better within the environment they already understand.

4. It bridges the developer-user gap

Power Apps is built for the people who actually use the processes. That means you can bring in someone from procurement or operations to co-create the app with IT, resulting in something that actually solves the problem, not just a “ticket closed” solution.

Real-World Use Cases of Power Apps in Business

Let’s drop the theoretical talk. Here’s where Power Apps has been a game-changer:

1. Procurement Request Management

A manufacturing firm used Power Apps to create a mobile-friendly procurement app that connected directly to their ERP. No more emails, Excel sheets, or lost requests—just a clean interface with multi-level approval workflows.

2. Field Service Reporting

A utilities company built a Power App for field technicians to log service visits. It works offline, syncs with SharePoint when back online, and replaces paper forms that were often submitted late or lost.

3. Employee Onboarding

An HR team built an onboarding tracker that automated task assignments across departments—IT setup, account creation, training schedules—all managed in Teams via Power Apps.

4. Sales Quote Generator

A B2B service company turned their clunky quoting process into a guided app that pulls customer data from Dynamics, calculates discounts based on pre-set rules, and generates branded PDFs—ready to send within minutes.

None of these took months to build. Most were created and deployed in under 3 weeks.

Benefits of Using Power Apps for Business Process Transformation

Here’s where we stop being polite and make a real recommendation: If you’re serious about process transformation but don’t want to double your IT budget, use Power Apps development solutions.

Here’s why:

  • Speed to Launch

You can build and launch working apps in days, not months. And because it’s cloud-native, there’s no waiting on infrastructure.

  • Cost Efficiency

You don’t need a full-stack developer or a UX designer for every internal tool. Power Apps handles most of the heavy lifting with pre-built components and logic.

  • Security You Can Trust

You get enterprise-grade security and governance baked in, especially if you’re already on Microsoft 365. Role-based access, data loss prevention, and environment controls are all there.

  • Scalability

Start with a single form or approval flow. Scale to a full platform that supports complex operations across teams or geographies.

  • Ownership Stays with the Business

This is the biggest win: the people who experience the problems get to be part of the solution. That kind of ownership drives adoption, reduces support issues, and builds a culture of innovation.

Getting Started with Power Apps (Without the Headache)

If this sounds like a no-brainer, you’re right. But starting strong matters.

Here’s how to approach it:

1. Pick a single, painful, internal process.

Don’t boil the ocean. Choose something your team complains about often manual inventory tracking, leave approvals, client onboarding, etc.

2. Map the workflow, including approvals and data sources.

Don’t start building until you’ve mapped what currently happens and what should happen. Use flowcharts or whiteboards to keep it simple.

3. Start building in Power Apps Studio.

Use canvas apps if you want more design flexibility or model-driven apps if your process is tightly linked to data.

4. Integrate with the right Microsoft tools.

Need approvals? Connect to Power Automate. Need reporting? Hook into Power BI. Need document management? Use SharePoint.

5. Test, iterate, and launch.

You’re not stuck with version 1. Launch fast, gather feedback, and improve. That’s the real power of low-code development platforms: it evolves with your needs.

Why We Recommend Working with a Power Apps Partner

If you’ve got an in-house IT team with bandwidth, great. But if you’re like most businesses juggling multiple systems and tight deadlines, working with a Power Apps low-code development partner saves you time and avoids common mistakes.

The right partner will:

  • Help you identify processes ripe for automation
  • Build scalable, secure apps tailored to your business
  • Provide training so your team can manage and evolve apps internally
  • Ensure proper governance and data compliance
  • Avoid dead-end approaches, and fast-track delivery, getting a quick win for your users

You don’t need to “hand over control.” You just need someone who’s done it before and can accelerate your success.

Final Thoughts

If your business is still running on spreadsheets, email chains, or legacy desktop apps, you’re not “saving money,” you’re losing time, data, and momentum.

Power Apps don’t make you bet the farm. It allows you to solve actual problems quickly. That’s the kind of change that works, not because it’s fashionable, but because it understands your time, budget, and people’s capacity to change.

And that’s why we endorse it, loudly.

SharePoint Premium: AI-Powered Content Management for Smarter Workflows

SharePoint Premium is an advanced AI-powered content management platform that revolutionizes SharePoint content management by streamlining workflows, improving search accuracy, and automating business processes. With its AI-driven capabilities, SharePoint AI content management finds, organizes, and classifies your files across various platforms, ensuring seamless access to critical business information.

By leveraging intelligent automation, SharePoint Premium extracts key details from documents, enhancing search accuracy and reducing manual effort. These SharePoint Premium services enable organizations to optimize document management while maintaining efficiency.

SharePoint Premium operates on a pay-as-you-go model using an Azure subscription, with costs tracked through a Syntex meter. To maximize the benefits of this AI-driven platform, businesses can leverage SharePoint consulting services for expert guidance on implementation, customization, and optimization.
SharePoint Premium Services

List of SharePoint Premium products available:

  • Prebuilt document processing: Uses artificial intelligence (AI) to automatically extract key information from common document types, such as invoices, receipts, and IDs. (trained for specific structured documents)
  • Structured and freeform document processing: This allows to create custom models to extract information from any type of document, regardless of its format.
  • Unstructured document processing: Similar to structured and freeform document processing, but it’s designed for Office documents where there are differences in the layout, but still similar information to be extracted.
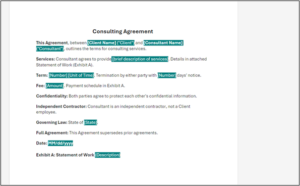
  • Content assembly: Allow to automatically generate documents by using Modern templates and data from various sources.
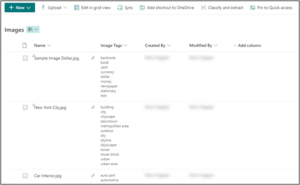
  • Image tagging: Uses AI to automatically tag images with relevant keywords, making them easier to find.
  • Taxonomy tagging: Allow to categorize content using a predefined set of terms, making it easier to organize and find information.
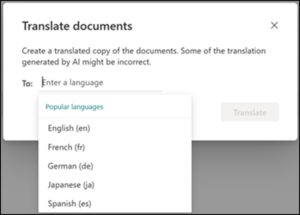
  • Document translation: Translates documents into multiple languages, making them accessible to a wider audience.
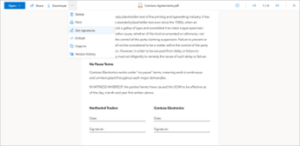
  • Syntex eSignature: Allow to electronically sign and send documents for signature.
  • Optical Character Recognition (OCR): Converts scanned documents and images into editable text.
  • Microsoft 365 Archive: Cloud-based storage solution for inactive emails and other data.
  • Microsoft 365 Backup (Preview): Cloud-based backup solution for your Microsoft 365 data. (Still under development)

Document Processing Models

  • Prebuilt document processing: Pre-built document processing models streamline document processing by extracting data from common formats without custom training.
  • Structured and freeform document processing: Structured processing uses templates for invoices and contracts, saving time, while freeform processing uses AI to handle unstructured documents and extract key information.
  • Unstructured document processing: Unstructured document processing tackles documents that lack a consistent format. (emails, contracts with varying layouts) to extract key info & categorize them automatically.
  • Content Assembly: Automatically generate common business documents (contracts, agreements, letters) using pre-built templates. Syntex pulls data from SharePoint lists or user entries, saving time, ensuring consistency, and minimizing errors.

Content assembly

  • Image tagging: Syntex uses AI to automatically tag new images in your SharePoint library with descriptive keywords. This creates an “Image Tags” column, making it easier to find and manage your visual content.

Image tagging

  • Document translation: Next to the file name, select “Show more actions” (…), then choose “Translate.” On the “Translate documents” screen, select the language and click “Translate.” You’ll receive a confirmation message.

Document translation:

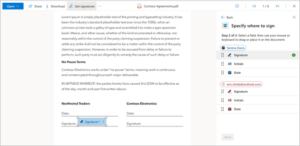
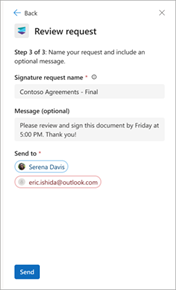
  • Create a signature request: Request eSignatures from up to 10 recipients (internal/external). Drag & drop signature fields where needed, set them as required, and add a message. Review, then send for a smooth signing experience!

Document translation

Document translation

Review request

Microsoft 365 Archive and Backup

Microsoft 365 Archive:

It keeps your archived data searchable, secure, and compliant with the same standards as active data. The advantage of Microsoft 365 Archive is that it stores information within the existing Microsoft 365 infrastructure, eliminating the need for separate data migration.

Microsoft 365 Backup (Preview):

It creates secure backups of SharePoint, Exchange Online, and OneDrive for Business information. This allows us to recover from accidental or malicious data deletion quickly and efficiently. An important point to note is that the backups are stored within the secure Microsoft 365 environment.

With these models, we also have the option to assign retention and sensitivity labels to manage the classified and extracted content.

Here are some Additional Services:

Merge and extract PDF files:

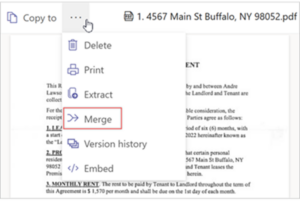
  • Merge PDFs: Combine multiple files into one for easier sharing and organization.

Merge PDFs

  • Extract Pages: Split a PDF and share specific pages as needed.

Extract Pages

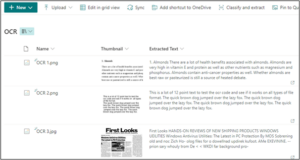
  • Optical Character Recognition (OCR): Microsoft Syntex’s OCR helps you unlock the information trapped within images, making them searchable and usable for various purposes.

Optical Character Recognition

Conclusion:

SharePoint Premium is an advanced AI-powered content management solution designed to enhance SharePoint content management by automating workflows, improving search accuracy, and organizing files efficiently. With its AI-driven capabilities, businesses can streamline document classification and retrieval across multiple platforms.

The service tracks usage and costs through a Syntex meter, making it a scalable and cost-effective solution. For organizations looking to maximize their SharePoint capabilities, SharePoint consulting services can provide expert guidance on implementation and optimization.

Leveraging Split Column Values for Dynamic Slicers in Power BI

Have you ever struggled to make your Power BI slicers truly intuitive and effective? Imagine using the Power BI split column feature to effortlessly separate year and month values, allowing you to create dynamic slicers in Power BI that transform how you interact with your reports.

By mastering split columns in Power BI, you can enhance your filtering experience and apply advanced Power BI slicer techniques for seamless data exploration.

Curious to see how it’s done? Let’s jump right into the steps and make your reports smarter!

Load Your Dataset and Add Table Visual

  • Begin by loading your dataset into Power BI.
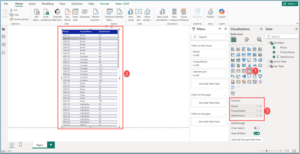
  • Once your data is ready, head to the Visualizations section and select Table Visual. Drag and drop the required columns into the table to display your data in a clean, tabular format.

Load Your Dataset and Add Table Visual

Create Necessary Tables from the Main Table

For Year

  • Create a Year Table by entering the following DAX query in the formula bar:
Year Table = DISTINCT('MainTable'[Period])
  • This will create a Year Table from the Main Table using the Period column.

Create Necessary Tables from the Main Table for year

For Month

  • Similarly, create another Month Table by entering the following DAX query in the formula bar:
Month Table = DISTINCT('MainTable'[Period])
  • This will create a Month Table from the Main Table using the Period column.

Create Necessary Tables from the Main Table for month

Create a new column in both the Year and Month tables to split the Period column value from the main table.

In Year Table

  • Create a column in the Year Table and enter the following DAX query:
Year = RIGHT('Year Table'[Period],4)
  • This will create a Year column from the Period column.

Create a new column in year

In Month Table

  • Similarly, Create a column in the Month Table and enter the following DAX query:
MonthNumber = MID('Month Table'[Period], 4, 2)
  • This will create a MonthNumber column from the Period column.

Create a new column in month

  • Next, create another column, MonthName, in the Month Table, and enter the following DAX query:
MonthName = SWITCH( 
MID('Month Table'[Period], 4, 2), 
"01", "JAN",
"02", "FEB",
"03", "MAR",
"04", "APR",
"05", "MAY",
"06", "JUN",
"07", "JUL",
"08", "AUG",
"09", "SEP",
"10", "OCT",
"11", "NOV",
"12", "DEC"
)
  • This will create a MonthName column from the Period column. The MonthName column can be used in slicers, and you can sort it using the MonthNumber column for proper order.
Create a Month Name column

Let’s Add the Hierarchy Slicer Visual

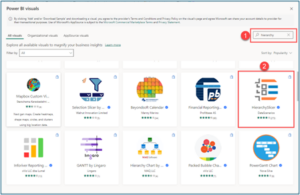
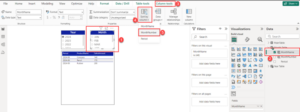
  • Add slicer from the Get more visuals.
  • In the search bar, type Hierarchy, and you will see Hierarchy Slicer. Click on it.
Let’s Add the Hierarchy Slicer Visual

Add visual to the Power BI Report

Add slicer for the Year

  • Add the HierarchySlicer visual to the Power BI report and select the Year column.

Add slicer for the Year

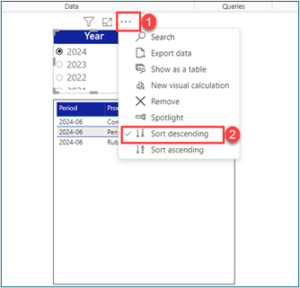
  • By default, the years will appear in ascending order. Click on the three dots (…) in the header icons and select Sort Descending.

Add slicer for the Year

Add slicer for the Month

  • Similarly, add another slicer for the Month and select the MonthName column from the Month Table.
  • To arrange the months in the correct order, select the Month visual, then navigate to the Column Tools menu. Choose Sort by Column and click on MonthNumber.

Add slicer for the Month

  • Finally, sort the months in descending order, just as you did for the year visual.

Define Relationships Between Tables

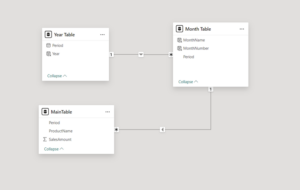
  • Establish the following relationships:
  • Main Table [Period]Month Table[Period] (many-to-one relationship, single direction).
  • Month Table [Period] Year Table[Period] (many-to-one relationship, single direction).

Define Relationships Between Tables

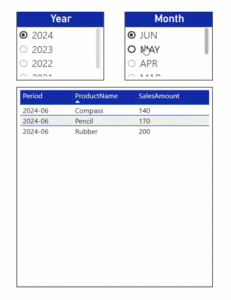
Test and Refine Your Slicers

  • Interact with the slicers to filter your data dynamically. Confirm that selecting a year or month updates your table visual accurately.

Test and Refine Your Slicers

Conclusion

By following this straightforward approach, you can significantly enhance the way you filter and analyze your data. Splitting values effectively provides better control over your reports, making the data exploration process more dynamic and insightful. Whether you’re a beginner or looking for expert guidance, leveraging Power BI consulting services can help you unlock even more potential from your reports.

How to Pass Data from Power Apps to Power Automate Using JSON

Microsoft Power Apps solutions offer a dynamic way to build custom applications, but when integrating with Power Automate, handling large datasets can be challenging. A common issue is Power Automate’s input size limit, which can lead to failures when processing large amounts of data.

This blog will guide you through a powerful approach to bypass these limitations using JSON. By leveraging Power Apps JSON data transfer, you can streamline workflows and ensure efficient data handling when sending Power Apps to Power Automate JSON requests.

For organizations looking for expert guidance, working with a Power Automate consultant can help optimize automation processes and enhance overall efficiency.

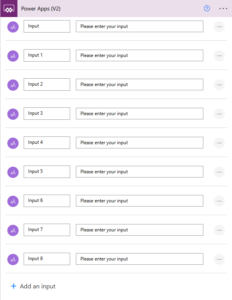
Power App v2

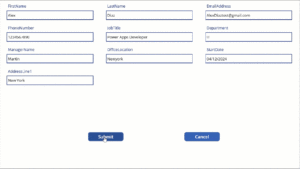
Scenario: Imagine a company onboarding employees through a Power Apps form. The form captures vital data such as Name, Department, Email, Address, etc., and sometimes attachments. This data is sent to Power Apps to Power Automate for processing and storage. However, large submissions often exceed the allowable input size, resulting in failed flows. To resolve this issue, we need to package the data efficiently in JSON format using the Power Automate JSON Connector, enabling smooth transmission and seamless automation.

Step 1: Creating the Power App

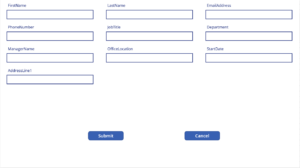
Set Up the Form

  • Start by creating a Power App.
  • Add the fields you want to populate, such as Name, Department, and Email.

Set Up the Form

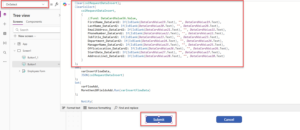
Collect the Data

  • Use a collection to temporarily store the data entered in the form. For instance, you can add the following code to the Submit button’s On Select property:

Collect the Data

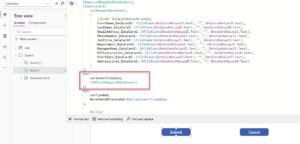
Convert to JSON

  • After creating the collection, convert it into a JSON format using the JSON function:

Convert to JSON

Trigger the Flow

  • Integrate Power Automate into your app and use the Run function to pass the JSON data to the flow:

Trigger the Flow

Step 2: Building the Power Automate Flow

Power Apps Trigger

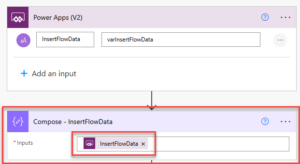
  • Start your flow with the Power Apps trigger. This allows the flow to receive the JSON variable from the Power App.

Power Apps Trigger

Compose Action

  • Add a Compose action to capture the data from Power Apps. Insert the variable passed from Power Apps into this action.

Compose Action


Parse JSON

  • Use the Parse JSON action to decode the JSON into a usable format.
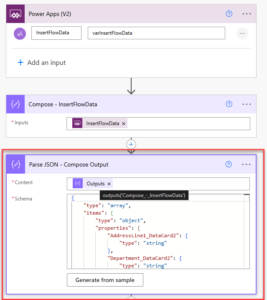
  • Add output from the Compose action inside content.
  • To generate the schema, start by adding only the Compose action in your Power Automate flow. Run the flow instance, and once it completes, click on the “Generate from sample” button. This will open a pop-up window where you can copy the output from the Compose action and paste it into the text box provided in the pop-up.

Parse JSON

Process Data

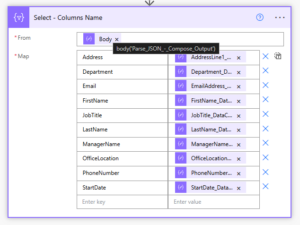
  • You can now access all the fields (e.g., Name, Department, Email) extracted from the JSON data.
  • Add actions like Create Item (for SharePoint) or Insert Row (for Excel) to store or use the data.
  • For example, we have extracted all the columns from JSON as below using select action.

Process Data

Test and Validate

  • Save the flow, submit data from the Power App, and verify that the flow processes all the data accurately.

Test and Validate

Key Benefits

  • Overcomes Input Limits: Efficiently handles large datasets without hitting Power Automate’s size restrictions.
  • Flexible Integration: Works seamlessly with Power Apps to pass complex data structures.
  • Scalable Solution: Suitable for workflows of varying complexity, from simple forms to multi-field submissions.

Conclusion

By combining Power Apps and Power Automate with JSON, you can overcome the input size limitations, streamline data transmission, and build scalable workflows.

For businesses looking to scale automation, Microsoft Power Platform services provide the tools necessary to integrate and streamline digital processes effectively.

This solution is particularly useful for handling complex forms or large datasets in scenarios like employee onboarding, customer feedback collection, or data surveys.

Start implementing this approach today to enhance the efficiency and reliability of your automated workflows. With a little creativity and the power of JSON, the possibilities are endless!

Simplify PDF Management with SharePoint Premium’s New Merge and Extract Features

SharePoint Premium introduces powerful tools to simplify PDF management directly within SharePoint document libraries or OneDrive. With the “Merge PDFs” action, you can combine multiple PDFs into one file, and the “Extract Pages” action allows you to create new files from selected pages—all without the need for external software or downloads. These features enhance document security, streamline workflows, and make SharePoint a more versatile and efficient platform for managing documents.

Getting Started

To take advantage of advanced SharePoint document management features, you’ll need either a Microsoft Syntex per-user license or access to the Syntex Pay-As-You-Go model. Once activated from the Admin Center, you can explore PDF management with SharePoint, including how to merge PDFs and extract pages directly while previewing a PDF in your document library.

How to Use the PDF Merge and Extract Features

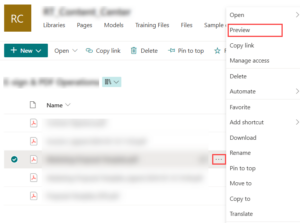
Easily combine PDFs into one by accessing the Merge and Extract options. Right-click a file or select the three dots next to it in your document library. Alternatively, use the top bar menu and choose Preview. From the preview mode, you’ll see options to combine multiple PDFs into one or extract pages as needed.

For automated solutions, you can also generate a PDF from the Microsoft Automate Method, leveraging SharePoint Premium Services to streamline your workflow.

IMG 02

Extract Features

Now, Let’s explore both PDF Merge and PDF Extract features in detail and how they will work.

Merging PDFs

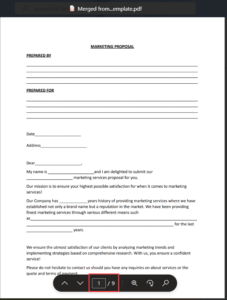
The PDF merge feature allows you to combine multiple files into one document.

Here are the Detailed steps to perform the PDF Merge Operation:

1. Open a PDF in Preview Mode by selecting the three dots next to the file name and choosing “Merge PDFs.”

Merge PDF

2. The original PDF will be pre-selected. Add other PDFs from your libraries or sites to include in the merger. Rearrange the order of the PDFs if needed to ensure the correct sequence.

original PDF

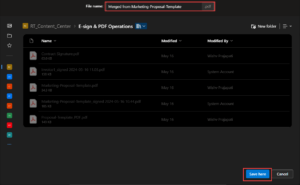
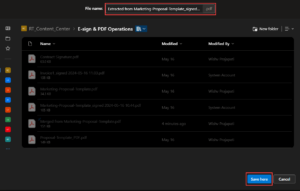
3. Click Next, provide a name for the merged file, and select your preferred save location.

merged file

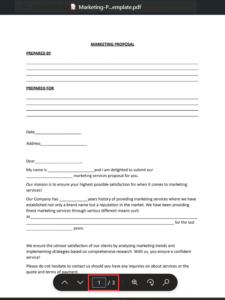
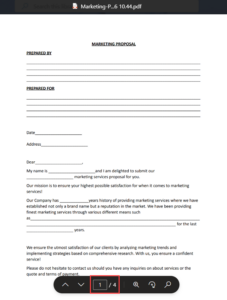
4. Example: A document with three pages can become part of a larger PDF after merging.

PDF after merging

(Before Merge: “Document – Pages 1 to 3”)

PDF after merging

(After Merge: “Combined Document – Pages 1 to 9”)

Extracting Pages from PDFs

The “Extract Pages” feature allows you to save specific pages from a PDF as a separate document.

Here are the steps to perform the PDF Merge Operation:

1. pen a PDF in Preview Mode and select the “Extract Pages” option from the navigation menu.

Extract Features

2. After that, choose the pages you want to extract from the displayed list of all pages in the PDF.

pages in the PDF

3. Click Next, enter a name for the new file, and choose the location where you want to save it. The selected pages will be saved as a separate document in the specified location.

pages in the PDF

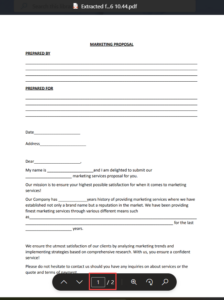
4. Example: A four-page document can be split into a new two-page file after extraction.

four-page document

(Before Extraction: “Original Document – Pages 1 to 4”)

four-page document

(After Extraction: “Extracted Pages – Pages 1 and 4)

Conclusion

The new PDF merge and extraction tools in SharePoint Premium offer a simple, secure, and efficient way for SharePoint document management. These features save time, eliminate the need for third-party software, and enhance the user experience. Start using them today to maximize your productivity and streamline your workflows!

Effective Ways to Share Large Files via Email

Sending large files through email as an attachment can be challenging, especially when they exceed the typical attachment limit of 20 MB. Here are ways to send large files via email:

  1. Compress the File into a ZIP Format to reduce its size.
    Use SharePoint or OneDrive for Cloud Sharing for seamless and secure file transfer.
  2. These methods help ensure your files reach the recipient efficiently while maintaining security and accessibility. Below is a step-by-step guide on how to send large files via email for both approaches.

Option 1: Using a ZIP File

One of the easiest ways to send large files via email is compressing them into a ZIP file. This method helps reduce file size, making it easier to email large files without hitting attachment limits.

Step 1: Create a ZIP File

Locate the file or folder you want to compress. Right-click on it and choose Compress to ZIP File. A new ZIP file, which is smaller in size, will be created in the same location as the original file.

Create a ZIP File

Step 2: Attach the ZIP File to an Email

You can now attach the compressed ZIP file to your email. Ensure the file size is 20 MB or less. If it still exceeds this limit, proceed with Option 2.

Option 2: Share Using SharePoint or OneDrive

If you need to share large files via email, using SharePoint support or OneDrive is an efficient solution. These Microsoft 365 solutions allow you to store and send large video files via email without worrying about attachment size limits. You can also automate email attachments using Power Automate for seamless file sharing.

Step 1: Upload the File

Navigate to the folder where you want to store the file in SharePoint/OneDrive. Drag and drop the file into the folder or click Upload > Files to add your document that you want to share.

Step 2: Create a Shareable Link

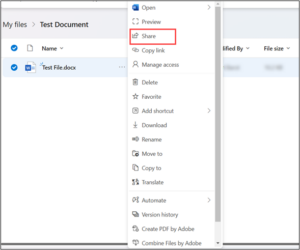
Navigate to the uploaded file in your SharePoint or OneDrive. Click the three dots (…) next to the file name to open the context menu.

Create a Shareable Link

Select Share.

Select Share

Step 3: Configure Link Settings

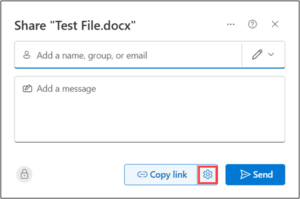
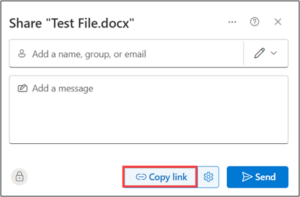
In the Share window, click the Gear Icon (⚙️) next to access link settings:

Configure Link Settings

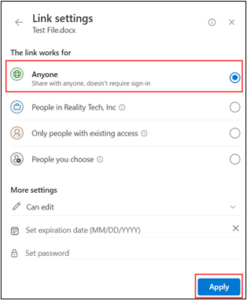
Choose the Sharing Options:

  • Anyone: Selecting anyone with the link can access the file without signing in. (You can optionally set a password for security and also the Expiration Date.)
  • People in [Your Organization]: Only internal users can access.
  • People with Existing Access: Only those already granted access can use the link.
  • Specific People: Share with specific individuals by entering their email addresses or names.

Choose the Sharing Options

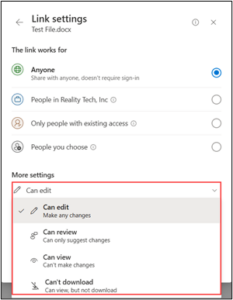
  • Set Permissions: Choose whether users can edit, review, view, or can’t download.

Choose the Sharing Options

  • Once done, Click Apply to save your link-sharing preferences.
  • Once your settings are configured, click the Copy link. The link is now copied to your clipboard.

Choose the Sharing Options

Step 4: Copy and Share the Link

You can now share the link with anyone by pasting the copied URL directly into the email.

Tips for Safe Sharing

  • Use Passwords: Protect sensitive files shared with “Anyone” links.
  • Set Expiration Dates: Limit how long the link stays active.
  • Clarify Access: Tell recipients if they can view, edit, or download the file.

This approach ensures your file reaches the recipient without worrying about attachment size limits!

Understanding Power BI Import Query and Direct Query

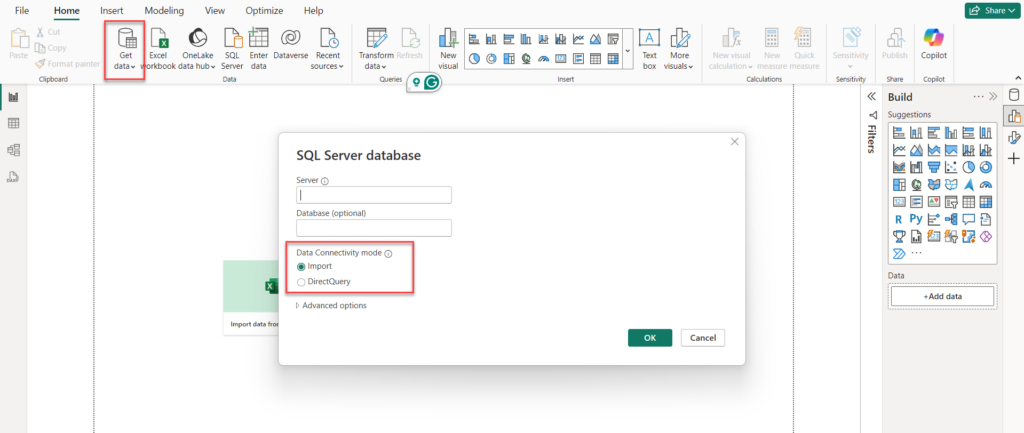
Introduction: Power BI is a powerful tool that helps businesses analyze data and make informed decisions. To better understand how it works, let’s take SQL Server as an example. When working with SQL Server as a data source in Power BI, you have two main options for connecting to your data: Import Mode and Direct Query. Choosing the right option depends on your specific needs. In this blog, we’ll break down these two modes, explain their features, and help you decide when to use each one.


IMG 01


What Is Import Query?

Import Mode in Power BI allows you to bring data from a source, like SQL Server, directly into Power BI’s memory. This imported data is saved in your Power BI file (.pbix) and doesn’t require constant connections to the source.

This mode is great for:

  • Performance: It provides fast query response times because everything is stored in memory.
  • Flexibility: You can create advanced calculations, relationships, and data transformations without relying on the source.
  • Small to Medium Data: Works best with smaller datasets that don’t need frequent updates.

When using Import Mode, Power BI takes a snapshot of your data at a specific time. You can then interact with and filter this compressed data without affecting the source. It’s perfect for reports needing complex models or quick responses to user actions.

Key Features of Import Query

  • High Performance: Data is preloaded into memory, enabling faster report rendering and interactions.
  • Offline Capabilities: Once data is imported, reports can be accessed even without a connection to the data source.
  • Enhanced DAX Support: Import Query supports advanced calculations and transformations using Data Analysis Expressions (DAX).
  • Multiple Data Sources: Using Import, you can combine data from various data sources (data flows, databases, CSV)
  • Complexity of Measures: Suitable for complex DAX Measures as all M and Dax Functions are accessible.

Disadvantages of Import Query

  • Limited to Data Size: Import mode struggles with very large datasets, as in-memory storage has limitations depending on your hardware and Power BI service tier.
  • Data Updates Are Not Real-Time: Data in Import mode is only updated when the dataset is refreshed, which means it may not reflect the latest changes in the source.
  • Refresh Limitations: Dataset refreshes are limited to 8 times per day on the Power BI Pro license (48 times with Premium), which can be a constraint for frequently changing data.
  • File Size Constraints: When you use Import Mode in Power BI, the data you bring in must fit within Power BI’s file size limits. The maximum file size for users with a Power BI Pro license is 1 GB. If you have a Power BI Premium license, you can work with larger files, but there are still size limits depending on your Premium capacity.

What Is a Direct Query?

Direct Query in Power BI allows you to connect directly to a data source (such as a SQL database) and retrieve data in real-time as users interact with the report. Unlike Import Query, where data is stored in Power BI, Direct Query leaves the data in the source, meaning the data is never stored or cached in Power BI. Power BI supports a wide range of data sources for Direct Query, including Azure SQL Database, Dataverse, Snowflake, SQL Server, Teradata Database, and many more. Here is how it works:

  • Real-Time Data Access: Always fetches the most up-to-date data.
  • No Data Size Constraints: Suitable for very large datasets that may exceed Power BI’s in-memory storage limits.
  • Centralized Security:  With Direct Query, the data stays in the source system, meaning it follows the security rules and access controls set by that system. This ensures that sensitive information is protected according to the security measures already in place in the data source, rather than relying on Power BI for security.

In simple terms, with Direct Query, Power BI queries the data source every time an interaction or filter is applied in the report, ensuring you’re always working with live data without manually refreshing anything.

Key Features of Direct Query

  • Real-Time Data: With Direct Query, the data in your report is always up to date because every time a user interacts with the report, Power BI sends a query directly to the data source to get the latest data.
  • No Data Storage in Power BI: Since no data is imported into Power BI, there’s no need for manual refreshes, and the data is always current.
  • Large or Frequently Updated Datasets: Direct Query is useful for very large datasets or when the data changes frequently, as it queries the source every time a report is run.
  • Cross-Source Data Models: You can create data models that pull data from multiple tables or even multiple data sources, enabling more flexible and real-time analysis.

Disadvantages of Direct Query

  • Slow Performance: Complex queries can slow down reports, especially with large datasets.
  • Limited Modelling: Fewer options for transforming or calculating data compared to Import mode.
  • Depends on Source: Relies on the performance and availability of the data source.
  • Limited Query Types: Some data sources or types of queries may not be supported by Direct Query. For example, complex SQL queries or specific advanced data operations may not work well or be supported in Direct Query mode, depending on the source system and its capabilities.
  • Connectivity Issues: Direct Query requires a constant and stable connection to the data source. If there are any network issues, or if the connection is slow or unavailable, it will directly affect the performance and usability of your reports. This can cause delays, errors, or incomplete data being displayed in your Power BI reports.
FeatureImport QueryDirect Query
Data StorageStored in Power BI’s memoryStored in the source system
PerformanceFast report loading and interactionsSlower due to real-time queries
Data FreshnessRequires manual or scheduled refreshesAlways up-to-date
Data Size LimitationsLimited by Power BI capacity (1 GB compressed per dataset for Pro license)No size constraints but depends on the performance of the source
Advanced CalculationsFully supported with DAX and transformations in Power QueryLimited support: some transformations may not work
Connection DependencyNot required after importContinuous connection required
Query ComplexitySupports complex queries and aggregations in Power BIRelies on the source system’s query capability
Source System LoadMinimal load after data is importedHigh load due to real-time queries
Offline AccessFully accessible offlineNot accessible without an active connection
ScalabilityLimited to Power BI’s in-memory capacityScales with source system capacity
Real-Time DataRequires frequent imports to simulate real-timeIdeal for real-time scenarios
Setup ComplexityEasier to set up and manageRequires careful design for performance optimization
Data SecurityRequires data to be imported into Power BI’s service or fileData remains in the source system, providing additional security in some scenarios
Supported Data SourcesMost data sources supported for importLimited to those with Direct Query capabilities
Cost ImplicationsMay require more storage and higher-tier licensing for large datasetsDepends on the performance and licensing of the data source
Data TransformationPower Query allows extensive data shaping and transformationLimited transformation; mostly in the source system
CachingFully cached in-memory dataNo caching: queries executed each time

Conclusion

Choosing between Import Query and Direct Query in Power BI depends on your specific needs. Use Import Query for smaller datasets, faster performance, and advanced modelling, particularly when offline access is required. Choose Direct Query for large datasets or when real-time data is essential. Both modes offer unique advantages, so evaluate your performance, data size, and refresh requirements to determine the best option for your scenario.

Transform Your Power BI Reports with the New Text Slicer!

Introduction to New Text Slicer feature 

What If You Could Filter Your Data in Seconds? 

You’re looking at a huge dataset in Power BI—thousands of rows, countless columns. You need to find something specific, like a product name or product ID, but scrolling through endless dropdowns is time-consuming and frustrating. 

Here’s the Solution: The Text Slicer! 

Forget the dropdowns. Now, you can simply type what you’re searching for, hit Enter, and Your visuals instantly update to show exactly what you need. 

No more wasted time. No more frustration. Just seamless, lightning-fast filtering that puts you in control.  With the Text Slicer, exploring your data has never been easier—or faster! 

Text Slicer – Enable and Use with Power BI

Enable Text Slicer in Power BI Desktop 

  • Open Power BI Desktop and Go to the File menu and click on Options and Settings, then select Options.1
  • Under the Preview Features section, enable the checkbox for the Text Slicer Visual, click OK, and restart Power BI Desktop. 

Note:

The Text Slicer feature is currently in Preview Mode in Power BI Desktop! This means it’s not available globally.  

02 3


Add the Text Slicer to Your Report 

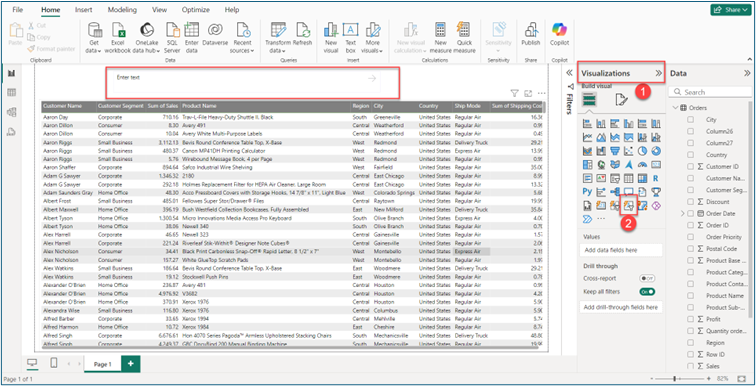
  • Open your Power BI report and ensure your dataset is loaded. In the Visualizations pane, locate and select the Text Slicer. The slicer will appear on your report page.03 3


Configure the Text Slicer
 

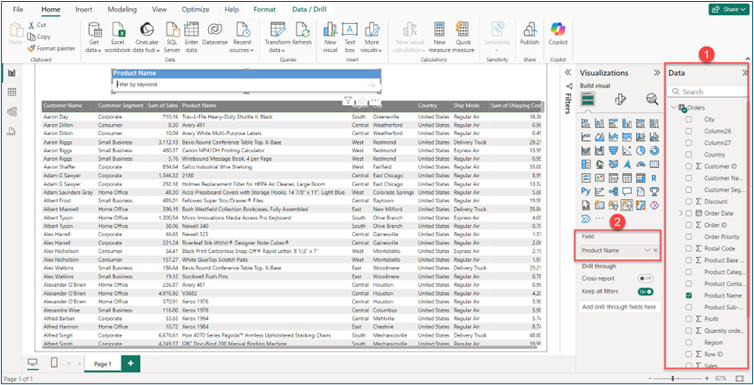
  • Add a column or field from the Data pane to the Field property of the Text Slicer.
    Example: Add the “Product Name” field for filtering product data.

    04 3 1

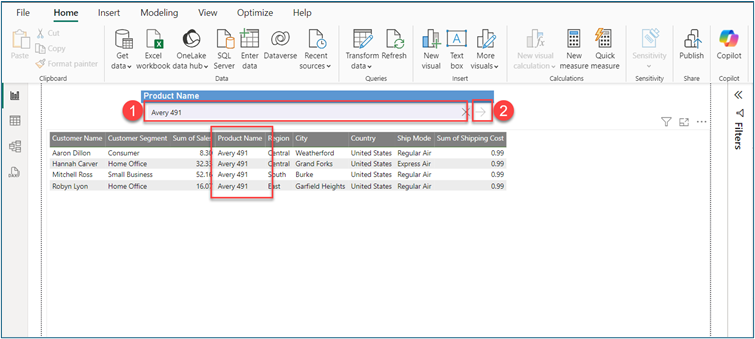
  • Use the slicer’s text box to type search terms, and click the arrow () to apply the filter.

    05 3


Customize the Text Slicer
 

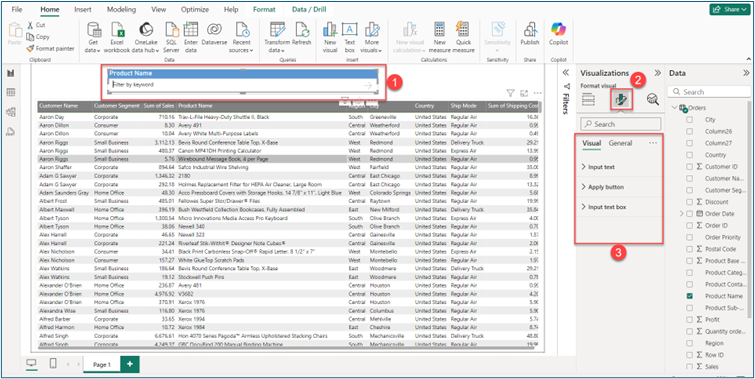
  • First, select the visual, then go to the Visualization section. Next, select the Format Visual section and modify properties like font size, style for the text box, and more.”06 3


Conclusion

The Text Slicer offers an innovative approach to filtering data in Power BI, making the process faster and more intuitive. Its ability to customize and adapt to user needs enhances both the functionality and design of reports. By incorporating this tool, users can achieve more efficient data exploration and create interactive, user-friendly visualizations.