When automating tasks in Microsoft 365, it’s best to avoid logon IDs and passwords.
The best practice is to use the least privileges and function in a zero-trust environment.
The ideal approach is to use a Managed Identity with the Sites.
Selected application scope, some approaches use a Sites.
Selected scope with an App Registration and Service Principal, but the best approach is to use Managed Identities for identity management in automation.
Approach 1: Connecting to SharePoint Online using Managed Identity with Granular Access Permissions
Microsoft Graph and SharePoint Online support some granular access permissions using Sites.
Selected application scope in Graph and app access role permissions in Site collections. It even works with Managed Identities.
The Sites selected application scope was added to Microsoft Graph a while back to enable granular app access permissions within SharePoint Online.
With this scope, one can grant application access to specific SharePoint Online site collections instead of granting access to all site collections in the tenant.
Managed Identities is a way of providing identities to Azure resources without any App credentials like certificates or client secrets involved.
The prerequisites:
Needed the following resources for setup:
- A Logic App with a System Assigned Managed Identity.
- A SharePoint Site with a SharePoint list populated with a few columns and items.
- Access to grant Microsoft Graph application scopes and SharePoint site permissions.
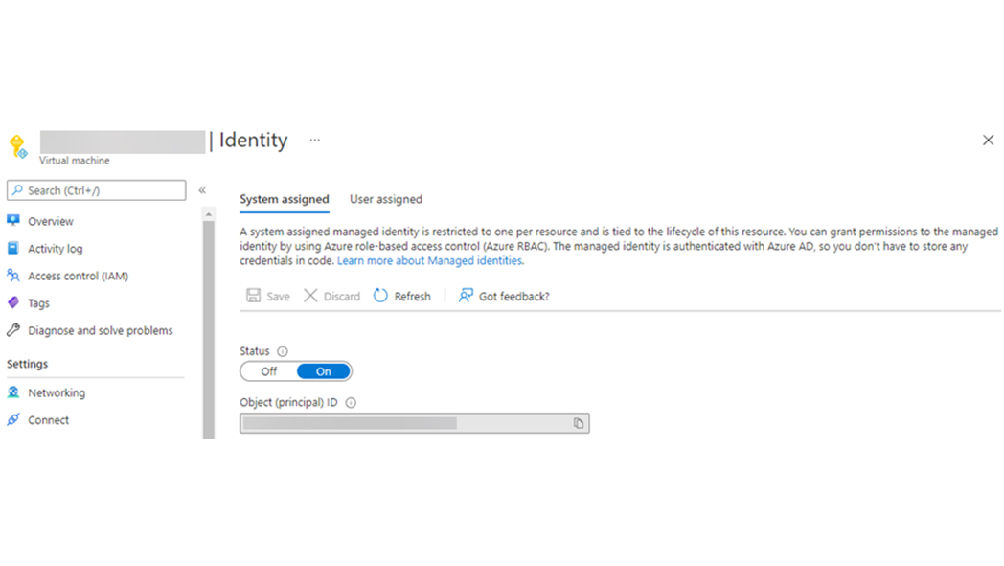
A Logic App with a System-assigned Managed Identity:
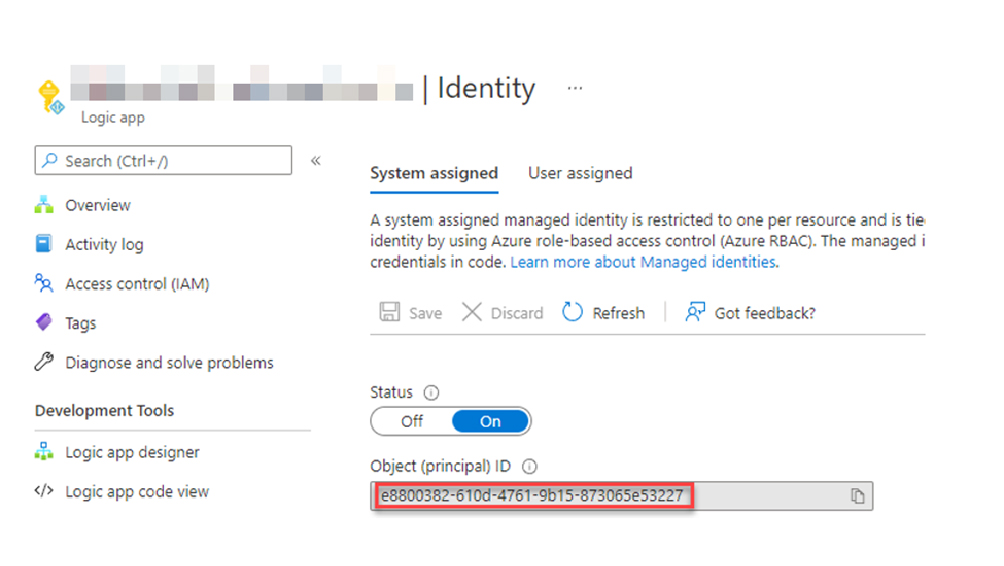
Once the System assigned Managed Identity is enabled on the Logic App, Note down the Object (principal) ID for the Managed Identity (guid e8800382-610d-4761-9b15-873065e53227) – which will be used to grant Sites. Selected application scope in Microsoft Graph.


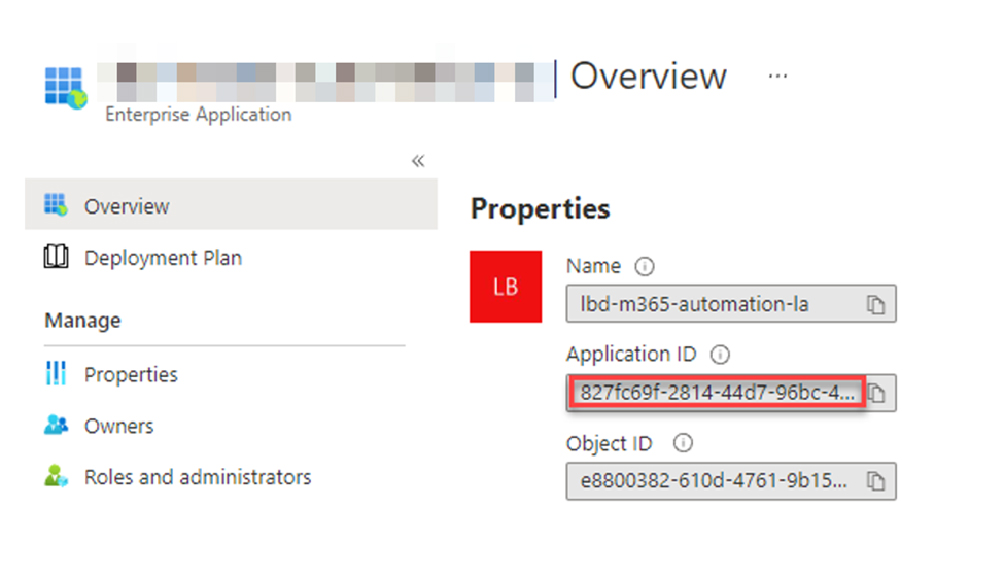
Visiting the Enterprise Application blade in the Azure AD Portal, select the recently created Managed Identity object and noted down the Application ID for the Managed Identity (guid 827fc69f-2814-44d7-96bc-492f2bf21c83) – which will be used to grant permission within the SharePoint site.

Create a Team site with the name Test Team Site, which generated a SharePoint site, and added a SharePoint List with the name OrderList with necessary columns and a few items.
Grant Application Scope in Microsoft Graph
Use Microsoft Graph PowerShell SDK to grant the Sites. Selected application scope in Microsoft Graph.
$ObjectId is set to the guid value of Object (principal) ID for the Managed Identity noted down earlier. # Add the correct ‘Object (principal) ID’ for the Managed Identity $ObjectId = “e8800382-610d-4761-9b15-873065e53227” # Add the correct Graph scope to grant $graphScope = “Sites.Selected” Connect-MgGraph -Scope AppRoleAssignment.ReadWrite.All $graph = Get-MgServicePrincipal -Filter “AppId eq ‘00000003-0000-0000-c000-000000000000′” $graphAppRole = $graph.AppRoles | ? Value -eq $graphScope $appRoleAssignment = @{ “principalId” = $ObjectId “resourceId” = $graph.Id “appRoleId” = $graphAppRole.Id } New-MgServicePrincipalAppRoleAssignment -ServicePrincipalId $ObjectID -BodyParameter $appRoleAssignment | Format-List Running the Powershell code produced the following output in the console, indicating that the scope was successfully granted. AppRoleId: 883ea226-0bf2-4a8f-9f9d-92c9162a727d CreatedDateTime: 14.02.2022 07:45:10 DeletedDateTime: Id: 9Uv0TSLb…Yw3xRUH8 PrincipalDisplayName: test-team-site-automation PrincipalId: e8800382-610d-4761-9b15-873065e53227 PrincipalType: ServicePrincipal ResourceDisplayName: Microsoft Graph ResourceId: 07165e04-89b3-4996-8b1d-a2a225eb5104 AdditionalProperties: {[@odata.context, https://graph.microsoft.com/v1.0/$metadata#servicePrincipals(‘e8800382-610d-4761-9b15-873065e53227’)/appRoleAssignments/$entity]} The Managed Identity now has the Sites. Selected application scope in Microsoft Graph, but still requires app access within the specific SharePoint site. Grant App Access to a Specific SharePoint Site Microsoft Graph PowerShell SDK to grant the Managed Identity app access to the SharePoint site. id in the application hashtable is set to the guid value of Application ID for the Managed Identity noted down earlier. # Add the correct ‘Application (client) ID’ and ‘displayName’ for the Managed Identity $application = @{ id = “827fc69f-2814-44d7-96bc-492f2bf21c83” displayName = “test-team-site-automation” } # Add the correct role to grant the Managed Identity (read or write) $appRole = “write” # Add the correct SharePoint Online tenant URL and site name $spoTenant = “tenant.sharepoint.com” $spoSite = “TestTeamSite” # No need to change anything below $spoSiteId = $spoTenant + “:/sites/” + $spoSite + “:” Import-Module Microsoft.Graph.Sites Connect-MgGraph -Scope Sites.FullControl.All New-MgSitePermission -SiteId $spoSiteId -Roles $appRole -GrantedToIdentities @{ Application = $application } |
Running the Powershell code produced the output of a permission ID in the console, indicating that the permission was successfully granted.
The Logic App’s Managed Identity should now have enough permissions to both read and write the SharePoint List items via Microsoft Graph.
Configure Logic App to Retrieve SharePoint List Items
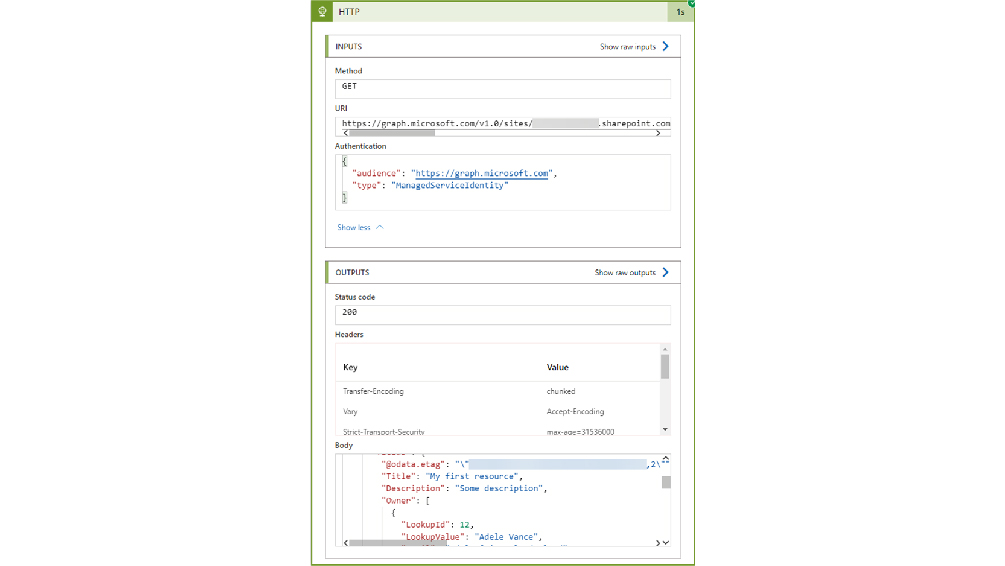
I went back to the Logic App and the Logic app designer blade and added a new action step.
- Connector: HTTP
- Method: GET
- URI: https://graph.microsoft.com/v1.0/sites/<tenant>.sharepoint.com:/sites/TestTeamSite:/lists/OrderList/items?$select=id,webUrl,fields,createdDateTime&$expand=fields($select=Title,Owner,Description,AutomationCompleted)&$top=999
- Authentication
- Authentication type: Managed Identity
- Managed identity: System-assigned managed identity
- Audience: https://graph.microsoft.com
Save the new configuration and triggered the Logic App. And behold – status code 200 and a response body with the list items!

Success! The Logic App is able to work with data in SharePoint Online sites authenticating with its least-privileged Managed Identity, but only for sites it is specifically granted app access to.
Now you know how to utilize Sites. Selected application scope and app access roles in SharePoint Online to grant least-privileged access for automation processes using Managed Identities. This aligns with many SharePoint security best practices that focus on minimizing surface exposure while maintaining efficiency.
For further assistance or to explore tailored SharePoint Development Services, consider consulting a reputable company like Reality Tech.
Additional Read
Approach 2: Registering the Azure App for SharePoint Online
Procedure
- Log on to the Azure portal (https://portal.azure.com/) using your global admin user account.
- Go to Azure Active Directory.
- In the navigation pane, click App Registrations.
The App Registrations page appears. - Click New Registration.
The Register an application screen appears. - In the Name box, type a name for the app.
- Under Supported account types, select Accounts in this organizational directory only (tenant_prefix – Single tenant).
- To verify the status of the app and to authorize the app from the Command Center, under Redirect URI, enter the Command Center URL.
For example, enter https://host_name.domainname.com/commandcenter. - Click Register.
- Copy and paste the following values in a document that you can access later:
– Application ID
– Directory ID
You will enter these values in the Commvault software when you complete the Office 365 guided setup. - In the navigation pane, click API permissions.
- Click Add a permission.
- Click Microsoft Graph and complete the following steps:
– Click Application permissions.
– Select the User. Read permission. - Click Add Permissions.
- Click Grant admin consent for tenant_name.
- Click Yes.
- In the navigation pane, click Certificates & secrets.
The Certificates & secrets page appears. - Click New client secret.
The Add a client secret dialog box appears. - Enter a description, and then select the maximum value.
- Click Add.
- Copy and paste the client’s secret value in a document that you can access later.
You will enter this value in the Command Center when you complete the Office 365 guided setup. - To assign full permissions to the tenant to back up SharePoint sites, in your browser, go to the tenant URL.
For example, go to https://<office_365_tenant_URL>/_layouts/15/appinv.aspx. The SharePoint admin center page appears. - In the App ID box, enter the application ID that you recorded earlier, and then click Lookup.
In the Title box, the name of the application appears. - In the App Domain box, type tenantname.onmicrosoft.com.
To get the correct domain name, go to the Microsoft Azure website, Custom domain names. - In the App’s Permission Request XML box, type the following XML string:
<AppPermissionRequests AllowAppOnlyPolicy=”true”><AppPermissionRequest Scope=”http://sharepoint/content/tenant” Right=”FullControl” /><AppPermissionRequest Scope=”http://sharepoint/social/tenant” Right=”Read” /></AppPermissionRequests> - Click Create.
- Click Trust It.
Start Your SharePoint Project in a Click
Our technology and wide delivery footprint have created billions of dollars in value for clients globally and are widely recognized by industry professionals and analysts.
Want to talk?
Drop us a line. We are here to answer your questions 24*7.


