
How to deploy multiple Office Solutions in a single setup
After creation of all your MS-Office solutions, they can be configured to be deployed all at once. The steps below walk through how to configure one setup for all MS-Office solutions using a Click Once installer for the .NET Framework:
Step 1: Create a sample Word Add-In project using VS
(File->New Project->Office/SharePoint;Office Add-ins)
Step 2: Add Projects to the Solution
Add all the projects into this solution where the sample add-in is created.
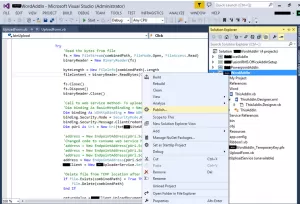
Step 3: Publish project one at a time to the common folder
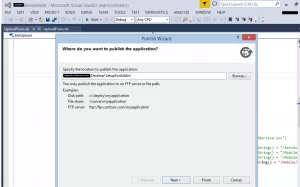
(For Ex. ‘C:/Publish/’). Publish the sample add-in project last, when you have finished publishing the other projects . (Note: Ensure that publish settings are set correctly. Add the necessary prerequisites to each project, select install prerequisites as the same location as my application. By selecting this one must ensure that all prerequisites are at this location ‘C:\Program Files (x86)\Microsoft SDKs\Windows\v8.1A\Bootstrapper\Packages’) in the appropriate folder.
Screen-Shot: Publishing to common place folder:
 \
\
Screen-Shot: Here we have taken ‘SetupForAddin’ folder (as the common location) to publish all add-in projects:
Step 4: Modifying the application manifest
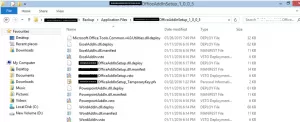
- From the c:\publish\Application Files folder, move the contents of the {EXCEL_PROJECT}_1_0_0_0 and {WORD_PROJECT}_1_0_0_0 or {PPT_PROJECT}_1_0_0_0 directories to the {SAMPLE_PROJECT}_1_0_0_0 directory.
- Open the {SAMPLE_PROJECT}.dll.manifest, {WORD_PROJECT}.dll.manifest, and {EXCEL_PROJECT}.dll.manifest, {PPT_PROJECT}.dll.manifest files in an XML editor.
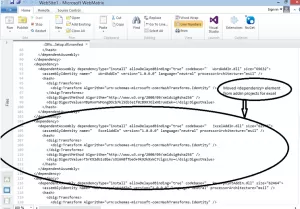
- From the {WORD_PROJECT}.dll.manifest file, copy all install and file dependencies including {WORD_PROJECT}.dll. That is, copy all dependencies that start with
- In the {SAMPLE_PROJECT}.dll.manifest file, paste the {WORD_PROJECT}.dll install dependency at the end of the dependency section.
- Repeat the previous #3 and #4 for {EXCEL_PROJECT} and {PPT_PROJECT}.
Screen-shot: move files from the add-in projects to our last published sampled project directory. (Files to move from each project are ‘.vsto’, ‘dll.deploy’,’dll.manifest’):
Screen-Shot: Copied all the element from all word, excel, PowerPoint add-in projects to sample projects {SAMPLE_PROJECT}.dll.manifest file:
Step 5: Adding the Entrypoints
- In the {SAMPLE_PROJECT}.dll.manifest file, remove the text between the and elements.
- From the {WORD_PROJECT}.dll.manifest file, copy the text between the and elements.
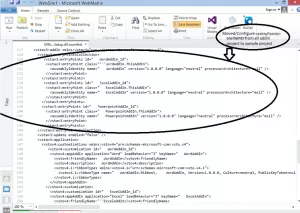
- In the {SAMPLE_PROJECT}.dll.manifest file, paste the code after the element.
- Add the id attribute to the element to differentiate this entrypoint from others.
- Repeat previous points #2, #3 and #4 for {EXCEL_PROJECT} and {PPT_PROJECT}.
Screen-Shot: Copied all the element from all word, excel, PowerPoint add-in projects to sample projects {SAMPLE_PROJECT}.dll.manifest file.
Step 6: Adding Assemblies
To add the assemblies to the vstov4 namespace in the application manifest
- In the {SAMPLE_PROJECT}.dll.manifest file, remove any text between the and elements.
- In the {WORD_PROJECT}.dll.manifest file, copy the text between the and elements.
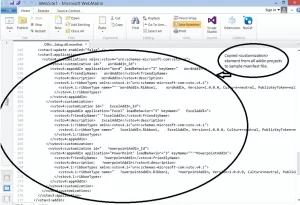
- In the {SAMPLE_PROJECT}.dll.manifest file, paste the code after the element.
- Add the id attribute to the element to differentiate this customization from others. This id is the same id that was added to the element in the previous step 5.
Screen-Shot: Copied all the element from all word, excel, PowerPoint add-in projects to sample projects {SAMPLE_PROJECT}.dll.manifest file.
Step 7: Sign manifests
To re-sign the application and deployment manifests
- Copy the {SAMPLE_PROJECT}_TemporaryKey.pfx certificate file from the {SAMPLE_PROJECT} solution directory into the c:\Publish\Application Files\{SAMPLE_PROJECT}_1_0_0_0directory.
- Open the Visual Studio command prompt.
- Change to the c:\Publish\Application Files\{SAMPLE_PROJECT}_1_0_0_0 directory.
- Sign the modified application manifest with the following command:
mage -sign ContosoInstaller.dll.manifest -certfile ContosoInstaller_TemporaryKey.pfx
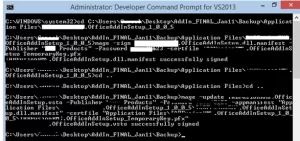
The message “{SAMPLE_PROJECT}.dll.manifest successfully signed” appears.
- Change to the c:\Publish directory.
- Update and sign the deployment manifest with the following command:
mage -update ContosoInstaller.vsto -appmanifest “Application Files\ContosoInstaller_1_0_0_0\ContosoInstaller.dll.manifest” -certfile “Application Files\ContosoInstaller_1_0_0_0\ContosoInstaller_TemporaryKey.pfx”
The message “{SAMPLE_PROJECT}.vsto successfully signed” appears.
Copy the {SAMPLE_PROJECT}.vsto file to the c:\publish\Application Files\{SAMPLE_PROJECT}_1_0_0_0 directory.
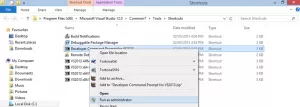
Commands to execute: (Use ‘Developer Command Prompt for VS2013’ command prompt from Visual Studio Tools)
- mage -sign XYZOfficeAddIn.OfficeAddInSetup.dll.manifest -Publisher “XYZ Products” -Password xyz@123 -certfile XYZOfficeAddIn.OfficeAddInSetup_TemporaryKey.pfx
- mage -update XYZOfficeAddIn.OfficeAddInSetup.vsto -Publisher “XYZ Products” -Password xyz@123 -appmanifest “Application Files\ XYZOfficeAddIn.OfficeAddInSetup_1_0_0_3\ XYZOfficeAddIn.OfficeAddInSetup.dll.manifest” -certfile “Application Files\ XYZOfficeAddIn.OfficeAddInSetup_1_0_0_3\ XYZOfficeAddIn.OfficeAddInSetup_TemporaryKey.pfx”
Screen-Shot: Run the ‘Developer Command Prompt for VS2013’ command prompt from VS tools:
Screen-Shot: Re-sign the application and deployment manifests:
Now your final setup is ready. You can run to install. You should then see the Add-Ins configured; for Word, Excel and PowerPoint
3 thoughts on “Deploy multiple Office Solutions in a single setup”
Leave a Reply
Want to talk?
Drop us a line. We are here to answer your questions 24*7.


Thanks for such post… good that u explained topic that is rarely available even on net… Even on Microsoft site, they have very old post explaining this with Office 2010, which could no way work with office 2016. Your is best…
better if you could have added video for the same.
Thanks once again for such explanation…
Good Post!!! Congrats!!!
Thank you for this information. I’ll try and deploy tonight on my server farm. Again, Thanks!