




SharePoint lists are frequently used to manage requests, service tickets, employee submissions, project information, and approval processes. In many of these scenarios, users also attach supporting files such as PDFs, images, spreadsheets, or Word documents to a list item.
Power Automate can automatically retrieve those attachments and send them as part of an email notification, eliminating the need for users to manually download files from SharePoint and forward them to another person. This is one of the most common automation requests we see: teams want to send an email with attachments from a SharePoint list the moment a new item is submitted, rather than relying on someone to check the list, download the files, and forward them manually.
In this guide, we will build a cloud flow that:
- Starts when a SharePoint list item is created.
- Retrieves all attachments from the item.
- Gets the binary content of each attachment.
- Builds an attachment array.
- Sends an Outlook email containing all the attachments.
Microsoft continues to support the SharePoint Get attachments and Get attachment content actions for this scenario. The Office 365 Outlook connector also supports supplying attachment names and content to the Send an email (V2) action, which is how Power Automate ultimately performs the actual send email with attachment step.
Prerequisites
Before creating the flow, confirm that you have:
- A SharePoint Online site.
- A standard SharePoint list with attachments enabled.
- Permission to read the list and its attachments.
- An Exchange Online mailbox.
- Access to Power Automate.
- Permission to send email from the mailbox used by the Outlook connection.
The SharePoint and Office 365 Outlook connectors are standard Power Automate connectors. Select Microsoft 365 and Office 365 licenses include the ability to create automated flows and use standard connectors. A Power Automate Premium license is generally not required for the flow described in this article unless you add premium connectors or premium capabilities.
Flow Architecture
The finished flow will contain the following actions:
- When an item is created
- Initialize variable
- Get attachments
- Condition
- Apply to each
- Get attachment content
- Append to array variable
- Send an email (V2)
The array variable is important because the number of attachments can be different for every SharePoint item. Instead of configuring a fixed number of email attachments, the flow dynamically creates one attachment object for every file found on the list item. The two SharePoint actions at the center of this pattern, Get attachments and Get attachment content, are what let Power Automate get attachment data from a SharePoint list in the first place, before anything is ever emailed.
Step 1: Create an Automated Cloud Flow
Sign in to Power Automate and create a new Automated cloud flow.
Enter a descriptive name, such as:
Email SharePoint List Item Attachments
Select the SharePoint trigger:
When an item is created
This trigger runs whenever a new item is added to the selected SharePoint list. Microsoft also provides When an item is created or modified, but that trigger should be used carefully because every later modification could send another email.
Select Create.
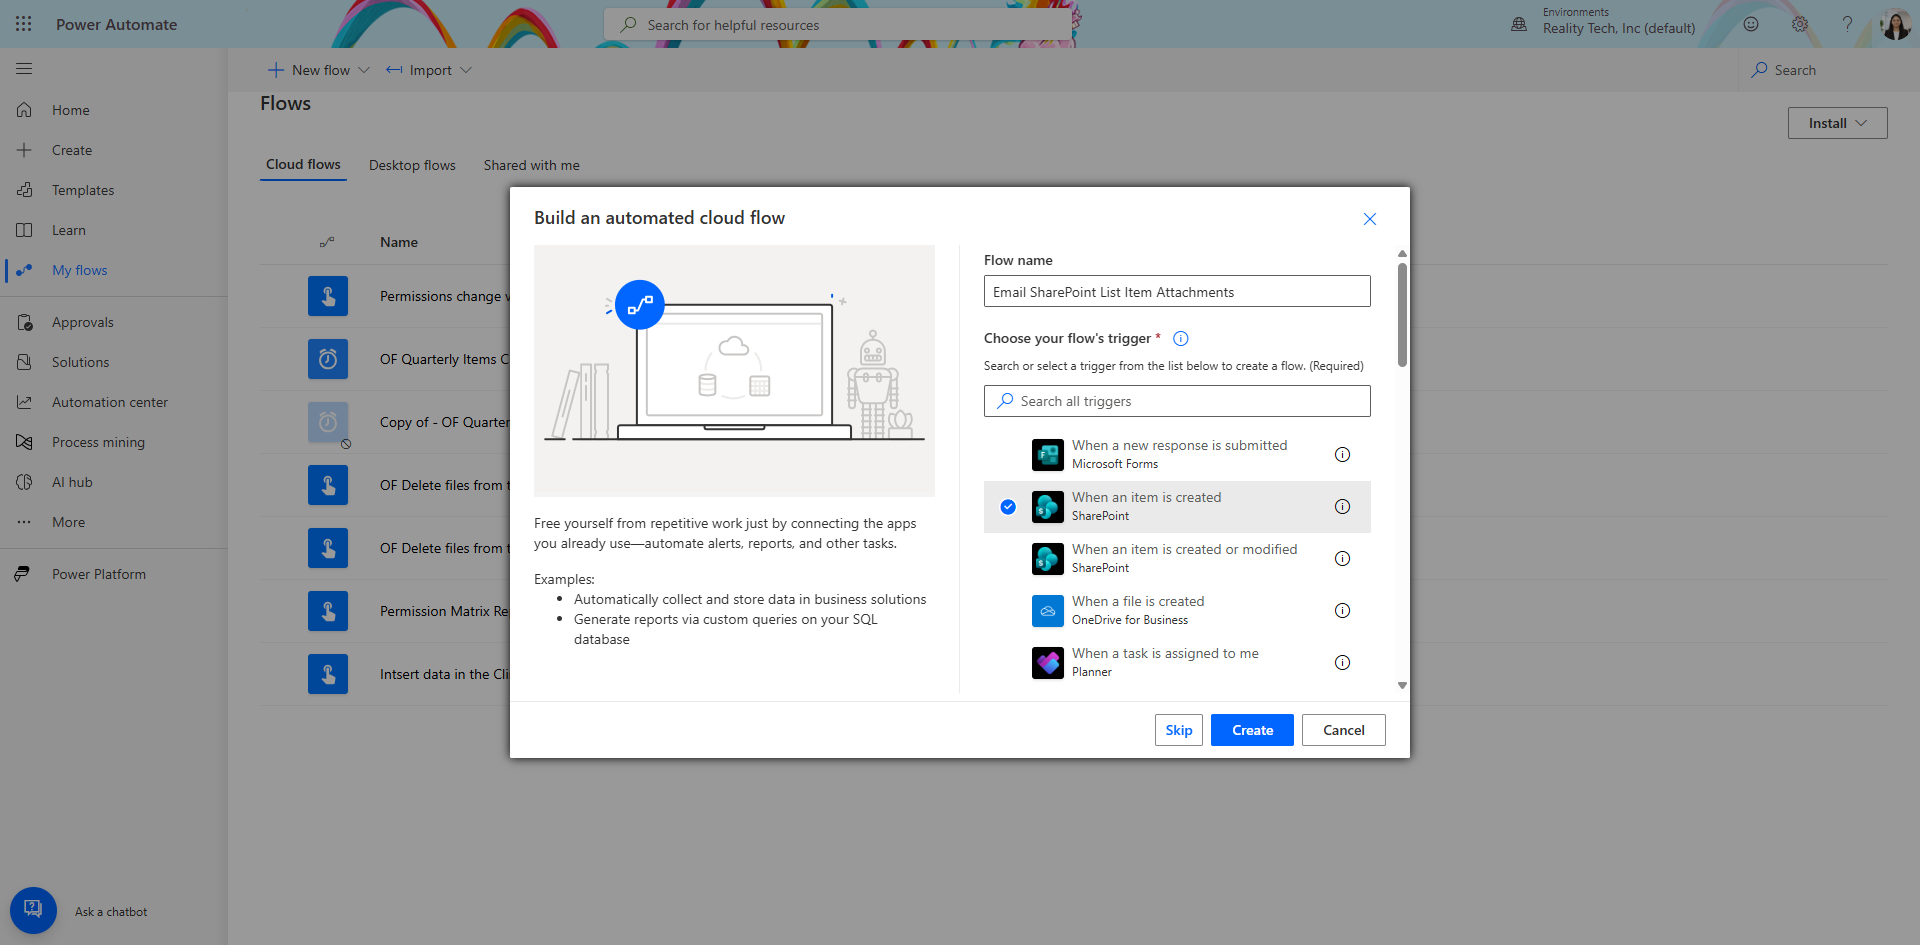
Step 2: Configure the SharePoint Trigger
In the When an item is created trigger, configure:
- Site Address: Select the SharePoint site containing your list.
- List Name: Select the appropriate SharePoint list.
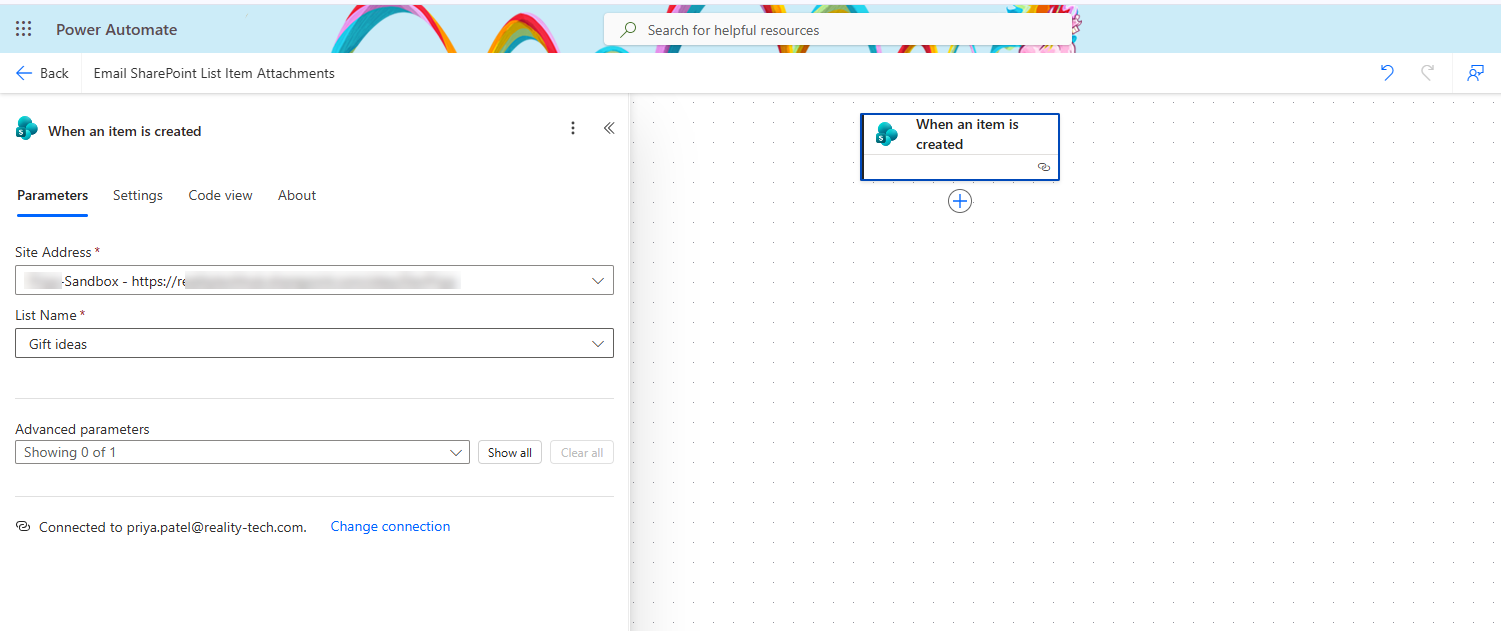
The trigger output will include the new item’s ID, title, creator information, column values, and other properties that can be used later in the flow.
When should you use “created or modified”?
Use When an item is created or modified when the email should be sent only after a particular business event, such as:
- The status changes to Approved.
- A reviewer is assigned.
- An item reaches a specific workflow stage.
- Attachments are added after the original item was created.
In these cases, add a trigger condition or a dedicated notification-status column to prevent duplicate emails. Microsoft recommends trigger conditions because they prevent unnecessary flow runs rather than allowing the flow to run and then rejecting the item later.
Step 3: Initialize the Attachment Array
Add the built-in Initialize variable action.
Configure it as follows:
- Name: varEmailAttachments
- Type: Array
- Value: Leave blank.
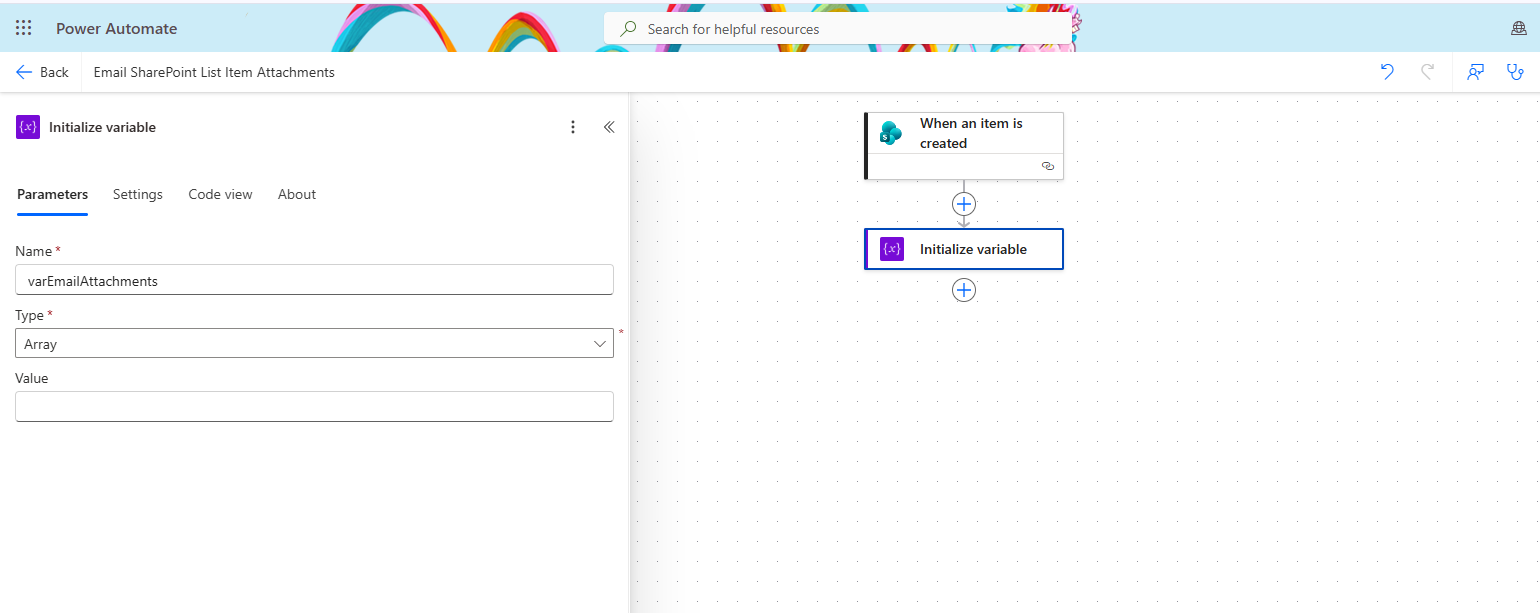
This variable will contain the attachment objects that are ultimately supplied to Outlook.
Clear names make the flow easier for other administrators and developers to understand.
Step 4: Retrieve the SharePoint Attachments
Add the SharePoint action:
Get attachments
Configure:
- Site Address: Use the same SharePoint site as the trigger.
- List Name: Use the same SharePoint list.
- Id: Select ID from the When an item is created trigger.
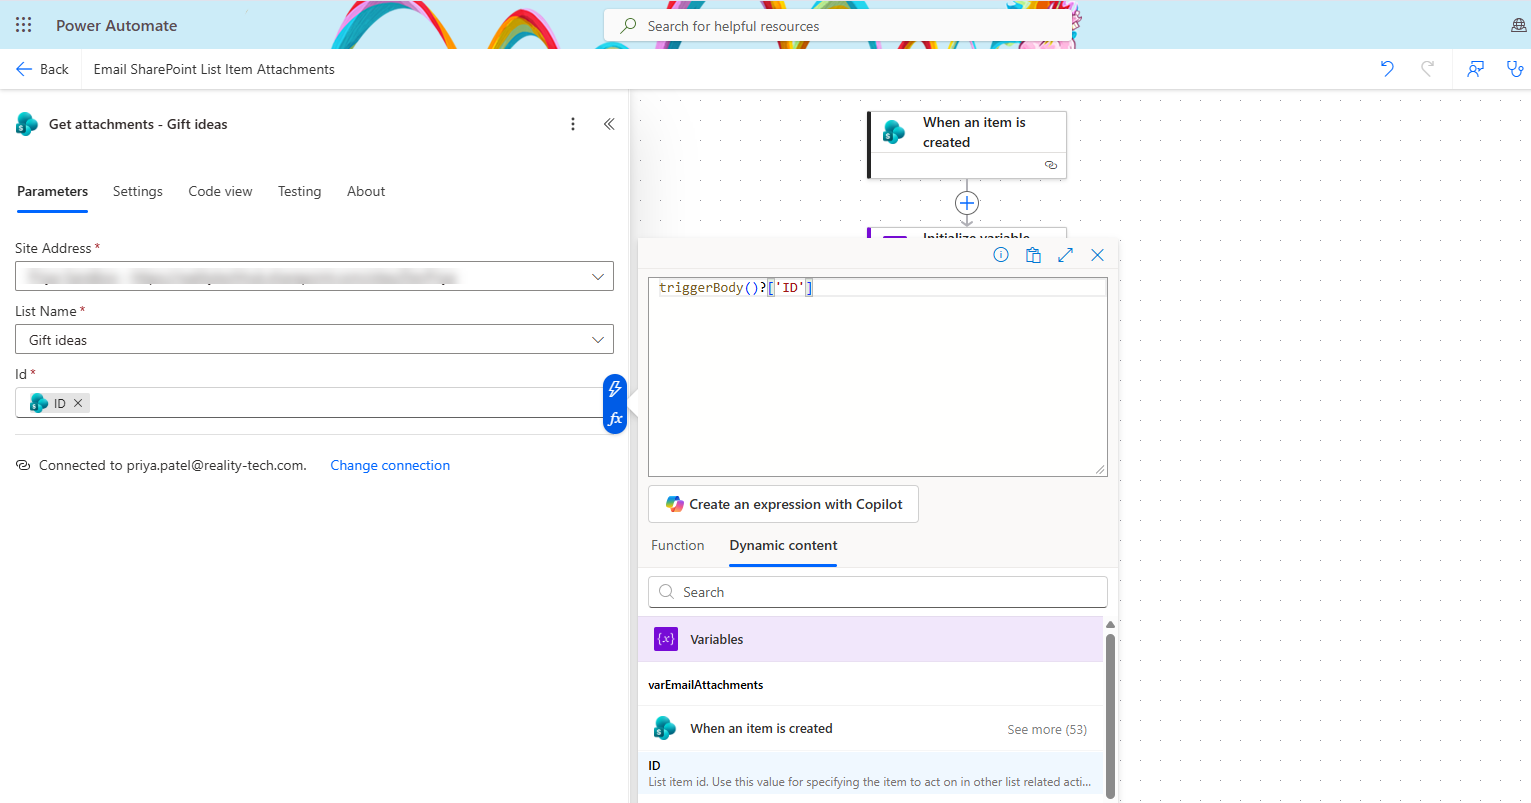
The Get attachments action returns attachment metadata, including the attachment name and file identifier. It does not return the complete file content. The file identifier is passed to Get attachment content in the next step.
Step 5: Check Whether Attachments Exist
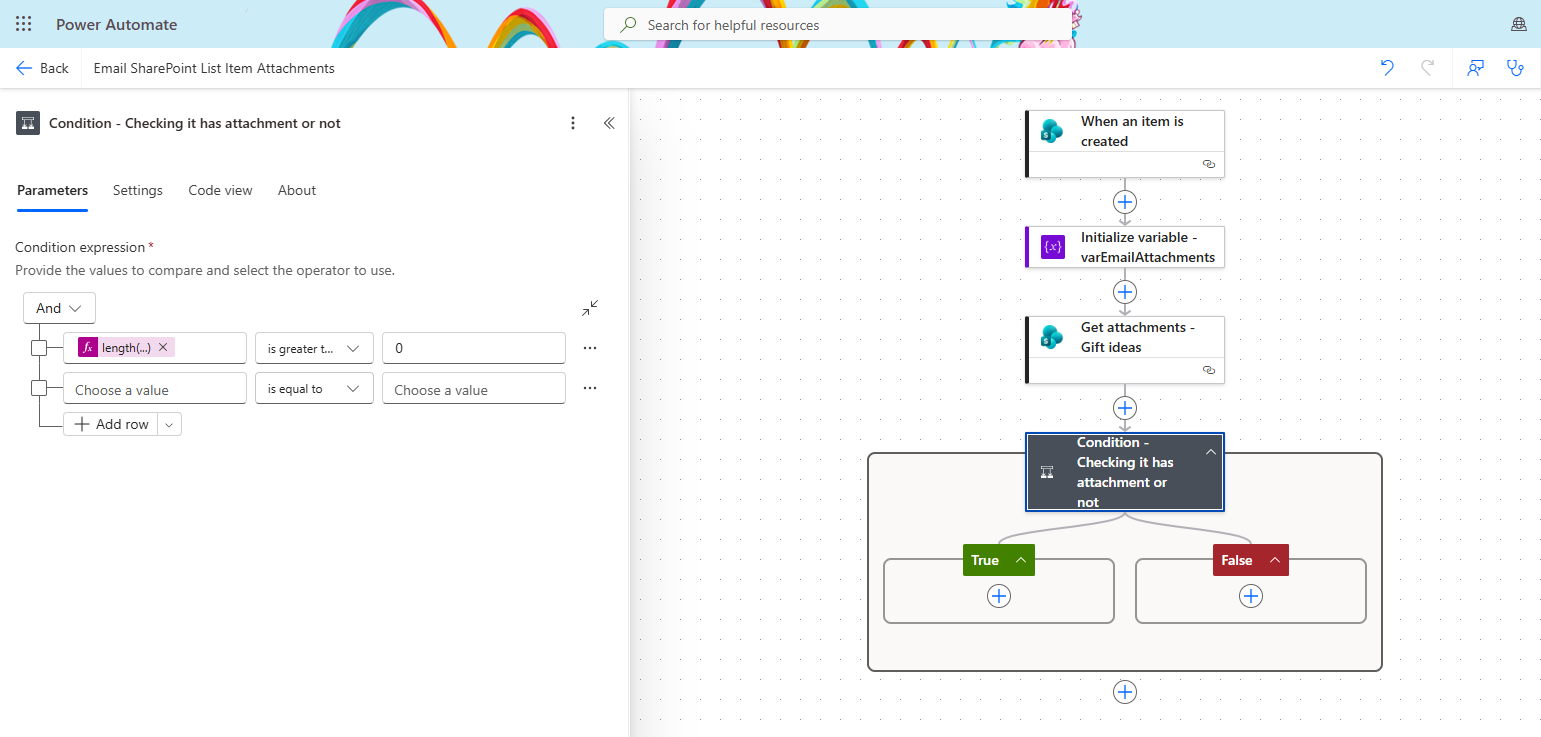
An item might be created without attachments. Add a Condition after Get attachments to determine whether any files were returned.
Use the following expression on the left side of the condition:
Configure the comparison as:
Enter:
The Yes branch processes and sends the attachments.
In the No branch, you can:
- Send the email without an attachment.
- Terminate the flow.
- Update the SharePoint item with a “No attachments found” status.
- Wait for a later item modification, depending on the business process.
Using this condition also makes the flow easier to troubleshoot because the attachment-processing actions run only when files are available.
Step 6: Get the Content of Each Attachment
Inside the Yes branch, add the SharePoint action:
Get attachment content
Configure:
- Site Address: Select the SharePoint site.
- List Name: Select the SharePoint list.
- Id: Use the item ID from the SharePoint trigger.
- File Identifier: Select the attachment ID or file identifier returned by Get attachments.
Because Get attachments can return multiple files, Power Automate will automatically place Get attachment content inside an For each loop.
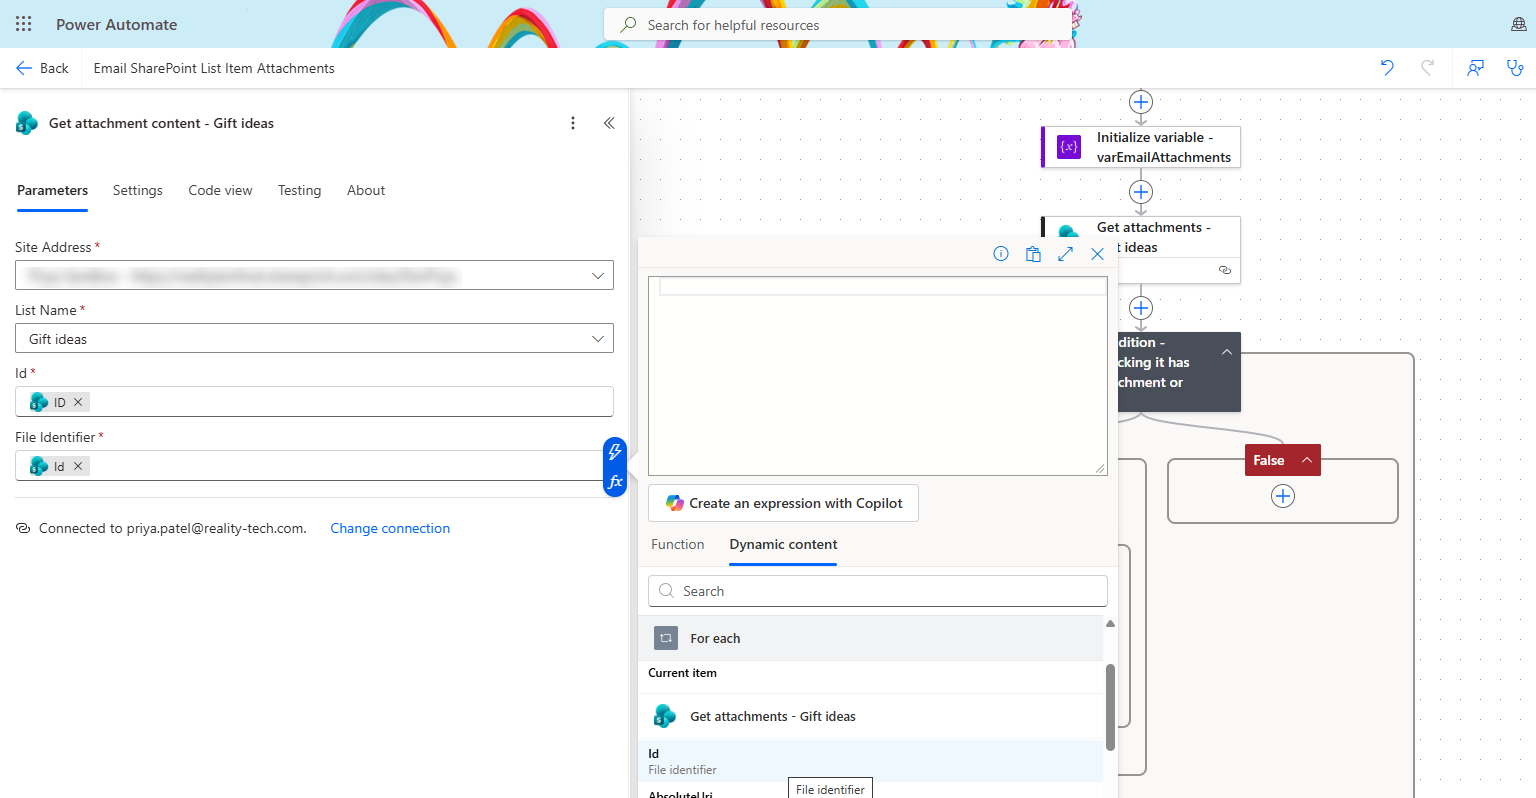
The loop runs once for every attachment associated with the SharePoint list item. Microsoft documents this as the standard pattern: use Get attachments to retrieve the attachment list and then pass each file identifier to Get attachment content.
Step 7: Add Each File to the Attachment Array
Inside the same For each loop, add:
Append to array variable
Select:
- Name: varEmailAttachment
The value must contain an object with two properties:
“Name”: “<Attachment file name>”,”ContentBytes”: “<Attachment file content>”
}
Configure these properties with dynamic content:
- Name: Select DisplayName from Get attachments.
- ContentBytes: Select Attachment Content from Get attachment content.
Conceptually, every loop adds an object similar to this:
{
“Name”: “ProjectProposal.pdf”,
“ContentBytes”: “<binary file content>”
}
Do not type the placeholder text shown in the example. Use the corresponding Power Automate dynamic-content values.
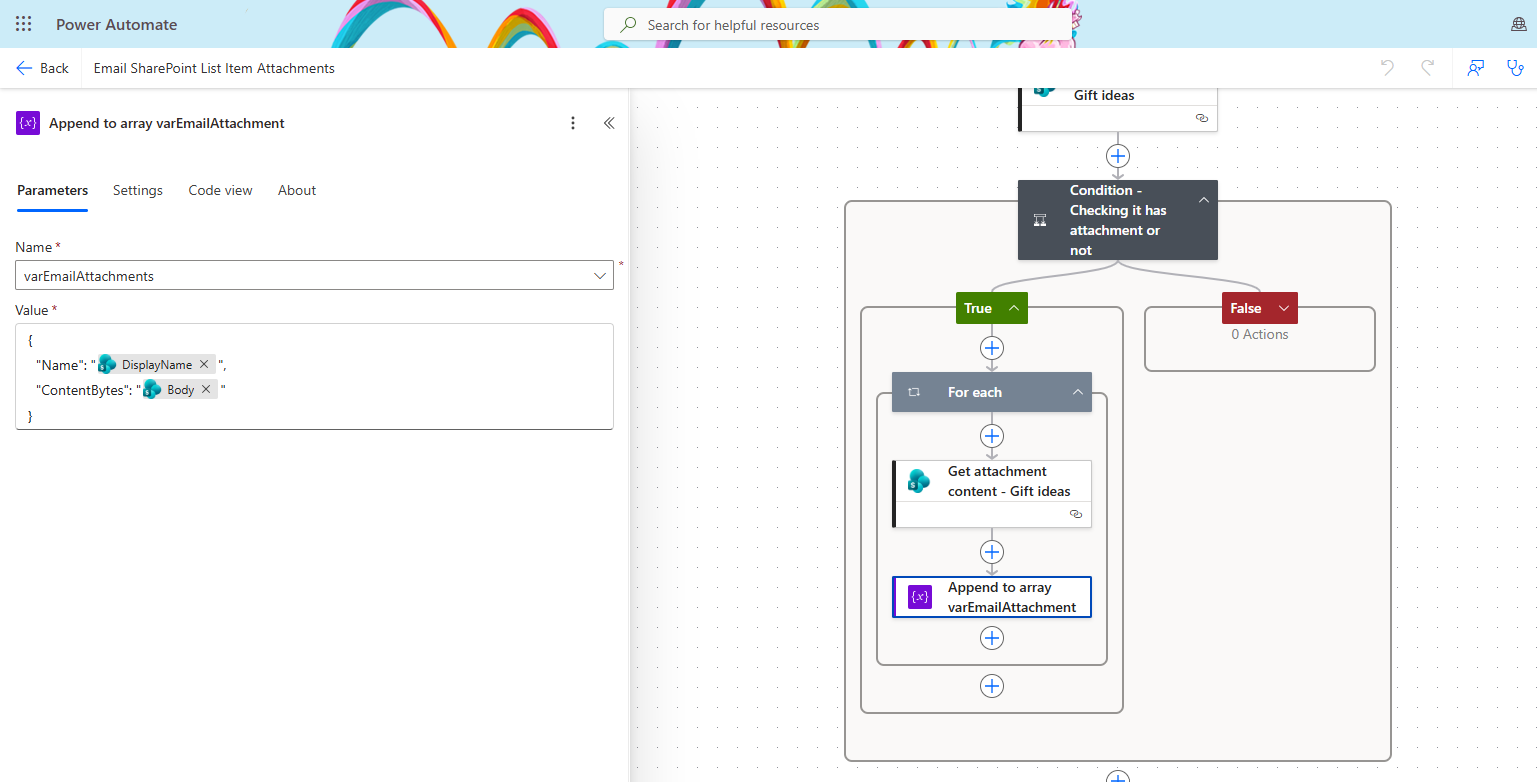
This append pattern is really the moment Power Automate builds the instruction to attach a file to email content; each object in the array becomes one attachment once the array reaches the Outlook action. Microsoft specifically recommends using an array when sending a dynamic number of attachments with Send an email (V2).
Step 8: Send the Email
Outside the For each loop, add the Office 365 Outlook action:
Send an email (V2)
Make sure the email action is placed after the loop. If it is placed inside the loop, the flow will send a separate email for every attachment.
Configure the email:
- To: Select a person column, enter an email address, or use another dynamic value.
- Subject: Add a useful subject containing the SharePoint item title or ID.
- Body: Add the relevant list-item information.
- Attachments: Supply the complete AttachmentArray variable.
Depending on the designer experience, you may need to select the option that allows the attachment input to accept an entire array rather than adding attachment rows individually.
A possible email subject is:
New request submitted: [SharePoint item title]
A possible email body is:
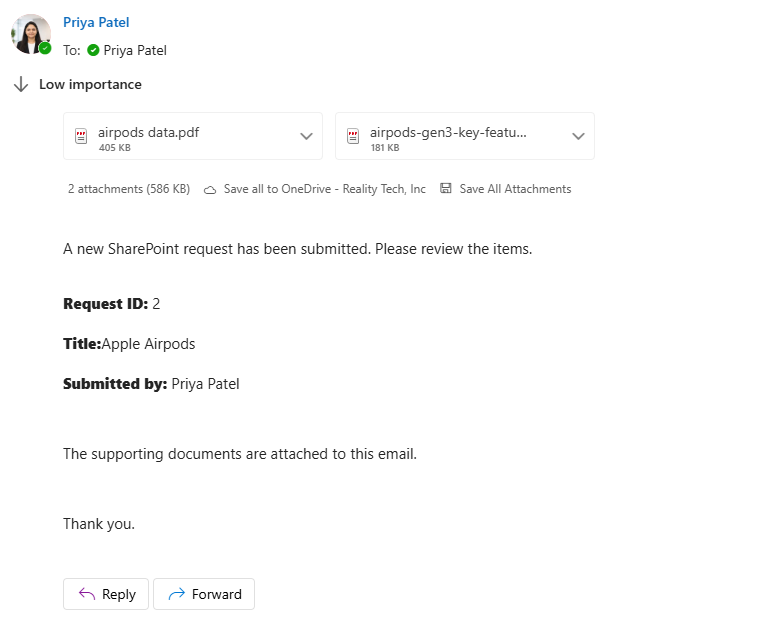
<p>A new SharePoint request has been submitted.</p><p>
<strong>Request ID:</strong> [ID]<br>
<strong>Title:</strong> [Title]<br>
<strong>Submitted by:</strong> [Created By Display Name]
</p>
<p>The supporting documents are attached to this email.</p>
You can also include the SharePoint Link to item dynamic value so recipients can open the source record.
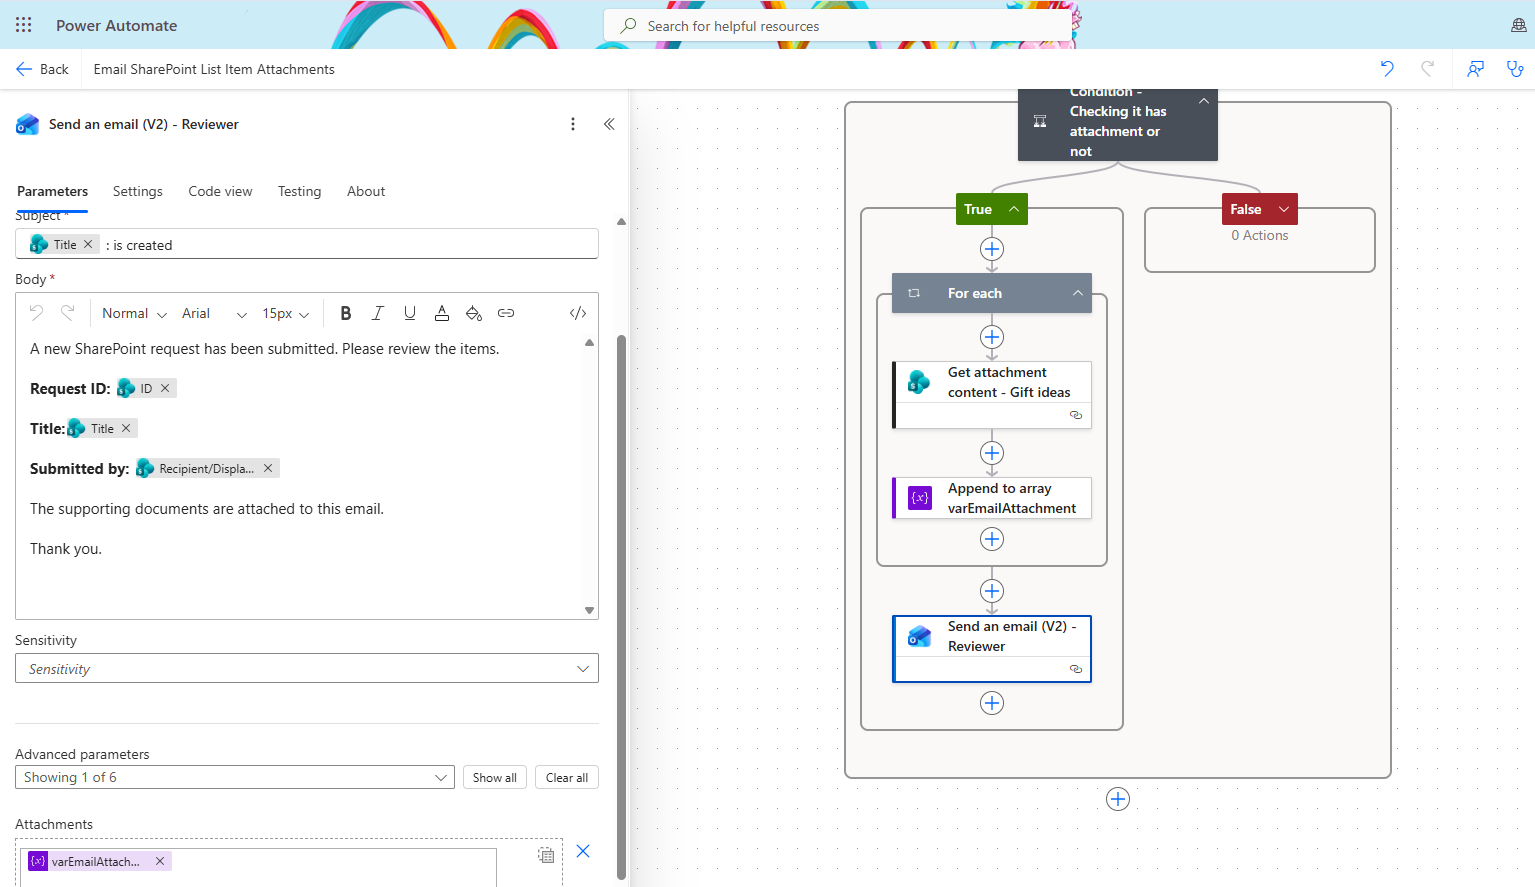
This action is where everything comes together: Send an email (V2) is what actually performs the send email with attachment step, using the array assembled in Step 7. Combined, Steps 4 through 8 form a complete, repeatable pattern to send an email with an attachment from a SharePoint list without any manual downloading or forwarding.
The legacy Send an email action is deprecated. New and updated flows should use Send an email (V2).
Step 9: Save and Test the Flow
Save the flow and use the flow checker to identify configuration issues.
Create a new item in the SharePoint list and attach several files. For example:
- A PDF document.
- An Excel spreadsheet.
- An image.
After saving the list item:
- Open the flow’s run history.
- Confirm that the trigger succeeded.
- Review the output of Get attachments.
- Confirm that Apply to each processed every file.
- Review the AttachmentArray variable.
- Confirm that Send an email (V2) received the complete attachment array.
- Verify that the recipient can open each attachment.
Avoid placing confidential file contents, access tokens, or unnecessary personal information in error notifications or diagnostic logs.
Sending from a Shared Mailbox
For departmental processes, it may be better to send the notification from a shared mailbox rather than an individual employee account.
Use:
Send an email from a shared mailbox (V2)
The account used by the Power Automate connection must have permission to access and send from the shared mailbox. Microsoft notes that the action is intended for Microsoft 365 shared mailboxes and requires the appropriate mailbox permissions.
Examples include:
- HumanResources@contoso.com
- ServiceDesk@contoso.com
- ProjectManagement@contoso.com
- Compliance@contoso.com
A shared mailbox creates a more consistent sender identity and reduces dependence on an individual employee’s mailbox.
Attachment Size and Connector Limits
Attachment size is one of the most important considerations in this design.
The SharePoint connector supports list-item attachment sizes of up to 90 MB. However, the Office 365 Outlook connector documents a maximum mail content length of 49 MB. The email body, attachments, and message encoding contribute to the final message size, so the practical attachment total should remain comfortably below that limit. Exchange Online settings and organizational mail-flow policies may impose additional restrictions.
For larger files, consider sending secure SharePoint links instead of attaching the files directly. This approach offers several advantages:
- Recipients access the latest file version.
- SharePoint permissions continue to protect the document.
- Large files do not increase email size.
- File activity remains within Microsoft 365.
- Access can be removed without recalling the email.
Only create sharing links that comply with your organization’s external-sharing and data-classification policies.
Security and Governance Best Practices
The files processed by this flow are accessed using the permissions of the SharePoint and Outlook connections. The flow should therefore follow least-privilege principles.
Recommended practices include:
- Give the flow account access only to the required site and list.
- Do not send sensitive attachments to unauthorized or external recipients.
- Review external-sharing restrictions before sending SharePoint links.
- Add at least one trusted co-owner for operational support.
- Review connection health and credential expiration.
- Use descriptive flow, action, variable, and connection-reference names.
- Apply Power Platform data policies to control which connectors can exchange organizational data.
- Document the business owner, technical owner, and support process.
That reverse flow uses a different trigger and action pair, typically when a new email arrives (V3) from the Office 365 Outlook connector, paired with the Create file action in the SharePoint connector to write each attachment into a document library. It’s a natural companion automation to the one built in this article, and it’s worth planning both together if your team handles files coming in from email as well as files going out from SharePoint.
Conclusion
Power Automate provides a flexible way to retrieve multiple attachments from a SharePoint list item and send them in a single Outlook email.
The core pattern is straightforward:
- Retrieve the list of attachments.
- Get the content of each file.
- Add the file name and content to an array.
- Pass the completed array to Send an email (V2).
For small files and moderate transaction volumes, this approach provides a useful automated notification experience. For larger files, sensitive content, or high-volume enterprise processes, consider sending governed SharePoint links and implementing stronger monitoring, ownership, data-policy, and application lifecycle management controls.
Need help turning manual SharePoint processes into reliable, governed business automations?
Reality Tech helps organizations design, modernize, and support Power Automate solutions across SharePoint, Microsoft 365, Teams, Outlook, and the Power Platform. Contact Reality Tech to review your workflow requirements and build an automation that is secure, maintainable, and ready for enterprise use.
Have a question?
We’re here to help. Get in touch with us anytime, 24/7