



A file share to SharePoint migration moves your organization’s files from traditional network drives or Windows file servers into SharePoint Online document libraries within Microsoft 365.
When done right, a file server to SharePoint migration protects every file, preserves permissions and metadata, and sets your teams up for better collaboration. When done poorly, it results in missing files, broken access controls, and weeks of cleanup.
This blog walks you through the full process – from the initial audit through final cutover. You can migrate your file server to SharePoint without data loss. It’s based on 15 years of migration experience at Reality Tech, where we’ve completed hundreds of migration rescues for organizations across financial services, healthcare, legal, manufacturing, and government.
Why Are Organizations Moving File Shares to SharePoint in 2026?
The support for SharePoint Server 2016 and 2019 is ending on July 14, 2026. But there is an earlier deadline most organizations miss. The SharePoint Add-In model and Azure Access Control Service (ACS) authentication were retired on April 2, 2026. Any custom solutions built on those frameworks have already stopped working.
If your file shares connect to SharePoint workflows, approval chains, or custom apps that relied on Add-Ins or ACS, those integrations are already broken or will be soon. That changes the scope of your migration. You are not just moving files; you are also replacing the automations that depended on those files.
- For a VP of Operations running a manufacturing plant, this means procurement approval workflows, QA document routing, and project status automations that run through SharePoint may need to be rebuilt in Power Automate before or during migration.
- For a healthcare network, this means patient record processing workflows tied to file shares need HIPAA-safe replacements.
- For a law firm, case document approval chains need to be re-architected with confidentiality controls intact.
The point is this: a migration plan that only accounts for moving files is incomplete in 2026. You also need to plan for what breaks when the old infrastructure goes away.
Step-by-Step Process to Migrate File Server to SharePoint Online
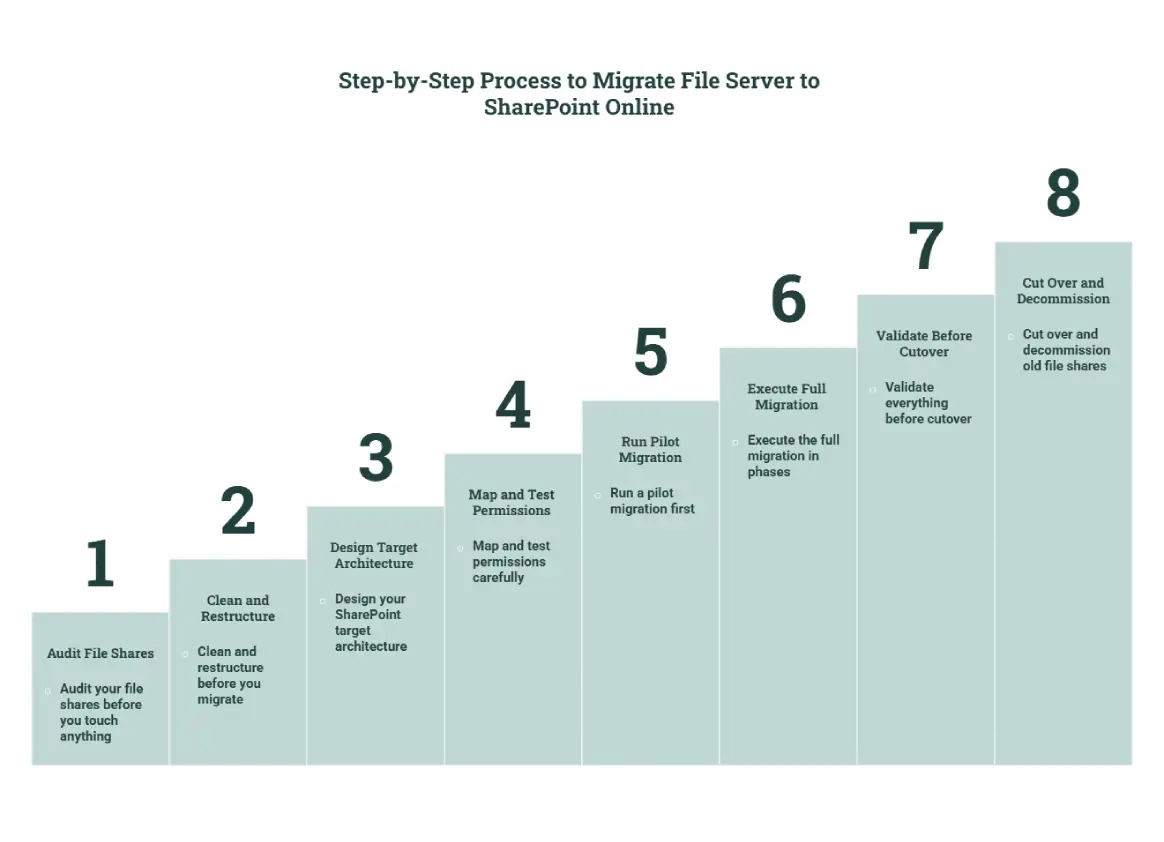
Step 1: Audit Your File Shares Before You Touch Anything
The most common reason migrations fail is skipping the audit. At Reality Tech, we’ve found that 68% of organizations discover redundant data costing $15,000 or more per year in storage fees. But only after migration, when cleanup is ten times harder.
Before you move a single file, you need a clear picture of what you have.
What to Audit:
- Total data volume across all file shares
- How many files and folders exist
- Who accesses which content and how often
- Which files haven’t been opened in over a year
- Where duplicate and outdated content lives
- Current NTFS permission structures and whether they reflect actual business needs
- Files with long paths, special characters, or unsupported formats.
How to Run it:
Microsoft’s SharePoint Migration Tool (SPMT) includes a scan-only mode. Turn on the “Only perform scanning” setting to generate assessment reports without moving anything. For larger environments, Migration Manager in the Microsoft 365 Admin Center provides centralized scanning across multiple file servers.
Your audit report becomes the foundation for every decision that follows, what to migrate, what to archive, and what to delete.
Step 2: Clean and Restructure Before You Migrate
This is the step most teams skip, and most teams regret skipping. If your file shares have turned into a disorganized collection of nested folders, outdated copies, and inconsistent naming conventions over the years, migrating that mess into SharePoint doesn’t fix the problem. It just moves the problem to a more expensive location.
What to Clean:
- Delete or archive files that haven’t been accessed in 12 or more months.
- Remove duplicate copies.
- Shorten file paths that exceed 400 characters (SharePoint’s limit).
- Rename files that contain unsupported characters like # % & * : < > ? / \ |.
- Consolidate folders that serve the same purpose across different departments.
Why Restructuring Matters:
SharePoint is not a file server. It’s a collaboration platform built around document libraries, metadata, and content types. If you “Pump and Dump” your old folder tree into SharePoint, you’ll end up with what the industry calls a “glorified file share”.
Instead, plan your target architecture around how teams actually work. Use SharePoint information architecture best practices to design hub sites, apply metadata instead of deep folder nesting, and configure content types that make documents searchable and governable.
Step 3: Design Your SharePoint Target Architecture
Before you migrate a single file, your destination has to be ready. This means building out your SharePoint Online site structure, document libraries, permissions model, and metadata schema.
Key Architecture Decisions:
- First, decide what goes where. Files that belong to a single user go to OneDrive. Files used by a team go to a SharePoint document library tied to a Team site or communication site.
- Second, design your site hierarchy using hub sites. Hubs let you group related sites under shared navigation, branding, and search without creating one massive site collection.
- Third, define your metadata. Replace deep folder structures with metadata columns like Department, Document Type, Client Name, or Project Code. This makes search far more powerful than browsing through folder trees.
For regulated organizations, this is also the time to configure Microsoft Purview sensitivity labels and retention policies. Don’t wait until after migration to layer on compliance but build it into the architecture from day one.
Step 4: Map and Test Permissions Carefully
Permissions are where most file share migrations break down. NTFS permissions on a Windows file server work differently from SharePoint’s permission model. If you migrate without careful mapping, you can accidentally expose sensitive documents to people who shouldn’t see them or lock out people who need access.
How Permissions Translate:
NTFS Read maps to SharePoint Read. NTFS Write maps to SharePoint Contribute. NTFS Full Control maps to SharePoint Full Control. But the nuances matter. SharePoint uses inheritance by default. Meaning files and folders inherit permissions from their parent library. NTFS environments often have deeply customized, folder-by-folder permissions that break this inheritance model.
What to Do:
Sync your on-premises Active Directory to Microsoft Entra ID (formerly Azure AD) before migration. Without matching user accounts in the cloud, permissions can’t be preserved.
Then decide: do you want to replicate your existing permissions exactly, or use migration as a chance to simplify and clean up your access controls?
For most organizations Reality Tech recommends restructuring permissions during migration rather than replicating legacy sprawl. Use SharePoint security groups and role-based access controls to create a cleaner, more auditable permission model.
Step 5: Run a Pilot Migration First
Never migrate everything at once. Start with a pilot, a small, representative set of files from one department or business unit.
What the Pilot Tells You:
It reveals throughput speeds so you can estimate the full migration timeline. It surfaces file path errors, unsupported file types, and permission mapping issues before they affect the whole organization.
It gives you a chance to test the user experience. Do people know where their files are in the new system? Can they find what they need using search?
Microsoft recommends an incremental migration approach where files move in the background without disrupting users. Migration is then followed by a cutover event where you disable access to the old file shares and direct everyone to SharePoint.
Use the pilot to benchmark your throughput. Microsoft suggests packages of 250 files per transaction and package sizes between 100 and 250 MB for optimal speed. Larger files migrate faster than smaller ones, and files migrate faster than list items.
Learn more about phased approaches in our Complete SharePoint Migration Guide.
Step 6: Execute the Full Migration in Phases
After a successful pilot, roll out the migration in waves. Typically organized by department, site collection, or business priority. Don’t try to move everything at once. A phased approach protects business continuity and gives your team time to address issues between waves.
Choosing Your Migration Tool:
Microsoft offers two free tools:
- SharePoint Migration Tool (SPMT) for smaller migrations,
- Migration Manager for centralized, large-scale projects with multiple file servers.
- Third-party tools like ShareGate, BitTitan MigrationWiz, and Tzunami Deployer add features like delta migration (moving only changed files), advanced metadata mapping, and scheduling.
The right tool depends on your data volume, complexity of permissions, metadata requirements, and budget.
During Migration, Monitor for:
Failed file transfers (check migration logs after each wave), permission errors (especially for files with broken inheritance), metadata that didn’t map correctly (creation dates, modified-by fields), and throttling from Microsoft 365 (which can slow large migrations during peak hours).
Step 7: Validate Everything Before Cutover
This step is what separates a good migration from a great one.
Your Post-migration Validation Checklist:
Verify file counts: compare the number of files in your source file share against the destination SharePoint library. Check metadata: confirm that created dates, modified dates, and author fields transferred correctly.
The “Modified By” field often defaults to the migration service account unless you configure your tool to preserve original values. Test permissions: spot-check access for a sample of users across each department. Can they see what they should? Are they blocked from what they shouldn’t? Verify search: run common search queries that employees use daily and confirm the results return the right files.
Check file integrity: open a random sample of documents such as Word, Excel, and PDF. Confirm they aren’t corrupted. Audit for edge cases: check files that had special characters, long paths, or were very large (over 15 GB).
Step 8: Cut Over and Decommission Old File Shares
Once validation is complete, execute the cutover. This means switching the old file shares to read-only and directing all users to SharePoint Online.
Don’t skip the read-only step. If even a few users keep saving files to the old location, you’ll end up with version conflicts and data that exists in two places, which is worse than not migrating at all.
Cutover Communication Plan:
Communicate the timeline to all stakeholders at least two weeks before cutover. Provide clear instructions on where to find files in the new system. Set up a dedicated help desk channel for migration-related questions in the first two weeks. After a defined stabilization period (usually 30 to 60 days), fully decommission the old file server.
How to Compare Migration Tools for File Shares in 2026?
Most migration guides list tools without telling you what each one actually preserves and what it drops. Here is a practical comparison for file share to SharePoint Online migrations as of 2026.
| Tool | Cost | Best For | Preserves | Limitations |
| SPMT (SharePoint Migration Tool) | Free – Microsoft | Small to mid-size file share migrations with straightforward permission structures | File metadata (created/modified dates and authors), folder permissions, file structure | 250 GB practical throughput cap; no advanced scheduling; limited error reporting; no tenant-to-tenant support; no version history migration for file shares |
| Migration Manager | Free – M365 Admin Center | Organizations with multiple file servers needing centralized management | Folder permissions (default); file permissions (when enabled); supports delta/incremental migration | File permissions need explicit configuration; no advanced metadata mapping; limited customization for complex folder-to-library restructuring |
| ShareGate Migrate | Paid – third-party | Complex migrations requiring metadata mapping, content type assignment, and reporting | Metadata, permissions, content types, sensitivity labels; property mapping during migration | Requires local installation; license cost; performance tied to network stability to source |
| BitTitan MigrationWiz | Paid – third-party | Large-scale migrations with Azure-based staging | File structure, basic metadata, permissions (with Azure container configuration) | Separate Azure container required per file share for permissions; no version migration for file shares; no real-time permissions sync; items missing from destination log errors |
| Tzunami Deployer | Paid – enterprise/third-party | Enterprise-scale migrations from legacy ECM systems and file shares | Metadata, permissions, version history, internal links; supports delta migration | Higher cost; built for large organizations with complex environments; steeper learning curve |
The right tool depends on your data volume, permission complexity, and whether you need to map metadata to SharePoint content types during migration.
Compliance Configuration During Migration
If your organization operates in a regulated industry, here is the mistake that creates audit findings: migrating first and applying compliance controls second.
In 2026, this is no longer an acceptable approach. Microsoft Purview sensitivity labels, Data Loss Prevention (DLP) policies, and retention policies should be configured in your destination SharePoint environment before the first file lands there. Not after.
For manufacturing (SOX, ISO, OSHA):
QA documents, supplier agreements, and safety inspection reports carry retention obligations.
- Configure retention labels in SharePoint before migration so these files are immediately classified when they arrive.
- Set up DLP policies to prevent production specs or proprietary formulas from being shared externally.
- Apply sensitivity labels to tag documents by classification level: internal, confidential, restricted.
For healthcare (HIPAA):
Patient records, insurance claims, and clinical documentation must be encrypted in transit and at rest.
- Enable sensitivity labels that enforce encryption and restrict downloading before migrating any PHI.
- Set DLP rules to detect and block Social Security numbers, medical record numbers, and insurance IDs from being shared outside the organization.
For legal (attorney-client privilege, court rules):
Case files, client communications, and litigation hold documents require strict access controls and audit trails.
- Use eDiscovery held in Microsoft Purview to preserve documents during migration.
- Configure site-level permissions so only assigned attorneys and paralegals can access specific case libraries.
- Enable audit logging before migration so every file access is tracked from day one.
The common thread: compliance controls should be part of your SharePoint information architecture design, not a cleanup task after files are already in the system.
How to Make Your Migration AI-Ready?
Trust us when we say your file share migration is also your Copilot readiness project.
Microsoft Copilot is the AI assistant embedded across Microsoft 365. Copilot can only work with content stored in SharePoint Online and OneDrive. It uses the permissions model in SharePoint to determine what each user can access. That means every governance gap in your SharePoint environment becomes an AI risk.
If sensitive financial records, patient data, legal case files, or HR documents are migrated without proper sensitivity labels and permission boundaries, Copilot could surface that content to unauthorized users through search or AI-generated summaries.
What AI-ready migration looks like?
- Apply sensitivity labels during migration, not after.
- Use Microsoft Purview to classify documents as they land in SharePoint.
- Ensure permissions are role-based and auditable. Overshared content becomes AI-overshared content.
- Build metadata structures that help Copilot understand document context. Labels like “Client Proposal,” “Audit Report,” or “Loan Application” make AI-generated summaries more accurate and useful.
- Test Copilot access after migration by running queries as different user roles and confirming it only surfaces content within their permission boundary.
This isn’t a future concern. It’s a migration requirement for any organization planning to use AI tools in 2026.
What Your Post-Migration Validation Should Actually Cover
Here is what “going right” looks like in validation, with specifics that matter for organizations.
-
File Count Reconciliation:
Compare source and destination counts at the library level, not just the site level. Migration tools log skipped files, but those logs are easy to overlook. A file that was skipped because of a 400-character path limit is a file that did not make it.
-
Metadata Spot Check:
Open 10 to 20 files per department and verify that Created By, Modified By, and Modified Date reflect the original values, not the migration service account or the migration date. If they show migration values, your tool was not configured correctly.
-
Permission Verification:
Ask three to five users per department to confirm they can access what they need and cannot access what they should not. Test both directions: access and restriction.
-
Search Testing:
Run the five most common search queries employees use daily. Do the results return the right files from the new location? If search is broken, adoption will suffer immediately.
-
Copilot Boundary Testing:
If Copilot is enabled, test whether it surfaces content outside a user’s intended access scope. This is the new validation step that did not exist in 2024 guides.
-
Workflow Verification:
If you rebuild any approval or routing workflows in Power Automate, test them end-to-end with real documents. A workflow that worked in testing may behave differently with production-scale content.
Training Your Team for the New Environment
The best migration in the world fails if users don’t adopt the new system. People who have worked with mapped drives and folder trees for years need help transitioning to document libraries, metadata-driven search, and browser-based collaboration.
Change management doesn’t end on migration day but is an ongoing process. Short training sessions, instructional videos, and a visible support channel go a long way.
Focus training on how to find files using SharePoint search instead of browsing folders, how to use version history instead of saving copies like “Report_v2_FINAL_v3.docx,” how co-authoring works for simultaneous editing, and how document management best practices keep the environment clean going forward.
Planning your M365 migration and not sure where to start? Our team has migrated hundreds of projects for clients across New York, New Jersey, Connecticut, Florida, Texas, and beyond. Let our experts understand what you need, guide you through the process, and migrate your files without data loss.
Talk to our M365 Migration Experts
FAQs
You prevent data loss by running a thorough audit first, cleaning up problem files (long paths, special characters, unsupported formats), testing with a pilot migration, and validating file counts and metadata after each wave. Use Microsoft’s Migration Manager or SPMT with the scan-only mode before moving anything. Professional migration services reduce data loss rates from 12% to under 1%. For a full walkthrough, see Reality Tech’s Complete SharePoint Migration Guide.
NTFS permissions are translated to SharePoint equivalents — Read stays Read, Write becomes Contribute, and Full Control remains Full Control. However, your on-premises Active Directory must be synced to Microsoft Entra ID first, or user accounts won’t match and permissions will fail. Many organizations use migration as an opportunity to simplify permissions rather than replicate legacy complexity. Learn how to approach this in Reality Tech’s SharePoint Security Best Practices guide.
You can do it yourself using Microsoft’s free tools (SPMT and Migration Manager). These tools handle basic migrations well. However, for organizations with complex permission structures, compliance requirements (HIPAA, SOX, FINRA), large data volumes, or multiple source systems, working with a SharePoint migration specialist significantly reduces risk. Self-managed migrations have a 12% data loss rate; professional services bring that below 1%.
The right tool depends on your situation. Microsoft’s Migration Manager works well for centralized, multi-server migrations and is free with your Microsoft 365 subscription. SPMT is good for smaller, simpler moves. Third-party tools like ShareGate, BitTitan MigrationWiz, and Tzunami Deployer offer advanced features like delta migration, metadata mapping, and scheduling. Reality Tech’s file server migration guide breaks down how to evaluate these options.
Copilot uses SharePoint’s permission model to determine what each user can see. Before or during migration, apply sensitivity labels using Microsoft Purview, set up role-based permissions instead of broad access, and structure metadata so Copilot can understand document context. If permissions are messy, Copilot will surface sensitive content to the wrong people. Reality Tech’s Copilot consulting services help organizations build AI-safe environments during migration.
Have a question?
We’re here to help. Get in touch with us anytime, 24/7