



Every organization eventually hits the same wall: someone is manually copy-pasting names, dates, and details into Word documents – offer letters, contracts, inspection reports, certificates – one at a time. It’s slow, error-prone, and it doesn’t scale.
Power Automate solves this with the Populate a Microsoft Word template action. You first add content controls – named placeholders for values such as names, dates, or images – to a Word template. The flow maps data to those controls and returns a personalized document automatically. This guide demonstrates the complete process with an employee offboarding letter and highlights the practical details that often cause first-time implementations to fail.
What Prerequisite Licences, Tools, and Access Do You Need to Build This Flow?
Before building the flow, confirm that you have Word for desktop to create the template, access to SharePoint Online or OneDrive for Business to store it, permission for the flow’s connection account to read and create files, and the Power Automate licence required for the Word Online (Business) connector in your environment.
Required tools, access, permissions, and licensing.
| What you need | Why it matters |
| Word desktop app (Windows or Mac) | The Developer tab and content controls aren’t available in Word Online – you need the desktop app to build the template. |
| A SharePoint document library | Both the template and the finished documents need to live somewhere Power Automate and Microsoft Graph can reach – OneDrive for Business, a SharePoint site, or a Microsoft 365 Group library all work. |
| Power Automate Premium (per-user or per-flow) | “Populate a Microsoft Word template” belongs to the Word Online (Business) connector, which Microsoft classifies as premium. A standard Microsoft 365 or free Power Automate plan will show a connection error. |
| A template with clearly named fields | Every content control needs a distinct, descriptive name – that name is what you’ll map to later inside the flow. |
Prerequisites for creating and storing a Word template for use in Power Automate.
How Does Power Automate Turn a Word Template into a Finished Document?
Before diving into steps, it helps to see the whole path a document takes – from a blank template to a finished file sitting in SharePoint.
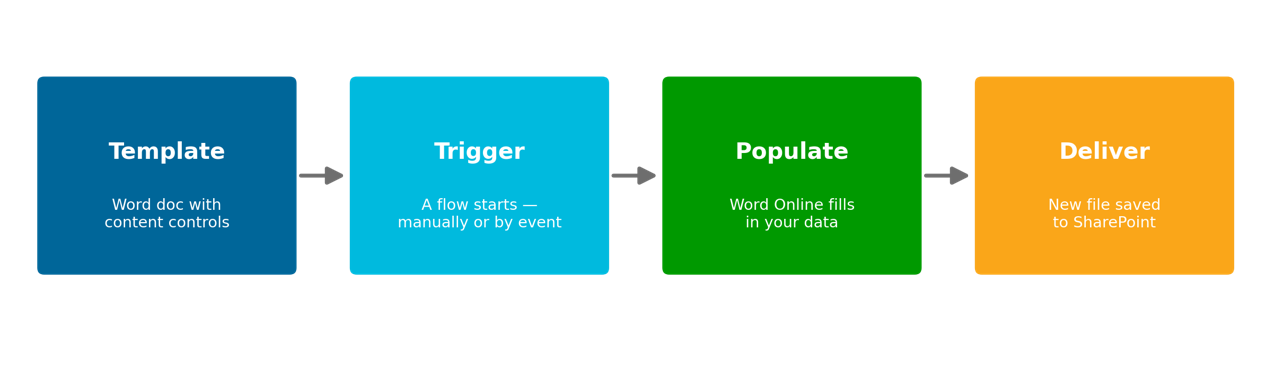
The four-stage journey from template to finished document.
There are two halves to this project: designing the template once in Word and building the flow once in Power Automate. After that, generating a new document is a single click – or fully automatic.
Part 1 – Prepare the Word Template
The template is where all the “magic” actually happens. Power Automate doesn’t understand your Word document – it only understands the fields you explicitly mark as dynamic. Here’s the process, illustrated with a real Offboarding Letter template.
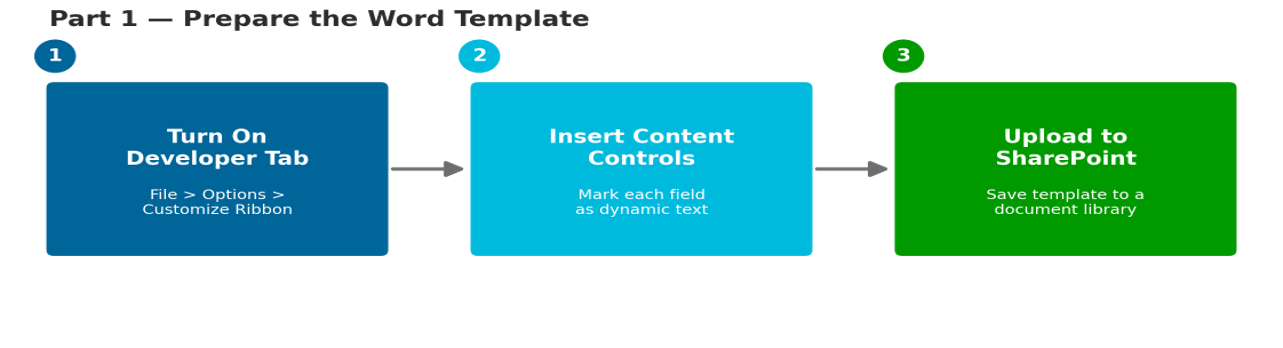
The Word template preparation process: enable Developer tools, add content controls, and upload the file.
Step 1: Turn on the Developer tab
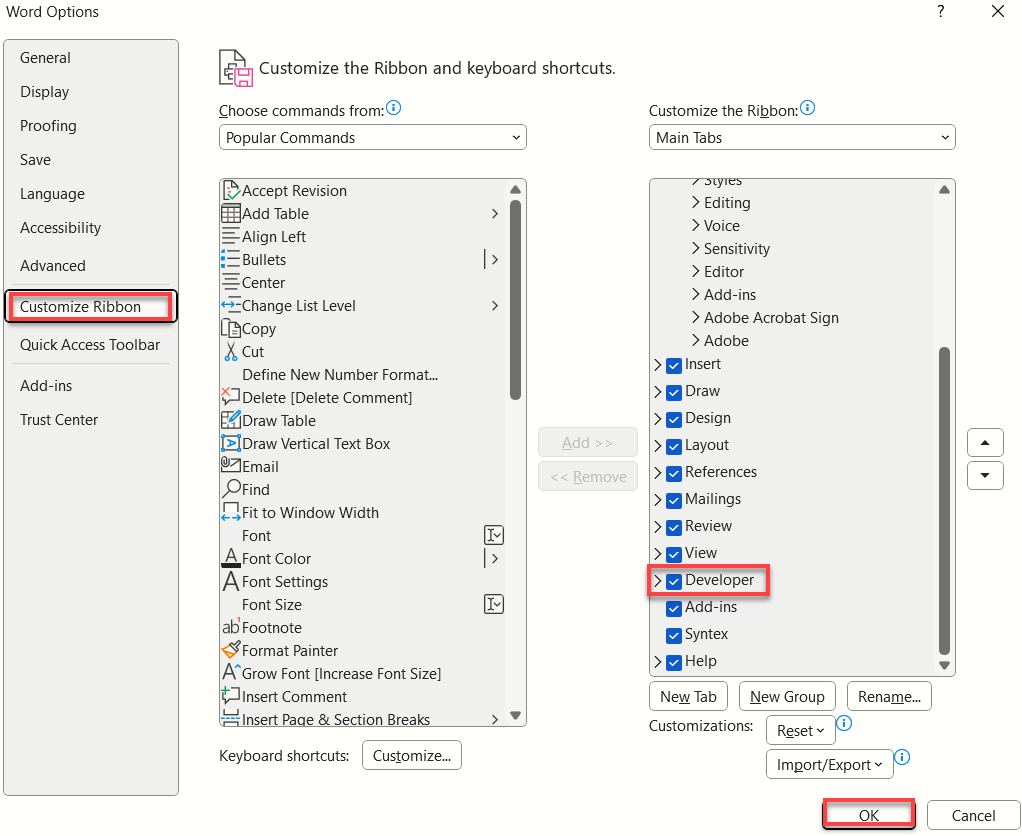
Open Word (desktop, not the browser version) and go to File > Options.

This opens Word Options. Select Customize Ribbon on the left, then check the box for Developer under the Main Tabs list on the right, and select OK. This adds a new Developer tab to the ribbon.
Step 2: Insert Content Controls for Every Dynamic Field
With the Developer tab enabled, you’ll see a Controls group with a Plain Text Content Control icon (the “Aa” button, highlighted below) and a Picture Content Control for images.

Draft the document as normal, place the cursor wherever a value should change – a name, date, or reference number – and insert a Plain Text Content Control. In this example, the Offboarding Letter uses one dynamic field for the employee’s name. Open Developer > Properties and give the control a clear, unique title so it is easy to identify when you map data in Power Automate.
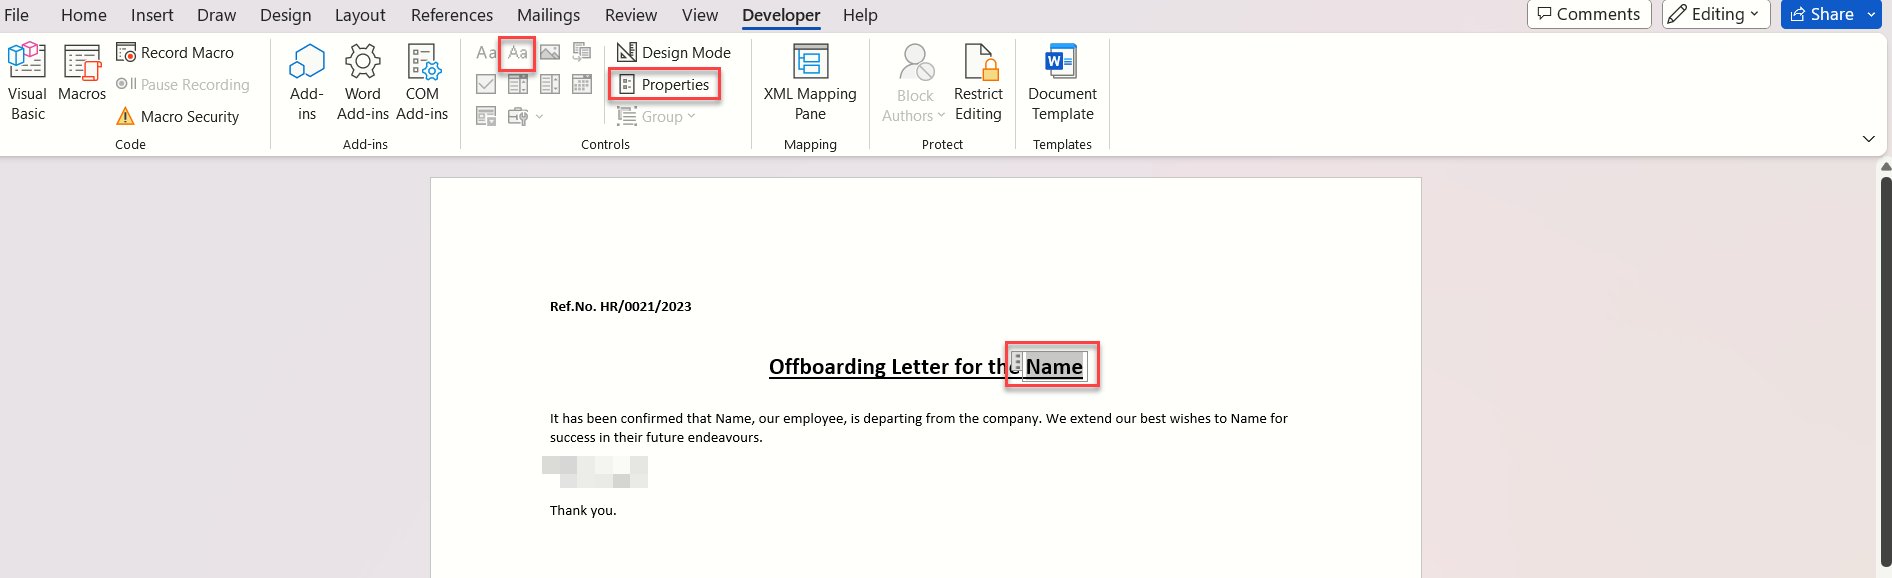
- Give each control a meaningful title under Developer > Properties (e.g., EmployeeName) – this is the label you’ll see later when mapping data in the flow.
- Keep names short, unique, and free of special characters – they become the field labels inside Power Automate.
- For images (logos, signatures, photos), use a Picture Content Control and size the placeholder to roughly match the image you plan to insert.
Practical tipWord Online (Business) may not scale every inserted image exactly as expected. Size the Picture Content Control deliberately, test with representative files, and standardize source-image dimensions where possible to reduce unexpected cropping, stretching, or layout changes. |
Step 3: Upload the Template to SharePoint
Save the finished template to a SharePoint document library, OneDrive for Business, or a Microsoft 365 Group library. Power Automate reads the template from there every time the flow runs.
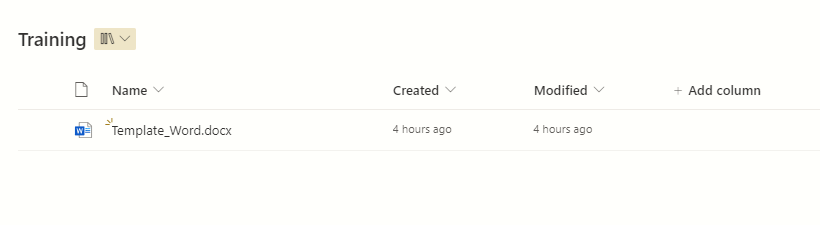
Keep the template in a location the flow’s connection account can access. If you move, rename, or replace the template after configuring the action, reopen the Populate a Microsoft Word template step, select the file again if needed, and retest the field mappings.
Part 2 – Automate it in Power Automate
With the template ready, the flow itself only needs three actions to produce a working document. Everything beyond that (approvals, notifications, PDF conversion) is optional polish layered on top.
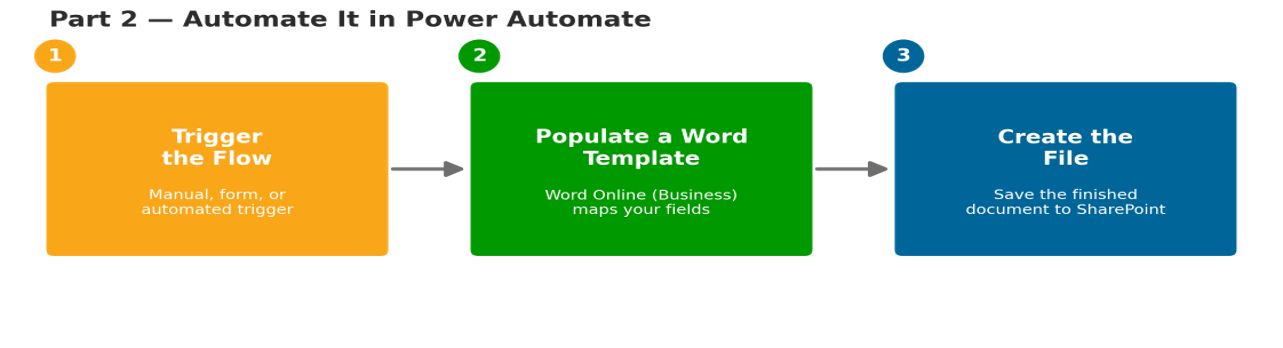
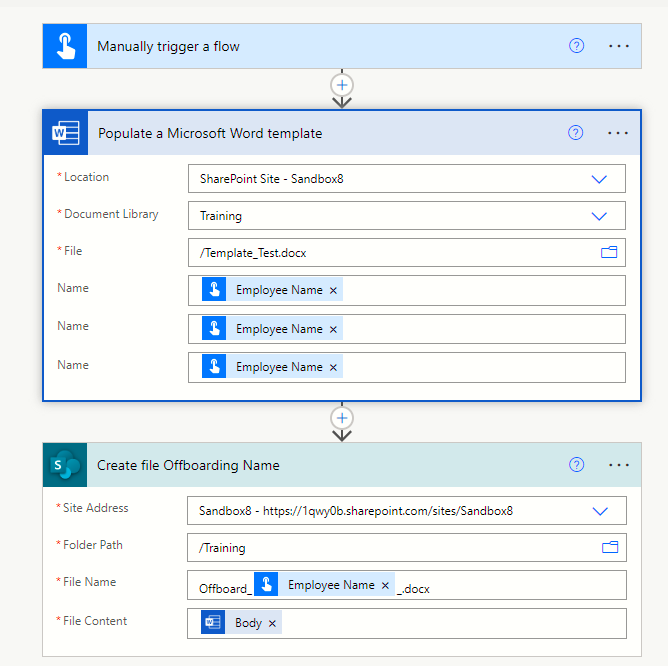
The three-action Power Automate flow used to generate and save a document from the template.
Step 1: Choose Your Trigger
A manual instant trigger is the simplest way to begin. It works well for testing and for documents generated on demand from a button. Add an input for each value the template requires; in this example, the input is the employee’s name.
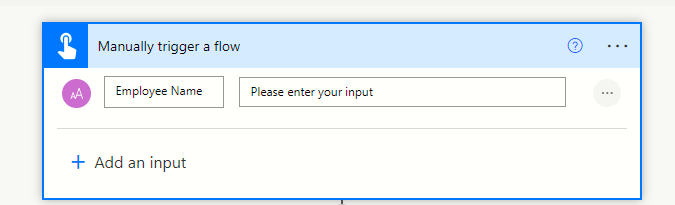
For a fully hands-off process, swap this for something event-driven: a new SharePoint list item, a Power Apps form submission, or an approval reaching “Approved.”
Step 2: Add “Populate a Microsoft Word template”
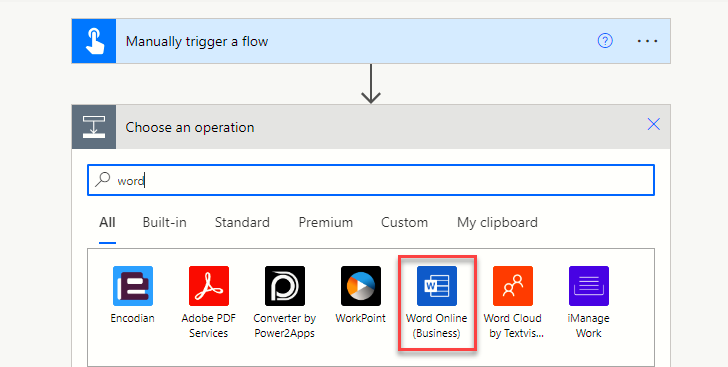
Select New step, search for word, and choose Word Online (Business) from the results.
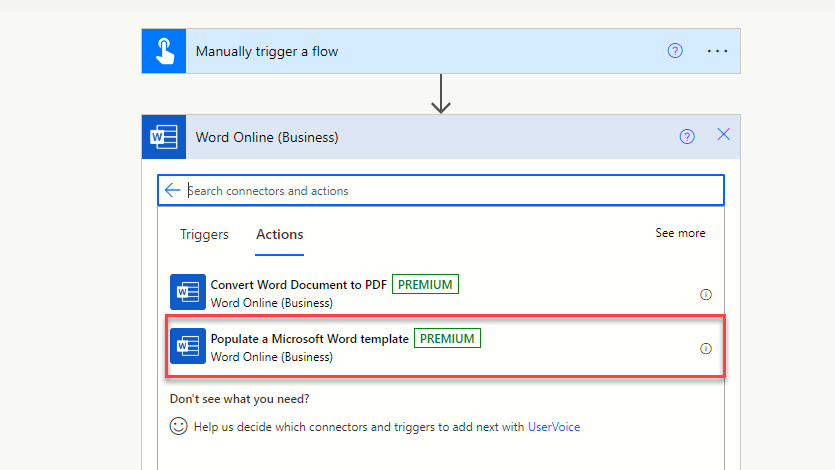
From the list of actions, select Populate a Microsoft Word template. If the action displays a PREMIUM tag in your environment, confirm that the flow owner has the appropriate Power Automate licence before continuing.
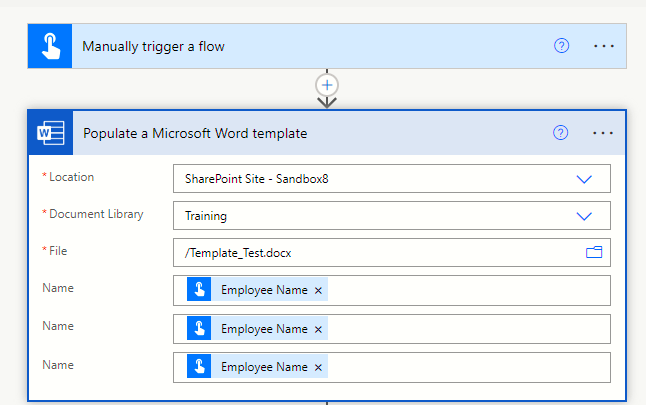
Point the action at the same site, library, and file uploaded in Part 1. Once selected, it automatically detects every content control in the document and lists it as a field to map – here, Employee Name, mapped straight from the trigger.
Step 3: Add “Create file” to Save the Result
Add a SharePoint Create file action, choose the destination site and folder, and set File Content to the output from Populate a Microsoft Word template.
- Optional: add a Convert file (to PDF) step afterward if stakeholders need a non-editable, shareable format.
- Optional: add an email or Teams notification once the file is created, so the requester knows it’s ready.
How to Test the Flow and Verify Every Action Succeeded?
Save the flow and run it manually with a sample name.
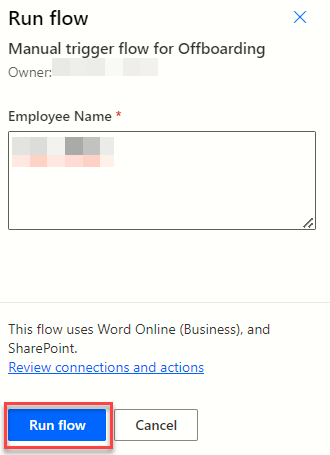
Check the run history and verify that each action succeeded. Confirm that the Populate step returned file content, the Create file step saved the document in the intended library, the file name is unique and valid, and no content-control value is blank or incorrectly mapped.
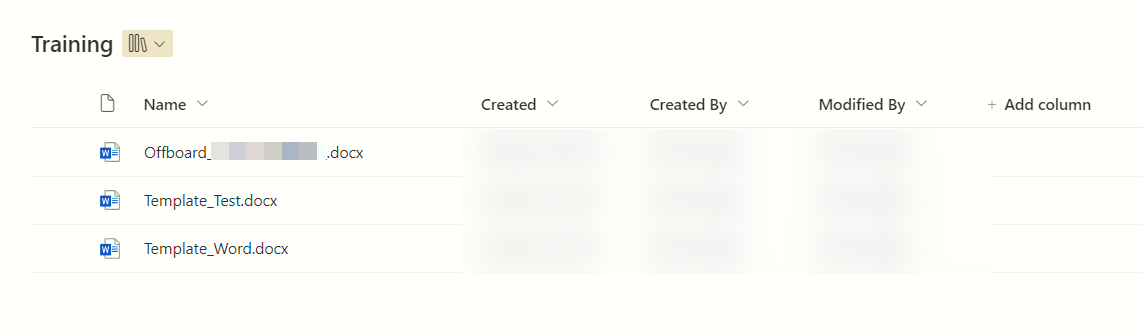
Finally, open the generated file and confirm every field mapped correctly.

Common Mistakes to Avoid when Building this Flow
A few things consistently trip people up the first time they build this.

Common mistakes to avoid when automating Word documents.
- License first, build second – verify Power Automate Premium is active for the account before spending time wiring up the flow.
- Name fields for humans, not just for yourself – whoever maintains this flow after you will thank you for EmployeeName instead of Field3.
- Use a unique file name – reusing a hard-coded name can cause the Create file action to fail or create an unwanted conflict when a file with that name already exists.
- Test with messy data – long names, accented characters, empty optional fields – before rolling the flow out to real users.
- Keep the template lean – fewer, well-organized content controls are less likely to trigger size or formatting errors than a template crammed with nested tables and images.
Conclusion
Templated document generation can remove repetitive copy-and-paste work from common business processes. Once the template and field mappings are tested, the same pattern can be adapted for other document types. Start with one document, validate its controls, permissions, naming rules, and licence requirements, and then reuse the approach where it provides clear operational value.
Need help designing a reliable document-generation flow or extending the pattern across a SharePoint or Power Platform environment? Reality Tech can help you plan the template, data mappings, governance, and rollout.
Have a question?
We’re here to help. Get in touch with us anytime, 24/7