
Sending large files through email as an attachment can be challenging, especially when they exceed the typical attachment limit of 20 MB. Here are ways to send large files via email:
- Compress the File into a ZIP Format to reduce its size.
Use SharePoint or OneDrive for Cloud Sharing for seamless and secure file transfer. - These methods help ensure your files reach the recipient efficiently while maintaining security and accessibility. Below is a step-by-step guide on how to send large files via email for both approaches.
Option 1: Using a ZIP File
One of the easiest ways to send large files via email is compressing them into a ZIP file. This method helps reduce file size, making it easier to email large files without hitting attachment limits.
Step 1: Create a ZIP File
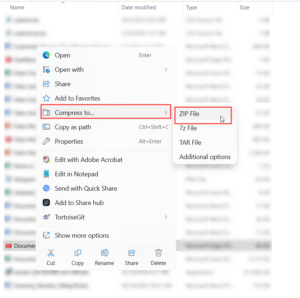
Locate the file or folder you want to compress. Right-click on it and choose Compress to ZIP File. A new ZIP file, which is smaller in size, will be created in the same location as the original file.
Step 2: Attach the ZIP File to an Email
You can now attach the compressed ZIP file to your email. Ensure the file size is 20 MB or less. If it still exceeds this limit, proceed with Option 2.
Option 2: Share Using SharePoint or OneDrive
If you need to share large files via email, using SharePoint support or OneDrive is an efficient solution. These Microsoft 365 solutions allow you to store and send large video files via email without worrying about attachment size limits. You can also automate email attachments using Power Automate for seamless file sharing.
Step 1: Upload the File
Navigate to the folder where you want to store the file in SharePoint/OneDrive. Drag and drop the file into the folder or click Upload > Files to add your document that you want to share.
Step 2: Create a Shareable Link
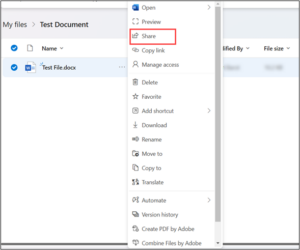
Navigate to the uploaded file in your SharePoint or OneDrive. Click the three dots (…) next to the file name to open the context menu.

Select Share.
Step 3: Configure Link Settings
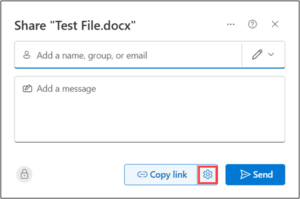
In the Share window, click the Gear Icon (⚙️) next to access link settings:
Choose the Sharing Options:
- Anyone: Selecting anyone with the link can access the file without signing in. (You can optionally set a password for security and also the Expiration Date.)
- People in [Your Organization]: Only internal users can access.
- People with Existing Access: Only those already granted access can use the link.
- Specific People: Share with specific individuals by entering their email addresses or names.
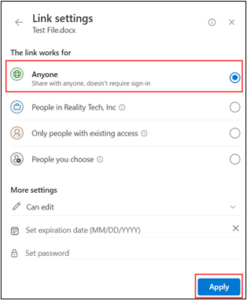
- Set Permissions: Choose whether users can edit, review, view, or can’t download.
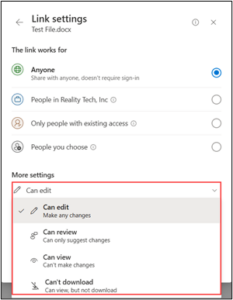
- Once done, Click Apply to save your link-sharing preferences.
- Once your settings are configured, click the Copy link. The link is now copied to your clipboard.
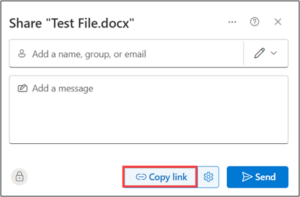
Step 4: Copy and Share the Link
You can now share the link with anyone by pasting the copied URL directly into the email.
Tips for Safe Sharing
- Use Passwords: Protect sensitive files shared with “Anyone” links.
- Set Expiration Dates: Limit how long the link stays active.
- Clarify Access: Tell recipients if they can view, edit, or download the file.
This approach ensures your file reaches the recipient without worrying about attachment size limits!
Want to talk?
Drop us a line. We are here to answer your questions 24*7.


