What are sensitivity labels in Microsoft 365?
Imagine adding an extra layer of security to your documents and emails. Sensitivity labels are used to classify content and protect content. With Microsoft Purview Sensitivity Labels, you can do just that.
These labels act like tags, classifying information based on its importance (think “confidential” or “public”). Once labelled, policies can be set to control who can access or share this information. This empowers your organization to:
- Prevent accidental leaks: Stop sensitive information from being shared with the wrong people.
- Restrict document access: Ensure only authorized users can view critical documents.
- Add extra safeguards: Block printing or other actions on highly sensitive documents.
Microsoft Purview (previously known as Microsoft 365 compliance) sensitivity labels can be applied to emails, documents, and Microsoft 365 containers, including Teams, SharePoint sites, and Microsoft 365 Groups.
Enhanced Security and Streamlined Compliance with Sensitivity Labels
- Beyond Permissions: While traditional security and permissions control who sees what, Sensitivity Labels go a step further. They offer a powerful layer of protection by:
- Encrypting Content: Highly sensitive information can be automatically encrypted, making it unreadable even if accessed by unauthorized users.
- Restricting Actions: Prevent accidental leaks by limiting actions like copying, printing, or downloading sensitive documents. This goes beyond just who can view the information.
- Disabling Print Screen: For documents containing the most critical data, you can even block users from capturing screenshots, adding an extra layer of defence.
- Combined Power: Sensitivity Labels work seamlessly with existing security and permission settings in Microsoft 365. This creates a multi-layered defence, ensuring your organization’s data is protected from both internal and external threats.
Regulatory Compliance:
Simplify Compliance Challenges: Many regulations like GDPR and HIPAA have strict guidelines for handling sensitive data.
Sensitivity Labels streamline compliance by automatically classifying and protecting information based on its sensitivity level.
This reduces the risk of non-compliance and associated penalties.
In this blog, we’ll explore the power of Sensitivity Labels in Microsoft Purview to safeguard your organization’s confidential information.
We’ll delve into how these labels can be configured to prevent two critical security risks: unauthorized external sharing and accidental printing of sensitive documents.
1. Access the Label Creation Portal:
Head over to the Microsoft Purview compliance portal
https://learn.microsoft.com/en-us/purview/purview-compliance-portal
Navigate to Information Protection and select Create label.


2. Craft a Clear and Informative Label:
- Name: Choose a descriptive name like “BlockSharingPrinting”. This clearly identifies the label’s purpose.
- Description: Provide a brief explanation of the restrictions and consequences of applying the label, both for users and adminis.
- Display Name: This is what users will see in applications (e.g., “Confidential”). Keep it concise.
- Colour: Select a colour that visually represents the sensitivity level. Click Next to proceed.

3. Define the Label Scope:
- Choose where you want the label to be applicable (e.g., Items-emails, documents, or both, Containers – Groups & Sites). Click Next.

4. Enhance Security with Visual Markings (Optional) and Control Access:
Select the Control access option for the protection setting.
You can also consider adding a watermark or header/footer to warn users about the document’s confidentiality. Click Next if you don’t want visual markings.

5. Control Access and Printing Permissions:
- Access Control: Here, you can determine who can view, edit, or copy the labelled content. Different permission levels offer varying access degrees. You can even create custom permissions.
- Blocking Printing: To restrict printing for specific users, choose the “Viewer” permission level. Higher permission levels allow printing.
Select the Configure access control settings and assign Permission now


Assigning Permissions:
Click “Assign Permission” to specify who can access the document with the chosen permission level. You can assign access to:
M365 Groups (e.g., Sales Department)
Individual Users or Groups
Specific Email Addresses


- Blocking Printing: To restrict printing for specific people, choose the “Viewer” permission level. This allows users to see the document but prevents them from printing it.
- Allowing Printing: If printing needs to be allowed for some users, select a higher permission level. Options include “Co-owner/Co-author” (full control over the document).
- Customizing Permissions (Optional): For even more granular control, you can create custom permission levels that define specific access rights.
6. Configure Protection for Groups and Sites
If you selected “Groups and Sites” in step 3, you could define additional settings here.
- External Sharing: Choose the “Control external sharing from labeled SharePoint sites” and “Only people in your organization” options. This ensures that when this label is applied to a SharePoint site, only members of your organization can access it. Click on next.


7. Review and Save:
- Double-check your chosen settings to ensure everything aligns with your security goals. Click Save to create the Sensitivity Label.

Making Labels Available to Users: Publishing with Label Policies
Now that you’ve created your powerful Sensitivity Label, it’s time to make it accessible to your users. This is achieved through a process called publishing the label using a label policy.
Here’s a breakdown:
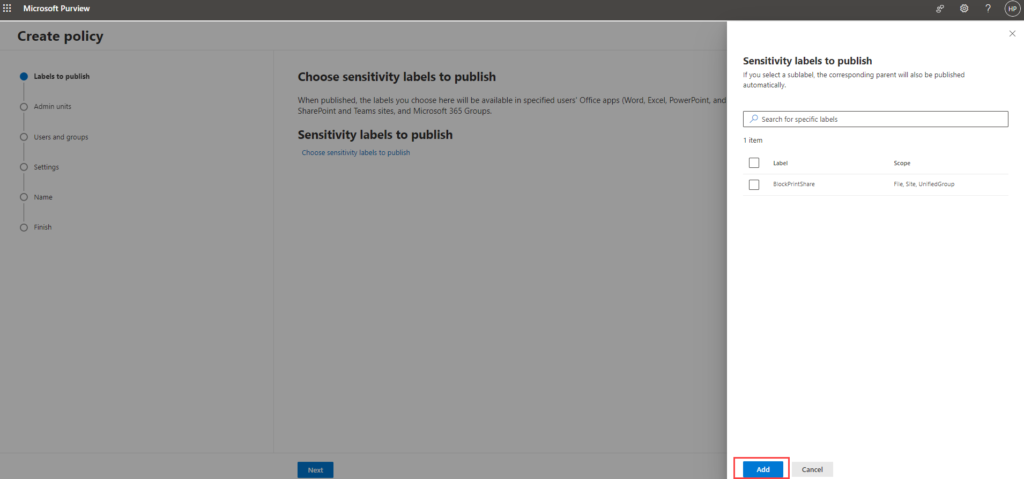
1. Navigate to the Label Policies page in the Information Protection. Click on Publish label to create a new policy.

2. Select the Sensitivity Label you want to publish from the available options.


3. Choose the admin units you’d like to assign this policy to.

4. Choose the users or groups to whom you want to assign this policy. This determines which users will see the label available for use in their applications (e.g., emails, documents).

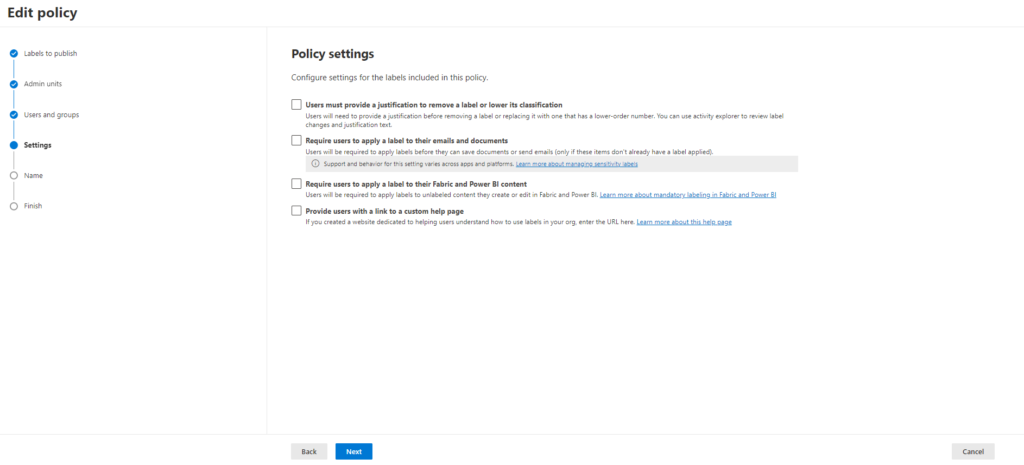
5. (Optional) You can customize additional settings within the policy, but for now, we’ll leave them as default.

6. Select the label if you want to apply it by default for documents, Emails, Meetings, Sites and groups, and Power BI.

7. Provide a clear and descriptive name for the label policy.

8. Review the settings then click Submit to publish the policy.

- Important Note: It can take up to 24 hours for the published label to become available in the applications of your selected users.
- Error Messages: Users may encounter an error message like “FileIRMProtected” when they attempt to print a labelled document. This message indicates that the label’s restrictions are being enforced.

The “File Info” menu within applications like Word or Excel might still show “Yes” for printing permissions. This information reflects the base permissions assigned to the document, not the additional restrictions imposed by the Sensitivity Label.
Remember: If “Yes” is displayed for printing permissions, the Sensitivity Label’s settings determine printing is allowed.

Want to talk?
Drop us a line. We are here to answer your questions 24*7.


